Showing posts with label Adirondack Alcohol Ink. Show all posts

Wednesday, October 11, 2017

Alcohol Ink Bauble- Merry Christmas Deer


Hi Friends!

This card was definitely an experiment for me!  I wanted to participate in the Splitcoaststampers Falliday Fest FF17UnderstandBlueA “Get Drunk” Challenge (no, not with real alcohol but to use alcohol inks- lol!!).  

There were several techniques that you could use but I chose to use the technique highlighted in this video by Heather Telford that Lydia referenced for the "alcohol ink bauble" background.

This was my first attempt at playing with Yupo™ Paper and Alcohol Inks and I have mixed feelings on how it turned out.  It seemed as once I started, I could not stop adding different inks- lol!! I think I will limit the colors next time but I did have a chance to create three different backgrounds so I have plenty of designs to create more cards in the future :-)  


If you have not had a chance to check out the challenge sites yet, I encourage you to do so- gorgeous inspiration from all!

To create this card:

1). On a silicone craft sheet, drop alcohol inks along with some alcohol blending solution. Lay a piece of Yupo™ paper into the inks, lift up and repeat the process.  Continue adding layers of ink along with dropping directly onto the paper for different effects.  I definitely experimented with various inks and also spritzed with water.  One benefit of using Yupo™ paper is that you can wipe the entire panel and remove most of the ink (since it is a plastic paper, just in case you want to start over- ask me how I know, lol!).

2). Once you are satisfied with your background, allow it to dry thoroughly before die cutting a circle for the “bauble”.  I used a die cut that would fit within my wreath die.

3). Using the Savoy Deer Head Die, die cut four of the images from Whisper White cardstock.  Also die cut a wreath using the Memory Box™ Tupelo Circle Die from a piece of Whisper White cardstock.

4). Adhere the panel that you die cut the Tupelo Circle Die onto another piece of Whisper White cardstock. Adhere the alcohol background circle in the center and carefully add the Tupelo Circle Die cut back into the cut portion on the outside of the circle, allowing the inner portion to stay on top of the alcohol background.

5). Use an embossing powder tool to de-static the surface at the bottom of the panel, ink the sentiment from the retired Stampin’ Up! Contempo Christmas stamp set with Versamark™, stamp onto the panel, apply Ranger® Blue Tinsel Embossing Powder and heat set with the heat tool.

6). Mount the layered Deer Head die cut with dimensional foam to finish off the card.

Stamp Sets: Contempo Christmas (retired Stampin’ Up!)

Ink/Mediums: Versamark™; Adirondack™ Alcohol Inks- Bottle, Espresso, Stonewash. Silver Metallic Mixative; Ken Oliver® Liquid Metals- Metallic Amethyst, Metallic Sky; Ranger® Alcohol Blending Solution

Paper: Whisper White, Yupo™

Accessories/Tools: Big Shot™, MB Tupelo Circle Die, Savoy Deer Head Die, Embossing Buddy®, Ranger® Blue Tinsel Embossing Powder, Heat Tool

I had fun creating this card, although the technique for the background is a bit messy.  Not one to try for a quick and easy card but once you have the backgrounds created, the cards are easy to assemble :-)  Now, I just have to finish several more Christmas cards to be ready for mailing this year...I had better get busy!!


Thanks again for taking the time to stop by- hugs and I hope all of you have a fabulous week!

Friday, August 4, 2017

Thoughts & Prayers- Nothing is Worth More than This Day

Hi Friends!!

Woohoo! I had a chance to create another Clean and Simple (CAS) Mixed Media card using an alcohol ink technique on vellum last night. One thing I forgot to do was work in a well ventilated room- lol! I must remember that for the next time :-)

I created this card for the August CAS Mixed-Media challenge and chose to use vellum versus Yupo® paper (I have the Yupo® as well as Glossy cardstock but neither one was in the area where I actually stamp right now, so I pulled out a piece of vellum instead) and the Simon Says Wednesday "Splatter It" Challenge.

My design style normally does not lean toward CAS cards but lately I have been trying to participate in CAS challenges and force myself to think CAS.  I am having so much fun with this style and who knows? I may be converted soon- lol!!

If you have not already had a chance to visit the above challenge sites yet, I hope you will do so- wonderful inspiration from their Design Teams as well as in their galleries!

OK, I have to admit, this card was an experiment so I did try a few different things ( I refused to give up :-)) :

1). Using alcohol inks for the “smoosh” technique (***Note- epic fail on vellum but it is part of this card ) place a few drops of Ranger® Adirondack™ Alcohol Inks- Ginger, Latte and Terra Cotta onto a silicone craft mat, spritz with alcohol blending solution and lay the piece of vellum into the ink. Immediately lift up the vellum, allow the inks to merge and blend.  The problem I had with this method on vellum was that I had too much of the ink on the mat (and too similar of colors) so the colors became one brown color (I decided to wipe it off the vellum and start over...)

2). Using  Spectrum Noir™ Alcohol Markers, color with the large flat nib back and forth over the panel- GB5 Yellow at the top, OR1 Orange in the center and the DG4 at the bottom. Once the marker has dried (only a few moments), spritz a bit of alcohol blending solution over the panel and allow that to dry.

3). Trim the vellum, de-static the alcohol marker ink side with an Embossing Buddy®, stamp the tree from Thoughts & Prayers using Versafine™ Onyx Black Ink, apply Clear Embossing Powder and carefully heat set with the Heat Tool.

4). Using the Big Shot™ with the MFT Stitched Rectangle STAX, cut the frame from Basic Black cardstock and adhere the vellum panel to the frame.  Mount the entire frame onto a piece of So Saffron cardstock (I had this piece in my stash already die cut with the same rectangle die).

5). On a piece of Whisper White cardstock, stamp the sentiment from the retired Summer Afternoon stamp set with Memento™ Tuxedo Black Ink at the bottom, trim the panel and mount onto a piece of Basic Black cardstock.  Adhere the entire background onto the white card base and add the vellum panel.

6). Die cut the cat from Basic Black cardstock with the Poppystamps™ Sitting Cat Die (I also had this die cut ready in my stash)- mount onto the card front with dimensional foam to finish off the card.

Stamp Sets: Thoughts & Prayers, Summer Afternoon (current and retired Stampin’ Up!)

Ink/Mediums: Versafine™ Onyx Black; Alcohol Inks, Spectrum Noir™ Alcohol Markers- GB5, OR1, DG4

Paper: Whisper White, Basic Black, Vellum

Accessories/Tools:  Big Shot™, MFT Stitched Rectangles STAX Dies, Poppystamps™ Sitting Cat Die, Embossing Buddy®, Stampin’ Emboss® Clear Embossing Powder, Heat Tool


Thanks again for stopping by- hugs and I hope all of you have a fabulous weekend!

Saturday, October 10, 2015

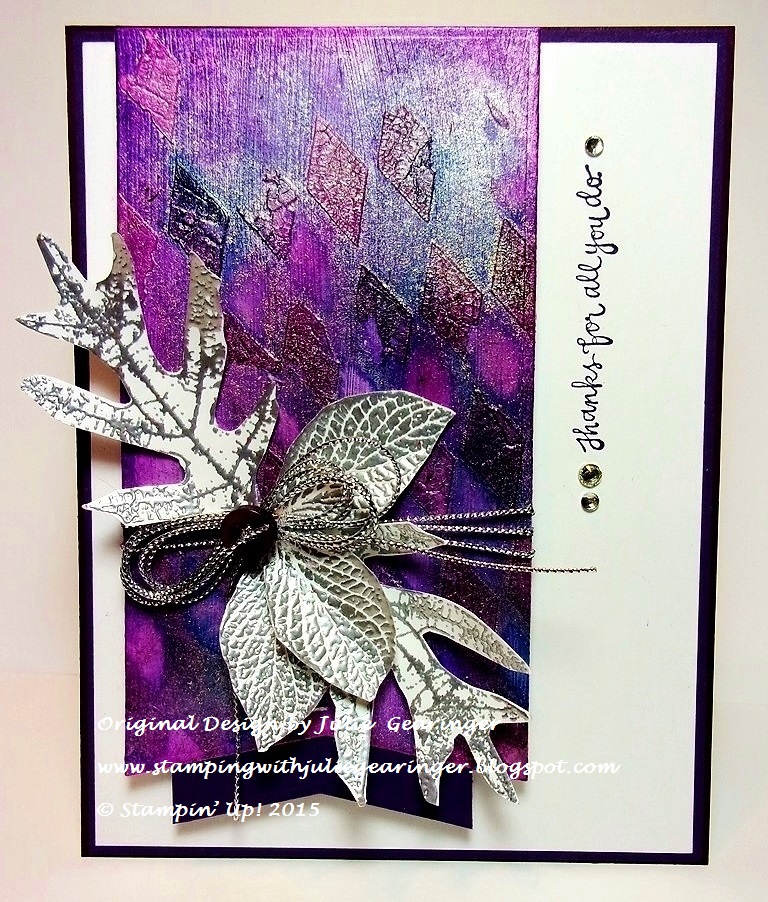
JUGS314 Thanks For All That You Do- A Labor of Love


Hi Friends!!

It’s time for the new Just Us Girls #314 “Stencils” Challenge and I decided to create a Mixed Media card using crackle texture paste with a harlequin stencil.

I hope you will have a chance to check out the rest of the fabulous Just Us Girls Design Team projects and come join in on the fun! 

I am also linking this card to the Splitcoaststampers’ Mix-Ability MIX138 “Falling Leaves” Challenge as well as the TLC531 “Stencil This or Stencil That” Challenge.

This card was definitely a “labor of love” since it was  almost discarded  several times throughout the design process (originally it had totally different colors – Pool Party, Melon Mambo and Blackberry Bliss with two very different stencil layers).    


Oh, how I love that Gesso® can cover a multitude of errors- lol!!

Since I  am so stubborn and refuse to give up :-) as I mentioned above, the main panel on this card has many layers under the final stenciling- Gelatos® - Dark Cherry, Blueberry, Concord and Silver along with Ranger® Tim Holtz® Distress Stains- Faded Jeans, Chipped Sapphire, Dusty Concord, Brushed Pewter, Picket Fence, addition of the Wendy Vecchi® Textured Crackle Paste, then adding Ranger® Adirondack® Alcohol Inks- Eggplant and Denim (spritzing rubbing alcohol) and additional Gelatos® with Distress Stains.  

Again, this is so subjective to your desires and a bit difficult to describe- you will need to experiment and do not be afraid to get your hands inky for sure!

Use a baby wipe to remove some of the ink (with the stencil covering the texture paste), then spritz the entire panel with Frost White Shimmer Paint, allow to dry and spritz again with Champagne Mist Shimmer Paint (these two paints have been diluted with rubbing alcohol and the layers are dried with the Heat Tool).  

Sponge Blackberry Bliss Classic Ink over the edges and areas that were removed with the baby wipe.

Cut the panel out with the Big Shot™ and the MFT Blueprints 13 Banner Die also cutting a smaller banner with the same die from Elegant Eggplant cardstock- so you have the same angle for the banner.

Adhere the smaller panel behind the stenciled panel and add the strips of Silver Cord.

Heat emboss the leaves using Stampin’ Silver Embossing Powder, allow to cool and carefully cut out by hand.

Trim a piece of Whisper White cardstock to 3.75” x 5” and stamp the sentiment using Elegant Eggplant Classic Ink.

Mount onto a piece of Elegant Eggplant cardstock, trim and mount onto the Blackberry Bliss card base.

Mount the banner onto the card front using Stampin’ Dimensionals® and add the leaves along with the Silver Cord bow to the front of the banner (I prefer to use Hot Glue for this step).

Add a few Rhinestones along with the Blackberry Bliss button with Silver Cord to finish off the card.

This card was not quick and easy (literally a few hours), but it was fun!!

Stamp Sets:  French Foliage, Absolutely Fabulous (both retired Stampin’  Up!)

Ink: Elegant Eggplant, Blackberry Bliss; Versamark™; Gelatos®, Ranger® Tim Holtz® Distress Stains, Ranger® Adirondack® Alcohol Inks, Frost White and Champagne Mist Shimmer Paint

Paper: Whisper White, Elegant Eggplant, Blackberry Bliss

Accessories: Gesso®, Wendy Vechhi® Textured Crackle Paste, Harlequin Stencil,  Big Shot™, MFT Blueprints 13 Die, Stampin’ Emboss Silver Embossing Powder, Heat Tool, Silver Cord,  Rhinestones, retired Blackberry Bliss button, baby wipe


Thanks again for stopping by- I hope you have a wonderful week and come play along with us at Just UsGirls!

Saturday, August 22, 2015

DTGD15understandblueb Awesome Wonder

Hi Stampers!!


Here is my last hostess sample for the recent 2015 Dare to Get Dirty Challenge for my good friend, Lydia’s DTGD15understandblueB Challenge (FYI- you can still create cards throughout the year and link to the challenges although the official challenge is over and you would not be eligible for the drawing for the vendor prizes) :-)

As I mentioned in my previous posts, Dare to Get Dirty is an annual event that allows the Splitcoaststampers’ Fan Club members to participate in several challenges hosted by the Dirty Dozen Girls (current and alumni, like me) in creating cards but also the possibility to receive prizes from the member companies (if interested in more details, see the beginning of this post). 

Again, one major rule of participation in the Dare To Get Dirty Challenges is that the actual challenge details are secret to all except the Fan Club Members…I can share the card but not the details on the actual challenge (unfortunately, any details on this card will reveal the challenge details, so if you have any questions, please let me know in the comment area).  


This card was a definite work in progress and incorporates a few Mixed Media techniques :-)


Stamp Sets: How Great Thou Art (Our Daily Bread Designs)

Paper:  Whisper White, Watercolor Paper, Elegant Eggplant, Brushed Gold

Ink: Versamark™, Ranger Tim Holtz Distress Stains and Silver Alcohol Ink, Gelatos, White Acrylic Paint, White Gel Pen

Accessories: Embossing Buddy®, Heat Tool, Stampin'Emboss® White EP, Rhinestones, Water Spritzer Bottle, AquaPainter


Thanks again for taking the time to visit!  I had so much fun creating the hostess sample cards as well as hostessing for this year’s Dare To Get Dirty Challenges and am looking forward to participating again next year :-)  I hope all of you have a wonderful weekend!!

Tuesday, August 11, 2015

CAS Thank You- Vintage Leaves for Autumn


Hi Again Stampers!!

I wanted to share one more card that I created yesterday using the CAS(E) ThisSketch CTS135 Challenge along with the Splitcoaststampers’ CAS329 "Thank You Paula" Challenge (see details here and gallery here).

Again, if you have not already done so, I hope you will find the time to visit the above challenge sites to check out the wonderful Design Team samples as well as their fabulous galleries!

This card was very easy to create- stamp the leaf image using Blackberry Bliss Classic Ink and color with Ranger® Adirondack® Alcohol Inks using the Blending Solution Pen. 

Cut the leaf image out with the Big Shot™ and the corresponding Leaflets Framelits™.

Stamp the diagonal line image using Cajun Craze Classic Ink onto Very Vanilla cardstock, add the splatter with Mossy Meadow Classic Ink and stamp the sentiment with the Blackberry Bliss Stampin’ Write marker for color (omitting part of the sentiment).
 
Trim the panel and mount onto the Blackberry Bliss card front and mount the leaf using Stampin’ Dimensionals® to finish off the card.

Stamp Sets:  Vintage Leaves, Gorgeous Grunge, Me = Grateful

Ink:  Blackberry Bliss, Cajun Craze, Mossy Meadow; Blackberry Bliss Stampin’ Write Marker, Ranger® Adirondack® Alcohol Inks with Blending Solution

Paper: Very Vanilla, Blackberry Bliss

Accessories: Big Shot™, Leaflet Framelits™


Thanks again for stopping by- have a wonderful day, my friends!

Monday, August 3, 2015

DTGD15JulieGearinger- Mixed Media Love and Prayers

Hi Stampers!!

Woohoo!!  Today is the day!  I am hosting my very first Dare To Get Dirty Challenge at Splitcoaststampers!!

As I mentioned in my previous posts, Dare to Get Dirty is an annual event that allows the Splitcoaststampers’ Fan Club members to participate in several challenges hosted by the Dirty Dozen Girls (current and alumni, like me) in creating cards but also the possibility to receive prizes from the member companies. 

To participate in Dare To Get Dirty, you have to be a Splitcoaststampers’ Fan Club Member, and if you are not a Fan Club member, here is the link to learn more about joining.    The Dare To Get Dirty for 2015 is from August 1st until August 7th (deadline for uploading your cards is August 10th) and it is a fun time of chatting in the challenge forums as well as being creative creating cards. 

While the Splitcoaststampers site is free, there are many benefits to becoming a Fan Club member and for the $25.00 a year membership fee (less than a penny a day), you can help support this wonderful stamping resource!  

I personally visit this site several times a day- so for me it seems to be a terrific bargain!!  And no, I do not receive a commission if you sign up- lol!!, I am just one of their unofficial “cheerleaders” since I am one of the Dirty Dozen Alumni and just love the site so much- between the galleries of wonderful inspiration, free tutorials, forums and challenges- this site has helped me immensely with my journey into the world of papercrafting!

One rule of participation in the Dare To Get Dirty Challenges is that the actual challenge details are secret to all except the Fan ClubMembers…I can share the card but not the details on the actual challenge (unfortunately, any details on this card will reveal the challenge details, so if you have any questions, please let me know in the comment area).  

I hope you enjoy my Mixed Media card for my DTGD15JulieGearinger Challenge :-)

Stamp Sets: En Francais (retired background), ODBD Sharing Your Sorrow
Ink: Stāz-On® Midnight Blue, Gelatos®, Ranger® Tim Holtz® Distress Stains and Alcohol Inks

Paper: Whisper White, Elegant Eggplant

Accessories: Big Shot™, MFT Royal Rose Die, Gesso®, Distressing Tool, Stencils, Water and Alcohol Spritzer Bottles, Gelatos®, 3/8" Perfect Plum Taffeta Ribbon, Crochet Lace, Pearls, MS Leaf Punch, Chipboard, Crackle Paste

Thanks again for visiting- I will be sharing more of my sample cards for the Dare To Get Dirty challenges over the next few days … hugs to you, my friends!!

Saturday, April 11, 2015

OLS15 One Layer Sympathy


Hi Stampers!!

I decided to create a one layer card using the OLS15 One Layer Simplicity “Blowin’in the Wind” Challenge  (this is the first time that I have played along with the OLS Challenge site :-))  along with the Splitcoaststampers WT520 Monochromatic Green Challenge (see details here and gallery here) along with the Splitcoaststampers Mix-Ability MIX112 First Day of Spring Challenge (see details here and gallery here).

I had purchased the Watercolor note cards from Stampin’ Up! last year and had yet to use them- I thought they would be perfect for this challenge and could hold up under the “abuse” of water for the mixed media elements :-)  Not sure if this card has the "simplicity" part of the challenge although it is only one layer :-)

Again, if you have not had time to visit the challenge sites yet, I encourage you to do so- wonderful ideas and inspiration from all!

To create this card:

Original Note Card (Before :-))
Use your craft mat to apply several layers of Ranger® Tim Holtz® Distress Stains- Mowed Lawn, Salty Ocean, Dusty Concord, Bundled Sage along with Picket Fence (and whatever other colors you prefer- I lost track :-)) and spritz with water before laying the card front into the ink.

Lift up and spritz the ink again lightly and tilt the card front to allow the ink to spread. 

Dry the card front between layers with the Heat Tool and continue to repeat until you are satisfied with the results.

Once the background was covered with Distress Stains, add a few layers of Ranger® Tim Holtz® Adirondack® Alcohol Inks- Denim, Eggplant, Pearl and Silver.  

Place a few drops of each color of the Alcohol Ink over the background (using only one color at a time), drop a bit of the Alcohol Blending Solution over the ink, then quickly used the retired Color Spritzer Tool to move the ink around (versus a drinking straw). 

Once the card front has dried, ink the retired script stamp from Notable Notions using Memento™ Tuxedo Black Ink and stamp over the background in a random fashion.

Use Versamark™ Ink to stamp the flower stems onto the card front, apply Stampin’ Emboss® White Embossing Powder and heat set with the Heat Tool.

Repeat the above steps for the sentiment to finish off the card.

Stamp Sets:  Love & Sympathy, Notable Notions, Agapanthus Thank You (Stampendous)

Ink: Versamark™, Memento™ Tuxedo Black; Ranger® Tim Holtz® Distress Stains- Mowed Lawn, Salty Ocean, Dusty Concord, Bundled Sage, Picket Fence; Ranger® Tim Holtz® Adirondack® Alcohol Inks- Denim, Eggplant, Pearl and Silver; Alcohol Blending Solution

Paper: Watercolor Note Cards (retired)

Accessories: Heat Tool, Stampin’ Emboss® White Embossing Powder, Craft Mat, Color Spritzer Tool


Thanks again for stopping by- I hope you have a wonderful weekend, my friends!

Thursday, November 13, 2014

MIX93- Just for You

 Hi Again Stampers!!

Here is the 2nd Mixed Media card that I created for the Mix-Ability MIX93 Challenge at Splitcoaststampers.   The challenge is Artist Inspired and the featured artist is France Papillon .

I hope you have a chance to check out all the entries in the MIX93 gallery here – wonderful inspiration from all!

The panels for both cards were created using similar colors and techniques- I described in detail the technique for the background in the first part of my previous post here :-)

To create this card:

Once you create the distress main background panel from my previous post (see link here), use the Distressing Tool to distress a piece of Basic Black cardstock, mount onto the card base (again, I used the same heavier weight of cardstock that was used for the background panel).  Use a Sponge Dauber to add Ranger® Tim Holtz® Tea Dye Distress Stain to the white areas of the card base.

Add a few strands of 1 ½” Burlap Ribbon strands onto the front of the card and mount the distressed, ink background panel to the card front.

Using My Digital Studio (MDS), insert the Touch of Nature and Teeny Tiny Wishes stamp brush images into a blank document and resize (I had both of these already pre-printed in my stash).  I had printed both of these out onto the same type of cardstock as noted above for the background panel.

Use the Big Shot™ with the Ovals Collection Framelits™ to cut the flower image and also cut a larger oval from Basic Black cardstock.  Use the Distressing Tool to distress the edges of the Basic Black oval.

Color the floral image using Stampin’ Up! Watercolor pencils and wet with the AquaPainter™.  Add the white highlights using a Faber-Castell White Pitt Artist Pen and stamp the Gorgeous Grunge splatter stamp using Ranger® Tim Holtz® Tea Dye Distress Ink.

Use a Sponge Applicator to apply additional Ranger® Tim Holtz® Tea Dye Distress Ink over the entire image and apply Gesso (I used my finger) with stencils in a few areas.

Add the floral oval to the distressed Basic Black oval and mount the focal image onto the card front using Stampin’ Dimensionals®.

Create the rolled flowers using Elegant Eggplant and Blackberry Bliss cardstock (I had a few of these flowers on hand so I used both colors).   To create the flowers- use Scallop Circle Punches- One each using the 2 ⅜”, 1 ¾” and 1 ¼”.  Hand cut a spiral from the outside edge of the scallop toward the center of the cardstock, scrunch the cardstock to break up the fibers and hand roll the flowers and adhere to the center of each scallop (I like to use Hot Glue to hold the flowers together)- here is a basictutorial...

Using your finger, lightly apply Gesso to the flowers and use the Faber-Castell™ Pitt Copper 252 Artist Pen to the petals to add a bit of metallic and mount the flowers onto the card front (again, I used Hot Glue).

Stamp the butterflies onto Whisper White cardstock using Elegant Eggplant Classic Ink and punch out using the Elegant Butterfly Punch.  Sponge Ranger® Tim Holtz® Tea Dye Distress Ink onto the image and add white highlights with the Faber-Castell White Pitt Artist Pen.   

Punch out the Basic Black butterflies using the Elegant Butterfly Punch and mount the sponged butterflies onto the Basic Black butterflies. Add the two butterflies to the card front.

Add the sentiment using Stampin’ Dimensionals® and adhere Pearls to the butterfly centers as well as the corners to finish off the card.

Stamp Sets:  Touch of Nature, Teeny Tiny Wishes- both MDS versions, Papillon Potpourri, retired French Script background

Ink: Elegant Eggplant; Faber-Castell Gelatos™, Faber-Castell Pitt Pen- Copper 252, Ranger® Tim Holtz® Distress Stains, Adirondack® Jim Holtz® Alcohol Inks

Paper: Basic Black, Whisper White, misc. cardstock (not sure of manufacturer)

Accessories: Big Shot™, Ovals Collection Framelits™, Gesso, Stencils, Distressing Tool, Sponge Dauber, Craft Mat, 1 ½” Burlap Ribbon, Punches- Elegant Butterfly, Scallop Circle Punches- 2 ⅜”, 1 ¾”, 1 ¼”; Pearls


Thanks again for taking the time to stop by- I am planning on posting more of the HYCCT challenge cards later this evening – have a wonderful Friday!!

MIX93 Friend to Friend- Together Again

 Hi Stampers!!

This has been another busy doctor appointment week for my hubby and I – my hubby had his first chemo treatment on Tuesday, and so far, so good (he has not had adverse side effects yet- Praise the Lord!)

Recently I have been experimenting with mixed media, so I decided to play with some of my new “goodies” last night and created two different cards using a similar color palette.  

I will be posting the two projects in separate posts and I was inspired by the Mix-Ability MIX93 Challenge at Splitcoaststampers- we were encouraged to check out France Papillon's site to be inspired :-)
  
I hope you have a chance to check out all MIX93 gallery- such inspiration from all!

The panels for both cards were created using similar colors and techniques- here are the steps to create both background panels:

On your piece of cardstock, apply a coat of Gesso and allow it to dry completely (you can use a Heat Tool to speed up the drying process).  

NOTE- I used a cardstock that is quite a bit heavier than Whisper White and it has a bit of a sheen to the finish- I received a large amount of this cardstock free from my last employer (it was "Over" from an old print job) and do not know the name of the manufacturer… I would definitely recommend Watercolor Paper or Natural White  (versus Whisper White) due to the amount of water used throughout the background process…

Once the Gesso has dried, apply Faber-Castell Gelatos™ to your craft mat (I used Cotton Candy and Guava)- spritz  water onto the Gelatos™ and mix together with your fingers (yes, this is a messy project but oh, so much fun)! 

Lay the Gesso background onto the mat and pull up- allow the Gelatos™ to spread around and dry with the Heat Tool.

Clean your craft mat and apply Ranger® Tim Holtz® Distress Stains to the craft mat- I used Chipped Sapphire, Salty Ocean, Peacock Feathers and Dusty Concord (I applied them to the mat close together but separate).  Spritz with water and lay the background panel onto the colors, twisting and picking up.  Again, allow the stains to swirl around, laying the panel down again for more color as needed- dry with Heat Tool.

Add some dimension with stencils and Gesso – dry with the Heat Tool (this layer will not be evident except when you look at the card from different angles). 

Add drops of Adirondack® Jim Holtz® Alcohol Inks directly to the background- I used Eggplant, Latte, Denim, Mixative Copper and Mixative Silver- spritz with water and rotate the background panel to allow the inks to swirl and merge together, dry with the Heat Tool (the ink will spread a bit more with the air from the Heat Tool), apply more drops and keep building up the background as desired. 

Once you are satisfied with the background layer (I wanted to mimic a stone wall), ink the retired background stamp, French Script with Elegant Eggplant Classic Ink.  Lay the panel onto the background stamp (with the background stamp face up on the table) and lightly press certain areas onto the stamp to give a sporadically stamped appearance.

Use the stencil with Gesso (I used my finger) and apply Gesso to a few areas with the various stencils and dry with the Heat Tool.

Use the Distressing Tool to distress the edges and sponge Ranger® Tim Holtz® Tea Dye Distress Stain over the edges to “antique” the white part of the paper.

To create the first card:

Use the Distressing Tool to distress a piece of Blackberry Bliss cardstock, mount onto the card base (again, I used the same heavier weight of cardstock that was used for the background panel) and use a Sponge Dauber to add Ranger® Tim Holtz® Tea Dye Distress Stain to the white areas of the card base.

Mount the distressed, ink background panel to the card front.
Using My Digital Studio (MDS), insert the Postage Due and Teeny Tiny Wishes stamp brush images into a blank document and resize (I had both of these already pre-printed in my stash).  I printed both of these out onto the same type of cardstock as noted above for the background panel.

Color the Postage Due using Ranger® Tim Holtz® Distress Stains – again, apply to the craft mat and lay the image into the stains, lift and dry with the Heat Tool.  Apply a bit of the Adirondack® Jim Holtz® Alcohol Inks – Mixative Copper, distress the edges and sponge Ranger® Tim Holtz® Tea Dye Distress Stain over the edges to “antique” the white part of the paper.

Mount the panel onto a piece of Blackberry Bliss cardstock, distress the edges of the Blackberry Bliss using the Distressing Tool and add the 3/8” Blackberry Bliss Stitched Satin Ribbon with the metal “Together” Embellishment (this was part of a scrapbooking kit from years ago- again in my stash).

Add the Postage Due focal image to the card front using Stampin’ Dimensionals®, insert the Paper Studio clock embellishment below the ribbon detail on the focal image and mount the lower part of the clock using Stampin’ Dimensionals®. 

Create the rolled flowers using Blackberry Bliss cardstock and Scallop Circle Punches-one each using the 2 ⅜” , 1 ¾” and 1 ¼” Scallop Circle Punches.  Hand cut a spiral from the outside edge of the scallop toward the center of the cardstock, scrunch the cardstock to break up the fibers and hand roll the flowers and adhere to the center of each scallop (I used Hot Glue to hold the flowers together)- here is a basic tutorial using Designer Series Paper (DSP)- I have found that cardstock makes a sturdier flower :-)

 Using your finger, lightly apply Gesso to the flowers and use the Faber-Castell™ Pitt Copper 252 Artist Pen to the petals to add a bit of metallic and mount the flowers onto the card front (again, I used Hot Glue).

Cut the sentiment apart, sponge a bit of Ranger® Tim Holtz® Tea Dye Distress Stain to distress the paper and mount to the card front using Stampin’ Dimensionals® to finish off the card.

Stamp Sets:  Postage Due, Teeny Tiny Wishes- both MDS versions, French Script (retired background)

Ink: Faber-Castell Gelatos™, Faber-Castell Pitt Pen- Copper 252, Ranger® Tim Holtz® Distress Stains, Adirondack® Jim Holtz® Alcohol Inks

Paper: Blackberry Bliss, misc. cardstock (from my stash)

Accessories: Gesso, Stencils, Distressing Tool, Sponge Dauber, Craft Mat, 3/8” Blackberry Bliss Stitched Satin Ribbon, Metal Embellishments- Clock- Paper Studio, Together- not sure of manufacturer, Scallop Circle Punches- 2 ⅜”, 1 ¾”, 1 ¼”


Thanks again for taking the time to visit- you are all such an encouragement to me!!  I will post the second card along with a few more of the HYCCT challenge cards later this evening – have a fabulous Friday!!
Related Posts Plugin for WordPress, Blogger...