Showing posts with label Me=Grateful. Show all posts

Sunday, November 8, 2015

CAS Thanks - Three Challenges in One!

Hello Friends!!

I hope you are having a great weekend!  My hubby was not able to have his maintenance chemo this past week since he caught a cold (he has now had it for 2 weeks and this week late Wednesday eve. after Awana, I came down with the chest congestion/sore throat part of the cold). 
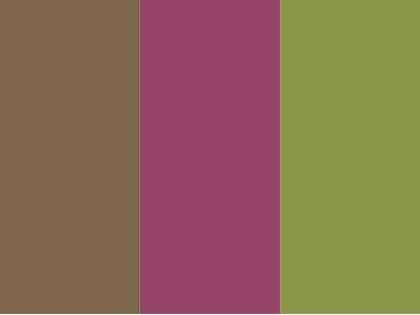
Soft Suede, Rich Razzleberry,
Mellow Moss 
Unfortunately, I have stayed homebound the rest of the week and in addition to missing my Ladie's Bible Study, we decided to stay home instead of meeting with our Small Group study/fellowship- I miss seeing everyone but did not want to spread the "love" around so to speak :-)

Luckily, I can still stamp and create and had a chance to design a Clean and Simple (CAS) card last night using the Splitcoaststampers’ CC555 Color Challenge along with the CAS347 “MeWant Candy” Inspiration Photo Challenge and the Simon Says Wednesday “Thanks”Challenge.
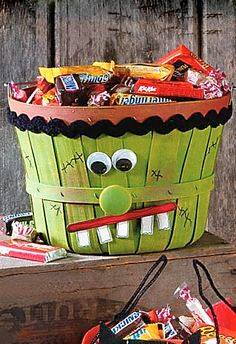
CAS347 Photo
As Christians (without children of our own) my husband and I choose not to celebrate Halloween, so even though the photo inspiration is a very cute Frankenstein basket, I chose to use the colors from the photo as my inspiration along with this week’s color palette (and I was even able to add the “dessert” of thanks).

If you have not done so, I hope you will have a chance to visit the above sites to check out the wonderful Design Team samples as well as their fantastic galleries!

To create this easy card:

Ink the retired hostess stamp image from Ageless Adornment using Memento™ Tuxedo Black Ink and stamp onto a piece of Whisper White cardstock.

Using an AquaPainter™ with Classic Ink, color the blossom with Rich Razzleberry, the stems and leaves with Mossy Meadow and the background with Soft Suede and add additional details with the coordinating Stampin’ Write Markers.  Apply Titanium White Acrylic Paint to the flower center (or just be careful not to paint this center with Rich Razzleberry- duh! :-)).

Use the AquaPainter™ to apply Frost White Shimmer Paint to the Soft Suede background and part of the petals (you cannot see this shimmer well in the photo but it is there) and once dry, carefully fussy-cut around the image and set aside.

Ink the “thank you” only portion of the stamp from Me=Grateful with the Soft Suede Stampin’ Write Marker and stamp the sentiment onto a piece of Whisper White cardstock.

Trim the panel to 4” x 5 ¼” and use the Simply Scored™ Scoring Tool to score the lines around the image.

Ink the Gorgeous Grunge large splatter stamp with Rich Razzleberry Classic Ink, stamp off on scrap paper and repeatedly stamp onto the panel.

Mount the panel onto a piece of Mossy Meadow cardstock, trim and mount onto the Rich Razzleberry card base.

Add the Silver Thread to the card front and mount the focal image with dimensional foam to cover the thread.

Add a few Rhinetsones to finish off the card.

Quick, easy and so much fun!!

Stamp Sets: Ageless Adornment (retired hostess), Me=Grateful, Gorgeous Grunge

Ink: Memento™ Tuxedo Black Ink, Rich Razzleberry, Mossy Meadow, Soft Suede Classic Ink and Stampin’ Write Markers; Frost White Shimmer Paint, Titanium White Acrylic Paint

Paper: Whisper White, Mossy Meadow, Rich Razzleberry

Accessories: Aquapainter™, Simply Scored™ Scoring Tool, Rhinestones, Silver Thread


Thanks again for stopping by- I hope all of you have a fabulous and restful day!!

Tuesday, October 27, 2015

SUO134 Thank You


Hello Friends!

It’s time for the new SUO134 “Thank You Very Much” Challenge and I decided to create a somewhat masculine “thank you” card using the Pals PaperArts PPA273 Sketch Challenge along with the FabFri75 Color Challenge.

I hope you will have a chance to check out the Pals Paper Arts and Fab Friday Challenge sites as well as my sister Design Team member samples at the SU-Only Challenges- great inspiration from all!

To create this card:

Stamp the ship image using Stāz-On® Jet Black Ink on Whisper White cardstock.
Create the circle mask for the sun/moon with the 1 ¼” Circle Punch and using Sponge Daubers, apply Tangelo Twist Classic Ink to the sky area and Bermuda Bay to the water.

Use an AquaPainter™ to blend some of the ink and wash a bit of the color over the sun/moon. 

Once you are satisfied with the sponging, use the fine tip end of the Basic Black Stampin’ Write Marker to add additional waves in the foreground and a few birds to the sky.

Use the Sahara Sand Stampin’ Write Marker to add shadows to the sails and lightly sponge a bit of Tangelo Twist over the waves as a reflection of the sky.

Use the Big Shot™ with the Square Collection Framelits™ to cut out the image and mount onto a piece of Basic Black cardstock, trim and set aside.

Ink the globe image using Bermuda Bay Classic Ink and stamp onto Bermuda Bay cardstock.

Punch out the globe image with a 2” Circle Punch and also punch a 2” circle from Basic Black cardstock.

Cut both the stamped circle and black circle in half and adhere each of the black circle halves behind the stamped globe halves and mount behind the focal image square.

Use the Big Shot™ along with the Chevron Textured Impressions™ Embossing Folder to emboss a piece of Whisper White cardstock, trim and mount onto a piece of Basic Black cardstock.

Use the Stampin’ Write Basic Black Marker to color in the “thank you” from the Me=Grateful sentiment and stamp onto a piece of Bermuda Bay cardstock.

Add the chevron embossed panel, trim and mount the knotted Natural Linen Thread to the center.

Add the panel to a piece of Whisper White cardstock, trim and mount onto a piece of Basic Black cardstock, trim and mount onto the Whisper White card base.

Add the focal image using Stampin’ Dimensionals® and a few Rhinestones near the sentiment to finish off the card.
Stamp Sets:  The Open Sea, Me=Grateful
Ink: Stāz-On® Jet Black,  Bermuda Bay, Tangelo Twist; Stampin’ Write Markers- Basic Black, Sahara Sand
Paper/Cardstock: Whisper White, Basic Black, Bermuda Bay
Accessories: Big Shot™, Square Collection Framelits™, Chevron Textured Impressions™ Embossing Folder, Sponge Daubers, 1 ¼” Circle Punch, Natural Linen Thread, Rhinestones

Thanks again for stopping by and we hope to see your Stampin’ Up! Only project in our “Thank You Very Much” Challengegallery!

Thursday, September 3, 2015

Lighthearted Leaves- Thank You

Hello Again Friends!

Here is another design using the new Lighthearted Leaves set along with the Splitcoaststampers’ CC546 "Rich Cucumber Twist" Color Challenge (with dessert of Black and White :-)) , SC553 Sketch Challenge and the Mix-Ability MIX135 "Back to School- Chalkboard Anything" Challenge (although just a tiny chalkboard :-)).  

If you have not had a chance to visit the above challenge site galleries yet, again, I would encourage you to do so- fabulous inspiration in the galleries!

To create this card:

Use the Embossing Buddy® to de-static a piece of Whisper White cardstock, ink the Lighthearted Leaves image using Versamark™ Ink, stamp onto the panel, apply Stampin’ Emboss® Black Embossing Powder and use the Heat Tool to heat set the powder.

Color the image with Stampin’ Write markers- Cucumber Crush, Rich Razzleberry and Tangelo Twist and fussy cut out the image.

Use the Big Shot™ with the Tiny Triangles Textured Impressions™ Embossing Folder to emboss a piece of Cucumber Crush cardstock, trim the angle for the sketch and mount onto a piece of Basic Black cardstock.

Mount the angled piece onto the Whisper White panel, trim and mount onto a piece of Basic Black cardstock, trim again and mount onto the Rich Razzleberry card base.

Use the Embossing Buddy® to de-static a scrap piece of Basic Black cardstock, ink the Me=Grateful sentiment image using the retired Versamark™ Marker (to omit all but the “thank you” from the sentiment), stamp onto the prepared piece of Basic Black cardstock, apply Stampin’ Emboss® White Embossing Powder and use the Heat Tool to heat set the powder.

For the chalkboard effect, use your fingertip or a Sponge Dauber to apply Whisper White Craft Stampin’ Ink to the sentiment.

Mount the embossed leaf image along with the sentiment to the card front using Stampin’ Dimensionals® to finish off the card.

Stamp Sets:  Lighthearted Leaves, Me=Grateful

Ink: Versamark™, Stampin’ Write Markers- Cucumber Crush, Rich Razzleberry, Tangelo Twist; Whisper White Craft Stampin’ Ink

Paper/Cardstock: Whisper White, Basic Black, Rich Razzleberry

Accessories:  Big Shot™, Tiny Triangles Textured Impressions™ Embossing Folder, Embossing Buddy®, Stampin’ Emboss® Black and White Embossing Powder, Heat Tool


Thanks again for taking the time to stop by- your visits are always an encouragement to me!  Hugs and have a blessed day!  

Tuesday, September 1, 2015

SUO130 Thanks for Being You


Hi Stampers! 

It’s time for the new SUO130 “Cards for Friends” Challenge and I decided to create a quick, easy and mainly one layer card using the new stamp set, Lighthearted Leaves (from the Holiday Mini) along with Me=Grateful (from the main catalog). 

I also incorporated the Splitcoaststampers’ CC544 "Wonderful Soft Coral" ColorChallenge (So Saffron, Calypso Coral and Wisteria Wonder) but chose to skip the "dessert" option of sequins :-))

I hope you will have a chance to check out my "sister" Design Team member samples and create your own Stampin’ Up! Only project for our gallery.
 
To create this card:

Using Sponge Daubers, apply So Saffron, Calypso Coral and Wisteria Wonder Classic Ink over a piece of Whisper White cardstock.

Ink the large stamp image using water and stamp repeatedly over the inked surface (*** FYI- this technique is called Water Stamping- you can do this by soaking a few paper towels with water and stamping onto the paper towels as you would an ink pad or spritz the stamp with water, which is what I did for this card***). 

Follow the same steps noted above with the smaller leaf as well until you have the desired pattern- use the Heat Tool to dry the background.

Once dried, de-static the card base using the Embossing Buddy®, stamp the large leaf using Versamark™ ink, apply Stampin’ Emboss® White Embossing Powder and set the powder with the Heat Tool.   

Stamp another leaf onto a piece of scrap paper, fussy cut to create a mask, mask the embossed leaf and repeat the steps above to stamp another large leaf onto the background.

Continue to mask the larger leaves and stamp the smaller leaf image with the embossing powder (again, using the same steps as noted above).

Repeat the embossing steps with the sentiment from the Me=Grateful stamp set and when all of the embossing is finished, ink the large splatter image from Gorgeous Grunge using Calypso Coral Classic Ink and stamp repeatedly over the surface.

Gently wipe off the entire panel with a paper towel to remove the excess ink, trim and mount onto a piece of Wisteria Wonder cardstock, trim and mount onto a piece of Calypso Coral cardstock, trim and mount onto the Whisper White card base.
Stamp Sets:  Lighthearted Leaves, Me=Grateful
Ink: Versamark™, Calypso Coral, So Saffron, Wisteria Wonder
Paper/Cardstock: Whisper White, Calypso Coral, Wisteria Wonder
Accessories: Sponge Dauber, Embossing Buddy®, Stampin’ Emboss® White Embossing Powder, Heat Tool

Thanks again for stopping by – we hope to see your Stampin’ Up! Only project in our “Cards for Friends” Challenge gallery!

Tuesday, August 11, 2015

CAS Thank You- Vintage Leaves for Autumn


Hi Again Stampers!!

I wanted to share one more card that I created yesterday using the CAS(E) ThisSketch CTS135 Challenge along with the Splitcoaststampers’ CAS329 "Thank You Paula" Challenge (see details here and gallery here).

Again, if you have not already done so, I hope you will find the time to visit the above challenge sites to check out the wonderful Design Team samples as well as their fabulous galleries!

This card was very easy to create- stamp the leaf image using Blackberry Bliss Classic Ink and color with Ranger® Adirondack® Alcohol Inks using the Blending Solution Pen. 

Cut the leaf image out with the Big Shot™ and the corresponding Leaflets Framelits™.

Stamp the diagonal line image using Cajun Craze Classic Ink onto Very Vanilla cardstock, add the splatter with Mossy Meadow Classic Ink and stamp the sentiment with the Blackberry Bliss Stampin’ Write marker for color (omitting part of the sentiment).
 
Trim the panel and mount onto the Blackberry Bliss card front and mount the leaf using Stampin’ Dimensionals® to finish off the card.

Stamp Sets:  Vintage Leaves, Gorgeous Grunge, Me = Grateful

Ink:  Blackberry Bliss, Cajun Craze, Mossy Meadow; Blackberry Bliss Stampin’ Write Marker, Ranger® Adirondack® Alcohol Inks with Blending Solution

Paper: Very Vanilla, Blackberry Bliss

Accessories: Big Shot™, Leaflet Framelits™


Thanks again for stopping by- have a wonderful day, my friends!
Related Posts Plugin for WordPress, Blogger...
