Showing posts with label Chalkboard. Show all posts

Friday, November 4, 2016

God's Work Done in God's Way


Hi Friends! 

I hope all of you are having a great week so far! Today, we are celebrating the November 2016 Release at Sweet ‘n Sassy Stamps in time for the SNSS 9th Birthday Celebration!!


To celebrate, Korin at Sweet 'n Sassy Stamps has a lot of specials lined up this month and a live FB posting at 12 pm EST on the Sweet 'n Sassy Stamps FB page for even more birthday festivities!!  We hope you can join in on the fun!


My card uses the brand new, SNSS Faith Quote Blocks Clear Stamp Set (designed by NinaB Designs) along with the previously released Decorative Frames Clear Stamp Set (designed by Korin Sutherland). 

To create this card:

Ink the frame from SNSS Decorative Frames Clear Stamp Set with embossing ink, stamp onto a piece of black cardstock, position the sentiment from SNSS Faith Quote in the center, stamp with embossing ink, apply white embossing powder and heat set with a heat tool.

Once the embossing powder has cooled, apply a bit of white craft ink (to mimic chalk- I used my finger) and fussy-cut the frame.

Emboss a piece of white cardstock, trim and mount onto a piece of black cardstock, add the crochet lace and gingham ribbon before mounting the entire panel onto the white card base.

Mount the SNSS Faith Quote Blocks panel with dimensional foam and add the rolled flowers and leaves.

Close-up to see a bit of the sparkle on the roses :-)
Use a clear glitter pen to add shimmer to the roses to finish off the card.

I am going to link this card to the Word Art Wednesday #244-#245 “Anything Goes” Challenge as well as the Stampin’ Royalty SR352 “All That Glitters” Challenge (there is glitter on the roses- a bit difficult to see in the photo but very “sparkly” IRL).

If you have not had a chance to stop by the Sweet ‘n Sassy Stamps site yet or visit the above challenge sites, I hope you will find the time to do so- wonderful inspiration from all!

Stamp Sets:  Faith Quote Blocks, Decorative Frames (Sweet‘n Sassy Stamps)

Ink:  Versamark™; Clear Wink of Stella®

Paper: Whisper White, Basic Black, Garden Green, Real Red

Accessories: Big Shot™, MFT retired Royal Roses Dies, Black and White Gingham Ribbon, White Crochet Lace

Thanks for stopping by- your visits are such an encouragement to me!  Have a blessed weekend, my friends!

Thursday, September 3, 2015

Lighthearted Leaves- Thank You

Hello Again Friends!

Here is another design using the new Lighthearted Leaves set along with the Splitcoaststampers’ CC546 "Rich Cucumber Twist" Color Challenge (with dessert of Black and White :-)) , SC553 Sketch Challenge and the Mix-Ability MIX135 "Back to School- Chalkboard Anything" Challenge (although just a tiny chalkboard :-)).  

If you have not had a chance to visit the above challenge site galleries yet, again, I would encourage you to do so- fabulous inspiration in the galleries!

To create this card:

Use the Embossing Buddy® to de-static a piece of Whisper White cardstock, ink the Lighthearted Leaves image using Versamark™ Ink, stamp onto the panel, apply Stampin’ Emboss® Black Embossing Powder and use the Heat Tool to heat set the powder.

Color the image with Stampin’ Write markers- Cucumber Crush, Rich Razzleberry and Tangelo Twist and fussy cut out the image.

Use the Big Shot™ with the Tiny Triangles Textured Impressions™ Embossing Folder to emboss a piece of Cucumber Crush cardstock, trim the angle for the sketch and mount onto a piece of Basic Black cardstock.

Mount the angled piece onto the Whisper White panel, trim and mount onto a piece of Basic Black cardstock, trim again and mount onto the Rich Razzleberry card base.

Use the Embossing Buddy® to de-static a scrap piece of Basic Black cardstock, ink the Me=Grateful sentiment image using the retired Versamark™ Marker (to omit all but the “thank you” from the sentiment), stamp onto the prepared piece of Basic Black cardstock, apply Stampin’ Emboss® White Embossing Powder and use the Heat Tool to heat set the powder.

For the chalkboard effect, use your fingertip or a Sponge Dauber to apply Whisper White Craft Stampin’ Ink to the sentiment.

Mount the embossed leaf image along with the sentiment to the card front using Stampin’ Dimensionals® to finish off the card.

Stamp Sets:  Lighthearted Leaves, Me=Grateful

Ink: Versamark™, Stampin’ Write Markers- Cucumber Crush, Rich Razzleberry, Tangelo Twist; Whisper White Craft Stampin’ Ink

Paper/Cardstock: Whisper White, Basic Black, Rich Razzleberry

Accessories:  Big Shot™, Tiny Triangles Textured Impressions™ Embossing Folder, Embossing Buddy®, Stampin’ Emboss® Black and White Embossing Powder, Heat Tool


Thanks again for taking the time to stop by- your visits are always an encouragement to me!  Hugs and have a blessed day!  

Monday, August 18, 2014

Magical Season- A Sneak Peak at Christmas Bauble

Hi Stampers!

I had fun this weekend spending time with my husband (he rarely has a weekend off from work) and when he decided to watch the games and relax, I used the time to create a few cards :-)

This card was designed with the Pals Paper Arts PPA215 Color Challenge in mind as well as the CCC14 Christmas Card Challenge at Splitcoaststampers (which is a monthly commitment you set for yourself to create Christmas cards all year long- I am a bit behind :-))

Again, I hope you will take the time (if you have not done so already) to visit both sites to check out all of the other Design Team entries as well as the galleries- wonderful designs and inspiration from all!!

To create this card:

Stamp the ornament from Christmas Bauble (sneak peek from the upcoming Holiday Catalog) using Memento™ Tuxedo Black Ink onto Whisper White cardstock.  

Color the ornament using a Stampin’ Write Pear Pizzazz (for the leaves and scroll design in the center), a Strawberry Slush marker for the berries and body of the ornament and a Basic Black marker for the top of the ornament.  

Carefully cut out the ornament and use the Basic Black marker to color the edges of the ornament (use the side of the marker to hide the white edges).

Distress the ornament using Ranger® Tim Holtz® Distress Tea Dye Stain and once dried, re-color using the Pear Pizzazz and Strawberry Slush markers.

To tone down the Tea Dye color (it was a bit darker than I expected), apply Ranger® Tim Holtz® Distress Picket Fence Stain, spritz with water and wipe off the stain (to speed up the drying, use the Heat Tool).

Once dried, use a .005 Sakura Pigma Micron™ Pen to go over the black lines and add a bit of highlighting over the light colored portions of the ornament and the berries using the Chalk Marker.  

Punch out the center of the ornament with the 1” Circle Punch and layer onto a circle of Basic Black cardstock (also punched with the 1” Circle Punch, split into two and spread apart a bit to create the border behind the ornament center). 

Use the Embossing Buddy® to de-static a piece of Basic Black cardstock and stamp the sentiment using Versamark™ ink.  Apply Stampin’ Emboss White Embossing Powder and heat with the Heat Tool to melt the powder.  

Use the Big Shot™ with the Northern Flurry Textured Impressions™ Embossing Folder to emboss a piece of Whisper White cardstock, trim the panel and adhere to a layer of Pear Pizzazz cardstock.

Add the sentiment layer onto the bottom of the Pear Pizzazz panel and adhere the crochet lace along with a strip of Pear Pizzazz cardstock to cover up the seam.  Mount the panel onto a Basic Black card base.

Add the Gold Trim around the ornament and mount the ornament using Stampin’ Dimensionals® to the card front.

Punch out the snowflakes from Whisper White cardstock and add to the panels on the card front.

To finish off the card, add the Pearls to the ornament center, strip above the lace and snowflake centers.

Stamp Sets: Christmas Bauble, Magical Season (retired)

Ink:  Memento™ Tuxedo Black Ink, Versamark™, Stampin’ Write markers- Basic Black, Pear Pizzazz, Strawberry Slush;  Chalk Marker; Ranger® Tim Holtz® Distress Stain- Tea Dye and Picket Fence

Paper: Whisper White, Basic Black, Pear Pizzazz

Accessories: Big Shot™, Northern Flurry Textured Impressions™ Embossing Folder, Embossing Buddy®, Stampin’ Emboss® White Embossing Powder, 1” Circle Punch, retired Gold Trim, Pearls, crochet trim from my stash, Martha Stewart snowflake punch


Thanks again for taking stopping by- I will be posting a few more cards late tomorrow evening.   In the meantime, I hope all of you have a marvelous Monday!

Saturday, December 21, 2013

DD84 A Sparkling Merry Christmas

Hi Stampers! 

This week’s DD84 “Black Tie” Dynamic Duo Challenge combines Basic Black with Cherry Cobbler and the dessert option is “Sparkle”.    Of course, this time of year, who can resist dessert :-)   

I hope that you will stop by and check out the rest of the Design Team projects and create a project of your own using the two colors - we would love to have you join us!!


I decided to try the Chalkboard Technique and the photo was difficult to take since this card is quite "Sparkly" IRL - Trust me, I did use Cherry Cobbler but the photo looks like Real Red- I always have trouble with reds in my photos :-)

To create this card:

De-static a piece of Basic Black cardstock with the Embossing Buddy™ and stamp the retired background stamp, Christmas Collage using Versamark™ ink.   Apply Stampin’ Emboss® White Embossing Powder and heat set with the Heat Tool.

Mount this panel onto a piece of Silver Foil paper- first use the non-SU! Branch Punch to cut out the branches from the Silver Foil paper (being careful to not punch too close to the edges), then mount onto a piece of Basic Black Cardstock and finally onto the Cherry Cobbler card base.

Use the Big Shot™ with the retired, Lacy Brocade Textured Impressions™ Embossing Folder to emboss a piece of Silver Foil paper and add this to the top of the background. 

Add the 5/8” Basic Black Satin Ribbon bow and sentiment (stamped from the retired Bells & Boughs set using Basic Black Classic Ink onto Whisper White cardstock). 

Using Basic Black Classic Ink, stamp three images of the outline poinsettias from the retired set, Watercolor Winter, onto Cherry Cobbler cardstock.  Carefully cut out by hand. 

Adhere the silver foil branches and stamped poinsettias over the circle area to hide the large '25' on the background stamped image. 

Add Pearls to the center of the poinsettias and the Frosted Finish Embellishment to the center of the bow to finish off the card.

Stamp Sets:  Christmas Collage, Watercolor Winter, Bells & Boughs

Ink: Basic Black Classic Ink, Versamark™

Paper: Whisper White, Basic Black, Cherry Cobbler, Silver Foil

Accessories:  Big Shot™, retired Lacy Brocade Textured Impressions™ Embossing Folder, Embossing Buddy®, Heat Tool, Stampin’ Emboss® White Embossing Powder, Frosted Finishes Embellishment, Pearls, non SU! Branch Punch


Thanks again for stopping by- hope all of you have a wonderful week and Merry Christmas!! 

Tuesday, November 5, 2013

SUO83 O Holy Night- A Favorite Sentiment

Hi Stampers! 

The SUO83 Stampin’ Up! Only Challenge is “Favorite Sentiment” and I decided to use the sentiment set from the 2013 Holiday Mini, O Holy Night along with the chalkboard technique to create another Christmas card for the Splitcoaststampers CCC13 Christmas Card Challenge.

I hope you will drop in to visit the SU-Only Challenge site and check out the rest of the Design Team!!  If you have a chance, we would love to see your “Favorite Sentiment” card using Stampin’ Up! Only products. 

To create this card:

Use the Big Shot™ with the Petals-A-Plenty Textured Impressions™ Embossing Folder to emboss a piece of Cherry Cobbler cardstock.  Distress the edges using the Distressing Tool and lightly sponge Illuminate Pigment Ink over the flowers and mount onto a piece of Basic Black cardstock.

Use the Big Shot™ along with the Finishing Touches Edgelits™ to cut the edge of two scrap pieces of Silver Foil (one piece approx. 2” wide and the other just large enough for the Edgelit™).  Emboss the larger piece using the Big Shot™ with the Pretty Print Textured Impressions™ Embossing Folder and adhere to top of the Cherry Cobbler background.

De-static a piece of Basic Black cardstock with the Embossing Buddy® and stamp the sentiment using Versamark™ ink.  Apply Stampin’ Emboss® White Embossing Powder and heat with the Heat Tool.  Once the powder has melted and cooled, trim the cardstock to size.

Trim the small piece of die cut Silver Foil to fit the bottom of the embossed chalkboard sentiment and layer onto a Tea Lace Paper doily. 

Cut a tag from a piece of Basic Black cardstock using the Big Shot™ and the Chalk Talk Framelits™- distress a bit with the Distressing Tool.

Split the Chalk Talk tag into two horizontally and spread apart to adhere behind the White Paper Tea Lace Doily (just allowing the ends to peek out from under the sentiment layer) and mount the entire focal panel to the Cherry Cobbler/Silver Foil layer using Stampin’ Dimensionals®.

Tie a double bow using the Organza Ribbon and attach the Frosted Finishes Embellishment (love this embellishment!) to the center using Mini Glue Dots.  Add to the top of the tag to finish off the card. 

Stamp Sets: O Holy Night

Ink: Versamark™, Illuminate

Paper/Cardstock:  Whisper White, Basic Black, Cherry Cobbler, Silver Foil

Accessories: Big Shot™, Chalk Talk Framelits™, Petals-A-Plenty and Pretty Print Textured Impressions™ Embossing Folder, Finishing Touches Edgelits™, Embossing Buddy®, Heat Tool, Stampin’ Emboss® White Embossing Powder, White Paper Tea Lace Doily, Frosted Finishes Embellishment, Sponge Dauber


Thanks again for stopping by to visit-  I hope you can join us for our FavoriteSentiment Challenge!

Monday, August 12, 2013

Trust in the Lord- A Scrap Card for Three Challenges :-)

Hi Stampers! 

I created this card for the Pals Paper Arts PPA167 Color Challenge along with a new challenge site for me, Word Art Wednesday “Anything Goes” Challenge #92 and the Stampin’ Royalty Challenge SR188 “It’s the Little Things” Challenge to use up small scraps (love being able to use up some of my scraps :-)).  

If you have not had the chance to drop in on any of these sites, I hope you will take the time to do so – again, wonderful inspiration!

To create this card:

Use the Big Shot™ with the Chalk Talk Framelits™ to cut a tag from Basic Black cardstock and the Large Scallop Framelit™ to cut the edges of two Whisper White scrap cardstock pieces.  Emboss the scalloped pieces using the Delicate Accents (Lace) Textured Impressions™ Embossing Folder. 

Use the Embossing Buddy® to de-static the Basic Black cardstock tag, stamp the sentiment from Trust God using Classic White Craft Ink and emboss with the Heat Tool and Stampin’ Emboss® White Embossing Powder.  Smudge a bit of White Craft Ink over the image using a Sponge Dauber. 

Use the AquaPainter™ to brush on Coastal Cabana Classic Ink onto Whisper White cardstock.  Once dried, stamp the En Francais background stamp using Coastal Cabana Classic Ink and trim to size.  Adhere to a piece of Coastal Cabana cardstock and then again onto Crisp Cantaloupe cardstock.

Using a small scrap piece of Eastern Elegance Designer Series Paper (DSP), cut in half and adhered to Coastal Cabana cardstock to create the vertical band for across the card. 

Adhere the two embossed lace paper pieces across the bottom of the card, add the DSP band across the center (you cannot see it but there is a gap under the tag since I used scraps- our little secret :-) )  and mount the black cardstock tag using Stampin’ Dimensionals®.  In fact, if you ever took my cards apart, all of the background layers have been punched in the center to use for future projects and to lower the weight of the card- again, our little secret :-)  We laugh and say they are "holy cards"- lol!!

Create the paper bow from scraps of the same DSP as the vertical band (two large ovals rolled in half and secured to a small scrap strip of DSP, add the two banner points for the tails).  Add the paper bow to the top of the tag using Mini Glue Dots®.

Create the four rolled flowers from Crisp Cantaloupe cardstock using the 1 ¼” Scallop Circle Punch (cut into the circle towards the center and roll up- see the Splitcoaststampers tutorial here) and cut the leaves from Pistachio Pudding cardstock using the Bird Builder Punch.   

Add the flowers and leaves to the bottom of the card and one to the center of the bow using Mini Glue Dots®.

Stamp the postage stamp image from Postage Due onto Whisper White cardstock using Coastal Cabana Classic Ink and cut out by hand.  Adhere to a scrap piece of Basic Black and free cut by hand around the image to create a small frame.  Use the Postage Stamp Punch to punch out a piece of Whisper White, adhere the stamp image and mount to the cardstock using Mini Glue Dots® and a Stampin’ Dimensional®.

Add the Pearls to the centers of the flowers to finish off the card.

Stamp Sets: Trust God, Postage Due, En Francais 

Ink: Coastal Cabana, White Craft Ink

Paper/Cardstock:  Whisper White, Crisp Cantaloupe, Coastal Cabana, Pistachio Pudding, Eastern Elegance DSP, Basic Black

Accessories: Big Shot™, Chalk Talk and Large Scallop Framelits™, Delicate Accents (Lace) Textured Impressions™ Embossing Folder, Sponge Dauber, Punches- 1 ¼” Scallop Circle, Bird Builder, Postage Stamp, Large Oval, Pearls

Thanks again for visiting- I hope you have a marvelous Monday!!

Saturday, August 3, 2013

Dare To Get Dirty- Card #3


Hi Stampers!

Here is the third card I created as a sample maker for the 2013 Dare To Get Dirty Challenge at  Splitcoaststampers (this one is for StamperTammy's challenge).

Again, if you are a Fan Club Member we would love to have you join in and participate- the deadline to upload your creations is August 5th and if you have not joined theFan Club, I would highly recommend it!

To create this card:

Using the Embossing Buddy®, de-static a piece of Basic Black cardstock and stamp the frame image using Versamark™ ink.  Apply Stampin’ Emboss® White Embossing Powder and heat with the Heat Tool.   

Create a mask from a sticky note to mask the frame and stamp the bird image with the same steps as above. 

On a separate piece of Basic Black cardstock, stamp the flowers, butterfly, sentiment and label tag, again, using the same steps above.

Carefully cut out the label tag, butterfly and flowers.  Punch the sentiment out using the XL Oval Punch and punch two other pieces from Whisper White to create the layer  behind the sentiment. 

Stamp the script stamp from Notable Notions over the background layer using White Craft ink and smudge a bit with your finger or a Sponge Dauber.

Using Metallic Pencils, color the embossed areas on the frame, bird, butterfly and flowers. 

Layer all of the stamped elements, adhere the entire panel to a Whisper White Layer and then again onto Basic Black cardstock.  Add the Gingham Ribbon bow along with the Pearls to finish off the card.

Stamp Sets: Papaya Collage, Love and Sympathy, Notable Notions, Flower Shop

Ink: Versamark™, White Craft Ink

Paper/Cardstock:  Whisper White, Basic Black

Accessories:  Embossing Buddy®, Stampin’ Write® White Embossing Powder, Heat Tool, XL Oval Punch, Metallic Pencils (retired), Gingham Ribbon (retired), Pearls


Thanks again for stopping by- have a wonderful evening!!

Tuesday, July 30, 2013

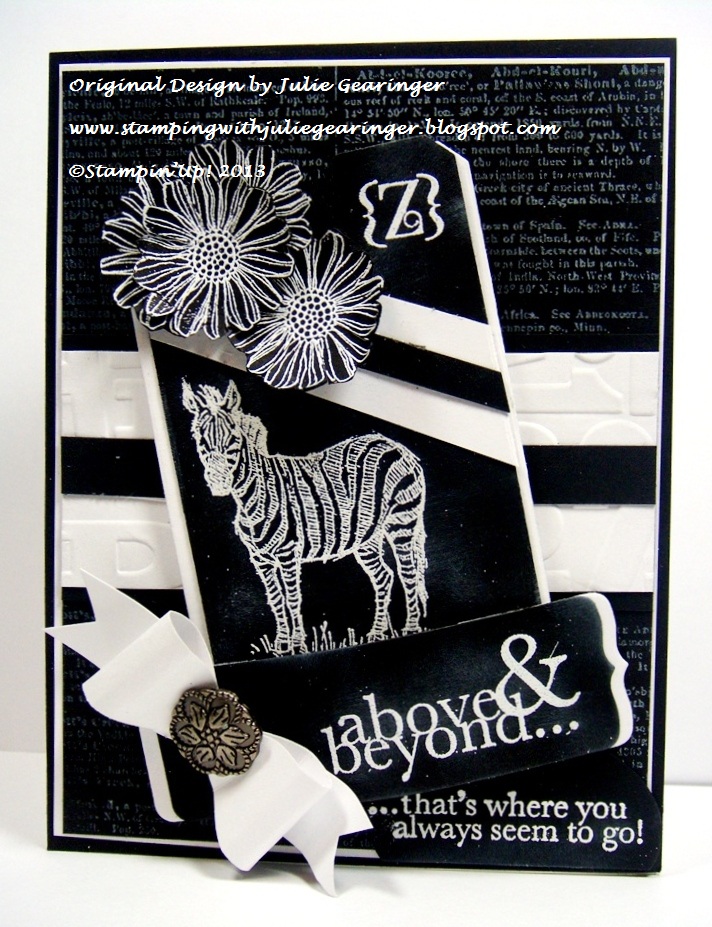
SUO76 Z is for Zebra, Zinnia- Thank you!

Hi Stampers! 

The Stampin’ Up! Only Challenges theme for the SUO76 Challengeis Back To School.  For some reason when I thought of this challenge, the first thing that came to my mind were the alphabet flash cards :-))  

I truly hope that you will have a chance to stop by to visit SUO-Only Challenges to check out all of the other Design Team creations and play along with us :-))

To create this card:

Ink the new background stamp, Dictionary, with Whisper White Craft Ink and stamp onto a piece of Basic Black cardstock.

Use the Big Shot™ with the Alphabet Press Textured Impressions™ Embossing Folder to emboss a piece of Whisper White cardstock.  Trim for the horizontal panel and adhere to Basic Black cardstock.  Add the Basic Black cardstock strip to the center of the panel and adhere to the Dictionary background panel.

Use the Big Shot™ with the Chalk Talk Framelits™ to cut the large tag and narrow tag from Basic Black cardstock.  De-static using the Embossing Buddy® and stamp the sentiment on the long narrow tag along with the zebra and “Z” image on the larger tag with Versamark™ ink.  Apply Stampin’ Emboss® White Embossing Powder and heat with the Heat Tool.  Once cooled, apply a bit of Whisper White Craft Ink with a Sponge Dauber to finish off the chalkboard effect.

If desired, add the Whisper White and Basic Black cardstock strip along with the top edge of the tag (FYI- I added this to hide my original handwritten “Z” that I decided did not look right- so now you know another secret about me:-))).
 
De-static another piece of Basic Black cardstock using the Embossing Buddy® and stamp the zinnia flower along with the sentiment for the lower portion of the card with Versamark™ ink.  Apply Stampin’ Emboss® White Embossing Powder and heat with the Heat Tool.  Once cooled, again apply a bit of Whisper White Craft Ink with a Sponge Dauber to finish off the chalkboard effect. 

Adhere the large Chalk Talk tag and the narrow sentiment tag to a Whisper White layer and mount to the card using Stampin’ Dimensionals®.   “Fussy-cut” the three zinnias and adhere to the top of the tag.   Punch out the lower sentiment using the XL Oval Punch and then cut the oval to square with the bottom of the card.

Create the paper bow using two large oval punches from Whisper White (rolled in half and adhered with a Mini Glue Dot), add a small strip of Whisper White cardstock on the bottom, adhere the two folded ovals and the two strips for tails.  Add the Antique Brad to the center and adhere to the card.

Stamp Sets:  Zoo Review, Best of Flowers, One in A Million, Dictionary, Occasions Alphabet

Ink: Versamark™

Paper/Cardstock: Whisper White, Basic Black

Accessories:  Big Shot™, Alphabet Press Textured Impression ™ Embossing Folders, Chalk Talk Framelits™, Embossing Buddy®, Heat Tool, Stampin’ Emboss® White Embossing Powder, XL and Large Oval Punch, 1” Square Punch, Antique Brad

Thanks again for stopping by- I know this card may not be what you would traditionally think of with a “Back to School” challenge but that is what I love about challenges- so many interpretations!! 


Again, I hope you can come join us for our Backto School Challenge at SUO Challenges!! Have a great Tuesday!!!

Monday, April 15, 2013

Chalkboard with a Flourish- Two Challenges in One!


Hi Again Stampers! 

Wow- this may be a first for me (three posts in one day :))!  I wanted to create a card using the CQC184 ColourQ Challenge along with the Create with Connie and Mary CCMC247 Sketch Challenge.  Again, if you have the time, check out both sites for wonderful inspiration!
 
To create this card:

Use the Embossing Buddy® to de-static a piece of Basic Black  cardstock and stamp the image from Flowering Flourishes using Versamark™ ink.  Apply Stampin’ Emboss® White  Embossing Powder and heat with the Heat Tool.   

Once cooled, softly sponge White Craft ink over the image to give the appearance of erased chalk, color over the embossing with SU! Metallic Pencils and add shadows with the White Stampin’ Up! Watercolor Pencil.
 
Use the Dotted Scallop Ribbon Border Punch on a piece of Going Grey DSP to create the border in the sketch and adhere to the back of the panel.

Use the Big Shot™ to emboss a piece of Vellum  with the Lacy Brocade Textured Impressions™ Embossing Folder and adhere to the Blushing Bride layer using Two-Way Glue.

Mount the embossed Blushing Bride layer onto Basic Black cardstock and add the focal image with Stampin’ Dimensionals®.  

Create the rolled flowers using the 1 1/4” and 7/8” Scallop Circle Punches (just punch the scallops out of the Blushing Bride and Whisper White cardstock, cut wavy spirals using Paper Snips along the edges and spiraling towards the center, roll from the outside towards the center and adhere to the small piece of cardstock in the middle) - see the Splitcoaststampers’ tutorial here.

Add the Vellum sentiment banner and Pearls to finish off the card.

Stamp Sets: Flowering Flourishes, Kind & Caring Thoughts (retired Hostess set)

Ink: Versamark™, Basic Black, Craft White

Paper/Cardstock:  Whisper White, Basic Black, Blushing Bride, Going Grey DSP

Accessories: Big Shot™,  Lacy Brocade Textured Impressions™ Embossing Folder, Punches- 7/8” Scallop Circle, 1 ¼” Scallop Circle, Dotted Scallop Ribbon Border, 1” Square (for banner points; Embossing Buddy®, Stampin’ Emboss® White  Embossing Powder, Heat Tool, Pearls, Sponge, Stampin’ Up! Metallic Pencils (retired), Stampin’ Up! Watercolor Pencil- White

Thanks again for visiting- have a great evening!!

Sunday, March 17, 2013

What is Black, White and Red All Over :-) ?


Hi Stampers!!
 
I wanted to create a card for this week’s FM101 Challenge at The Friday Mashup! and decided to incorporate the colors from the CC302 Splitcoaststampers’ Color Challenge (Basic Black, Whisper White and Real Red) along with the TLC410 Chalkboard Technique.  

If you have a chance, check out the samples at all of these sites- such wonderful galleries!!

To create this card:

Using the Embossing Buddy®, de-static a piece of Basic Black cardstock and stamp the Ex Libris background stamp image using Versamark™ ink.   Apply Stampin’; Emboss® White Embossing Powder and heat with the Heat Tool. 

Trim the background layer to 4” x 5 ¼” and add the 5/8” Basic Black Satin Ribbon at the bottom of the panel.   Mount onto a piece of Basic Black cardstock (4 1/8” x 5 3/8”) and adhere to the Whisper White card base.

De-static, stamp with Versamark™ and heat emboss another piece of Basic Black cardstock with the sentiment from Trust God.  Once cooled, center and cut out with the Big Shot™ and the Adorning Apothecary Accents Framelit™.  Lightly sponge White Craft ink over the image to give the appearance of the chalkboard.

Create the rolled flowers using the 1 ¼” Circle punch to punch out six circles and the 1 3/8" Circle Punch to punch out one circle from Real Red cardstock.  Use the Crimper Tool to crimp all of the circles twice (run thru the Crimper once and then rotate and run thru the Crimper again).

Using scissors, start at the outside of the circle and cut a way spiral following the edge of the circle towards the center until you are in near the center (leave a flat bit of cardstock in the center to add glue and adhere the rolled flower). 

Add the Antique Brad to the sentiment layer and adhere the layer to the embossed background using Stampin' Dimensionals®.    Add the rolled flowers using Mini Glue Dots, add the 5/8" Basic Black Satin Ribbon bow and Pearls to finish off the card.

Stamp Sets: Ex Libris, Trust God

Ink: Versamark™, Craft White

Paper: Basic Black, Whisper White, Real Red

Accessories:  Big Shot™,  Adorning Apothecary Framelits™, Punches- 1 ¼”, 1 3/8” Circle and 1/16" Handheld, Sponge, Embossing Buddy®, Stampin’ Write® White Embossing Powder, Heat Tool, Crimper Tool, Antique Brad, Pearls, 5/8” Basic Black Satin Ribbon (retired)

Thanks again for visiting and I hope all of you have a blessed Sunday!
Related Posts Plugin for WordPress, Blogger...