Showing posts with label One In A Million. Show all posts

Monday, October 21, 2013

Above & Beyond- A Color and Sketch Challenge :-)

Hi Again Stampers!!
Here is the second card that I created using the CQC211 ColourQ Challenge Colors along with the PPA176 Sketch at Pals Paper Arts (although I am too late to link up to the PPA sketch- I still wanted to share :-))

Again, I hope you will take the time to visit each site – amazing inspiration from all of the Design Team projects as well as the other entrants!

This card was quick and easy for me since I used quite a few scraps that were already pre-punched (remember, I punch out all of my layers that you do not see and use them for other cards :-))...comes in handy when I need a quick card :-)


To create this card:

Using the Big Shot™ emboss a piece of Whisper White cardstock with the Chevron Textured Impressions™ Embossing Folder and adhere the Basic Black diagonal piece of cardstock per the sketch.

Stamp the sentiment from One in a Million using White Craft Ink and adhere the panel to a background piece of Whisper White and again onto the Basic Blaxk card base.

Add the Basic Black cardstock strip along with the piece of Whisper White (all from my scraps) and trim to size.

Create the flowers- use the Pansy Punch and Strawberry Slush cardstock,  the 5 Petal Punch for the leaves from Lucky Limeade cardstock and the 7/8” Scallop Circle Punch from Whisper White cardstock for flower centers.  Add the retired Pumpkin Pie corduroy button brad to the flower centers and adhere the flowers to the diagonal panel. 

Create the paper bow with the XL Oval Punch and a few scrap pieces of Strawberry Sluch cardstock- add the retired Pumpkin Pie corduroy button brad.  Adhere to the strip at the bottom to finish off the card.

Stamp Sets:  One in A Million

Ink: White Craft Ink

Paper: Whisper White, Basic Black, Strawberry Slush, Lucky Limeade (retired)

Accessories: Big Shot™,  Chevron Textured Impressions™ Embossing Folder,  Punches- Pansy, 7/8” Scallop Circle, 5 Petal , XL Oval; retired Pumpkin Pie corduroy button brads


Thanks again for visiting- have a great evening!

Tuesday, July 30, 2013

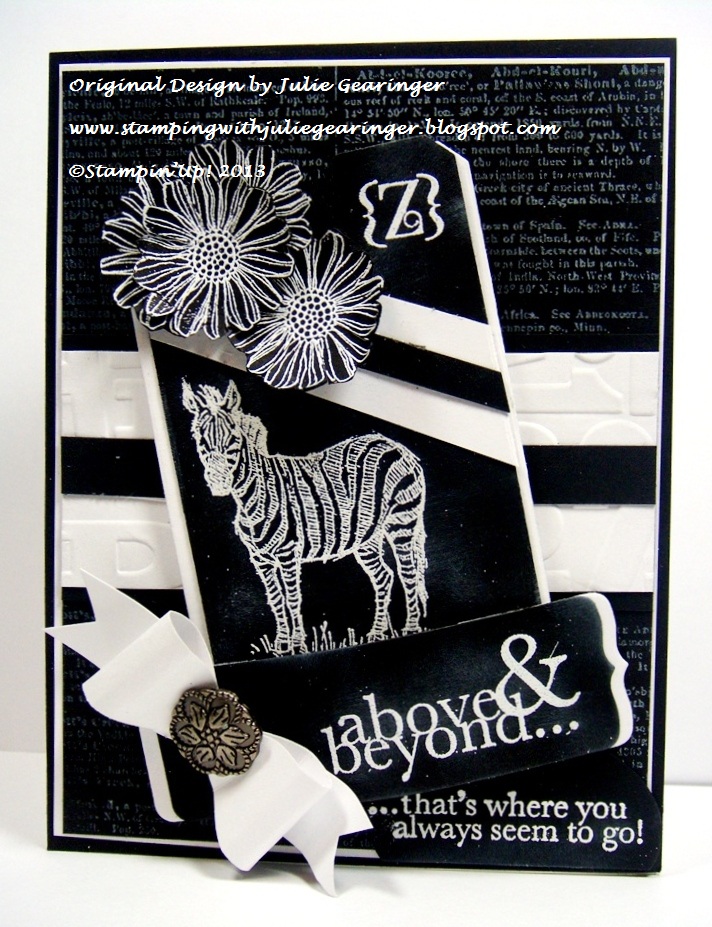
SUO76 Z is for Zebra, Zinnia- Thank you!

Hi Stampers! 

The Stampin’ Up! Only Challenges theme for the SUO76 Challengeis Back To School.  For some reason when I thought of this challenge, the first thing that came to my mind were the alphabet flash cards :-))  

I truly hope that you will have a chance to stop by to visit SUO-Only Challenges to check out all of the other Design Team creations and play along with us :-))

To create this card:

Ink the new background stamp, Dictionary, with Whisper White Craft Ink and stamp onto a piece of Basic Black cardstock.

Use the Big Shot™ with the Alphabet Press Textured Impressions™ Embossing Folder to emboss a piece of Whisper White cardstock.  Trim for the horizontal panel and adhere to Basic Black cardstock.  Add the Basic Black cardstock strip to the center of the panel and adhere to the Dictionary background panel.

Use the Big Shot™ with the Chalk Talk Framelits™ to cut the large tag and narrow tag from Basic Black cardstock.  De-static using the Embossing Buddy® and stamp the sentiment on the long narrow tag along with the zebra and “Z” image on the larger tag with Versamark™ ink.  Apply Stampin’ Emboss® White Embossing Powder and heat with the Heat Tool.  Once cooled, apply a bit of Whisper White Craft Ink with a Sponge Dauber to finish off the chalkboard effect.

If desired, add the Whisper White and Basic Black cardstock strip along with the top edge of the tag (FYI- I added this to hide my original handwritten “Z” that I decided did not look right- so now you know another secret about me:-))).
 
De-static another piece of Basic Black cardstock using the Embossing Buddy® and stamp the zinnia flower along with the sentiment for the lower portion of the card with Versamark™ ink.  Apply Stampin’ Emboss® White Embossing Powder and heat with the Heat Tool.  Once cooled, again apply a bit of Whisper White Craft Ink with a Sponge Dauber to finish off the chalkboard effect. 

Adhere the large Chalk Talk tag and the narrow sentiment tag to a Whisper White layer and mount to the card using Stampin’ Dimensionals®.   “Fussy-cut” the three zinnias and adhere to the top of the tag.   Punch out the lower sentiment using the XL Oval Punch and then cut the oval to square with the bottom of the card.

Create the paper bow using two large oval punches from Whisper White (rolled in half and adhered with a Mini Glue Dot), add a small strip of Whisper White cardstock on the bottom, adhere the two folded ovals and the two strips for tails.  Add the Antique Brad to the center and adhere to the card.

Stamp Sets:  Zoo Review, Best of Flowers, One in A Million, Dictionary, Occasions Alphabet

Ink: Versamark™

Paper/Cardstock: Whisper White, Basic Black

Accessories:  Big Shot™, Alphabet Press Textured Impression ™ Embossing Folders, Chalk Talk Framelits™, Embossing Buddy®, Heat Tool, Stampin’ Emboss® White Embossing Powder, XL and Large Oval Punch, 1” Square Punch, Antique Brad

Thanks again for stopping by- I know this card may not be what you would traditionally think of with a “Back to School” challenge but that is what I love about challenges- so many interpretations!! 


Again, I hope you can come join us for our Backto School Challenge at SUO Challenges!! Have a great Tuesday!!!

Tuesday, June 18, 2013

Above & Beyond- A CAS Fish for Two Challenges :-)


Hi Stampers!!

This card was created for the Just Add Ink JAI169 Inspiration Photo and the CASology #49 Fish Challenge. 

 I hope you have the time to visit both sites- such wonderful Design Teams and loads of inspiration!


To create this Clean and Simple (CAS) card:


Use sticky notes to create the rectangular background area and using Sponge Daubers, apply Cool Cabana ad Strawberry Slush Classic Ink. 

Ink the script stamp from By The Tide with Midnight Muse Classic Ink and stamp off once before stamping over the sponged area. 

Ink the coral stamp using Basic Black Classic Ink and then stamp again, this time inking with Strawberry Slush Classic Ink.

Ink the sentiment from One in A Million using Island Indigo Classic Ink onto Whisper White and mount the background panel onto the Whisper White card base using Stampin’ Dimensionals® (I cannot stamp directly onto a cad base without smudging the ink :-))

Ink the fish image with Basic Black and stamp onto Whisper White cardstock.  Carefully cut out the fish and using Sponge Daubers, apply Strawberry Slush and Island Indigo Classic Ink.

Mount the sponged sea panel onto the card front using Stampin’ Dimensionals® along with the fish image to finish off the card.

Stamp Sets:  By The Tide, One in A Million

Ink: Cool Cabana, Strawberry Slush, Island Indigo, Basic Black

Paper: Whisper White

Accessories:  Sponge Daubers, Stampin’ Dimensionals®. Sticky Notes for masking


Thanks again for stopping by- I hope you enjoy this fishy card!!

Wednesday, June 12, 2013

CAS Above and Beyond- 10 Minutes to Completion :-)

Hi Stampers!!

One of the lessons I learned this past weekend from the Virtual Stamp Night (VSN) at Splitcoaststampers was that I can create a card n 45 minutes or less, so I decided to start timing myself :-)

When I saw the colors from this week's DD56 Dynamic Duos Color Challenge, I decided to create a Clean and Simple (CAS) card based off one that I had created this past weekend- plus it only took 10 minutes to create!!

To create this CAS card:

On Whisper White cardstock, use the AquaPainter™ to watercolor Blushing Bride Classic Ink across the cardstock on a diagonal.  Allow the ink to dry (I blotted the ink with a paper towel to speed the drying process) and stamp the script stamp with Soft Suede Classic Ink.  Using the Color Spritzer Tool with the Soft Suede marker to add a bit of interest.

Stamp the focal image from retired set, Nature’s Wonder using Soft Suede Classic Ink onto Whisper White cardstock and color using Stampin’ Write Markers- Blushing Bride and Soft Suede.  Watercolor a bit with the AquaPainter™, add a bit more marker  and finish off with Moonlight Smooch™ Pearlized Accent Ink on the wings.  Trim and adhere to Soft Suede cardstock.

Stamp the sentiment at the bottom, adhere the focal image using Stampin’ Dimensionals® to the background panel and mount the entire panel to the Whisper White card base with Stampin’ Dimensionals®.

Stamp Sets:  Nature’s Wonder, Botanicals, One in A Million

Ink: Blushing Bride, Stampin’ Write Markers- Blushing Bride, Soft Suede

Paper: Whisper White, Soft Suede

Accessories:  AquaPainter™, Color Spritzer Tool


Thanks again for your visit – have a great Wednesday!
Related Posts Plugin for WordPress, Blogger...