Showing posts with label Lacy Brocade EF. Show all posts

Wednesday, February 24, 2016

Up, Up and Away

Hi Friends! 

I hope you are having a great week so far!  This evening I had a chance to create a quick Clean and Simple (CAS) card for Joanne's PP283 Up, Up and Away Challenge at The Paper Players as well as the Splitcoaststampers’ Alphabet Challenge (B is for Balloons).

If you have not had a chance to visit the above sites, I hope you will find time to do so- wonderful inspiration from all!

To create this card:

Fussy cut the balloon images from the Graphic 45® World’s Fair 8x8 Designer Paper (Balloon Bouquet).

Use the Big Shot™ to die cut a piece of Very Vanilla with the My Favorite Things® (MFT) Stitched Rectangle STAX Die and emboss a piece of Very Vanilla cardstock with the Lacy Brocade Textured Impressions™ Embossing Folder.

Trim the embossed panel and mount onto the Tangelo Twist card base.

Adhere the smaller balloons directly to the stitched rectangular die cut (I used Tombow Multipurpose Adhesive) and add the larger balloon using dimensional foam.

Prepare a piece of Tangelo Twist cardstock with the Embossing Buddy®, ink the sentiment from Six-Sided Sampler with Versamark™ Ink, stamp onto the prepared cardstock, apply Stampin’ Emboss® Winter White Embossing Powder and heat set with the Heat Tool.

Trim the “Hello” from the sentiment and create the banner points with the Hexagon Punch.

Mount the rectangle die onto the card front using dimensional foam and add the sentiment to the larger balloon image to finish off the card.

Stamp Sets:; Six-Sided Sampler  (Stampin’ Up!)

Ink: Versamark™

Paper: Very Vanilla, Tangelo Twist, Graphic 45® World’s Fair Designer Paper

Accessories: Big Shot™, Lacy Brocade Textured Impressions™ Embossing Folder (retired), MFT Stitched Rectangle STAX Dies, Embossing Buddy™, Stampin’ Emboss® Winter White Embossing Powder (retired), Heat Tool, Hexagon Punch


Thanks again for stopping by!!  Have a fabulous week, my friends!

Sunday, November 1, 2015

HYCCT1530SURVIVOR Simply Soft- You've Got This

Hi Again Friends!

This card was created for the Splitcoaststampers’  “Hope You Can Cling To” HYCCT1530SURVIVOR  Ceal’s  “You’ve Got This” Challenge to create a card for encouragement.

This card was fairly easy to create- stamp and mask the images from the retired Simply Soft stamp set, stamp the sentiment and color using Stampin’ Write Markers.

Die cut the panel, add the Silver Cord, mount onto the embossed card front with dimensional foam and add the brads with Rhinestones to finish off the card 

***FYI- I remove the prongs on the brads and use Hot Glue to adhere the brads to the card front with the final step to add the self-adhesive Rhinestones to the brad centers.

I hope you will have time to visit the HYCCT1530SURVIVOR gallery and check out all of the gorgeous inspiration!

Stamp Sets:  You’ve Got This, Simply Soft(retired)

Ink: Stāz-On® Jet Black, Stampin’ Write Markers- Blushing Bride, Tip Top Taupe, Pear Pizzazz

Paper: Whisper White, Basic Black, Tip Top Taupe

Accessories: Big Shot™, My Favorite Things™ Blueprints 20 Die, retired Lacy Brocade Textured  Impressions™ Embossing Folder, Silver Cord, retired Circle Brads, Rhinestones


Thanks again for stopping by- have a fabulous Sunday, my friends!

Thursday, October 29, 2015

HYCCT1527 Well Behaved Women Seldom Make History

Hi Friends!!

This card was created for the Splitcoaststampers’ “Hope You Can Cling To” HYCCT1527 Edna’s “Strength In Numbers” Challenge to use "masking" to create a group of people or animals.

Again, if you have not had a chance to do so, I hope you will find the time to visit the above gallery- fantastic inspiration from all!!

I decided to use the Graphic45® Couture set from Hampton Arts® to create my group of fanciful ladies :-)

To create this card:

Stamp the main lady in the center using Stāz-On® Jet Black Ink onto Whisper White cardstock.

Re-ink the image and stamp onto a piece of scrap paper, fussy-cut out the image and use this as a mask for the main image on the Whisper White cardstock.

Ink the other two ladies using Stāz-On® Jet Black Ink.

Remove the mask and color the image with Faber-Castell® Polychromos™ Pencils and use Gamsol® with a Blending Stump to blend.

Add definition with the Real Red Stampin’ Write Marker and add shadows to all of the images with the Sahara Sand Stampin’ Write Marker.

Add Frost White Shimmer Paint with an AquaPainter™ to the hat and dark bands on the central image, the veil, gloves on the right hand side lady and the coat for the lady on the left.

Use the Big Shot™ with the Spellbinders® Labels 18 Die to cut out the panel along with another label from Basic Black cardstock.

Split the Basic Black label in half and mount behind the focal image.

Use the Big Shot™ to emboss a piece of Real Red cardstock with the Lacy Brocade Texture Impressions™ Embossing Folder, trim and mount onto a piece of Basic Black cardstock, trim and mount onto the Whisper White card base.

Stamp the sentiment from the retired Stampin’ Up! set, Fabulous Thoughts using Stāz-On® Jet Black Ink onto Whisper White cardstock, add the banner points with the Hexagon Punch.

Mount the focal image and sentiment to the card front with dimensional foam and add the 5/8” Basic Black Satin Ribbon Double Bow along with the Rhinestone to the center of the lady in red’s blouse to finish off the card.

 Stamp Sets:  Favorite Thoughts (retired Stampin’ Up!), Couture (Graphic 45® by Hampton Arts®)

Ink: Stāz-On® Jet Black Ink, Stampin’ Write Real Red and Sahara Sand Markers, Faber-Castell® Polychromos™ Red Pencil, Frost White Shimmer Paint

Paper: Whisper White, Basic Black, Real Red

Accessories: Big Shot™, retired Lacy Brocade Textured Impressions™ Embossing Folder, Spellbinders® Labels 18 Die, Hexagon Punch, 5/8” Basic Black Satin Ribbon, Rhinestone, Gamsol®, Blending Stump, AquaPainter™


Thanks again for taking the time to stop by- I will be posting a few more of the Hope You Can Cling To Challenge cards later this evening and tomorrow!  

Monday, March 23, 2015

Whispers of Smoky Wisteria- Pleasant Poppies for a Color and Sketch Challenge :-)

Hi Stampers! 

Here is the another card using the Pleasant Poppies background stamp for the Pals Paper Arts PPA244 Sketch Challenge and the CC522 Splitcoaststampers Color Challenge (Smoky Slate, Wild Wisteria, Whisper White and for “dessert” a touch of green)- see the details here and gallery here .

Sorry about the lighting (the card does look better IRL)- it was a bit difficult to photograph since the Wisteria Wonder has a grey tint and with the Smoky Slate, the Wisteria Wonder tended to wash out a bit in the photo...I color enhanced it a bit for the photo above :-)

Again, if you have not stopped by the challenge sites yet, I hope you will find the time to do so- fantastic inspiration from all!!

To create this card:

Adhere a piece of retired Wisteria Wonder Designer Series Paper (DSP) to a piece of Basic Black cardstock and mount onto a piece of Smoky Slate cardstock. 

Use the Big Shot™ with the retired Lacy Brocade Textured Impressions™ Embossing Folder to emboss the layered panel, trim and mount onto the Basic Black card base.
Add the vertical strip of Basic Black cardstock to the center of the card.

Open a blank document in My Digital Studio (MDS), position the Pleasant Poppies background stamp image (re-sizing- this image was reduced a bit) and print out onto Whisper White cardstock.

Color the poppies using Stampin’ Write markers- Wisteria Wonder and Smoky Slate for the petals along with Pear Pizzazz for the stems. 

Carefully cut out the flowers (“fussy-cut”) and add a few white highlights using a White Gel Pen.  I had reduced the image a bit when I initially printed this out months ago to fill up my 8.5 x 11 blank document…if I had to do this over, I would use a larger image :-)

Punch out a piece of Whisper White cardstock using the 2 ½” Circle Punch.   Adhere all of the petals except the last one on the left using adhesive directly to the Whisper White layer. 

Layer the floral image circle onto a Smoky Slate cardstock circle (also punched with the 2 ½” Circle Punch and cut in half) and two Basic Black cardstock circles to create the layered frame for the petals.

Mount the layered circle directly to the card front and add the last floral image using Stampin’ Dimensionals®. 

Ink the sentiment using Memento™ Tuxedo Black Ink and stamp onto a piece of Whisper White cardstock.  Punch out using the Word Window Punch and punch two additional Word Window shapes from Smoky Slate and Basic Black.

Create the banner points in all three punched pieces using the Hexagon Punch and cut the Smoky Slate and Basic Black in half.  Add the layers behind the stamped sentiment and mount the sentiment to the card front using Stampin’ Dimensionals®. 

Add a few Pearls to the sentiment layer to finish off the card.

Stamp Sets:  Pleasant Poppies (MDS version), Moon Lake

Ink: Printer Ink- Black, Memento™ Tuxedo Black Ink, Stampin’ Write Markers- Wisteria Wonder, Smoky Slate, Pear Pizzazz; White Gel Pen

Paper: Whisper White, Basic Black, Smoky Slate, retired Wisteria Wonder DSP

Accessories: Big Shot™, retired Lacy Brocade Textured Impressions™ Embossing Folder, Hexagon Punch, Pearls, Stampin’ Dimensionals®


Thanks again for visiting- I will be posting the new SU-Only Challenge early Tuesday morning so I hope you have a chance to stop by again soon! 

Monday, August 11, 2014

CC491 Friendship's Journey

Hi Stampers! 

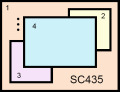
Here is the second card that I created using this week’s CC491 “Blackberry Saffron Bay”colors at Splitcoaststampers along with the SC500 Sketch Challenge (to use one of the sketches from SC400-SC499- I chose SC435 and flipped the sketch upright) :-)

This card also has the has “dessert” to add a sentiment – you have to look close (below the rolled flowers) to see the “love” banner  :-)

If you have not had a chance to do, I hope that you will take a moment to visit the gallery for inspiration, create your own card with this week’s colors and join in on the fun!

To create this card:

Ink the focal using Memento™ Tuxedo Black Ink and stamp onto a piece of Whisper White cardstock. 

Color the images using an AquaPainter™ with Bermuda Bay, Blackberry Bliss and So Saffron Classic Ink and add additional details with the corresponding Stampin’ Write markers. 

Use the Crumb Cake Stampin’ Write marker to add shadows, trim and mount onto a piece of Blackberry Bliss cardstock, trim again and mount onto a piece of Bermuda Bay cardstock.  

Ink the retired background stamp, En Francais using Blackberry Bliss Classic Ink and stamp onto a piece of retired I Am Me Designer Series Paper (DSP).

Use the Big Shot™ with the retired Lacy Brocade Textured Impressions™ Embossing Folder to emboss the stamped DSP panel.  Lightly sand with the Sanding Block, trim and mount onto a piece of Blackberry Bliss cardstock, trim and mount onto the Bermuda Bay card base.

Trim a piece of Park Lane DSP to create two squares and mount onto pieces of Bermuda Bay cardstock and add to the background panel (per the sketch).

Mount the focal image using Stampin’ Dimensionals®.

Create the rolled roses from Blackberry Bliss cardstock using the 2 3/8” and 1 ¾” Scallop Circle Punch – cut a wavy line from the outside of the scallop toward the center.   Use the retired Crimper Tool to crimp the roses and roll up toward the center.  Use a Hot Glue Gun to adhere the outside edges to the center part of the scallop- here is a basic tutorial from Splitcoaststampers.

Stamp the banner from the retired Banner Blast stamp set using Blackberry Bliss Classic Ink, punch out with the Banner Punch , mount onto a banner punched from Bermuda Bay cardstock and add to the card front using Stampin’ Dimensionals®.

Punch the leaves from Bermuda Bay cardstock using the Bird Builder Punch.  Using the Hot Glue Gun, add the leaves with the rolled roses to the front of the card.

Stamp Sets: Friendship’s Journey, Banner Blast (both retired)

Ink: Memento™ Tuxedo Black, Bermuda Bay, Blackberry Bliss, Crumb Cake, So Saffron; Stampin’ Write Markers- Bermuda Bay, Blackberry Bliss, Crumb Cake, So Saffron

Paper/Cardstock:  Whisper White, Bermuda Bay, Blackberry Bliss, So Saffron, Park Lane DSP,  I Am Me DSP (retired)

Accessories: Big Shot™, retired Lacy Brocade Textured Impressions™ Embossing Folder, AquaPainter™, Sponge Dauber, Punches- 2 3/8” and 1 ¾” Scallop Circle, Banner; Pearls


Thanks again for stopping by- I will be posting my design for the new SU-Only Challenge at 3am EST (hope you can stop by again tomorrow to check it out!) 

Tuesday, July 23, 2013

Ladies Card Ministry- Card #2- Butterfly Birthday

Hi Again Stampers! 

Here is the second card of three that we created at our recent Ladies Ministry Card Making class- if interested, more details on the event and the first card are located here :-)

To create The Butterfly Masking Technique card: 

Stamp the outline flower from Stippled Blossoms onto a piece of sticky note paper and cut around the outside petals (remember to leave some of the sticky strip).  

Ink the outline floral stamp using Elegant Eggplant Classic Ink and stamp onto the corner of a piece of Whisper White cardstock, re-ink the stamp and stamp again into the opposite corner.  Cover the stamped images with the mask and re-stamp the other flowers without re-inking the stamps to fill in the white spaces.

Use a Sponge Dauber with Melon Mambo Classic Ink to softly color the flowers and sponge Elegant Eggplant over the edges.  Mount onto a piece of Elegant Eggplant cardstock,

Use the Big Shot™ along with the Lacy Brocade (retired) Textured Impressions™ Embossing Folder to emboss a piece of Whisper White cardstock.  Adhere to a piece of Elegant Eggplant cardstock and add to the Whisper White card base.

Stamp the butterflies using Elegant Eggplant Classic Ink onto Whisper White cardstock and punch out using the Elegant Butterfly Punch.

Stamp the sentiment using Elegant Eggplant Classic Ink onto Whisper White cardstock and cut out using the Large Oval Punch.  We actually used the Thank You for Your Kindness stamp in the class since the Dress card used the Happy Big Day sentiment :-)   

If you create as shown, mount onto two ovals punched from the same punch and overlap to allow the edges to show.  If you use the Thank You for Your Kindness stamp, the Decorative Label Punch will create the 

Lightly sponge the edges with Elegant Eggplant Classic Ink and adhere to the bottom right hand side of the focal panel .

Mount the focal panel to the card front using Stampin’ Dimensionals® and adhere the butterflies using Mini Glue Dots.  Add the Pearls to finish off the card.

Stamp Sets: Stippled Blossoms, Papillon Potpourri, Wetlands
Ink: Elegant Eggplant, Melon Mambo
Paper/Cardstock:  Whisper White, Elegant Eggplant
Accessories: Big Shot™,  Lacy Brocade Textured Impressions™ Embossing Folder (retired), Punches- Elegant Butterfly, Large Oval, Sponge Daubers, Pearls, Ribbon (from my stash)


Thanks again for visiting- I will post the final card shortly :-)

Tuesday, June 18, 2013

Thinking of You- Two Challenges in One


Hi Stampers!

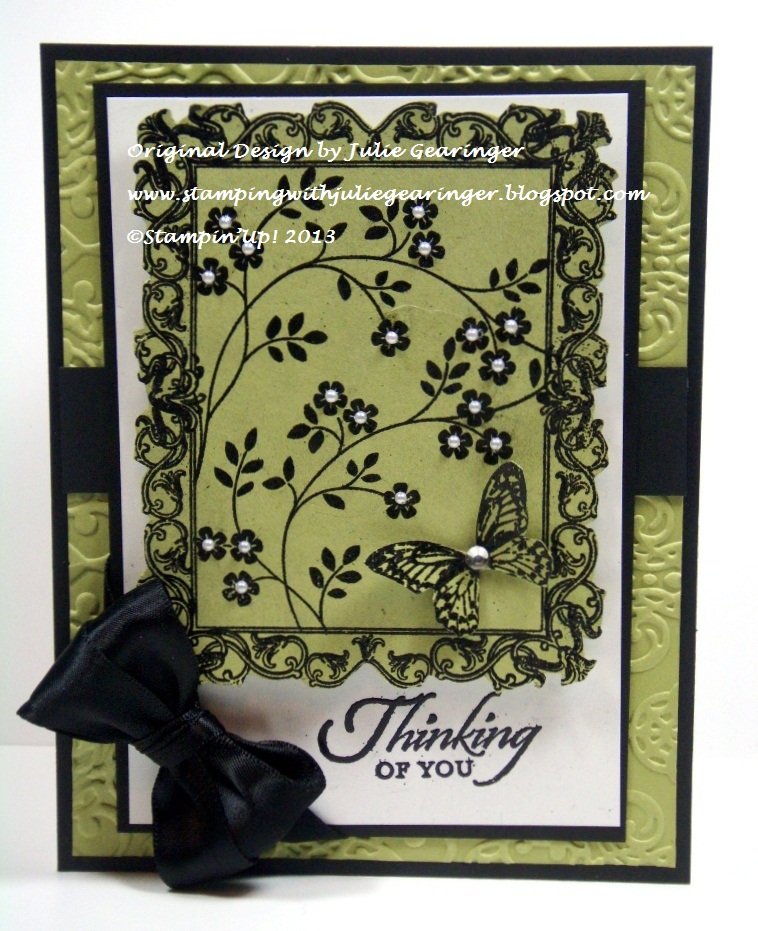
I wanted to create a card for this week’s DD57 Dynamic Duos Color Challenge and The Paper Players PP150CAS Add the Bling Challenge.  I love both of these weekly challenge sites and if you have not had a chance to do so, plan to visit each of them to see their wonderful Design Team samples as well as the other entries!

To create this card:

Using the Embossing Buddy®, de-static a piece of Pear Pizzazz cardstock and stamp the frame image and butterfly (on a separate piece of cardstock) from Papaya Collage using Versamark™ ink.  Apply Stampin’ Emboss® Black Embossing Powder and heat with the Heat Tool.   

Once cooled, mask the frame with sticky notes and repeat the above process with the floral spray image from Thoughts and Prayers.

On a piece of Whisper White cardstock, de-static and emboss the sentiment using the above steps as well.

Carefully cut out the frame and mount above the sentiment using Stampin’ Dimensionals®.

Add the fussy-cut butterfly along with the Rhinestone and Pearls to the center of the flowers.

Adhere the entire panel onto Basic Black cardstock and add the 5/8” Basic Black Satin Ribbon bow.

Use the Big Shot™ to emboss a piece of Pear Pizzazz cardstock with the retired Lacy Brocade Textured Impressions™ Embossing Folder and layer onto Basic Black cardstock.  Add the vertical Basic Black cardstock panel and the main focal image to finish off the card.

Stamp Sets: Papaya Collage, Thoughts & Prayers, Wetlands
Ink: Versamark™
Paper/Cardstock:  Whisper White, Basic Black, Pear Pizzazz
Accessories:  Big Shot™,  Lacy Brocade Textured Impressions™ Embossing Folder (retired), Embossing Buddy®, Stampin’ Write® Black Embossing Powder, Heat Tool, Pearls, Rhinestone, 5/8” Basic Black Satin Ribbon (retired)

Thanks again for visiting- I hope all of you have a wonderful Tuesday!!

Saturday, June 1, 2013

Imagine The Possibilities- A Vintage Graduation


Hi Stampers!

I needed another graduation card for a young lady that likes to read historical novels so I thought the retired set, Friendship’s Journey would be the perfect choice. 

To create this card:

Using the Embossing Buddy®, de-static a piece of Whisper White cardstock and stamp the image from Friendship’s Journey  and sentiment from Word Play using Versamark™ ink.  Apply Stampin’ Emboss® Early Espresso Embossing Powder and heat with the Heat Tool.   

Once cooled, color with the vintage girl image using Stampin’ Write markers- So Saffron, River Rock, Wild Wasabi, Crumb Cake, Blush Blossom, Bashful Blue, Elegant Eggplant, Wisteria Wonder and Perfect Plum. Distress the edges with the Distressing Tool and use a Sponge Dauber to apply Crumb Cake and Soft Suede Classic Ink to “antique” the paper.

Ink the vintage girl image with Crumb Cake Classic Ink and stamp over the sentiment.  Punch out using the 2 ½” Circle Punch and adhere a 2 ½” circle of Early Espresso cardstock behind the sentiment. 

Use the Big Shot™ to emboss a piece of Crumb Cake cardstock with the Lacy Brocade Textured Impressions™ Embossing Folder (ink the interior of the folder with Crumb Cake Classic Ink prior to embossing). 

Add the 5/8” Satin Ribbon triple ribbon bow and sentiment.   Adhere the focal image using Stampin’ Dimensionals®.  Add the Elegant Eggplant rolled flowers with Pearl centers to finish off the card.  

Stamp Sets: Friendship’s Journey, Word Play

Ink: Versamark™, Stampin’ Write Markers- So Saffron, River Rock, Wild Wasabi, Crumb Cake, Blush Blossom, Bashful Blue, Elegant Eggplant, Wisteria Wonder and Perfect Plum

Paper/Cardstock:  Whisper White, Early Espresso, Crumb Cake

Accessories:  Big Shot™,  Lacy Brocade, Vintage Wallpaper Textured Impressions™ Embossing Folder, Punches- 2 ½” Circle, 1 ¼” Scallop Circle (for rolled flowers), Embossing Buddy®, Stampin’ Write® Early Espresso Embossing Powder, Heat Tool, Pearls, 5/8” Satin Ribbon (from my stash)


Thanks again for visiting- I hope all of you have a great weekend!

Friday, May 31, 2013

CAS Doodling- A Quick and Easy Card

Hi Stampers! 

I decided to create a Clean and Simple (CAS) Card using this week’s Splitcoaststampers Way To Use It Challenge-  WT429 DoodleDefined (check out the gallery).  

I have not had a chance to doodle lately and decided to use the Stampin' Up! White Gel Pen on Midnight Muse cardstock to draw the flower and fill in the area with dots. 

 
Quick and easy- stamped the sentiment with Midnight Muse Classic Ink and extended the flourishes on the ends to create a larger tulip type image as well.

Layered with Stampin’ Dimensionals® and added a previously embossed panel (using the soon to be retired Lacy Brocade Textured Impressions™ Embossing Folder). 

Quick and easy-very relaxing, I will have to try this again soon!!  

­Stamp Sets: My Friend

Ink:  Midnight Muse, White Gel Pen, Stampin’ Write Marker- Midnight Muse

Paper: Whisper White, Midnight Muse

Accessories:  Big Shot™, Lacy Brocade Textured Impressions™ Embossing  Folder, Stampin’ Dimensionals®


Thanks again for dropping by!  Have a wonderful Friday!

Monday, May 20, 2013

10 Minute CAS Thank You Scrap Card :-)


Hi Again, Stampers! 

I decided to create a CAS Card using this week’s Stampin’ Royalty SR176 Colors along with the Splitcoaststampers SC422 Sketch .   

I hope you can take a moment to check out both sites- you will find terrific inspiration! 

Luckily, I was able to create this card using scraps that were already embossed, so it was a 10 minute card for me as well- love those scraps!:-) 
                                                                                               
To create this very easy CAS card:

Use the Big Shot™ with the Square Lattice Textured Impressions™ Embossing Folder to emboss a piece of Pool Party cardstock- trim down to 4” W x 5 1/4”H and mount onto a piece of Island Indigo cardstock.

Create the large flower with the Blossom Punch (already embossed the Calypso Coral cardstock with the Lacy Brocade Textured Impressions™ Embossing Folder)  and the center is two rolled flowers into one- the center is the 1 ¼” Scallop Circle Punch and the 1 ¾” Scallop Circle Punch- spiral cut around the scalloped circle toward the center, roll and glue the smaller one in the center of the larger rolled flower.  Adhere the double rolled flower center to the embossed blossom.

Add the DSP Panel, Tea Doily Paper Lace corner and the Scallop border along with the sentiment to finish off the card. 

­Stamp Sets: Because I Care (sentiment)

Ink:  Island Indigo

Paper: Whisper White, Pool Party, Island Indigo, Calypso Coral, Sycamore Street DSP

Accessories:  Big Shot™, Square Lattice and Lacy Brocade Textured Impressions™ Embossing  Folders, Punches- 1 3/4” Scallop Circle, 1 ¼” Scallop Circle, Blossom Punch, 1” Square Punch (for banner points), Pearl, Tea Lace Paper Doily


Thanks again for stopping by- have a great weekend!!

Sunday, May 19, 2013

Sunflower Prayers- A Sketch with a Color Challenge :-)


Hi Stampers! 

I hope you are having a great weekend so far!  I decided to stay up late (or early depending on your point of view:-) and create one more card.  This one incorporates the PalsPaper Arts PPA159 Sketch along with the Dynamic Duos DD53 Color Challenge.  Again, if you have not done so yet, please take a moment to stop by each site and check them out!

Whenever I use black lately, I find that I tend to gravitate towards either heat embossing, or in this case, my printer ink and My Digital Studio (MDS).  I love the crisp clean lines that you can get with the digital image plus as I studied the color combo, I knew that I had the perfect images already printed ready to go!!  Love using MDS for this very reason. 

To create this card:

Print the image from the Sunflower Background Brush stamp set (resize to approx. ½ the size of the actual stamp) and the sentiment from Thoughts and Prayers onto Whisper White cardstock. 

Carefully cut out the sunflower image and cut the petals apart to remove all of the white background. 

Use the Big Shot™ with the Lacy Brocade Textured Impressions™ Embossing Folder to emboss a piece of Pacific Point Designer Series Paper and a piece of Basic Black cardstock.  Lightly sand the Pacific Point DSP and cut into a 3 ½” square, mount onto Basic Black and again onto Whisper White cardstock. 

Use the Big Shot™ with the Adorning Accents Edgelit™ to cut two lacy edge pieces for the top and the bottom of the card and assemble per the sketch.

Add the 5/8” Basic Black Satin Ribbon bow along with the punched sentiment to finish off the card (the punch used is a sneak peek of the new Artisan Label Punch).  Add the Pearls to finish off the card.

Stamp Sets:  Sunflower (MDS), Thoughts and Prayers (MDS)

Ink: Printer Ink- Black

Cardstock: Whisper White, Basic Black, Pacific Point DSP

Accessories:  Big Shot™, Lacy Brocade Textured Impressions™ Embossing Folder, 5/8” Basic Black Satin Ribbon, Pearls, Artisan Label Punch

Thanks again for stopping by- have a wonderful day!!

Tuesday, May 7, 2013

SUO70- Friendly Butterflies


Hi Stampers! 

The SUO70Challenge is Anything Butterflies and we welcome all entries using Stampin’ Up! Only products!  So pull out those butterfly stamps,  punches, embosslits, dies and as in my case, My Digital Studio to create a project and come share with us!!

I decided to use My Digital Studio along with some of the new 2013-2015 In-Colors to create another card- I love the Swallowtail stamp brush and the fact that you can "re-size" the image! 

To create this “hybrid” card:

Using My Digital Studio (MDS), insert the Swallowtail image onto your 8.5 x 11 blank page and re-size into three different sizes.   Also insert the sentiment from Friendly Words and print out onto Whisper White cardstock. 

Carefully cut out each butterfly by hand and use a Sponge Dauber with the 2013-2015 New In-Colors (Coastal Cabana and Crisp Cantaloupe) along with So Saffron to pounce color onto the butterflies.

Use the Big Shot™ with the Apothecary Accents Framelit™ to create the label detail from Whisper White and Basic Black (cut the Basic Black layer in half vertically to layer behind the frame).  Emboss with the Big Shot™ and soon to be retired Lacy Brocade Textured Impressions™ Embossing Folder (I will miss this one so much!). 

Using the Big Shot™, position an Oval Framelit™ over the sentiment and a piece of Basic Black cardstock and cut both at the same time.  Adhere the sentiment to the Basic Black layer allowing a bit of the black to show as a frame. 

Use the Big Shot™ along with the Fancy Fan Textured Impressions™ Embossing Folder to emboss a piece of Coastal Cabana cardstock. 

Using Crisp Cantaloupe Classic Ink, repeatedly stamp the floral image from Bloomin’ with Kindness onto a piece of Crisp Cantaloupe cardstock. 

Layer the embossed/stamped pieces onto a piece of Basic Black and layer again onto the Whisper White card base.  Add a scrap strip of Basic Black cardstock to hide the seams of the Crisp Cantaloupe and Coastal Cabana layers.  

Add the Antique Brads to the focal layer (use the 1/16” Hand Held Punch or Paper Piercer Tool to punch the holes for the brads).  Position the sentiment and focal layer onto the  card and add the butterflies/pearls to finish off the card.   

Stamp Sets:  Bloomin’ with Kindness, Swallowtail (MDS), Friendly Words (MDS)

Ink: Printer Ink- Black, Crisp Cantaloupe, Coastal Cabana, So Saffron

Paper/Cardstock: Whisper White, Basic Black, Coastal Cabana, Crisp Cantaloupe

Accessories:  Big Shot™, Fancy Fan and Lacy Brocade Textured Impression ™Embossing Folders, Oval and Apothecary Accents Framelits™, Sponge Daubers, Antique Brads, Pearls

Thanks again for stopping by- I hope can come join us for the SUO70 Butterflies Challenge!!

Monday, April 15, 2013

Chalkboard with a Flourish- Two Challenges in One!


Hi Again Stampers! 

Wow- this may be a first for me (three posts in one day :))!  I wanted to create a card using the CQC184 ColourQ Challenge along with the Create with Connie and Mary CCMC247 Sketch Challenge.  Again, if you have the time, check out both sites for wonderful inspiration!
 
To create this card:

Use the Embossing Buddy® to de-static a piece of Basic Black  cardstock and stamp the image from Flowering Flourishes using Versamark™ ink.  Apply Stampin’ Emboss® White  Embossing Powder and heat with the Heat Tool.   

Once cooled, softly sponge White Craft ink over the image to give the appearance of erased chalk, color over the embossing with SU! Metallic Pencils and add shadows with the White Stampin’ Up! Watercolor Pencil.
 
Use the Dotted Scallop Ribbon Border Punch on a piece of Going Grey DSP to create the border in the sketch and adhere to the back of the panel.

Use the Big Shot™ to emboss a piece of Vellum  with the Lacy Brocade Textured Impressions™ Embossing Folder and adhere to the Blushing Bride layer using Two-Way Glue.

Mount the embossed Blushing Bride layer onto Basic Black cardstock and add the focal image with Stampin’ Dimensionals®.  

Create the rolled flowers using the 1 1/4” and 7/8” Scallop Circle Punches (just punch the scallops out of the Blushing Bride and Whisper White cardstock, cut wavy spirals using Paper Snips along the edges and spiraling towards the center, roll from the outside towards the center and adhere to the small piece of cardstock in the middle) - see the Splitcoaststampers’ tutorial here.

Add the Vellum sentiment banner and Pearls to finish off the card.

Stamp Sets: Flowering Flourishes, Kind & Caring Thoughts (retired Hostess set)

Ink: Versamark™, Basic Black, Craft White

Paper/Cardstock:  Whisper White, Basic Black, Blushing Bride, Going Grey DSP

Accessories: Big Shot™,  Lacy Brocade Textured Impressions™ Embossing Folder, Punches- 7/8” Scallop Circle, 1 ¼” Scallop Circle, Dotted Scallop Ribbon Border, 1” Square (for banner points; Embossing Buddy®, Stampin’ Emboss® White  Embossing Powder, Heat Tool, Pearls, Sponge, Stampin’ Up! Metallic Pencils (retired), Stampin’ Up! Watercolor Pencil- White

Thanks again for visiting- have a great evening!!
Related Posts Plugin for WordPress, Blogger...