Showing posts with label Graphic 45. Show all posts

Saturday, April 10, 2021

Rejoice in the Lord


Hi Friends!

Today I am sharing a pocket card designed using stamps, dies and paper from The Stamp Simply Ribbon Store.

I love Graphic 45 paper and the Blossom 8x8 paper pad has such beautiful designs!  This card uses a few cut-parts along with a green striped pattern that has a pink floral (see the inside of the card) on the reverse side.


As many of you that follow my blog know, I have a personal goal to create a card for each one of the over 800 Splitcoaststampers Sketch Challenges.  This card uses the SC03 Sketch for the layout  from 2005 (modified with the oval for the sentiment).  

I am also participating with the Simon Says Monday “Layer It” Challenge along with the Tic-Tac-Toe Challenge #108 Challenge (middle row down- Floral, Free, Any Shape Die).

If you have not had time to check out the Stamp Simply blog or the other challenge sites yet, I hope you will do so- gorgeous inspiration from all!

To create this card:


Cut the striped piece of Blossom designer paper to approx. 5 ¼” x 5 ¼”.  Trim off a 2” strip off the bottom of the panel, emboss the larger portion with the Darice Wire Fence embossing folder, lightly sand the embossing with a sanding block and distress the edges.

Mount onto a piece of 5 ½” x 5 ½” dark navy cardstock, distress the edges and set and adhere the entire card panel onto a 5 ½” x 11” dark navy cardstock base.

To create the pocket- adhere the 2” portion of the striped designer paper (cut from the step above) onto a piece of dark navy cardstock and distress the outside edges only. Add a strip of ivory Venise lace  (approx. 1” below the upper edge), adhere the border strip cut from the Blossom 8x8 paper pad to the top portion (this layer should cover the raw edge of the lace).   

Mount the pocket onto the embossed/layered front panel using adhesive only on the sides and bottom. Add a piece of sage twill ribbon, wrapping the ends behind the panel.

De-static a piece of Luxury Pearlescent Quartz Metallic 105# Cardstock with a
n embossing powder tool, ink the verse sentiment from He Has Risen with a black pigment ink, apply clear embossing powder and heat set with a heat tool.

Die cut the sentiment with the medium oval die from the Hemstitch Oval Dies, die cut another oval from dark navy cardstock, cut the navy oval in half, and adhere behind the sentiment oval.  Mount onto the pocket layer using adhesive only on the bottom half of the oval (to allow the pocket feature to function).

Trim two pieces of ivory cardstock to approx. 4” x 5 ¼”.  De-static each with an embossing powder tool, stamp the sentiments from Birthday Blessings with a pigment black ink, apply clear embossing powder and heat set with a heat tool.


Adhere to the inside of the card and use strips of the Blossom pink floral pattern to cover the edges (this is the reverse side of the green striped pattern). 

Die cut a small heart using the Farmhouse Pierced Nested Hearts dies from the striped pattern, add to the top of the upper inside layer and adhere a pearl to the center of the heart.

Trim the two cut-a-parts from the Blossom paper pad, mount onto dark navy cardstock and add a piece of ivory cardstock to the back (for journaling or adding a hand-written message).  

Tuck the two journaling cards into the front pocket, and to finish off the card, add a few pearls to the sentiment oval and upper left-hand corner of the card. 

Stamp Sets:  He Has RisenBirthday Blessings  (Stamp Simply

Ink/Mediums: Versafine Onyx Black

Cardstock/Paper:  Dark Navy, Ivory; Graphic 45 Blossom 8x8 Paper Pad, Luxury Pearlescent Metallic 105# Cardstock- Quartz White (6 ct)

Accessories/Tools: Gemini, Jr., Stamp Simply Steel Dies- Farmhouse Pierced Nested Hearts, Spellbinders Die- Hemstitch Ovals, Embossing Powder Tool, Sanding Block. Distressing Tool, Clear Embossing Powder, Heat Tool, Darice Embossing Folder- Wire Fence, Venise Lace .75”- Lucia Ivory by the Yard, Sage Twill Ribbon, Pearls  


Thanks again for taking the time to stop by! I hope I have inspired you to create something this weekend, sweet friends!


Tuesday, June 19, 2018

RRCB89 Time To Celebrate


Hi Friends!

Woohoo! Today I am Guest Designing for the Retro Rubber Blog Challenge #89 "X's and O's" Challenge! 

I love participating with the Retro Rubber Blog Challenge since you are required to use a stamp/stamp set that is at least one year old! This encourages me to use my retired stamps and I also generally use older paper and embellishments as well :-)

For this card, I chose the diagonal column, left to right (Romantic-DSP-Gems/Enamel Shapes) and I decided to pull out the older Graphic 45 stamp set, Time to Flourish Set #2 for the sentiment along with Graphic 45 Time to Celebrate designer paper.  I think Graphic 45’s papers are so gorgeous, they basically create the cards for you :-)

I also am incorporating the Sweet Sketch Wed 2 #138 Sketch Challenge into the design and will be linking to the Word Art Wednesday #338-#339 “Anything Goes”Challenge.

If you have not had a chance to visit the Retro Rubber Blog Challenge site yet, or the other challenge galleries, I would encourage you to do so- wonderful ideas and projects by all!

To create this card:

1). Ink the “Happy Anniversary” sentiment from the Graphic 45 Time to Flourish Set #2 with archival black ink, stamp onto white cardstock, apply clear embossing powder and heat set with a heat tool.  Trim the sentiment and create the banner end either by hand or with a punch. Mount onto espresso cardstock and trim close to the edge.

2). Using the “Celebrate” stamp from the same stamp set, ink with green ink and stamp onto a piece of green designer paper.  Distress the edges a bit and mount onto a piece of espresso cardstock.

3). Die cut the two smaller rectangle panels with stitched rectangle dies, mount onto espresso cardstock and mount onto the card front.

4). Trim the cut-a-way image from the Graphic 45 Time to Celebrate designer paper, mount onto espresso cardstock, trim close to the edge.  Add ½ of a white paper doily to the back of the image, mount onto the card front with dimensional foam.

5). Wrap the polished hemp twine pieces across the card front, wrapping the ends behind the panel.  Mount the entire panel onto the white card base.  Add the hemp twine bow with the button (I used hot glue to adhere).

6). Mount the sentiment to the card front and add three rhinestones to finish off the card.

Stamp Sets: Time to Flourish, Set 2 (Graphic 45)

Ink: Versafine™ Onyx Black

Paper: Whisper White, Early Espresso, retired Certainly Celery Designer Paper (all Stampin’ Up); Time to Celebrate Designer Paper(Graphic 45), misc. coral designer paper (not sure of manufacturer)

Accessories: Big Shot™, MFT Stitched Rectangle A2 Set 1 & 2 STAX Dies, Embossing Buddy®, Clear Embossing Powder, Heat Tool, Polished Hemp Twine, retired SU! button, Rhinestones

Thanks again for visiting- you are all such an encouragement to me!!  Hugs and I hope you can join us at the Retro Rubber Blog Challenge!

Wednesday, February 24, 2016

Up, Up and Away

Hi Friends! 

I hope you are having a great week so far!  This evening I had a chance to create a quick Clean and Simple (CAS) card for Joanne's PP283 Up, Up and Away Challenge at The Paper Players as well as the Splitcoaststampers’ Alphabet Challenge (B is for Balloons).

If you have not had a chance to visit the above sites, I hope you will find time to do so- wonderful inspiration from all!

To create this card:

Fussy cut the balloon images from the Graphic 45® World’s Fair 8x8 Designer Paper (Balloon Bouquet).

Use the Big Shot™ to die cut a piece of Very Vanilla with the My Favorite Things® (MFT) Stitched Rectangle STAX Die and emboss a piece of Very Vanilla cardstock with the Lacy Brocade Textured Impressions™ Embossing Folder.

Trim the embossed panel and mount onto the Tangelo Twist card base.

Adhere the smaller balloons directly to the stitched rectangular die cut (I used Tombow Multipurpose Adhesive) and add the larger balloon using dimensional foam.

Prepare a piece of Tangelo Twist cardstock with the Embossing Buddy®, ink the sentiment from Six-Sided Sampler with Versamark™ Ink, stamp onto the prepared cardstock, apply Stampin’ Emboss® Winter White Embossing Powder and heat set with the Heat Tool.

Trim the “Hello” from the sentiment and create the banner points with the Hexagon Punch.

Mount the rectangle die onto the card front using dimensional foam and add the sentiment to the larger balloon image to finish off the card.

Stamp Sets:; Six-Sided Sampler  (Stampin’ Up!)

Ink: Versamark™

Paper: Very Vanilla, Tangelo Twist, Graphic 45® World’s Fair Designer Paper

Accessories: Big Shot™, Lacy Brocade Textured Impressions™ Embossing Folder (retired), MFT Stitched Rectangle STAX Dies, Embossing Buddy™, Stampin’ Emboss® Winter White Embossing Powder (retired), Heat Tool, Hexagon Punch


Thanks again for stopping by!!  Have a fabulous week, my friends!

Saturday, February 6, 2016

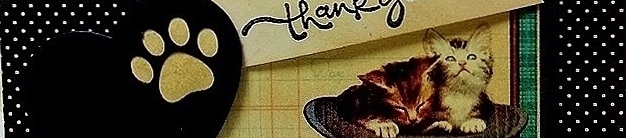
Mojo337 Purr-fect Thank You :-)


Hi Friends!

I am working on a few pet themed cards for a card drive at Splitcoaststampers and decided to use the Mojo337 Sketch for the layout.

I love this sketch- it was fun to work with and you should see all of the gorgeous examples in their gallery!

Bermuda Bay is another color that seems a bit difficult to photograph- it
is not as bright blue/turquoise as it appears here :-)
To create this card-  emboss a piece of Bermuda Bay cardstock with the Darice® Paw Print Background Embossing Folder, trim and mount onto Basic Black cardstock, add the Graphic45® Raining Cats and Dogs designer paper to the stitched Basic Black frame, add the strip of polka dot paper along with the framed designer paper, sentiment and paw print heart and you are finished!

Stamp Sets: Short & Sweet (retired Stampin’ Up!)

Ink: Stāz-On® Jet Black, Ranger® Tim Holtz® Old Paper Distress Ink

Paper: Very Vanilla, Basic Black, Bermuda Bay; Graphic45® Raining Cats and Dogs

Accessories: Big Shot™, Darice® Paw Prints Background Embossing Folder, My Favorite Things© (MFT) Pet Accents Dies,  MFT Blueprints 20 Die, Hexagon Punch


Thanks again for taking the time to stop by- hugs and have a great week, my friends!

Thursday, August 13, 2015

Vintage Golf with Graphic 45 Good Ol' Sport

Hi Again Stampers!   

Here is the second card that I created for the CCEE1532 “NationalGolf Month” Theme Challenge and I also incorporated the Splitcoaststampers’ SC548 Sketch Challenge (see gallery here). 

Again, as I mentioned in my previous post, I do not own any golf stamps so I decided to incorporate Graphic 45™ Good Ol’ Sport Collection Designer Paper.  It may be a bit difficult to see but the lady in the front has some golf clubs so I hope this will qualify as a golf themed card :-)

If you have not visited the above challenge sites yet, I encourage you to do so- tremendous inspiration from all!

This card was fairly simple to create:

Use the retired  Distressing Tool to distress the edge of the Newsworthy Designer Paper, mount onto Basic Black cardstock, trim and mount onto Wild Wasabi cardstock, trim and mount onto the Cajun Craze card base and apply Ranger® Tim Holtz® Tea Dye Distress Ink to “antique” the paper with a sponge applicator. 

Trim the Touchdown cutaway and mount onto Basic Black cardstock and add the retired Baked Brown Sugar Thick Baker’s Twine to the corners.

Stamp the sentiment from Teeny Tiny Wishes using Memento™ Tuxedo Black Ink onto Very Vanilla cardstock, punch out with the retired Word Window Punch, add the banner ends using the Hexagon Punch and apply Ranger® Tim Holtz® Tea Dye Distress Ink to “antique” the paper.

Mount the sentiment onto Basic Black cardstock, trim and create the banner points with the Hexagon Punch and adhere to the focal image panel.

Create the angled panel (per the sketch) using the reverse side of the Graphic 45™ Newsworthy Designer Paper layered onto Basic Black, Wild Wasabi and Cajun  Craze cardstock.

Add a scrap piece of embossed Wild Wasabi cardstock layered onto Basic Black to the center.

Add the angled layer to the card front and mount the focal image using Stampin’ Dimensionals® to finish off the card.

Again, quick and easy since the Graphic 45™ paper does most of the work for you!!
Stamp Sets: Teeny Tiny Wishes
Ink:  Memento™ Tuxedo Black Ink, Ranger© Tim Holtz® Tea Dye Distress Ink
Paper/Cardstock:  Very Vanilla, Basic Black, Cajun Craze, Wild Wasabi; Good Ol’ Sport (Graphic 45™)
Accessories:  Big Shot™, retired Square Lattice Textured Impressions™ Embossing Folder, Hexagon Punch, retired Distressing Tool, Sponge Applicator, retired Baked Brown Sugar Thick Baker’s Twine

Thanks again for visiting- I hope all of you have a fantastic day and I will be sharing a few more cards later this evening  :-)

CCEE1532 National Golf Month with Graphic 45™

Hi Again Stampers!   

Last night I had a chance to play in my craft room and decided to create a few cards using the CCEE1532 “National Golf Month” Theme Challenge. 

Since I do not own any "golf" stamps, I decided to incorporate Graphic 45™ Good Ol’ Sport Collection Designer Paper.  

I just love the Graphic 45™  vintage style images but when my husband looked at the card, he said “The lady has a tennis racket, not a golf club” and I told him, “But the man has golf clubs” so hope this qualifies as a golf themed card- lol!!

If you have not visited the CCEE Challenge site yet, I encourage you to do so- marvelous inspiration from all!

The Graphic 45™ paper does most of the work so this card was fairly simple to create:

Distress the edge of the Newsworthy Designer Paper using the Distressing Tool,  mount onto Night of Navy cardstock, trim and mount onto the Wild Wasabi card base and apply a bit of Ranger® Tim Holtz® Tea Dye Distress Ink to “antique” the paper with a sponge applicator. 

Trim the Touchdown cutaway and mount onto Night of Navy and Wild Wasabi cardstock.  Create the banners using the Banner Punch and adhere the banners at the bottom of the panel.

Ink the retired French Foliage script stamp using Ranger® Tim Holtz® Tea Dye Distress Ink and stamp onto the panel and add the postage mark stamp using Memento™ Tuxedo Black Ink.

Stamp the sentiment from the retired Kind & Caring Thoughts using Memento™ Tuxedo Black Ink onto Very Vanilla cardstock and add the splatter from Gorgeous Grunge using Ranger® Tim Holtz® Tea Dye Distress Ink onto the sentiment and focal image panel.

Trim the sentiment and create the banner points with the Hexagon Punch, mount onto Night of Navy cardstock and create the points again with the Hexagon Punch.

Use the Big Shot™ with the retired Square Lattice Textured Impressions™ Embossing Folder to emboss a piece of retired Poppy Parade cardstock, distress the edges with the Distressing Tool and Ranger® Tim Holtz® Tea Dye Distress Ink.

Mount onto Night of Navy cardstock and adhere to the card front.

Add the red grosgrain ribbon loops to the focal image panel and mount the panel to the card front using Stampin’ Dimensionals®.

Mount the sentiment to finish off the card. 
Stamp Sets: Gorgeous Grunge, French Foliage and Kind & Caring Thoughts (both retired),
Ink:  Memento™ Tuxedo Black Ink, Ranger© Tim Holtz® Tea Dye Distress Ink
Paper/Cardstock:  Very Vanilla, Night of Navy, Wild Wasabi, retired  Poppy Parade; Good Ol’ Sport (Graphic 45™)
Accessories:  Big Shot™, retired Square Lattice Textured Impressions™ Embossing Folder, Punches- Banner and Hexagon; Distressing Tool, Sponge Applicator, ¼” Red Grosgrain Ribbon (from my massive ribbon stash)

Thanks again for stopping by- I hope all of you have a fabulous day and I will be sharing another golf themed card shortly :-)
Related Posts Plugin for WordPress, Blogger...