Showing posts with label Banner Punch. Show all posts

Sunday, November 22, 2015

Wetlands- Happy 55th Birthday!!

Hi Friends!!

I had a chance to stamp today and decided to create a card for my brother (today was his birthday so this card will be late...I hope he does not check my blog and see it before receiving it :-)).  
I decided to use the Mojo Monday 424 Sketch Challenge along with the Nacho Average #168 Color Challenge and the Seize the Birthday 11/19/15 “Anything Goes” Challenge.

 Again, if you have not already visited the above sites, I hope you will take a moment to do so- wonderful inspiration from all!

This card is very easy to create:  

Stamp the Canadian goose image using Stāz-On® Jet Black Ink onto Whisper White cardstock, mask the goose and create a moon mask with a 1 1/4" Circle Punch (from scrap paper), place the masks over the goose and where you would like your "moon" and use a Sponge Dauber to apply Rich Razzleberry Classic Ink. 

Remove the masks and use an AquaPainterc to soften your sponged area and pulling some of the ink over the moon.

Use an Old Olive Stampin’ Write Marker to color the grass and the Big Shot™   with the MFT Stitched Rounded Rectangular Dies to cut out the image and cutting another die from Early Espresso cardstock.

Cut the Early Espresso die cut in half and adhere behind the goose image.

Use the Big Shot™   with the Arrows Textured Impressions™  Emobssing Folder to emboss a piece of Whisper White cardstock, trim and mount onto Old Olive cardstock, trim and mount onto the Early Espresso card base.

Use the banner punch to create a few banners from retired Old Olive and Rich Razzleberry Designer Series Paper (DSP) and also cut a strip of Old Olive DSP (mount onto Early Espresso cardstock).

Add the vertical Old Olive striped strip and banners to the card front.

Pull the 1 1/2" Burlap Ribbon into threads and adhere behind the goose image area, mount the goose image panel onto the card front using Stampin' Dimensionals®.

Stamp the sentiment onto a piece of Whisper White cardstock, punch out with the 2" Circle Punch and create a frame from the 2" Circle Punch from Early Espresso cardstock (cut this frame in half and mount behind the sentiment).

Create the numbers from Early Espresso cardstock using the retired GoGo Boots™  Sizzlets™ , spray with Champagne Mist Shimmer Paint and when dry, mount onto a 1 1/4" Punched Circle.

Add the sentiment with the numbers along with the retired Hodgepodge Hardware Clip to finish off the card.

***Optional ****  I felt that the card was a bit too "white" so I applied a bit of Ranger™ Tim Holtz™ Old Paper Distress Ink (plus this helped cover a bit of the glue around the numbers :-))

Stamp Sets:  Wetlands

Ink:  Stāz-On® Jet Black, Early Espresso, Rich Razzleberry; Stampin’ Write Markers- Old Olive, Basic Gray; Ranger™ Tim Holtz™ Old Paper Distress Ink

Paper: Whisper White, Early Espresso, Old Olive, retired Old Olive and Rich Razzleberry DSP

Accessories: Big Shot™ , Arrows Textured Impressions™  Embossing Folder, GoGo Boots™  Sizzlets™ , Punches- Banner, 2" and 1 1/4" Circle; 1 1/2" Burlap Ribbon, Hodgepodge Hardware Clip, Sponge Daubers, AquaPainter™

Thanks again for stopping by- have a wonderful week, my friends!

Friday, August 21, 2015

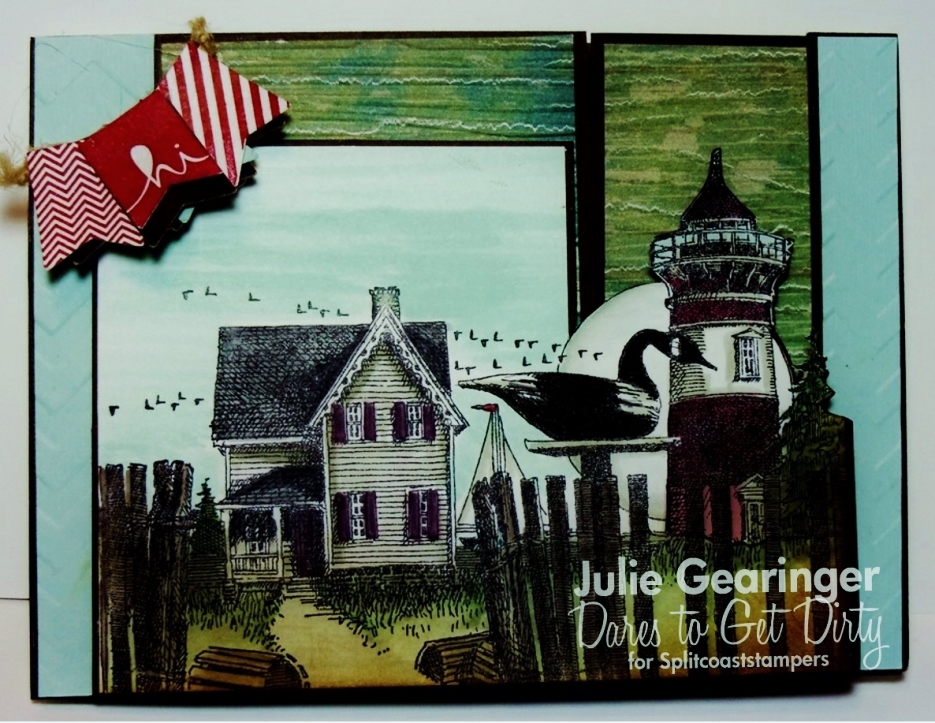
DTGD15dinib- Seashore Hello

Hi Stampers!!

Even though the official 2015 Dare to Get Dirty Challenge is now over, I wanted to share another card that I created as a sample maker for my good friend, Dina’s  DTGD15dinib Challenge (FYI- you can still create cards throughout the year and link to the challenges although the official challenge is over and you would not be eligible for the drawing for the vendor prizes) :-)

As I mentioned in my previous posts, Dare to Get Dirty is an annual event that allows the Splitcoaststampers’ Fan Club members to participate in several challenges hosted by the Dirty Dozen Girls (current and alumni, like me) in creating cards but also the possibility to receive prizes from the member companies (if interested in more details, please see the beginning of this post). 

Again, one major rule of participation in the Dare To Get Dirty Challenges is that the actual challenge details are secret to all except the Fan Club Members…I can share the card but not the details on the actual challenge (unfortunately, any details on this card will reveal the challenge details, so if you have any questions, please let me know in the comment area).  

It is hard to see in the photo, but this card has a modified Gate Fold and I have decorated the inside as well :-)

Stamp Sets: Banner Blast, Lighthouse with Decoy (Impression Obsession)
Paper:  Whisper White, Early Espresso, Soft Sky, retired This and That Epic Day DSP

Ink: Stāz-On® Jet Black Ink, Cherry Cobbler, Soft Sky, Wild Wasabi, Stampin' Write Markers- Smoky Slate, Early Espresso, Baked Brown Sugar, Basic Black

 
Accessories: Big Shot™, Woodgrain Textured Impressions™ Embossing Folder, AquaPainter™, Banner Punch, Natural Twine, Sponge Dauber


Thanks again for visiting! I still have one final DTGD15 Hostess Sample card to share (hopefully within the next few days)....Have a great weekend, my friends!

Thursday, August 13, 2015

Traveler Locomotive with a Color and Sketch Challenge :-)


Hi Again Stampers!!

I am trying to catch up my postings for my blog and will be sharing several cards throughout the day that I have created for the Splitcoaststampers' Dare To Get Dirty Challenges as well as a few for some of my favorite online challenges. 

This card was created for The Paper Players Claire's PP257 Color Challenge using the RetroSketches RS176 Challenge (love both of these weekly challenge sites!) :-)

Again, if you have not already done so, I hope you will find the time to visit the above sites to check out the wonderful Design Team samples as well as their challenge galleries!

This card was fairly easy to create but took a bit of time with the layering.

Stamp the locomotive image from Stampin' Up! Traveler using Stāz-On® Jet Black Ink, watercolor with an AquaPainter™ along with Bermuda Bay and Old Olive Classic Ink, add color to the train using the Stampin' Write Crumb Cake marker, die cut the image and mount onto cardstock layers, emboss a few pieces of cardstock with the Woodgrain Textured Impressions™ Folder, create some banners with the Banner Punch and layer onto Basic Black banners (also created with the banner punch), add the sentiment using the Hexagon Punch for the banner points and finish by layering all to the card front.

Stamp Sets: Traveler, Teeny Tiny Wishes

Ink: Stāz-On® Jet Black, Bermuda Bay, Old Olive; Crumb Cake Stampin’ Write Marker

Paper: Very Vanilla, Bermuda Bay, Basic Black, Crumb Cake, Old Olive; Typeset Designer Series Paper

Accessories: Big Shot™,  Square Collection Framelits™, Woodgrain Textured Impressions™ Embossing Folder, AquaPainter™, Punches- Banner (for banners), Hexagon (for sentiment banner), Envelope Punch Board (for corner rounder);  Natural Linen Thread, Pearls, retired Antique Copper Hodgepodge Hardware Clip (still have a bunch of this in stock-lol!)


Thanks again for taking the time to stop by- I hope all of you enjoy the rest of the week!  

Friday, June 19, 2015

JUN15VSNI Happy Together with Betsy the Beekeeper :-)


Hi Again Stampers!!

This card was created for the Splitcoaststampers’ Virtual Stamp Night JUN15VSNI “Happy Together” Challenge (see details here and gallery here) using the CC535 Color Challenge- Bermuda Bay, Daffodil Delight and Rich Razzleberry with dessert to add a punched or die cut element  (see details here and gallery here) as well as the SC540 Sketch Challenge (see details here and gallery here).

Woohoo!!  I was able to incorporate all of the nine elements for this “recipe” challenge and pulled out one of my favorite retired stamp sets, Betsy the Beekeeper (just love this gal with her honey hive and jars :-)).

Again, if you have not already done so, I hope you will find the time to visit the above sites to check out the wonderful Design Team samples as well as the galleries!

To create this card:

Ink the retired stamp image, Betsy the Beekeeper using Stāz-On® Jet Black Ink onto Whisper White cardstock.

 Using an AquaPainter™, apply Rich Razzleberry Classic Ink to her dress and use Stampin’ Write Markers-  Bermuda Bay, Daffodil Delight, Rich Razzleberry and Sahara Sand  (for shadows) to finish coloring the image.

Use a sponge dauber with the Mini Punchenella stencil by Balzar Designs to add Daffofil Delight with the Honeycomb portion of the stencil to the background.

Trim the image and mount onto a piece of Bermuda Bay cardstock.
Trim a piece of retired International Bazaar Designer Series Paper (DSP) and mount onto a piece of Bermuda Bay cardstock.

Create the Whisper White square card base and adhere a piece of retired Rich Razzleberry DSP (solid color from a retired Hostess Level I selection years ago) and add the 5 ¼”  x 5 ¼” square of  retired Beyond the Garden DSP.

Adhere a paper doily to the background (I used a Royal Lace 6” diameter doily from my stash) and add the DSP on an angle per the sketch.

Add a few pieces of Rich Razzleberry ¼” Grosgrain Ribbon loops to the side of the focal image and adhere the Bermuda Bay Sequins (cut from the Bermuda Bay Sequin Trim) to the side of the card near the ribbon and add the Pink Rhinestones to the centers of the sequins as well as the flowers on her dress (the pink rhinestones were from a retired Stampin’ Up!  Flower cardstock sticker pack- sorry, I do not recall the name:-)). 

Add the focal image to the card front using Stampin’ Dimensionals®.

Add the strip of Rich Razzleberry cardstock with Stampin’ Dimensionals® and adhere the Rich Razzleberry bow (created with the Bow Builder Punch) along with the retired Daffodil Delight button.

Close up of Betsy the Beekeeper :-)
Stamp the sentiment with using Stāz-On® Jet Black Ink onto Whisper White cardstock.

Use the retired Word Window Punch to punch out the sentiment, create the banner points using the Banner Punch and adhere to a strip of Bermuda Bay cardstock (also creating banner points with the Banner Punch).

Mount the sentiment to the card front using Stampin’ Dimensionals® to finish off the card.

Stamp Sets: Betsy the Beekeeper, Moon Lake (sentiment)

Ink: Stāz-On® Jet Black, Rich Razzleberry; Stampin’ Write Markers- Bermuda Bay, Daffodil Delight, Rich Razzleberry, Sahara Sand

Paper: Whisper White, Bermuda Bay, Rich Razzleberry; retired International Bazaar, Beyond the Garden and Hostess Level I Pack DSP; Royal Lace 6” diameter Paper Doily

Accessories: Punches- Banner, Bow Builder, retired Word Window; Sponge Dauber, Bermuda Bay SequinTrim, retired Daffodil Delight button, retired Rich Razzleberry ¼” Grosgrain ribbon, retired Pink Rhinestones, Mini Punchenella stencil by Balzar Designs


Thanks again for taking the time to visit- I have one more VSN card to upload and  will do so shortly :-) 

Hugs and have a wonderful weekend, my friends!

Thursday, May 28, 2015

Perfect Peacock Thanks- A Sketch, Color and Photo Inspiration Challenge :-)


Hi Stampers! 

I have been busy creating Thank You cards this week and wanted to share this one that was designed using the FMS188 Freshly Made Sketches Challenge along with  the CQC292 ColourQ Challenge and Just Us Girls #294 Photo Week Challenge.

If you have not had a chance to do so, I hope you will find the time to visit all three of the challenge sites- each one has a fantastic Design Team as well as inspiration from their galleries!

To create this card:

Trim a piece of Whisper White cardstock and mount onto a piece of Tangerine Tango cardstock, trim and mount onto the Coastal Cabana card base.

Ink the Perfect Peacock stamp using Stāz-On® Jet Black Ink and stamp onto Whisper White cardstock.

Color the upper two thirds of the image using an AquaPainter™ with Classic Ink from the Coastal Cabana, Daffodil Delight, Strawberry Slush and Tangerine Tango pads and use the same colors in Stampin’ Write Markers to add definition.  ***Note- I used Daffodil Delight first, then Coastal Cabana for the leaves :-)) ***

Add a few white highlights with the White Gel Pen and shadows with the Sahara Sand Stampin’ Write Marker.

Cut the panel for the sketch and mount onto Tangerine Tango cardstock, trim and mount onto Coastal Cabana cardstock.

Create the banners from retired Eastern Elegance and Quatrefancy Designer Series Paper (DSP) using the Hexagon and Banner Punches for the banner points. 

Mount onto Tangerine Tango cardstock and create matching points with the punches and adhere behind the peacock panel.

Stamp the sentiment onto Whisper White cardstock using Stāz-On® Jet Black Ink, punch out with the Word Window Punch and create the banners with the Banner Punch.

Adhere  the sentiment to a knotted piece of Coastal Cabana Thick Baker's Twine and mount onto the peacock focal image panel (I used Hot Glue for both of these steps:-)).

Mount the focal image panel onto the card front using Stampin’ Dimensionals® to finish off the card.

Stamps: Perfect Peacock, Teeny Tiny Wishes

Ink: Coastal Cabana, Daffodil Delight, Strawberry Slush, Tangerine Tango; Stampin’ Write Markers- Coastal Cabana, Daffodil Delight, Sahara Sand, Strawberry Slush, Tangerine Tango; White Gel Pen

Paper: Whisper White, Coastal Cabana, Tangerine Tango; retired Eastern Elegance and Quatrefancy DSP

Accessories: AquaPainter™, Punches- Banner and Hexagon, Coastal Cabana Thick Baker’s Twine


Thanks again for visiting- I will share a few more cards throughout the week.  I hope you have a fabulous weekend, my friends!!

Saturday, May 16, 2015

The Earth Laughs in Flowers- Seasonal Shelves with Two Challenges :-)


Hi Stampers!!

I wanted to create a card using the CQC291 ColourQ Challenge along with the Freshly Made Sketches FMS186 Sketch Challenge.

When I saw the cute chicken in the inspiration photo from the ColourQ, I thought of a neglected retired set, Seasonal Shelves and decided to give it some  "love"  :-)

 Again, I hope you will take the time to visit the above sites- both sites have fabulous Design Team creations as well as the wonderful galleries!

To create this card:

Use the Big Shot™ with the Honeycomb Embossing Folder to emboss a piece of Whisper White cardstock, trim and mount onto a piece of retired Poppy Parade cardstock, trim and mount onto the Whisper White card base.

Cut a piece of retired Gumball Green Designer Series Paper (DSP) on a diagonal, adhere to the card front and add a scrap piece of Poppy Parade cardstock to cover the seam of the DSP.

Ink the retired stamp from Seasonal Shelves using Stāz-On® Jet Black Ink and stamp onto a piece of Whisper White cardstock.

Color the image using Stampin’ Write Markers- Hello Honey, retired Bordering Blue, Gumball Green and Poppy Parade and the Sahara Sand Stampin’ Write marker to add shadows.

Fussy cut the image and use a foam brush to apply Mod Podge® to the entire image.  

Allow the Mod Podge® to dry and mount the focal image onto a piece of Moonlight DSP, trim and mount onto a piece of retired Poppy Parade cardstock.

Ink the sentiment banner with the Poppy Parade Stampin’ Write marker and punch the image out with the Banner Punch.  Punch another banner from the Moonlight DSP and adhere behind the focal image.

Add the focal image to the card front with Stampin’ Dimensionals®.
Use the Bow Builder Punch to create the paper bow from retired Poppy Parade cardstock and add the Hello Honey button with Natural Linen Thread to the center.

Mount the bow onto card front to finish off the card.

Stamp Sets: Seasonal Shelves, Banner Blast

Ink: Stāz-On® Jet Black, Stampin’ Write Markers- Hello Honey, Sahara Sand, retired Bordering Blue, Gumball Green, Poppy Parade

Paper: Whisper White, retired Poppy Parade, Moonlight DSP, retired Gumball DSP

Accessories: Big Shot™, Honeycomb Textured Impressions™ Embossing Folder, Punches- Bow Builder, Banner; Foam Brush, Mod Podge®, Hello Honey button, Natural Linen Thread


Thanks again for taking the time to stop by- it is such an encouragement to me!  Have a wonderful weekend, my friends!

Tuesday, February 24, 2015

SUO117 Hello There Teen Card

Hi Stampers!   

It’s time for the new SUO117 “Just for Teens” Challenge and I decided to create a card using the new hostess set, Time to Celebrate along with a Project Life® by Stampin’ Up! Everyday Adventure project card as the base for the images.  

Not sure if a teen would like this card but I think the bird image in this set is so cute!

I was also inspired by the Splitcoaststampers "Try A New Technique" TLC520 Embossing Folder Stamping Challenge- see their gallery here.   I did use the embossing folder to stamp the chevron on the right hand side of the bird image :-)

I hope you will find the time to check the both challenge sites and create your own Stampin’ Up! Teen Card to join in on the fun!

To create this card:
Use the Big Shot™ with the Zig Zag Textured Impressions™  Embossing Folder to emboss a piece of Whisper White cardstock, trim and mount onto a piece of Strawberry Slush cardstock, trim and mount onto the Bermuda Bay card base.
Using the card from the Project Life® by Stampin’ Up! Everyday Adventure set, stamp the bird and sentiment from the hostess set, Time to Celebrate using Memento™ Tuxedo Black Ink.
Color the bird using Stampin’ Write Markers- Bermuda Bay, Crushed Curry and Rose Red (I could not locate my Strawberry Slush marker- oops!) :-).   Use the Crumb Cake Stampin’ Write marker to add shadows around the bird, circle border, arrow and the sentiment box. 
Ink the large splatter image from Gorgeous Grunge with Crumb Cake Classic Ink and stamp over the bird and sentiment images. 
Ink the interior of the Chevron Textured Impressions™ Embossing Folder using Rose Red Classic Ink and spritz with a bit of water.  Create a mask for the circle and sentiment box on the Project Life® card and lay the inked/spritzed part of the embossing folder face down onto the masked card to “stamp” the chevron. 
Trim the Project Life® panel and round the top right hand corner using the 3/8” Project Life® Corner Rounder Punch.  Use the 2 ½” Circle Punch to punch out a portion of the top left had corner. 
Mount the panel onto a piece of Strawberry Slush cardstock, round the top tight hand corner and remove part of the top left hand corner using the same punches as above.
Create the banner using the Banner Punch punching pieces from Bermuda Bay and Strawberry Slush cardstock as well as the retired Eastern Elegance Designer Series Paper (DSP).
Using a Craft Mat with a Hot Glue Gun, adhere the banners together in an arch form and add the Bermuda Bay Sequin Trim to cover the glued edges.
Using the same papers as above, add a few banners to the lower right hand side of the panel as well.
Mount the panel to the card front using Stampin’ Dimensionals® and add a few Rhinestones near the sentiment to finish off the card. 
Stamp Sets:  Time to Celebrate, Gorgeous Grunge
Ink: Memento™ Tuxedo Black Ink, Crumb Cake and Rose Red Classic Ink; Stampin’ Write Markers- Bermuda Bay, Crushed Curry, Rose Red, Crumb Cake
Paper/Cardstock: Whisper White, Bermuda Bay, Strawberry Slush; Everyday Adventure Project Life® by Stampin’ Up!, retired Eastern Elegance DSP
Accessories: Big Shot™, Chevron and Zig Zag Textured Impressions™ Embossing Folders,  Banner Punch, Rhinestones, Bermuda Bay Sequin Trim

Thanks again for taking the time to visit – I hope that you will join in on in on the fun with your Stampin’ Up! Only creations and create your own “Just for Teens” project!

Sunday, January 18, 2015

Nautical "Hi"- A Color and Sketch Challenge :-)

Hi Stampers! 

I had a chance to create another quick card for the PalsPaper Arts PPA236 Sketch Challenge (I flipped the sketch on its side) along with the Colour Me! CMCC54 Challenge.

The colors reminded me of a Nautical Theme so I decided to pull out one of my favorite current sets, Traveler and create a slightly masculine card :-)

Again, if you not have already visited either site yet, I hope you will find the time to do so- wonderful ideas from all!
 
To create this Clean and Layered (CAL) card:

Use the Big Shot™ along with the Stylish Stripes Textured Impressions™  Embossing Folder to emboss the Pacific Point striped piece of retired High Tide Designer Series Paper (DSP).  Trim the panel and mount onto a piece of Pacific Point cardstock, trim once more and mount onto the Real Red card base.

Add the vertical panels created from Maritime DSP mounted onto Pacific Point and Real Red cardstock strips.  Add the center strip of Pacific Point cardstock.

Stamp the ship image using Pacific Point Class Ink onto Whisper White cardstock, color using an AquaPainter™ with Pacific Point Classic Ink and add more detail with the Stampin’ Write Pacific Point and Real Red markers.

Trim the focal image panel and mount onto Pacific Point cardstock, trim again and mount onto Real Red cardstock.  Add the Real Red Photo Corners (created from the retired Photo Corner Punch trimming the corners to scale) and the retired Silver Brads to the corners.

Stamp the banners using Real Red Classic Ink onto Whisper White cardstock and punch out using the Banner Punch.  Add the banners to the back of the focal image panel.

Adhere the focal image panel to the card front using Stampin’ Dimensionals® to finish the card.

Stamp Sets: World Traveler, Banner Blast

Ink: Pacific Point, Real Red Classic Ink;  Stampin’ Write markers- Pacific Point, Real Red

Paper: Whisper White, Pacific Point, Real Red, Maritime DSP, retired High Tide DSP

Accessories: Big Shot™, Stylish Stripes Textured Impressions™ Embossing Folder, Punches- Banner and Photo Corner; retired Silver Brads


Thanks again for stopping by- I hope you are having a terrific weekend!  

Monday, August 18, 2014

CC492 Happy Birthday Cake :-)

Hi Stampers!

Time for another Color Challenge at Splitcoaststampers!!  This week’s CC492 Challenge is to useChocolate Chip, Pretty In Pink and So Saffron and the dessert option is “Dessert”- cupcakes, cakes, pies, cookies, etc. 

I find that when I start working with specific colors, I generally stamp several images and create a few cards…this week, I decided to opt for “dessert” on two of the three cards that I created and will be sharing the others later this week :-)

The first card is also a birthday card so I have entered it into the Seize theBirthday “Anything Goes” Challenge.   Again, I hope you will take the time (if you have not done so already) to visit both sites and check out all of the Design Team entries as well as the galleries- wonderful designs and inspiration from all!!

To create this card:

Use Stampin’ Write Markers- Chocolate Chip, So Saffron and retired Pretty In Pink to color the retired Birthday Cake a la carte stamp.  

Stamp the image onto Whisper White cardstock and I decided to use a .005 Sakura Pigma Micron™ pen to outline the stamp image after stamping (and added a few details to the cake stand).

Trim the image to 1 ½” wide and insert the top of the paper into the new Note Tag Punch and punch the top (have the punch area facing you and insert the image down into the punch in order to only stamp the top portion).  Rotate the paper and punch the bottom as well. 

Punch another Note Punch from Chocolate Chip cardstock, cut this tag in half and adhere to the back of the stamped image at the top and bottom (the finished card, you cannot see the bottom so you could omit that layer).

Use the Big Shot™ with the Chevron Textured Impressions™ Embossing Folder to emboss the So Saffron and Pretty In Pink Designer Series Paper (DSP- retired Stampin’ Up!). Trim and layer onto a piece of Chocolate Chip cardstock.

Adhere a retired Pretty In Pink button to the center of the 5/8” Satin Ribbon bow and add to the card front to hide the seam (I added a small strip of Chocolate Chip cardstock to the center to mimic thread).

Add the cake image using Stampin’ Dimensionals® to the card front.  Stamp the sentiment from Happiest Birthday Wishes using Chocolate Chip Classic Ink onto Whisper White cardstock.  Use the Hexagon Punch to create the banner points and mount onto Chocolate Chip cardstock (creating the banner points with the punch as well).

Punch the little banners from the coordinating DSP using the Banner Punch.   Arrange onto a piece of White Baker’s Twine (I use Hot Glue to attach to the twine) and add to the upper corner of the card front. 


Attach a portion of a White Tea Lace Doily to the upper corner and add the buttons along the banner to finish off the card.

Stamp Sets: Birthday Cake, Happiest Birthday Wishes (both retired)

Ink:  Chocolate Chip, Stampin’ Write Markers- Chocolate Chip, So Saffron, retired Pretty In Pink 

Paper: Whisper White, Chocolate Chip, So Saffron, retired DSP (not sure of the name)

Accessories: Big Shot™, ChevronTextured Impressions™ Embossing Folder, Punches- Hexagon, Banner and Note Tag, White Tea Lace Doily, retired buttons- Button Latte, Pretty In Pink, White Baker’s Twine, .005 Sakura Pigma Micron™ pen, 5/8” Satin Ribbon (from my stash)


Thanks again for taking stopping by- I will be posting a few more cards using this same color challenge throughout the week- hope you can come play along!!

Monday, August 11, 2014

CC491 Friendship's Journey

Hi Stampers! 

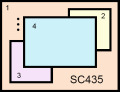
Here is the second card that I created using this week’s CC491 “Blackberry Saffron Bay”colors at Splitcoaststampers along with the SC500 Sketch Challenge (to use one of the sketches from SC400-SC499- I chose SC435 and flipped the sketch upright) :-)

This card also has the has “dessert” to add a sentiment – you have to look close (below the rolled flowers) to see the “love” banner  :-)

If you have not had a chance to do, I hope that you will take a moment to visit the gallery for inspiration, create your own card with this week’s colors and join in on the fun!

To create this card:

Ink the focal using Memento™ Tuxedo Black Ink and stamp onto a piece of Whisper White cardstock. 

Color the images using an AquaPainter™ with Bermuda Bay, Blackberry Bliss and So Saffron Classic Ink and add additional details with the corresponding Stampin’ Write markers. 

Use the Crumb Cake Stampin’ Write marker to add shadows, trim and mount onto a piece of Blackberry Bliss cardstock, trim again and mount onto a piece of Bermuda Bay cardstock.  

Ink the retired background stamp, En Francais using Blackberry Bliss Classic Ink and stamp onto a piece of retired I Am Me Designer Series Paper (DSP).

Use the Big Shot™ with the retired Lacy Brocade Textured Impressions™ Embossing Folder to emboss the stamped DSP panel.  Lightly sand with the Sanding Block, trim and mount onto a piece of Blackberry Bliss cardstock, trim and mount onto the Bermuda Bay card base.

Trim a piece of Park Lane DSP to create two squares and mount onto pieces of Bermuda Bay cardstock and add to the background panel (per the sketch).

Mount the focal image using Stampin’ Dimensionals®.

Create the rolled roses from Blackberry Bliss cardstock using the 2 3/8” and 1 ¾” Scallop Circle Punch – cut a wavy line from the outside of the scallop toward the center.   Use the retired Crimper Tool to crimp the roses and roll up toward the center.  Use a Hot Glue Gun to adhere the outside edges to the center part of the scallop- here is a basic tutorial from Splitcoaststampers.

Stamp the banner from the retired Banner Blast stamp set using Blackberry Bliss Classic Ink, punch out with the Banner Punch , mount onto a banner punched from Bermuda Bay cardstock and add to the card front using Stampin’ Dimensionals®.

Punch the leaves from Bermuda Bay cardstock using the Bird Builder Punch.  Using the Hot Glue Gun, add the leaves with the rolled roses to the front of the card.

Stamp Sets: Friendship’s Journey, Banner Blast (both retired)

Ink: Memento™ Tuxedo Black, Bermuda Bay, Blackberry Bliss, Crumb Cake, So Saffron; Stampin’ Write Markers- Bermuda Bay, Blackberry Bliss, Crumb Cake, So Saffron

Paper/Cardstock:  Whisper White, Bermuda Bay, Blackberry Bliss, So Saffron, Park Lane DSP,  I Am Me DSP (retired)

Accessories: Big Shot™, retired Lacy Brocade Textured Impressions™ Embossing Folder, AquaPainter™, Sponge Dauber, Punches- 2 3/8” and 1 ¾” Scallop Circle, Banner; Pearls


Thanks again for stopping by- I will be posting my design for the new SU-Only Challenge at 3am EST (hope you can stop by again tomorrow to check it out!) 
Related Posts Plugin for WordPress, Blogger...