Showing posts with label International Bazaar DSP. Show all posts

Friday, June 19, 2015

JUN15VSNI Happy Together with Betsy the Beekeeper :-)


Hi Again Stampers!!

This card was created for the Splitcoaststampers’ Virtual Stamp Night JUN15VSNI “Happy Together” Challenge (see details here and gallery here) using the CC535 Color Challenge- Bermuda Bay, Daffodil Delight and Rich Razzleberry with dessert to add a punched or die cut element  (see details here and gallery here) as well as the SC540 Sketch Challenge (see details here and gallery here).

Woohoo!!  I was able to incorporate all of the nine elements for this “recipe” challenge and pulled out one of my favorite retired stamp sets, Betsy the Beekeeper (just love this gal with her honey hive and jars :-)).

Again, if you have not already done so, I hope you will find the time to visit the above sites to check out the wonderful Design Team samples as well as the galleries!

To create this card:

Ink the retired stamp image, Betsy the Beekeeper using Stāz-On® Jet Black Ink onto Whisper White cardstock.

 Using an AquaPainter™, apply Rich Razzleberry Classic Ink to her dress and use Stampin’ Write Markers-  Bermuda Bay, Daffodil Delight, Rich Razzleberry and Sahara Sand  (for shadows) to finish coloring the image.

Use a sponge dauber with the Mini Punchenella stencil by Balzar Designs to add Daffofil Delight with the Honeycomb portion of the stencil to the background.

Trim the image and mount onto a piece of Bermuda Bay cardstock.
Trim a piece of retired International Bazaar Designer Series Paper (DSP) and mount onto a piece of Bermuda Bay cardstock.

Create the Whisper White square card base and adhere a piece of retired Rich Razzleberry DSP (solid color from a retired Hostess Level I selection years ago) and add the 5 ¼”  x 5 ¼” square of  retired Beyond the Garden DSP.

Adhere a paper doily to the background (I used a Royal Lace 6” diameter doily from my stash) and add the DSP on an angle per the sketch.

Add a few pieces of Rich Razzleberry ¼” Grosgrain Ribbon loops to the side of the focal image and adhere the Bermuda Bay Sequins (cut from the Bermuda Bay Sequin Trim) to the side of the card near the ribbon and add the Pink Rhinestones to the centers of the sequins as well as the flowers on her dress (the pink rhinestones were from a retired Stampin’ Up!  Flower cardstock sticker pack- sorry, I do not recall the name:-)). 

Add the focal image to the card front using Stampin’ Dimensionals®.

Add the strip of Rich Razzleberry cardstock with Stampin’ Dimensionals® and adhere the Rich Razzleberry bow (created with the Bow Builder Punch) along with the retired Daffodil Delight button.

Close up of Betsy the Beekeeper :-)
Stamp the sentiment with using Stāz-On® Jet Black Ink onto Whisper White cardstock.

Use the retired Word Window Punch to punch out the sentiment, create the banner points using the Banner Punch and adhere to a strip of Bermuda Bay cardstock (also creating banner points with the Banner Punch).

Mount the sentiment to the card front using Stampin’ Dimensionals® to finish off the card.

Stamp Sets: Betsy the Beekeeper, Moon Lake (sentiment)

Ink: Stāz-On® Jet Black, Rich Razzleberry; Stampin’ Write Markers- Bermuda Bay, Daffodil Delight, Rich Razzleberry, Sahara Sand

Paper: Whisper White, Bermuda Bay, Rich Razzleberry; retired International Bazaar, Beyond the Garden and Hostess Level I Pack DSP; Royal Lace 6” diameter Paper Doily

Accessories: Punches- Banner, Bow Builder, retired Word Window; Sponge Dauber, Bermuda Bay SequinTrim, retired Daffodil Delight button, retired Rich Razzleberry ¼” Grosgrain ribbon, retired Pink Rhinestones, Mini Punchenella stencil by Balzar Designs


Thanks again for taking the time to visit- I have one more VSN card to upload and  will do so shortly :-) 

Hugs and have a wonderful weekend, my friends!

Monday, September 1, 2014

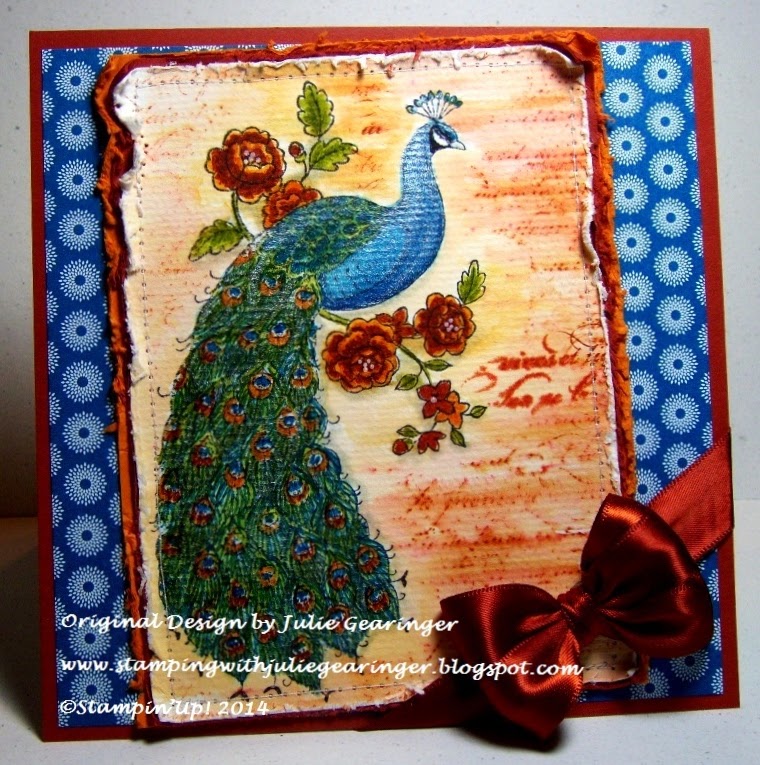
Perfect Peacock- A Color and Sketch Challenge


Hi Stampers!

Happy Labor Day!  Hope all of you are able to take this day to rest and for those of you who have to “labor” at work outside the home, I hope you are compensated well and can take time off soon.

I wanted to create a card using the CQC256 ColourQ Challenge along with the PPA217 Pals Paper Arts Sketch and I decided to do a masking/watercolor technique.   It was a bit difficult to photograph this card with the shimmer :-)

Again, I hope you will take the time (if you have not done so already) to visit both sites and check out all of the fabulous Design Team samples as well as the wonderful examples and inspiration from their galleries!!

To create this card:

Using Memento™ Tuxedo Black Ink, stamp the Perfect Peacock stamp onto a piece of watercolor paper.

Using an AquaPainter™, apply Pacific Point and Old Olive Classic Ink to the peacock image,  Pumpkin Pie to the flowers and Old Olive to the leaves.

Ink the retired background stamp, En Francais using Cajun Craze Classic Ink .  Mask the peacock using scrap paper or a sticky note and stamp the background with light pressure around the peacock.

Apply a light wash of Pumpkin Pie to the background- the script stamp images will soften and blend with the Pumpkin Pie wash.

Use Stampin’ Write Markers to highlight and darken the colors of the peacock image- for the feathers use Pacific Point, Old Olive, Pumpkin Pie and Cajun Craze and for the flowers and leaves, Cajun Craze along with Old Olive.   Use the Chalk Marker to add a few white highlights to the flower centers.

Use the Distressing Tool to distress the edges of the stamped panel and adhere to a piece of Cajun Craze cardstock using a sewing machine.  Mount the panel onto a piece of Pumpkin Pie cardstock and distress the edges of the Pumpkin Pie layer as well.

Mount a piece of retired International Bazaar Designer Series Paper (DSP) onto a Cajun Craze panel (5.5” x 5.5”  square).   Add the focal image panel to the card front and adhere the 5/8” Triple Ribbon Satin Bow to the corner.

Mount the entire card front onto the Whisper White card base,  
To finish off the card, add additional shimmer to the peacock using an AquaPainter™ with Frost White Shimmer Paint.

Stamp Sets: Perfect Peacock, En Francais (retired)

Ink:  Memento™ Tuxedo Black Ink, Old Olive, Pacific Point, Pumpkin Pie, Cajun Craze; Stampin’ Write Markers- Pacific Point, Old Olive, Pumpkin Pie, Cajun Craze; Chalk Marker

Paper: Whisper White, Cajun Craze, Pumpkin Pie, International Bazaar DSP (retired), Watercolor Paper

Accessories: AquaPainter™, Distressing Tool, Frost White Shimmer Paint (retired), 5/8” Satin Ribbon (from my stash)


Thanks again for visiting- I hope all of you have a wonderful Labor Day! 

Sunday, October 13, 2013

CAS Christmas- 2nd Attempt at a Color and Sketch :-)

Hi Again Stampers!!

I was not completely satisfied with my last post using this week’s Create with Connie and MaryCCMC272 Colors along with the CAS Colours and Sketches #46 Sketch Challenge- I know, OK I admit it, I am a perfectionist who is rarely satisfied with my creations but while I still had all of the supplies out, decided to give it one more try and am more satisfied with this CAS card :-))

This one still did not come easy- not sure but I think I may have a problem...first step is admitting, right?  It seems as though when the colors are challenging and I am trying to create a CAS card (Clean and Simple), my brain freezes up! :-)

I thought that the Masking Tape Technique may look better so used the tape with So Saffron Classic Ink onto Whisper White and stamped the smallest snowflake from Festive Flurry in Bermuda Bay, then Rich Razzleberry, punched them out and even had them mounted onto Rich Razzleberry cardstock but still did not seem right (did set these aside for possible future use)...

Then I thought possibly Vellum...tried one in Bermuda Bay and larger in Rich Razzleberry and as I just layered them to see the effect, they were not dry (duh!) and smeared ... 

Then I decided to stamp the Festive Flurry snowflake with Rich Razzleberry Classic Ink onto Whisper White, trimmed and decided to cut it in half to put the sentiment in the center... did not like that look so I cut into fourths but since I did not cut into fourths from the beginning, the squares were not the same size... so I glued it back together and what now??  Should I start over again or just give up???  

Decided to color with the markers and thought, oh no, can you see the seam??  What about the Woodgrain folder- couldit  hide the seams of my mistake??  

So there you have it- you know all my secrets and the story of my creative process...I think I need help!!!  And if you look too close, you can see the seams!!  Oh well, I have learned from my mistakes and if I create any additionals, I will not cut them apart :-))     


To create this card:

Stamp the Festive Flurry image (second from the largest snowflake) using Rich Razzleberry Classic Ink onto Whisper White and trim to size. 

Mount onto So Saffron cardstock and emboss using the Big Shot™ with the Woodgrain Textured Impressions™ Embossing Folder and adhere to Rich Razzleberry cardstock (again, trim to size). 

Using Rich Razzleberry Classic Ink stamp the sentiment from More Merry Messages onto the Bermuda Bay lbackground layer  and add the Designer Series Paper cut on a diagonal per the sketch (I used the other half from the last post- Rich Razzleberry piece from the retired International Bazaar).

Adhere this entire panel to the Rich Razzleberry card base and add the focal image using Stampin’ Dimensionals®- add the Pearl to the center to finish off the card.

Stamp Sets:  Festive Flurry, More Merry Messages

Ink: Rich Razzleberry, Stampin’ Write Markers-  Bermuda Bay, Rich Razzleberry ,So Saffron

Paper: Whisper White, Bermuda Bay, Rich Razzleberry , So Saffron, Designer Series Paper- retired International Bazaar

Accessories: Big Shot™,  Woodgrain Textured Impressions™ Embossing Folder, Pearl

This card reminds me of the Lancaster PA region and the Pennsylvania Dutch creations that you sometimes see painted on the barns…need to take another visit to that beautiful part of our country :-)


Thanks again for visiting- have a wonderful, relaxing Sunday and God Bless!

Christmas Greeings- A CAS Sketch and Color Combo

Hi Stampers!!

I wanted to create another Christmas card design for my CCC13 Splitcoaststampers' commitment and decided to try using this week’s Create with Connie and Mary CCMC272 Colors (love the colors but ithey are a bit bright together- definitely a challenge for me :-)) along with the CAS Colours andSketches #46 Sketch Challenge

Again, I hope you have the chance to visit each site- great inspiration from both Design Teams and other entrants!


To create this card:


Stamp the tree image from Special Season using Bermuda Bay Classic Ink onto Whisper White and trim to size. 

Using So Saffron  and Rich Razzleberry Stampin’ Write markers, color a few of the bulbs and garland.         
                    
Cut the Designer Series Paper on a diagonal per the sketch and layer onto a piece of Rich Razzleberry cardstock ( (I used a few pieces of retired DSP-  International Bazaar and Summer Smooches))

  Layer again onto a piece of Whisper White cardstock and add the Bermuda Bay diagonal strip to hide the seam.  

Use the Big Shot™ with the retired Lacy Brocade Textured Impressions™ Embossing Folder to emboss the entire panel and mount onto the Rich Razzleberry card base.

Stamp the sentiment using Rich Razzleberry Classic Ink onto Whisper White cardstock and trim to size.

Add the tree image and sentiment using Stampin’ Dimensionals®.  Adhere the Rhinestones to finish off the card.

Stamp Sets:  Special Season

Ink: Bermuda Bay, Rich Razzleberry, Stampin’ Write Markers- Rich Razzleberry and So Saffron

Paper: Whisper White, Bermuda Bay, Rich Razzleberry , Designer Series Paper- retired International Bazaar and Summer Smooches

Accessories: Big Shot™, retired Lacy Brocade Textured Impressions™ Embossing Folder, Rhinestones

Not sure if I will create the monthly CCC13 commitment of five to six of this color combo- if you have the time, let me know what you think…too bright or too retro?  Not sure if I am "sold" on it- lol!! 


Thanks again for stopping by- it means so much to me!! Have a great Sunday- God Bless!
Related Posts Plugin for WordPress, Blogger...