Showing posts with label Lacy Brocade EF. Show all posts

Wednesday, March 23, 2016

John 3:16 For God So Loved the World


Hi Friends!

I had a chance to spend some time stamping this evening and decided to create a card using Friday Mashup! FM245 Easter or Sketch Theme Challenge (sadly this will be their final challenge) along with the Splitcoaststampers CC575 Color Challenge and the Word Art Wednesday #222/223 “Anything Goes” Challenge.

I love this verse- the Gospel Message in one verse and perfect for Easter :-)
If you have not had a chance to visit the above galleries yet, I hope you will find the time to do so- wonderful Design Team samples and inspiration from all!

To create this card:

Ink the Our Daily Bread Designs (ODBD) Chalkboard John’s stamp with Blackberry Bliss Classic Ink and stamp onto a piece of Whisper White cardstock.

Trim the image, mount onto Blushing Bride cardstock, trim and mount onto Mint Macaron cardstock, trim and mount onto Blackberry Bliss cardstock.

It is difficult to photograph Blackberry Bliss- the card looks better in real life :-)
Use the Big Shot™ along with the retired Lacy Brocade Textured Impressions™ Embossing Folder to emboss a piece of retired Blushing Bride Designer Series Paper (DSP).

Lightly sand the embossed DSP, trim and mount onto a piece of Mint Macaron cardstock, trim again and mount onto a piece of Blackberry Bliss cardstock.

Emboss a scrap piece of Mint Macaron cardstock with the Lacy Brocade Textured Impressions™ Embossing Folder, adhere to the card front, add the strips of 3/8” Blackberry Bliss Stitched Satin Ribbon (retired) and the strips of Pearls.

Mount the entire panel onto the 5 ½” square Whisper White card base.

Ink the Boho Cross (ODBD) image using Stāz-On® Jet Black Ink and stamp onto a piece of Whisper White cardstock.

Color the Boho Cross using Stampin’ Write Markers- Blushing Bride, Blackberry Bliss and Mint Macaron, fussy-cut the cross and use a Basic Black marker to darken the edges.

Use a paint brush to apply Ranger® Tim Holtz® Crazing Distress Medium to the cross.

Mount the focal image panel to the card front using dimensional foam, add the 3/8” Blackberry Bliss triple Stitched Satin Ribbon bow and add Pearls to the corners of the card.

Mount the cross with dimensional foam and add the Pearl to the center to finish off the card.

Stamp Sets: Chalkboard John’s, Boho Cross (both Our Daily Bread Designs)

Ink: Stāz-On® Jet Black, Blackberry Bliss, Stampin’ Write Markers- Blackberry Bliss, Blushing Bride, Mint Macaron

Paper: Whisper White, Blackberry Bliss, Blushing Bride, Mint Macaron, retired Blushing Bride DSP

Accessories: Big Shot™, retired Lacy Brocade Textured Impressions™ Embossing Folder, 3/8” Blackberry Bliss Stitched Satin Ribbon, Pearls, Ranger® Tim Holtz® Crazing Distress Medium, Sanding Block

Thanks again for taking the time to visit- I hope you have a wonderful Easter Week and Resurrection Sunday!!


Monday, October 12, 2015

CC552 Vintage Locomotive

Hi Friends!

Here is my card for this week’s Splitcoaststampers' CC552 Color Challenge- Pool Party, Pistachio Pudding and Sahara Sand (dessert option is to use your favorite embellishment) along with the  HYCCT1511 "Can I Get a Ride?" Challenge (card with any mode of transportation), Free for All F4A292 “Extra, Read All About It” Challenge (celebrate newsprint) as well as the CAS-ual Chic 004 "Tic, Tac Toe" Challenge (stitching, coloring and distressing).

I tend to use quite a few embellishments and just love this crochet lace that I found on clearance years ago...plus, I cannot seem to create a card without Pearls!  How can I choose a favorite?  Difficult to say which is my very favorite but I did use two of my favs on this card :-)

If you have not had a chance to do, I hope that you will take a moment to visit each of the galleries linked above – great designs by all!

To create this card:

Stamp the train image from Traveler using Stāz-On® Jet Black Ink onto Whisper White cardstock, color using an AquaPainter™ and Classic Ink from the Pool Party and Pistachio Pudding ink pads.

Add a horizon line with the Stampin’ Write Black Marker and additional shadows on the train with the Sahara Sand Stampin’ Write Marker.  Cut the image out using the Big Shot™ with the Squares Collection Framelits™.

Use a sewing machine to stitch the panel onto a piece of Sahara Sand cardstock.  Mount onto a piece of Pistachio Pudding cardstock and use the Distressing Tool to distress the edges.

Distress the edges of a piece of Typeset Specialty Designer Series Paper (DSP) using the Distressing Tool, stitch to the upper part of a piece of Pistachio Pudding cardstock, emboss the entire panel using the Big Shot™ with the retired Lacy Brocade Textured Impressions™ Embossing Folder.

Use a Sponge Dauber to apply Sahara Sand Classic Ink over the Typeset DSP, add the crochet lace and strips of ¼” Pool Party Stitched Satin Ribbon.

Mount the entire card front onto the Pool Party card base.

Use the Big Shot™ with the My Favorite Things™ Stitched Jumbo Fishtail Banner STAX Die to cut a banner from Pool Party cardstock, apply Sahara Sand Classic Ink using a Sponge Dauber and adhere to the front of the card.

Add the triple ¼” Pool Party Stitched Satin Ribbon bow along with the retired Sahara Sand button (using a strip of Pool Party cardstock as the “thread”).

Stamp the Banner Blast image using Memento™ Tuxedo Black Ink onto Whisper White cardstock and punch out with the Banner Punch. 

Punch a piece of Sahara Sand cardstock using the Banner Punch, distress with your fingernail and mount behind the stamped banner.

Add the banner to the focal image panel and mount the focal image to the front of the card using dimensional foam.

Add a few Pearls to the corner to finish off the card.

Stamp Sets: Traveler, Banner Blast (retired)

Ink: Memento™ Tuxedo Black, Pool Party, retired Pistachio Pudding; Stampin’ Write Markers- Basic Black, Sahara Sand

Paper/Cardstock:  Whisper White, Pool Party, Sahara Sand, retired Pistachio Pudding; retired Typeset Specialty DSP

Accessories: Big Shot™, Square Collections Framelits™, MFT Stitched Jumbo Fishtail Banner STAX Die, retired Lacy Brocade Textured Impressions™ Embossing Folder, Banner Punch, Distressing Tool, Sewing Machine, Sponge Dauber, ¼” Pool Party Stitched Satin Ribbon, Sahara Sand Button, Crochet Lace, Pearls 

Thanks again for stopping by- I hope you have a wonderful week, my friends!

Monday, June 1, 2015

Two Horses for Two Special Young Ladies :-)

Hi Stampers! 

It has been a busy weekend for me as I was having fun designing and creating cards for several people on our prayer list along with our Awana ministry.

I created two cards using the same stamp set for the horse image for two special 6th grade Awana girls.  They both completed their Timothy Awards and have been so sweet to have in our club for the last two years :-)  They will be "moving up" but I should still be able to see them occasionally on club night- I will miss spending time with them each week for sure!   

I incorporated the Splitcoaststampers’ CC532 "Coastal Old Vanilla" Color Challenge with "dessert" :-) (see details here and gallery here) for both cards  and the first card uses the SC530 Sketch Challenge (see details here and gallery here) and the SC538 Sketch Challenge (see details here and gallery here) was used for the second card (modified both sketches a bit :-).

If you have not had a chance to do so, I hope you will find the time to visit the Splitcoaststampers’ galleries to check out all of the inspiration from the color and sketch challenges!

Shared steps to create both cards:

Ink the Inkadinkado® horse image from the Horses stamp set using Memento™ Tuxedo Black Ink and stamp onto two pieces of Very Vanilla cardstock.

Color the horse image with Faber-Castell® Polychromos Black colored pencil, the grass with the Stampin’ Write Old Olive marker and use the Big Shot™ with the My Favorite Things® (MFT) Stitched Rectangle Die to cut out each horse image.

Mount the images onto Basic Black cardstock and trim to create the frame.

To finish Card #1:

Emboss a piece of retired Jr. Varsity Designer Series Paper (DSP) with the Big Shot™ and retired Lacy Brocade Textured Impressions™ Embossing Folder, trim the panel and mount onto a piece of Basic Black cardstock.

Lightly sand the embossed DSP with the Sanding Block to bring out the white core.

Stamp the sentiment from the retired Blessings from Heaven stamp set using Memento™ Tuxedo Black Ink onto a piece of Very Vanilla cardstock, insert the sentiment panel into the Stylish Stripes Textured Impressions™ Embossing Folder (keeping the sentiment portion outside of the folder) and emboss with the Big Shot™.

Add the Coastal Cabana Thick Baker’s Twine over the panel at the edge of the embossing, mount onto a piece of Old Olive cardstock, trim the edges, add the retired Antique Pewter brads and mount onto the Basic Black card base.

Create the banner from retired Afternoon Tea DSP using the Hexagon Punch, mount onto Basic Black cardstock and create the banner points with the Hexagon Punch. 

Add the Coastal Cabana Thick Baker’s Twine with the retired Antique Pewter Hodgepodge Hardware clip and mount the banner onto the embossed Olive Green DSP panel.

Mount the embossed Old Olive DSP panel to the card front using Stampin’ Dimensionals® (I angled it a bit from the initial sketch :-)).

Add the horse image to the card front with Stampin’ Dimensionals® to finish off the card.

Stamps: Blessings from God, Horses (Inkadinkado®)

Ink: Memento™ Tuxedo Black Ink, Stampin’ Write Old Olive Marker; Faber-Castell® Polychromos Black Pencil

Paper: Very Vanilla, Basic Black, Old Olive; retired Jr. Varsity and Afternoon Tea DSP

Accessories: Big Shot™, MFT Rectangle Stitched Dies, Stylish Stripes and retired Lacy Brocade Textured Impressions™ Embossing Folders, Sanding Block, Coastal Cabana Thick Baker’s Twine, retired Antique Pewter Hodgepodge Hardware

To finish the second card:

Lightly sponge Ranger® Tim Holtz® Antique Linen Distress Ink onto the horse image.

Using My Digital Studio (MDS), insert the Word Art Wednesday Proverbs 17:17 verse and print out onto Whisper White cardstock.  Use Ranger® Tim Holtz® Antique Linen Distress Ink to “antique” the paper and match the Very Vanilla cardstock.

Emboss a piece of retired Jr. Varsity DSP with the Big Shot™ and the Modern  Mosaic Textured Impressions™ Embossing Folder, lightly sand with the Sanding Block, trim and mount onto the Basic Black card base.

Adhere the Coastal Cabana pieces of Afternoon Tea DSP to Basic Black cardstock, trim and create the vertical and horizontal panels on the card front.

Add the portion of the White Tea Lace Doily (this was an afterthought since I originally had a bit of Hot Glue on my card front and when it was removed, the DSP tore so the Doily is covering up the mistake- lol!).

Mount the verse onto a piece of Basic Black cardstock and adhere to the horizontal panel.

Add the horse image using Stampin’ Dimensionals® , Pearls to the verse and the retired Antique Pewter Hodgepodge Hardware clip to finish off the card.

Stamps: Horses (Inkadinkado®), Digital Verse from Word Art Wednesday

Ink: Memento™ Tuxedo Black Ink, Faber-Castell® Polychromos Black Pencil, Stampin’ Write Old Olive Marker; Ranger® Tim Holtz® Antique Linen Distress Ink

Paper: Very Vanilla, Basic Black, Old Olive; retired Jr. Varsity and Afternoon Tea DSP

Accessories: Big Shot™, MFT Rectangle Stitched Dies, Modern Mosaic Textured Impressions™ Embossing Folder,Sanding Block, White Tea Lace Doily, Pearls, Sponge Dauber, retired Antique Pewter Hodgepodge Hardware


Thanks again for stopping by- I will share more later today    Have a wonderful  week, my friends!

Saturday, January 10, 2015

Sending Love and Sympathy- A Color, Sketch using "Old" and "New"


Hi Stampers!!

I wanted to take a moment to share a card that I created for the PPA235 Color Challenge at PalsPaper Arts along with the Mojo379 Sketch and the Simon Says Stamp “Make New Friends but Keep the Old” Monday Challenge.

I decided to pull out an "old" retired stamp along with a retired embossing folder to create this card using some of the "new" Mixed Media techniques (well, new to me :-)) for the focal image panel...

 If you have not already visited the above sites, I hope you will find the time to do so- fabulous Design Team inspiration as well as galleries!  It always amazes me to see the creations that one color combination, sketch or inspiration photo can generate!

To create this Mixed Media card:

Apply Gesso to a piece of Whisper White cardstock and allow it to dry (you can use the Heat Tool to speed up the drying process).

Once dried, apply Soft Sky Classic Ink to the background, add water and spread using a paint brush and once dried, repeat with Pool Party Classic Ink (making sure not to cover all of the Soft Sky).  

Once dried, apply Gelatos™ (Bubble Gum and Coconut) to the background, add water and use your finger to smooth onto the background.  

Using a Sponge Dauber apply Island Indigo Classic Ink to the Honeycomb portion of the Mini Punchella stencil by Balzar Designs.
Soften the stencil with a paper towel and apply again if needed. 
 
Ink the retired Very Vintage Jumbo Wheel (this is the “old” item of the Simon Says Stamp Challenge) using Island Indigo Classic Ink and stamp repeatedly on the background.  

Repeat with the Very Vintage Jumbo Wheel using Ranger® Tim Holtz® Vintage Photo Distress Ink  (** Note- this is one of the wheels that I have un-mounted and use as a stamp versus a wheel :-)).    Trim the panel, mount onto Island Indigo cardstock and add two strips of retired ¼” Sycamore Street Island Indigo Satin Ribbon. 

Add the embossed Soft Sky panel to a scrap piece of Island Indigo cardstock- I had both of these pieces in my organized scraps (the Soft Sky panel was previously embossed with the retired Lacy Brocade Textured Impressions™ Embossing Folder- another “old” item- love using scraps when I can).   Oh, also, not all of my scraps are organized- still a work in progress, lol!!

Re-ink the Very Vintage Jumbo Wheel using Pool Party Classic Ink and stamp onto the Pool Party background panel (some of the Distess ink also transferred to this panel).

Add the strips of retired ¼” Sycamore Street Island Indigo Satin Ribbon to the sides of the Pool Party background panel (lining up with the focal image panel) and mount onto a piece of Whisper White cardstock.  

Trim the panel and mount onto a piece of Island Indigo cardstock, trim and adhere to the Whisper White card base.

Stamp the sentiment using Island Indigo Classic Ink onto a piece of Vellum.  Trim and mount onto a scrap piece of Soft Sky cardstock, trim and mount onto a piece of Island Indigo cardstock.

Assemble the card by mounting the embossed Soft Sky panel to the Pool Party background panel, add the Mixed Media focal image panel and mount the sentiment using Stampin’ Dimensionals®.

Create the rolled flowers using Island Indigo and Pool Party cardstock (use the Big Shot™ with the Sizzix Flowers 3D Originals™ Die) and create the leaves using the Bird Builder Punch from Island Indigo cardstock.

Adhere the flowers and leaves to the sentiment panel.

Stamp the butterflies using Island Indigo Classic Ink and punch out with the Elegant Butterfly Punch.  Lightly color the butterflies using the Soft Sky Stampin’ Write Marker and mount onto the card front.

Add the Pearls to the butterfly centers to finish off the card.

Stamp Sets:  Love & Sympathy, Papillon Potpourri, Very Vintage Jumbo Wheel

Ink: Island Indigo, Pool Party, Soft Sky Classic Ink;  Gelatos™ -Bubble Gum and Coconut, Ranger® Tim Holtz® Vintage Photo Distress Stain, Stampin’ Write Soft Sky Marker

Paper: Whisper White, Island Indigo, Pool Party, Soft Sky Regular and Textured, Vellum

Accessories: Gesso, Big Shot™, retired Lacy Brocade Textured Impressions™ Embossing Folder, Sizzix Flowers 3D Originals™ Die,  Punches- Elegant Butterfly, Bird Builder; ¼”; Sycamore Street Island Indigo Satin Ribbon, Mini Punchenella Stencil (Balzar Designs), Sponge Dauber, Pearls


Thanks again for taking the time to stop by- I hope all of you have a wonderful weekend!!

Saturday, November 1, 2014

HYCCT1402 Hope Floats

Hi Again Stampers!

Here is another entry for the Splitcoaststampers Hope You Can Cling To Challenge (HYCCT) to promote Breast Cancer Awareness and create cards to encourage those with cancer and their families. 

This card was created for the rgrohall aka Rebecca aka bellacarta HYCCT1402 "Hope Floats" Challenge (see the gallery here and the details for the challenge here) along with the Splitcoaststampers SC511 Sketch Challenge.  

Again, I hope you will find the time to check out the links above and see all of the fabulous and inspiring samples!

To create this card:

Stamp the image from the retired set, Birds (I love using my retired sets) using Memento™ Tuxedo Black Ink onto Whisper White cardstock. 

Punch the image out using the 2 ½” Circle Punch and also punch a circle from Basic Black cardstock.  Cut the Basic Black circle in half and mount behind the focal image.

Use the Big Shot™ with the retired Lacy BrocadeTextured Impressions™ Embossing Folder to emboss a piece of Whisper White cardstock.  Trim and mount onto a piece of Basic Black cardstock and add the 5/8” Basic Black Triple Satin Ribbon bow.
 
Stamp the sentiment from Heartspeak using Memento™ Tuxedo Black Ink onto a piece of retired Blushing Bride Designer Series (DSP).  Add two strips of Basic Black cardstock to mimic an entire layer (and reduce the weight for mailing) and mount onto the embossed card front.

Adhere the entire panel to the Blushing Bride card front and mount the bird images using Stampin’ Dimensionals®.

Add the Pearls to finish off the card.

Stamp Sets: Birds, Heartspeak

Ink:  Memento™ Tuxedo Black Ink

Paper: Whisper White, Basic Black, Blushing Bride, retired Blushing Bride DSP 
           
Accessories: Big Shot™, retired Lacy Brocade Textured Impressions™ Embossing Folder, 2 ½” Circle Punch, Pearls, retired 5/8” Basic Black Satin Ribbon


Thanks again for visiting- I will be sharing a few more of the challenges this weekend so I hope you can stop by again soon!!  Have a wonderful weekend!

Sunday, August 24, 2014

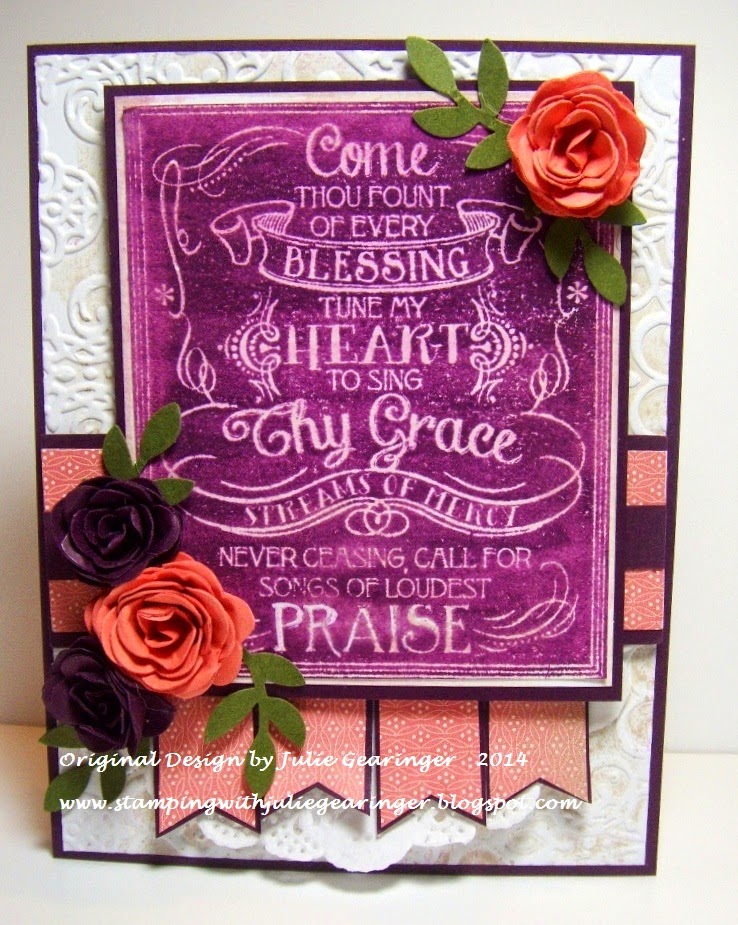
Every Blessing- Two Challenges in One :-)


Hi Stampers! 

I had a great time creating this past week and this card was created for the Just Add Ink JAI228 Color Challenge along with the Our DailyBread Designs ODBDSLC212 Sketch Challenge.
  
I know some of you have arrived from these challenge sites, but if not, I encourage you to visit the linked pages above and check out the wonderful Design Team projects as well as their fabulous galleries- you will definitely be inspired!

To create this card:
Use the Big Shot™ with the retired Lacy Brocade Textured Impressions™ Embossing Folder to emboss a piece of Whisper White cardstock (I inked the interior of the embossing folder before embossing the paper with Ranger© Tim Holtz® Antique Linen Distress Stain). 
Trim the embossed panel and mount to the Blackberry Bliss card base.
Stamp the Chalkboard Hymn stamp with Blackberry Bliss Classic Ink onto Whisper White cardstock, trim the panel and mount onto Whisper White cardstock and mount onto Blackberry Bliss cardstock. Apply Ranger© Tim Holtz® Antique Linen Distress Stain over the image to antique the paper a bit. 
Add a piece of Calypso Coral print of retired Everyday Enchantment Designer Series Paper (DSP) to a piece of Blackberry Bliss cardstock.  Add a strip of Blackberry Bliss cardstock across the center of the panel and mount onto the card front.
Mount ½ of a White Tea Lace Paper Doily below the horizontal strip onto the card front.
Create the banners from the same print of retired Everyday Enchantment DSP- use the Hexagon Punch for the banner points and mount onto Blackberry Bliss cardstock (creating banners with the punch as well).  
Add the banners to the back of the focal image and mount the focal image to the card front using Stampin’ Dimensionals®.
Create the rolled flowers from Blackberry Bliss and Calypso Coral cardstock using the 2 ⅜” and 1 ¾” Scallop Circle Punches.   Spiral cut by hand a wavy line from the outside of the scallop toward the center and roll up to create the rose (here is a basic tutorial from Splitcoaststampers). 
Use the Bird Builder Punch with Mossy Meadow cardstock to create the leaves.
Add the roses and the leaves to the card front to finish off the card.
Stamp Sets: Chalkboard Hymns (ODBD)
Ink: Blackberry Bliss, Ranger© Tim Holtz® Antique Linen Distress Stain
Paper/Cardstock:  Whisper White, Blackberry Bliss, Calypso Coral, Mossy Meadow, retired Everyday Enchantment DSP
Accessories: Big Shot™, retired Lacy Brocade Textured Impressions™ Embossing Folder, Punches: Hexagon, Bird Builder, Scallop Circle- 2 ⅜”, 1 ¾”, White Tea Lace Paper Doily

Thanks again for stopping by- I hope all of you have a great Sunday!!

Monday, August 11, 2014

DTGD14JanTink Trust in the Lord

Hi Stampers!!

This past week has been the annual Dare To Get Dirty Challenge at Splitcoaststampersand I was honored to be able to create a few samples for the many hostesses of this fun challenge!!

Again, if you are not a Fan Club member, here is the link to learn more aboutjoining. 
While the Splitcoaststampers site is free, there are benefits to becoming a Fan Club member and one of them is to be able to participate in the exclusive challenges and possibly win some of the fantastic, free prizes!!  

For the $25.00 a year membership fee (approx. 6.5 cents a day), you can help support this wonderful stamping resource that I know I visit several times a day- what a bargain!!  And no, I do not receive a commission if you sign up- lol!!, I am just one of their unofficial “cheerleaders” since I love the site so much- between the galleries of wonderful inspiration, free tutorials, forums and challenges- this site has helped me immensely with my journey into the world of papercrafting!

One rule of participation in the Dare To Get Dirty Challenges is that the actual challenge details are secret to all except the Fan Club Members…I can share the card but not the details on the actual challenge (unfortunately, any details on this card will reveal the challenge details, so if you have any questions, please let me know in the comment area).   


Stamp Sets: Say It With Scripture (retired)

Ink: Midnight Muse (retired)

Paper: Very Vanilla, Cajun Cruze, Midnight Muse (retired), Comfort Café DSP (retired)

Accessories: Big Shot™, Hearts Collection Framelits™, Lacy Brocade Textured Impressions™ Embossing Folder (retired), 1 ¼” Square Punch, XL Oval Punch, White Tea Lace Doily, 5/8” Satin Ribbon (from my stash)


Thanks again for visiting- I will be sharing additional cards throughout the day that were created as samples for the hostesses of a few of the 2014 Dare To Get Dirty Challenges…  have a wonderful Monday and hope you have a chance to visit again soon!!

Tuesday, May 20, 2014

SUO97- Celebrate with Something Yummy!

Hi Stampers! 


I thought of our current sets with cakes, coffee  and tea but chose to use a non-traditional stamp along with a sneak peek of one of the new In-Colors to create my stacked cake :-)

I hope you will have the time to visit and check out the rest of the fantastic Design Team projects at both sites and use your Stampin’ Up! Only products to come join in on the fun!

To create this card:
Repeatedly stamp the image from Lovely Romance using Blackberry Bliss Classic Ink onto Whisper White cardstock. Carefully cut out the pieces and cut one of the images down to two “flowers” and the other to one “flower”.
Use the Big Shot™ with the retired Lacy Brocade Textured Impressions™ Embossing Folder to emboss a piece of Smoky Slate cardstock and mount onto the Blackberry Bliss card base. 
Also emboss a piece of Whisper White cardstock using the Perfect Polka Dots Textured Impressions™ Embossing Folder and a piece of Smoky Slate cardstock using the Pretty Print Textured Impressions™ Embossing Folder.  Layer both onto pieces of Blackberry Bliss cardstock.
Using a 1 ¾” Square Punch to punch out a piece of the Moonlight Designer Series Stack and layer the Dotted Scallop Punch piece behind to create the element for the sketch (punched from Blackberry Bliss cardstock).   
Using Silver Foil paper, create the cake stand (I used a scrap remaining from the  Finishing Touches Framelits™ for the top portion, a scrap vertical strip for the center and bottom and a 1” Circle punched piece cut in half for the rounded areas at the top and bottom).  Use the Big Shot™ with the Square Lattice Textured Impressions™ Embossing Folder to emboss all of the pieces and glue together to create the stand.
Layer the cake pieces alternating with strips of Silver Foil paper to create the stacked cake onto the Perfect Polka Dot Whisper White panel using Stampin’ Dimensionals®.  Use the Scallop Trim Border Punch along with Silver Foil paper, trim and add to the silver layers.  Add the Rhinestone strips to the top of the stamped images and Pearls to the Scallop Trim and centers of the flowers.
Layer the DSP piece, Pretty Print embossed Smoky Slate panel to the card base. Add the cake image panel using Stampin’ Dimensionals® and add the 3/8” Bllack berry Bliss Stitched Satin Ribbon Double Bow.
Stamp the sentiment using Blackberry Bliss Classic Ink onto Whisper White cardstock, punch out using the 1” Circle Punch and punch another 1” Circle to cut in half and layer behind the sentiment.  
Add the Rhinestones below the sentiment and a few Pearls to the lower left hand corner to finish off the card.
 Stamp Sets: Lovely Romance, Express Yourself (2013-2014 Hostess Set)
Ink: Blackberry Bliss
Paper/Cardstock:  Whisper White, Blackberry Bliss, Smoky Slate, Silver Foil, Moonlight DSP Stack
Accessories: Big Shot™, Perfect Polka Dot, Pretty Print, retired Lacy Brocade, retired Square LatticeTextured Impressions™ Embossing Folders; Punches: 1” Circle, Scallop Trim Border, Dotted Scallop Ribbon Border;  3/8” Blackberry Bliss Stitched Satin Ribbon, Pearls, Rhinestones

Thanks again for visiting - I hope you have a chance to join in on our “Something Yummy” SU-Only Challenge!

Friday, May 16, 2014

Together Forever- A Sneak Peak for the Paper Players

Hi Stampers! 

I had a great time in my craft room last night and created several cards using My Digital Studio, traditional stamps and a sneak peek of the new Blendabilities™.  I created several of the cards using The Paper Players PP195 Color Challenge – So Saffron, CalypsoCoral and Pear Pizzazz

I hope you will have time to check out the Design Team as well as the other entrants- great job by all!!

To create this card:

Open a blank document in My Digital Studio (MDS), position the floral spray from Elements of Style along with the sentiment from Together Forever and print onto an 8 ½ x 11” piece of Whisper White cardstock.

Color the floral spray using the Daffodil Delight, Pumpkin Pie and Old Olive Blendabilities™ . Use the Sahara Sand Stampin’ Write marker to create shadows.
Use the Big Shot™ with the retired Lacy Brocade Textured Impressions™ Embossing Folder to emboss a piece of So Saffron and Pear Pizzazz Designer Series Paper (DSP), lightly sand to expose the white core.

Create the paper lace with the Big Shot™, the Large Scallop Edgelit™ and the Delicate Designs Textured Impressions™ Embossing Folder.

Layer the embossed DSP and paper lace onto the 5 ½” Square piece of Whisper White cardstock and add the ½” Ruffled Calypso Coral Ribbon to hide the seam.

Cut the floral spray image out using the Big Shot™ along with the Heart Collections Framelits™ and also cut out the same size heart using Calypso Coral cardstock.
Layer the hearts using Stampin’ Dimensionals® and add the Pearls to finish off the card.
 
Stamp Sets:  Elements of Style, Together Forever (MDS versions)

Ink: Printer Ink- Black, Blendabilities™- Daffodil Delight, Pumpkin Pie and Old Olive Collections,  Stampin’ Write Marker- Sahara Sand

Paper: Whisper White, Calypso Coral, retired So Saffron and Pear Pizzazz DSP

Accessories: Big Shot™, Heart Collection Framelits™, Large Scallop Edgelit™, Delicate Accents and retired Lacy Textured Impressions™ Embossing Folders, Pearls, retired Calypso Coral ruffled ribbon


Thanks again for visiting- I hope all of you have a wonderful weekend and will post the rest of the cards later this evening :-)
Related Posts Plugin for WordPress, Blogger...