Showing posts with label Modern Mosaic EF. Show all posts

Monday, June 1, 2015

Two Horses for Two Special Young Ladies :-)

Hi Stampers! 

It has been a busy weekend for me as I was having fun designing and creating cards for several people on our prayer list along with our Awana ministry.

I created two cards using the same stamp set for the horse image for two special 6th grade Awana girls.  They both completed their Timothy Awards and have been so sweet to have in our club for the last two years :-)  They will be "moving up" but I should still be able to see them occasionally on club night- I will miss spending time with them each week for sure!   

I incorporated the Splitcoaststampers’ CC532 "Coastal Old Vanilla" Color Challenge with "dessert" :-) (see details here and gallery here) for both cards  and the first card uses the SC530 Sketch Challenge (see details here and gallery here) and the SC538 Sketch Challenge (see details here and gallery here) was used for the second card (modified both sketches a bit :-).

If you have not had a chance to do so, I hope you will find the time to visit the Splitcoaststampers’ galleries to check out all of the inspiration from the color and sketch challenges!

Shared steps to create both cards:

Ink the Inkadinkado® horse image from the Horses stamp set using Memento™ Tuxedo Black Ink and stamp onto two pieces of Very Vanilla cardstock.

Color the horse image with Faber-Castell® Polychromos Black colored pencil, the grass with the Stampin’ Write Old Olive marker and use the Big Shot™ with the My Favorite Things® (MFT) Stitched Rectangle Die to cut out each horse image.

Mount the images onto Basic Black cardstock and trim to create the frame.

To finish Card #1:

Emboss a piece of retired Jr. Varsity Designer Series Paper (DSP) with the Big Shot™ and retired Lacy Brocade Textured Impressions™ Embossing Folder, trim the panel and mount onto a piece of Basic Black cardstock.

Lightly sand the embossed DSP with the Sanding Block to bring out the white core.

Stamp the sentiment from the retired Blessings from Heaven stamp set using Memento™ Tuxedo Black Ink onto a piece of Very Vanilla cardstock, insert the sentiment panel into the Stylish Stripes Textured Impressions™ Embossing Folder (keeping the sentiment portion outside of the folder) and emboss with the Big Shot™.

Add the Coastal Cabana Thick Baker’s Twine over the panel at the edge of the embossing, mount onto a piece of Old Olive cardstock, trim the edges, add the retired Antique Pewter brads and mount onto the Basic Black card base.

Create the banner from retired Afternoon Tea DSP using the Hexagon Punch, mount onto Basic Black cardstock and create the banner points with the Hexagon Punch. 

Add the Coastal Cabana Thick Baker’s Twine with the retired Antique Pewter Hodgepodge Hardware clip and mount the banner onto the embossed Olive Green DSP panel.

Mount the embossed Old Olive DSP panel to the card front using Stampin’ Dimensionals® (I angled it a bit from the initial sketch :-)).

Add the horse image to the card front with Stampin’ Dimensionals® to finish off the card.

Stamps: Blessings from God, Horses (Inkadinkado®)

Ink: Memento™ Tuxedo Black Ink, Stampin’ Write Old Olive Marker; Faber-Castell® Polychromos Black Pencil

Paper: Very Vanilla, Basic Black, Old Olive; retired Jr. Varsity and Afternoon Tea DSP

Accessories: Big Shot™, MFT Rectangle Stitched Dies, Stylish Stripes and retired Lacy Brocade Textured Impressions™ Embossing Folders, Sanding Block, Coastal Cabana Thick Baker’s Twine, retired Antique Pewter Hodgepodge Hardware

To finish the second card:

Lightly sponge Ranger® Tim Holtz® Antique Linen Distress Ink onto the horse image.

Using My Digital Studio (MDS), insert the Word Art Wednesday Proverbs 17:17 verse and print out onto Whisper White cardstock.  Use Ranger® Tim Holtz® Antique Linen Distress Ink to “antique” the paper and match the Very Vanilla cardstock.

Emboss a piece of retired Jr. Varsity DSP with the Big Shot™ and the Modern  Mosaic Textured Impressions™ Embossing Folder, lightly sand with the Sanding Block, trim and mount onto the Basic Black card base.

Adhere the Coastal Cabana pieces of Afternoon Tea DSP to Basic Black cardstock, trim and create the vertical and horizontal panels on the card front.

Add the portion of the White Tea Lace Doily (this was an afterthought since I originally had a bit of Hot Glue on my card front and when it was removed, the DSP tore so the Doily is covering up the mistake- lol!).

Mount the verse onto a piece of Basic Black cardstock and adhere to the horizontal panel.

Add the horse image using Stampin’ Dimensionals® , Pearls to the verse and the retired Antique Pewter Hodgepodge Hardware clip to finish off the card.

Stamps: Horses (Inkadinkado®), Digital Verse from Word Art Wednesday

Ink: Memento™ Tuxedo Black Ink, Faber-Castell® Polychromos Black Pencil, Stampin’ Write Old Olive Marker; Ranger® Tim Holtz® Antique Linen Distress Ink

Paper: Very Vanilla, Basic Black, Old Olive; retired Jr. Varsity and Afternoon Tea DSP

Accessories: Big Shot™, MFT Rectangle Stitched Dies, Modern Mosaic Textured Impressions™ Embossing Folder,Sanding Block, White Tea Lace Doily, Pearls, Sponge Dauber, retired Antique Pewter Hodgepodge Hardware


Thanks again for stopping by- I will share more later today    Have a wonderful  week, my friends!

Wednesday, June 25, 2014

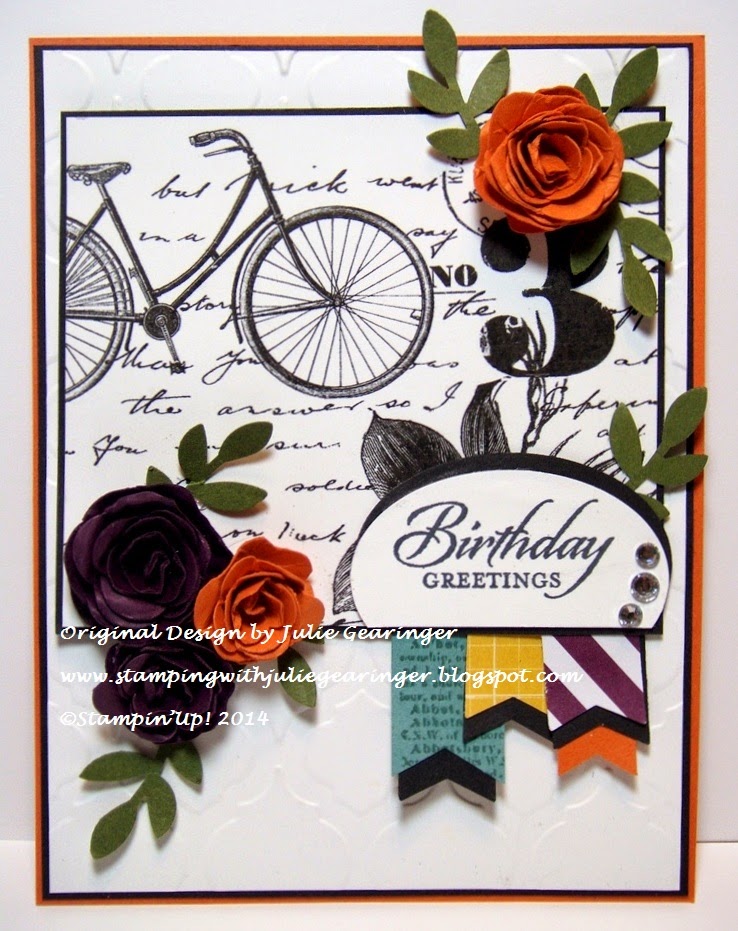
Birthday Greetings- A Fun Color, Sketch and Theme Challenge


Hi Again Stampers! 

This card was created for few of my favorite bi-weekly online challenges, the Fab Friday using their FabFri44 Color Challenge and Hand Stamped Sentiments using their HSSC188 Sketch Challenge and the Seize the Birthday Anything Goes Challenge :-)

Again,  I hope you will have a chance to visit and check out all of the wonderful Design projects and other entries- great inspiration from all!

To create this card:

Use the Big Shot™ along with the Modern Mosaic Textured Impressions™ Embossing Folder to emboss a piece of Whisper White cardstock, trim and mount onto a piece of Basic Black cardstock, trim again and mount onto the Tangelo Twist card base. 

Ink the sentiment from Wetlands (again, I just love the font used on the sentiments in this set) using Memento™ Tuxedo Black ink onto a piece of Whisper White cardstock and punch out with the XL Oval Punch.   Mount onto another oval punched from Basic Black cardstock using the XL Oval Punch and trim off the lower portion of the oval. 

Using MDS, insert the image from Postage Due into your document, re-size and print out onto Whisper White cardstock (or you could stamp using Basic Black or Memento™ Tuxedo Black ink- I had this image already printed and ready to go from a previous project).  Trim and mount onto Basic Black cardstock.

Create the little banners from the new Moonlight Designer Series stack and Basic Black cardstock using the Banner Punch,  Tangelo Twist cardstock using the Banner Punch and trimming the edges to create a tiny banner and the Lost Lagoon cardstock (stamped with the Dictionary background stamp using Lost Lagoon Classic Ink and the edge inserted into the Banner Punch to create a longer banner).   Here is a tutorial on Splitcoaststampers with the basic steps for the rolled flowers :-)

Adhere to the back of the Postage Due panel and add the panel to the card front using Stampin’ Dimensionals® and add the sentiment to the lower right hand corner. 
Create the rolled flowers from Blackberry Bliss and Tangelo Twist cardstock (use the 2 3/8” and 1 ¾” Scallop Circle Punches- punch the scallop circles, hand cut a wavy spiral from the outside of the scallop circle toward the center, use the retired Crimper Tool to distress a bit, roll up from the outside edge and adhere using Tombow Multi-Purpose Adhesive or a Hot Glue Gun).
Create the leaves from Mossy Meadow cardstock with the Bird Builder Punch and adhere behind the rolled flowers.   Add the flowers to the card front (again, I used a Hot Glue Gun since I had it on my desk and ready to go) and add a few Rhinestones to finish off the card.   
Stamp Sets: Postage Due (MDS Version), Wetlands, Dictionary
Ink: Memento™ Tuxedo Black
Paper/Cardstock:  Whisper White, Basic Black, Blackberry Bliss, Lost Lagoon, Mossy Meadow, Tangelo Twist, Moonlight DSP Stack
Accessories: Big Shot™, Modern Mosaic Textured Impressions™ Embossing Folder, Punches: Banner, XL Oval, Bird Builder, Scallop Circle- 2 3/8”, 1 ¾”, 1 ¼”, Rhinestones

Thanks again for stopping by- I hope all of you have a wonderful Wednesday!!   

Saturday, February 1, 2014

DD88 Love and Sympathy- Roses and Butterflies for Comfort


Hi Stampers! 

This week’s DD88 “Bold & Cheery” Dynamic Duo Challenge combines Real Red with Island Indigo.  This color combination is fresh and bright and I think these colors are fabulous together (but I do tend to struggle with bright colors :-))

Again, I hope that you will find the time to stop by and check out the rest of the Dynamic Duos Design Team projects and create one of your own using this week’s colors - we would love to have you join us!!


To create this card:

Using Island Indigo Classic Ink, stamp two of the butterflies from Papillon Potpourri (re-inking before stamping the second image) and the sentiment from Love & Sympathy onto Whisper White cardstock.

Punch out the butterflies using the Elegant Butterfly Punch and use the Big Shot™ with the Chalk Talk Framelits™ to cut out the sentiment (also cut another Chalk Talk frame the same size from Real Red cardstock).    Cut the Real Red Chalk Talk frame in half horizontally, trim off the pointed ends and layer behind the sentiment.

Use the Big Shot™ with the Modern Mosaic Textured Impressions™ Embossing Folder to emboss a piece of Whisper White cardstock, trim and mount onto a piece of Real Red cardstock (trimming the Real Red as well).

Create the rolled roses: 

For the larger roses use the 2 3/8” and the smaller ones use the 1 ½” Scallop Circle Punch- punch out the different size scallop circles from Real Red cardstock, run through the retired Crimper Tool twice and “scrunch” by hand, cut a wavy spiral toward the center on each one, roll up starting from the outside edge toward the middle and adhere using Tombow Multi-Adhesive or a Hot Glue Gun (I have been using the Hot Glue Gun lately and loving it!).  Here is a basic written tutorial from Splitcoaststampers with the idea using Designer SeriesPaper- I have found that cardstock is sturdier and will allow more manipulation of the petals to give a realistic look…  After creating the roses, don't forget to punch out a few leaves from Island Indigo cardstock using the Bird Builder Punch :-) 

Add the sentiment to the Modern Mosaic panel using Stampin’ Dimensionals®, using adhesive of your choice (I used the Hot Glue Gun again :-)) proceed to add the leaves, follow with the rolled roses and add the butterflies last.   Adhere the entire panel onto the Whisper White card base using Stampin’ Dimensionals®.  

Add the Pearls to the bodies of the butterflies to finish off the card.

Stamp Sets:  Papillon Potpourri, Love & Sympathy
Ink: Island Indigo
Paper/Cardstock:  Whisper White, Real Red, Island Indigo
Accessories: Big Shot™, Chalk Talk Framelits™, Punches- Bird Builder, 2 3/8” and 1 ½” Scallop Circle, retired Crimper Tool, Pearls, Hot Glue Gun (optional)
Thanks again for taking the time to drop by- I hope you can join in the fun with our DD88 Dynamic Duos “Bold& Cheery” Challenge!

Sunday, December 15, 2013

PPA183 Rose Red Roses- Thinking of You

Hi Stampers!!

It was a snowy, wintry day so I had a chance to play in my craft room and decided to create a card using the Pals Paper Arts PPA183 Color Challenge (again, the Design Team has created a variety of fantastic projects as well as the other entries- wonderful inspiration)!

I wanted to create a basic “Thinking of You” card and incorporated a sneak peek of a new items from the upcoming All Occasions Mini:-)

To create this card:

Use the Big Shot™ to emboss a piece of Whisper White cardstock using the Modern Mosiac Textured Impressions™ Embossing Folder.  Mount this layer onto a piece of Rose Red cardstock and again onto the Whisper White card base.

Use the Big Shot™ with the new Spiral Floral Die to cut two of the large roses and the 2 /12” Circle Punch for the smaller rose (hand cut a spiral towards the center of the 2 ½” Circle). 

Using the retired Crimper Tool, crimp all three roses and crumple the paper a bit by hand.  Roll starting with the outside edge toward the center and adhere in the middle with adhesive- for this card, I chose to use a hot glue gun for the centers :-).

Cut two Chalk Talk tags using the Big Shot™ with the Chalk Talk Framelits™- one from Whisper White and the other from Rose Red cardstock.  Cut the Rose Red tag into four sections and adhere behind the Whisper White tag to allow the edges to show (there will be a few gaps that the roses and leaves will cover).

Ink the script stamp from Notable Notions using Rose Red Classic Ink and repeatedly stamp over the Whisper White tag.

Add the leaves (cut with the Bird Builder Punch from Wild Wasabi cardstock) and roses to the tag.  Adhere the tag to the card front using Stampin’ Dimensionals®.

Stamp the sentiment from Teeny Tiny Wishes using Rose Red Classic Ink onto Whisper White cardstock and punch out using the Word Window punch.  Add to a layer of Rose Red cardstock punched with the Modern Label Punch and add to the tag/card front. 

Adhere the triple bow created from retired ½” Striped Wild Wasabi Grosgrain Ribbon and Pearls to finish off the card.

Stamp Sets: Notable Notions, Teeny Tiny Wishes

Ink: Rose Red

Paper: Whisper White, Rose Red, Wild Wasabi

Accessories: Big Shot™,  Spiral Floral Originals™ Die, Chalk Talk Framelits™, Modern Mosiac Textured Impressions™ Embossing Folder, Punches- 2 ½” Circle, Word Window, Modern Label, Bird Builder, Pearls, retired ½” Wild Wasabi Striped Grosgrain Ribbon


Thanks again for visiting- have a wonderful Sunday!!

Saturday, September 14, 2013

Bright Blossoms Wreath- CAS Non-Traditional Christmas

Hi Stampers!!

I wanted to create another quick Clean and Simple (CAS) Christmas card that I could easily multiply for one of my designs for the September CCC13 Splitcoaststampers Christmas Card Challenge (if you recall, I have committed to 20-25 cards per month with 5 to 6 designs per month).   Work has been so hectic along with getting ready for the new Awana year and I am so far behind on my own commitment….working on it though- lol!!

I decided to use the colors from the Hand Stamped Sentiments HSSSC168 Color Challenge along with using a non-traditional stamp to create the wreath- believe it or not, it is from Bright Blossoms.  This is another stamp set that lends itself to the Clean And Simple style with bright colors- both at times a struggle for me...so I have not inked up this stamp set until now :-)

To create this card:

Use the 1 3/8” Circle Punch to create a mask for the center and on Whisper White cardstock, repeatedly stamp the circular “bubble-like” stamp from Bright Blossoms with Gumball Green Classic Ink around the circle mask to create the wreath.

Remove the center mask and create a few berries with the Raspberry Ripple Stampin’ Write marker and use the Chalk Marker to create the highlights.

Cut the entire image out using the Big Shot™ with the Window Frames Collection Framelits™ and cut another framelit the same size from Raspberry Ripple cardstock.  Hand cut the Raspberry Ripple cardstock frame in half horizontally and adhere it behind the stamped frame.

Use the Big Shot™ along with the Modern Mosaic Textured Impressions™ Embossing Folder to emboss a piece of Baked Brown Sugar cardstock and adhere to a piece of Raspberry Ripple cardstock.  Adhere the background to the 4” x 4” Whisper White card base and adhere the window frame to the card using Stampin’ Dimensionals®. 

Stamp the sentiment from Greetings of the Season using Raspberry Ripple Classic Ink onto Vellum, trim to size and add to the frame using the Two-Way Glue Pen.

Add the 3/8” Raspberry Ripple Stitched Satin Ribbon triple bow along with the Rhinestones to finish off the card.

Stamp Sets:  Bright Blossoms, Greetings of the Season

Ink: Gumball Green, Raspberry Ripple, Stampin’ Write Marker- Raspberry Ripple

Paper: Whisper White, Baked Brown Sugar, Raspberry Ripple, Vellum  

Accessories: Big Shot™, Window Frames Collection Framelits™, Modern Mosaic Textured Impressions™ Embossing Folder, Chalk Marker, 3/8” Raspberry Ripple Stitched Satin Ribbon, Rhinestones


Thanks again for taking the time to visit- I hope you enjoyed this Christmas card using such a non-traditional Christmas stamp :-)   Stop by again soon- I plan on having fun in my craft room this weekend!!

Thursday, June 27, 2013

Mosaic Miss You- Two Challenges in One!

Hi Stampers!!

I wanted to create a card with this week’s  CQC195 ColourQ Challengecolors along with the Splitcoaststampers SC442 Sketch Challenge (if you have not had the chance to do so, check out both sites for terrific examples of how colors and sketches can be so versatile)!!


To create this card:

Stamp the medallion image from Lovely Romance using Basic Gray Classic Ink twice onto Whisper White cardstock.  Color using Stampin’ Write markers in Pool Party, Summer Starfruit and Orchid Opulence (retired) and “fussy cut” the interior oval out of one of the images.  Use the Big Shot™ with the smallest Deco Labels Framelit™ to cut out the other image. 

Use the Big Shot™ and the same size Deco Labels Framelit™ as above to cut another frame out of Basic Gray cardstock- cut this frame in half horizontally and trim the edges so only the top portion shows as a frame behind the focal image. 

Punch a circle from Basic Gray cardstock using the 1 ¾” Circle Punch and cut this in half- layer behind the focal image on the sides.  Add the “fussy cut” oval using Stampin’ Dimensionals®. 

Stamp the sentiment from Lacy & Lovely using Basic Gray Classic Ink onto Whisper White cardstock- use the 1” Square Punch to create the banner points and layer onto Basic Gray cardstock.

Use the Big Shot™ along with the Modern Mosaic Textured Impressions™ Embossing Folder to emboss a piece of Summer Starfruit Designer Series Paper (I used a retired piece from Patio Party)- lightly sand with the Sanding Block.

Mount the Basic Gray cardstock to a Whisper White card base, add the embossed piece of Summer Starfruit DSP and the Paper Tea Lace Doily (cut in half).  Add the sentiment to cover the cut edge of the doily, adhere the focal image using Stampin’ Dimensionals® and the Pearl to the center to finish off the card.

Stamp Sets:  Lovely Romance, Lacy & Lovely

Ink: Basic Gray, Stampin’ Write Markers- Pool Party, Summer Starfruit and Orchid Opulence (retired)

Paper: Whisper White, Basic Gray, Patio Patio DSP (retired)

Accessories:  Big Shot™, Modern Mosaic Textured Impressions™ Embossing Folder, Deco Labels Framelits™, 1” Square Punch, 1 ¾” Circle Punch, Tea Lace Paper Doily, Sanding Block, Pearl


Thanks again for stopping by- I hope you have a wonderful Thursday!!

Sunday, June 2, 2013

CAS Daydream Birthday


Hi Stampers! 

I decided to create a CAS Card using this week’s Dynamic Duos DD55 Color Challenge- I hope you will take the time to visit their site and check out the Design Team entries as well as the other submissions!

This card was quick and easy:

Stamp the Daydream Jumbo Wheel using Raspberry Ripple Classic Ink and stamp onto Whisper White cardstock. Fill in the center of the floral scrolls with a Stampin’ Write marker in Wisteria Wonder.  

Use the Big Shot™ with the Square Lattice Textured Impressions™ Embossing Folder and mount onto Raspberry Ripple cardstock.

Also emboss a piece of Whisper White with the Modern Mosaic Textured Impressions™ Embossing Folder, adhere the Daydream panel at the top along with the sentiment from Petite Pairs.

Add the Satin Ribbon double bow (from my stash and it matches Wisteria Wonder perfectly) and mount onto Raspberry Ripple and again onto a Whisper White card base.

Use the Elegant Butterfly Punch to punch out three butterflies from Raspberry Ripple cardstock and add the Rhinestones to finish off the card.

­Stamp Sets: Daydream (Jumbo Wheel), Petite Pairs

Ink:  Raspberry Ripple, Stampin’ Write marker- Wisteria Wonder

Paper: Whisper White, Raspberry Ripple

Accessories:  Big Shot™, Modern Mosaic and Square Lattice Textured Impressions™ Embossing  Folders, XL Oval and Elegant Butterfly Punches, Rhinestones, Satin Ribbon (from my stash)


Thanks again for visiting- I hope you have a wonderful Sunday!
Related Posts Plugin for WordPress, Blogger...