Showing posts with label Bird Builder. Show all posts

Friday, March 6, 2015

John 3:16- For God So Loved the World


Hi Again Stampers! 

I wanted to share another card that I created last night for the Our Daily Bread Designs ODBDSLC229 Pastel Color Challenge along with the MojoMonday Mojo#387 Sketch.

Again, if you have not visited the above sites, I hope you will find the time to do so!  Great Design Teams and wonderful inspiration from their galleries :-)

To create this Clean and Layered (CAL) card:

Ink the Chalkboard John’s image using retired Midnight Muse Classic Ink and stamp onto retired Bashful Blue cardstock.   Trim around the image and mount onto a piece of retired Midnight Muse cardstock. 

Use the Big Shot™ with the Zig Zag Textured Impressions™ Embossing Folder to emboss a piece of retired Bashful Blue Designer Series Paper (DSP), trim and mount onto a piece of Midnight Muse cardstock, trim and mount onto the Whisper White card base.

Using the Big Shot™ emboss a piece of Barely Banana cardstock with the retired Lacy Brocade Textured Impressions™ Embossing Folder.  Trim and mount this panel onto a piece of Midnight Muse cardstock, add a piece of Wisteria Wonder Designer Series Paper (DSP) to the bottom (round the corners before adding with the 3/8” Project Life® Corner Rounder Punch) and round the corners of the Midnight Muse layer using the punch as well.

Add a piece of Lace and retired 3/8” Midnight Muse Stitched Satin Ribbon to hide the seam.

Mount the Chalkboard John’s image to the panel and add the rolled flowers and branches (Scallop Circle Punches were used to create the rolled flowers from Wisteria Wonder cardstock – see basic tutorial here and the Bird Builder Punch as used to create the leaves from Pistachio Pudding cardstock). 

Add a piece of White Tea Lace Paper Doily to the upper right hand corner and adhere the Midnight Muse paper bow (created with the Bow Builder Punch) along with the Wisteria Wonder rolled rose and hand cut leaves from Pistachio Pudding cardstock scraps.

Add the Pearls to the corner to finish off the card.

Stamp Sets: Chalkboard John’s (Our Daily Bread Designs)

Ink: Midnight Muse

Paper: Whisper White, Pistachio Pudding, Wisteria Wonder,  retired Barely Banana, Bashful Blue and Midnight Muse; retired Bashful Blue DSP

Accessories: Big Shot™, Zig Zag and retired Lacy Brocade Textured Impressions™ Embossing Folders, Punches- Scallop Circle Punches- ⅞”, 1 ¼”, 1 ½”,   3/8” Project Life® Corner Rounder, Bow Builder, Bird Builder; Pearls, retired 3/8” Midnight Muse Stitched Satin Ribbon, White Tea Lace Paper Doily, lace from my stash


Thanks again for visiting- have a wonderful weekend, my friends!! 

Monday, October 6, 2014

Hope- A Color Challenge with a Technique "Twist"


Hi Stampers!

I wanted to create a card using the CQC261 ColourQ Challenge and decided to incorporate a version of the Alcohol Marker Marbling Technique (hence, the "Technique Twist", using Stampin’ Write Markers versus the alcohol markers).  

Also, you would normally use glossy cardstock for this technique, but since the challenge needed Very Vanilla cardstock, I decided to go ahead and give it a try :-)   One thing I noticed is that the regular cardstock soaks up most of the ink so you do not have the ability to allow the ink to spread (nor the chance for a second print) as you do with the glossy cardstock.  

If you have not had a chance to visit the ColourQ Challenge site yet, I hope you will find the time to do so- as always, great Design Team samples as well as tremendous inspiration from the gallery of submissions!!

To create this card:

Using the same steps as the technique for alcohol markers (see tutorial here), apply the Stampin’ Write markers directly onto the plastic bag- Island Indigo and retired Dusty Durango and use a Sponge Dauber to apply retired Kiwi Kiss Classic Ink.

Mist the ink on the plastic bag with Rubbing Alcohol and lay the piece of Very Vanilla cardstock over the moistened ink.

Repeatedly stamp the sentiment image using Chocolate Chip Classic Ink over the newly created background (re-inking after each stamping) and using Island Indigo Classic Ink, add a bit of additional distressing using the splatter stamp from Gorgeous Grunge.

Carefully cut the sections apart, use a Sponge Dauber with Chocolate Chip Classic Ink to apply ink over the edges and adhere to a piece of Chocolate Chip cardstock. 

Mount a piece of Island Indigo cardstock to the Chocolate Chip card base.

Ink the Gorgeous Grunge stamps using retired Dusty Durango , Kiwi Kiss and Island Indigo Classic Ink. 

Mount the two sentiment panels flush with the card front and add the third panel using Stampin’ Dimensionals®.   
Create the rolled roses from Island Indigo and Dusty Durango cardstock (use the 2 ⅜” , 1 ¾” and 1 ¼” Scallop Circle Punches- punch the scallop circles, hand cut a wavy spiral from the outside of the scallop circle toward the center, use the Bone Folder to curl the edges of the petals a bit, roll up from the outside edge and adhere using Tombow Multi-Purpose Adhesive or a Hot Glue Gun).
Add the rolled flowers to the card front along with the Chocolate Chip leaves to finish off the card.

Stamp Sets:  Gorgeous  Grunge, Natural Beauty (retired)

Ink:  Chocolate Chip, Island Indigo, retired Dusty Durango and Kiwi Kiss; Stampin’ Write Markers- Island Indigo, retired Dusty Durango

Paper: Very Vanilla, Chocolate Chip, Island Indigo , retired Dusty Durango

Accessories: Sponge Daubers, Punches- 2 ⅜”, 1 ¾” and 1 ¼” Scallop Circle, Bird Builder; Plastic Bag, Rubbing Alcohol  

Thanks again for visiting- have a terrific Tuesday, my friends!

Saturday, September 6, 2014

Bible Verse Memory Album- Prov 17:17 A Friend Loves at All Times

Hi Stampers! 

I am working on organizing my craft storage area and decided to create a project using some of my retired “stash” :-)


I am a little late getting started for the Divine Design Bible Verse Challenge (it started in January and the goal is to create one card, scrapbook page, project a month with a verse that you memorize so at the end of the year, you have memorized at least twelve verses).  

This album has six hearts (twelve “pages”) and was perfect for the entire year!

I love the idea of this monthly challenge so I plan on creating additional cards/projects for the rest of the year.  

I will post each page as a separate post so I can link the Splitcoaststampers gallery to the specific post- here is the first page of the album as well as the overall picture of the project.

The verses used are free digital images from Word Art Wednesday (downloaded into My Digital Studio (MDS) and printed onto Very Vanilla cardstock).
The basic steps are as follows:
Using retired Beau Château Designer Series Paper (DSP), cover the chipboard with Tombow Mono Liquid Glue and adhere the DSP.
Using MDS, position the verses onto the page to allow the best use of space to allow cutting the images out with Framelits™, punches or as banners.
 “Antique” the DSP using Ranger™ Tim Holtz® Distress Stain (Tea Dye and Vintage Photo) and add 3/8” Venetian Crochet Trim along with 5/8” Early Espresso Satin Ribbon (retired) or Early Espresso cardstock.
Create the rolled flowers from cardstock and DSP (I used Pink Pirouette and Hello Honey cardstock as well as Baja Breeze retired DSP) using punches- 2 ⅜”, 1 ¾”  and 1 ¼” Scallop Circle Punches.   Spiral cut by hand a wavy line from the outside of the scallop toward the center and roll up to create the rose (hereis a basic tutorial from Splitcoaststampers). 
 “Antique” the flowers using Ranger™ Tim Holtz® Distress Stain (Tea Dye and Vintage Photo) and punch out the leaves using the Bird Builder Punch from Early Espresso cardstock.
 Front Page/Page One:
“A friend loves at all times” Proverbs 17:17
In addition to the elements noted above, add a piece of White Tea Lace Paper Doily (“antiqued” with Ranger™ Tim Holtz® Tea Dye and Vintage Photo Distress Stain)  along with Pearls.
Darken the words of Memories with Watercolor Pencils and cut the verse out with the Big Shot™ using the Project Life® Cards and Labels Framelits™.
Stamp Sets:  None, Verses- free Digital Images from Word Art Wednesday
Ink: Printer Ink- Black, Ranger™ Tim Holtz® Tea Dye and Vintage Photo Distress Stain
Paper: Very Vanilla, Early Espresso, Pink Pirouette, Beau Château DSP, Baja Breeze DSP
Accessories:  Big Shot™, Project Life® Cards and Labels Framelits™, White Lace Paper Doily, Punches: 2 ⅜”, 1 ¾”  and 1 ¼” Scallop Circle, Bird Builder, 3/8” Venetian Crochet Lace Trim
Thanks again for visiting- I will be posting the remaining pages in separate posts

Have a great week and God Bless!

Sunday, August 24, 2014

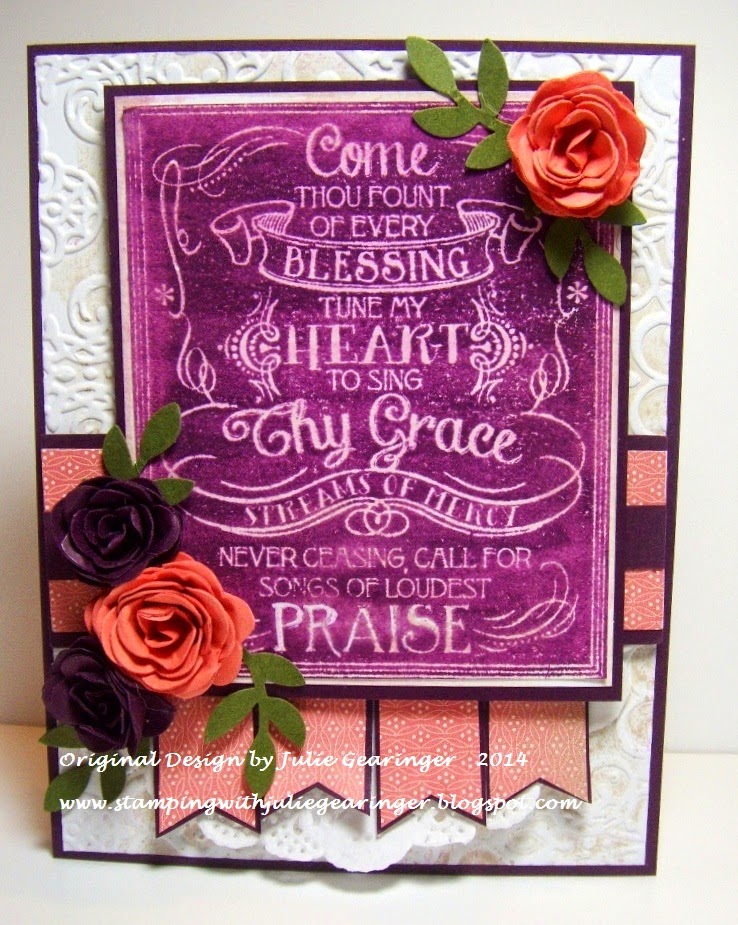
Every Blessing- Two Challenges in One :-)


Hi Stampers! 

I had a great time creating this past week and this card was created for the Just Add Ink JAI228 Color Challenge along with the Our DailyBread Designs ODBDSLC212 Sketch Challenge.
  
I know some of you have arrived from these challenge sites, but if not, I encourage you to visit the linked pages above and check out the wonderful Design Team projects as well as their fabulous galleries- you will definitely be inspired!

To create this card:
Use the Big Shot™ with the retired Lacy Brocade Textured Impressions™ Embossing Folder to emboss a piece of Whisper White cardstock (I inked the interior of the embossing folder before embossing the paper with Ranger© Tim Holtz® Antique Linen Distress Stain). 
Trim the embossed panel and mount to the Blackberry Bliss card base.
Stamp the Chalkboard Hymn stamp with Blackberry Bliss Classic Ink onto Whisper White cardstock, trim the panel and mount onto Whisper White cardstock and mount onto Blackberry Bliss cardstock. Apply Ranger© Tim Holtz® Antique Linen Distress Stain over the image to antique the paper a bit. 
Add a piece of Calypso Coral print of retired Everyday Enchantment Designer Series Paper (DSP) to a piece of Blackberry Bliss cardstock.  Add a strip of Blackberry Bliss cardstock across the center of the panel and mount onto the card front.
Mount ½ of a White Tea Lace Paper Doily below the horizontal strip onto the card front.
Create the banners from the same print of retired Everyday Enchantment DSP- use the Hexagon Punch for the banner points and mount onto Blackberry Bliss cardstock (creating banners with the punch as well).  
Add the banners to the back of the focal image and mount the focal image to the card front using Stampin’ Dimensionals®.
Create the rolled flowers from Blackberry Bliss and Calypso Coral cardstock using the 2 ⅜” and 1 ¾” Scallop Circle Punches.   Spiral cut by hand a wavy line from the outside of the scallop toward the center and roll up to create the rose (here is a basic tutorial from Splitcoaststampers). 
Use the Bird Builder Punch with Mossy Meadow cardstock to create the leaves.
Add the roses and the leaves to the card front to finish off the card.
Stamp Sets: Chalkboard Hymns (ODBD)
Ink: Blackberry Bliss, Ranger© Tim Holtz® Antique Linen Distress Stain
Paper/Cardstock:  Whisper White, Blackberry Bliss, Calypso Coral, Mossy Meadow, retired Everyday Enchantment DSP
Accessories: Big Shot™, retired Lacy Brocade Textured Impressions™ Embossing Folder, Punches: Hexagon, Bird Builder, Scallop Circle- 2 ⅜”, 1 ¾”, White Tea Lace Paper Doily

Thanks again for stopping by- I hope all of you have a great Sunday!!

Sunday, July 13, 2014

When My Mind Wanders- A Fun Sketch, Color and Anything Goes Challenge!!

Hi Stampers! 

I had a very interesting few days and despite all of the “excitement” (long story including a trip to the ER but everything is OK now :-)), I was able to find time last night and this afternoon to create a few cards.  
 
This card was created using the AW20 Color Challenge along with the FMS144 Sketch and the SR236 Anything Goes Challenge

If you have not linked up to the challenge sites yet, I urge you to do so- great samples by all!

To create this card:

Stamp the Bloom for You  onto Whisper White cardstock three separate times using Calypso Coral, Hello Honey and Blackberry Bliss Classic Ink  (don’t forget to clean the stamp before inking with a new color :-)).  

Punch each of the flowers out first using the ½” Circle Punch (for the center) followed by the 7/8”Scallop Punch and the final punch using the Fun Flower Punch.  

Assemble one of the flowers using the Calypso Coral Fun Flower piece, the Blackberry Bliss scallop and Hello Honey center and assemble one center only using the Calypso Coral scallop and Blackberry Bliss center.

Cut a panel from the Park Lane Designer Series Paper (DSP) and mount onto a piece of Blackberry Bliss cardstock.   Punch the leaves from Hello Honey cardstock using the Bird Builder Punch and add to the panel along with the Calypso Fun Flower.

Stamp the sentiment using Blackberry Bliss Classic Ink onto Whisper White cardstock and emboss above the sentiment using the Big Shot™ along with the Chevron Textured Impressions™ Embossing Folder. Trim and mount onto a piece of Blackberry Bliss cardstock, trim again and adhere to the Calypso Coral card base.

Cut two of the same size banners using the Big Shot™ and the Banner Collection Framelits™ - cut one from a piece of Blackberry Bliss cardstock and the other from a piece of Hello Honey Lullaby DSP. 

Before layering the banners, use the Pansy Punch to punch out a flower from the Blackberry Bliss banner (you will not see this cut) and then cut the Blackberry Bliss banner in half horizontally.  Layer the Hello Honey Lullaby DSP banner onto the Blackberry Bliss banner with the banner points showing at the bottom as well as a bit of the Blackberry Bliss showing at the top.

Punch out the leaves using the Bird Builder Punch from Calypso Coral cardstock, adhere the leaves and the Pansy flower to the Hello Honey banner, add the Calypso Coral/Blackberry Bliss center created in the steps above and add a strip of Blackberry Bliss cardstock to the top of the banner.

Mount the Blackberry Bliss panel to the card front (per the sketch) and add the Hello Honey banner using Stampin’ Dimensionals®.

Add the Pearls to the flower centers and across the top of the banner to finish off the card.

Stamp Sets: Bloom for You, Bloom with Hope

Ink: Blackberry Bliss, Calypso Coral, Hello Honey

Paper: Whisper White, Blackberry Bliss, Calypso Coral ; Designer Series Paper- Lullaby and Park Lane

Accessories: Big Shot™, Chevron Textured Impressions™ Embossing Folder,  Banner Collection Framelits™, Punches- Fun Flower, 7/8” Scallop Circle, ½” Circle, Bird Builder, Pearls


Hope this post makes sense (my new medications are settling in :-) ) so I will post the other cards later today ... Blessings to all of you and thanks again for stopping by!

Wednesday, June 25, 2014

CCMC308 Sending Love and Sympathy with Rolled Roses

Hi Stampers! 

I had a chance to play in my craft room last night and create several cards for a few online challenges :-)  I love participating in the online challenges since they allow you to work with colors that you may not have thought of to put together yourself and/or sketches (layouts) that again, may not have been something that you would have designed on your own (makes me “think outside the box” :-))  .  
 
This card was created for one of my favorite weekly challenges, Create with Connie and Mary using their CCMC308 ColorChallenge.   I hope you will have a chance to visit and check out all of their wonderful Design projects on their blog hop and other entries- such great inspiration!

To create this Clean and Layered (CAL) card:

Use the Big Shot™ along with the new Lovely Lace Textured Impressions™ Embossing Folder to emboss a piece of Whisper White cardstock, trim and mount onto a piece of Real Red cardstock, trim again and mount onto a piece of Bermuda Bay cardstock and finally onto the Whisper White card base. 

Ink the sentiment from Love & Sympathy (I just love the font on this sentiment- don’t you?) using the Bermuda Bay and Real Red Stampin’ Write markers and stamp onto a strip of Whisper White cardstock (there goes my scraps in use again :-)).  Mount onto a piece of Real Red cardstock and again onto a piece of Bermuda Bay cardstock (I just used strips of these colors from my stash and unless I told you my secret, which I just did, you would never know - lol!).   Trim the sentiment panel and mount onto the card front.
Create the rolled flowers from Real Red and Crushed Curry cardstock (use the 2 3/8”,  1 ¾” and 1 ¼” Scallop Circle Punches- punch the scallop circles, hand cut a wavy spiral from the outside of the scallop circle toward the center, use the retired Crimper Tool to distress a bit, roll up from the outside edge and adhere using Tombow Multi-Purpose Adhesive or a Hot Glue Gun).  Here is a brief tutorial on Splitcoaststampers site using Designer Series Paper under Rolled Flower...
Create the leaves from Bermuda Bay cardstock with the Bird Builder Punch and adhere behind the rolled flowers and add to the card front to finish off the card (again, I used a Hot Glue Gun since I had it on my desk and ready to go :-)).   
Stamp Sets: Love & Sympathy
Ink: Stampin’ Write Markers- Bermuda Bay, Real Red
Paper/Cardstock:  Whisper White, Bermuda Bay, Crushed Curry, Real Red
Accessories: Big Shot™, Lovely Lace Textured Impressions™ Embossing Folder, Punches: Bird Builder, Scallop Circle- 2 3/8”, 1 ¾”, 1 ¼”

Thanks again for stopping by- I will be sharing a few more cards later today.  Have a blessed week, my friends!!

Saturday, May 24, 2014

Way To Go- CAS for Three Challenges!


Hi Stampers!!

I decided to create another Clean and Simple (CAS) card using the CASology Theme-Flower along with the CCMC304 Create with Connie and Mary Color Challenge and a fairly loose interpretation of the CTS77 CAS(E) This Sketch! Challenge


This card is CAS to me (compared to my normal style) but may have a few too many elements to qualify for the CAS Challenges- even so, I had fun making it!!

If you have not had time to visit any of the above sites, I hope that you will do so- truly great inspiration from all!

To create this card:

Sporadically ink the Chevron background using Basic Gray Classic Ink and stamp onto a piece of Sahara Sand and Whisper White cardstock.  Trim both panels and mount the Sahara Sand background onto a piece of Basic Gray cardstock and add to the Whisper White card base.

Stamp the sentiment from Bravo using Basic Gray onto the Whisper White background panel, trim and mount onto a piece of Basic Gray cardstock.  Adhere to the Sahara Sand background (I darkened the sentiment using a Basic Gray Stampin’ Write marker and added a few shadows using the Sahara Sand Stampin’ Write marker). 

Stamp the flowers from Flower Shop using Basic Gray Classic Ink onto Soft Sky cardstock and punch out using the Pansy Punch.  Use the Soft Sky Stampin’ Write marker to darken the petals and add the Kraft corduroy button brads to the center (buttons retired years ago and seemed to match the Sahara Sand better than our current Crumb Cake).

Punch the leaves out using the Bird Builder Punch from Basic Gray cardstock and add the leaves and flowers to the front of the card.   

Sporadically add a few Rhinestones to finish off the card.

Stamp Sets: Flower Shop, Chevron, Bravo

Ink: Basic Gray, Stampin’ Write markers- Sahara Sand, Soft Sky and Basic Gray
Paper: Whisper White, Basic Gray, Sahara Sand, Soft Sky

Accessories: Punches- Pansy and Bird Builder; Rhinestones, retired Kraft corduroy button brads

Thanks again for taking the time to stop by-  I hope you have a wonderful weekend

Tuesday, May 6, 2014

Happy Mother's Day- Three Challenges in One!


Hi Again Stampers! 


My mother has been with the Lord now for over twenty years but I have a wonderful step-mother plus a few great friends who are terrific mothers as well, so it will be great to have a few Mother’s Day cards ready to go :-)


The inspiration photo reminded me of the beautiful panels from the Graphic45 Botanical Tea Paper Collection so I decided to use one of the panels and add a bit of gold, and of course, pearls and roses :-)

If you have not visited the challenge sites yet, I encourage you to do so- the Design Teams and gallery entries are wonderful!

To create this card:

Ink the En Francais stamp using Gold Encore! Metallic Ink and stamp onto a piece of Crumb Cake and Very Vanilla cardstock. 

Adhere to a piece of Blushing Bride cardstock and add the crochet lace trim along with the retired Blushing Bride Pleated Satin Ribbon and thin strip of Brushed Gold cardstock (I just used a scrap piece).   Mount onto the Brushed Gold card base (again, two strips of scraps along the outside edge). 

Mount the focal panel from Botanical Tea onto the Gold cardstock and add to the card front using Stampin’ Dimensionals®.  
Create the rolled flowers from Blushing Bride cardstock using the 1 ¾” and 1 ¼” Scallop Circle Punches- punch the scallop circles, hand cut a wavy spiral from the outside of the scallop circle toward the center, use the retired Crimper Tool to distress a bit (or just scrunch the paper by hand), roll up from the outside edge and adhere using Tombow Multi-Purpose Adhesive or a Hot Glue Gun - here is a tutorial for the rolled flowers from Splitcoaststampers.   Create the leaves from Wild Wasabi cardstock with the Bird Builder Punch and add to the back of the flowers.
Using Gold Encore! Metallic Ink, stamp the sentiment from Teeny Tiny Wishes onto Very Vanilla cardstock and create the banner points using the Hexagon Punch.  Add to the card front along with the rolled roses.
Adhere the Pearls to finish off the card.
Stamp Sets: En Francais, Teeny Tiny Wishes
Ink:  Gold Encore! Metallic Ink
Paper/Cardstock:  Very Vanilla, Blushing Bride, Crumb Cake, Brushed Gold, Botanical Tea (Graphic45)
Accessories: Punches: Hexagon, Bird Builder, Scallop Circle- 1 ¾”, 1 ¼”; Pearls, Antique Brad, Crochet Lace (from my stash), retired Blushing Bride Pleated Ribbon
Thanks again for visiting- I hope all of you have a wonderful week and Mother’s Day!

Saturday, May 3, 2014

Hello Sweet Friend- Roses for Two Challenges


Hi Stampers!

I finally had a chance to play around in my craft room today and wanted to create a card using the Pals Paper Arts PPA202 Colors and the Freshly Made SketchesFMS134 Sketch

Both of these sites have fabulous Design Teams and I hope you will have a chance to check them out!!

To create this card:

Use the Big Shot™ with the Chevron Textured Impressions™ Embossing Folder to emboss a piece of Crumb Cake cardstock and adhere it to the Bermuda Bay card base.

Adhere a White Paper Tea Lace Doily (cut in half) and add the strip of Real Red cardstock mounted onto a strip of Bermuda Bay cardstock.

Create the mini tag using the Big Shot™ and the Chalk Talk Framelits™- cut two frames (one from the Fresh Prints Designer Series Paper Stack and the other from Bermuda Bay cardstock).  Cut the tag in the middle and layer to create a shortened version for the sketch layout. 

Adhere the tag to the card front using Stampin’ Dimensionals® and add the Real Red paper bow (created with two Large Ovals and strips of Real Red cardstock using the Hexagon Punch to create the banner points).

Add the sentiment from Six Sided Sampler (punched out with the Large Oval Punch and layered onto a Large Oval from Bermuda Bay cardstock).  Add a strip of Bermuda Bay cardstock across the top of the sentiment and add the row of Pearls.

Create the rolled flowers from the 1 ¾”and 1 ¼” Scalloped Circle Punch, use scissors to cut a wavy spiral from the outside of the scallop toward the center, scrunch the paper by hand and starting from the outside, roll into the spiral and adhere (I have found that Hot Glue works well).  Here is a tutorial for the basic idea from Splitcoaststampers:-)

Adhere the rolled roses to the tag and in the center of the bow along with the Bermuda Bay leaves created with the Bird Builder Punch to finish off the card.

Stamp Sets: Six Sided Sampler

Ink: Basic Black

Paper: Bermuda Bay, Real Red, Fresh Prints DSP

Accessories: Big Shot™, ChevronTextured Impressions™ Embossing Folder, Chalk Talk Framelits™, Punches- Large Oval, Hexagon, Bird Builder, White Tea Lace Paper Doily


Thanks for stopping by- I hope all of you have a wonderful weekend!

Saturday, April 12, 2014

DD98 Cross of Hope- Happy Easter!

Hi Stampers! 

Time for the new DD98 Dynamic Duos “Subtly Yours”  and I decided to turn to My Digital Studio (MDS) along with traditional card making techniques to create my Easter card for this project :-)

I hope you will have the time to visit and check out the rest of the fantastic Design Team projects as well as create your own and share with us!!


To create this project:
Using MDS, open a blank 8.5x11 document and insert the floral cross from Crosses of Hope and enlarge a bit.   Also insert the “Easter” sentiment from Well Scripted, the “Happy” sentiment from Fabulous Phrases (reducing the size of the word Happy and inserting above Easter) and print out onto Whisper White cardstock.
Using Stampin’ Write markers in So Saffron, Wisteria Wonder and Sahara Sand to color the cross image and carefully cut out.  
Punch out the sentiment using the 1 ¾” Circle Punch and mount onto a piece of Basic Black cardstock (also punched with the 1 ¾” Circle Punch).
Use the Big Shot™ with the retired Elegant Bouquet Textured Impressions™ Embossing Folder to emboss a piece of So Saffron cardstock and the retired Lacy Brocade Textured Impressions™ Embossing Folder to emboss a strip of Wisteria Wonder Designer Series Paper (DSP).   
Mount the Wisteria Wonder strip to a piece of Basic Black cardstock and lightly sand with the Sanding Block to expose the white core.  Adhere the sentiment behind the layer and mount onto the So Saffron embossed background.
Adhere the entire panel to the Basic Black card base and add the cross using Stampin’ Dimensionals®. 
Create the rolled flowers using Whisper White, Wisteria Wonder and So Saffron cardstock and the 1 3/4” and 1 ¼” Scallop Circle Punches (punch out the scallops, hand “scrunch” the cardstock to loosen the fibers in the paper, cut a wavy spiral from the outside toward the center and roll up). 
Add the flowers with the Basic Black leaves (from the Bird Builder Punch) and Pearls to finish off the card.
Stamp Sets: Crosses of Hope, Fabulous Phrases, Well Scripted (MDS version)
Ink: Printer Ink- Black, Stampin’ Write Markers- So Saffron, Wisteria Wonder, Sahara Sand
Paper/Cardstock:  So Saffron, Wisteria Wonder, Basic Black, Whisper White, Wisteria Wonder DSP
Accessories: Big Shot™, retired Elegant Bouquet and Lacy Brocade Textured Impressions™ Embossing Folders, Punches: 1 ¾” and 1 1/4” Scallop Circle, Bird Builder, 1 ¾” Circle; Pearls

Thanks again for visiting - I hope you have a chance to join in on our “DD98 Subtly Yours” Challenge!
Related Posts Plugin for WordPress, Blogger...