Showing posts with label Elements of Style. Show all posts

Tuesday, July 28, 2020

Come Near To God


Hi Friends!

I hope you are enjoying your week so far!  This evening, I am sharing a card that was designed with the retired Stampin’ Up! Elements of Style along with a verse sentiment from the current Stamp Simply stamp set, Fear Not.

I am slowly working my way through the over 800 Splitcoaststampers sketches and this card uses the SC766 Sketch for the layout.


If you have not had a chance to check out the challenge sites yet, I hope you will do so- gorgeous inspiration from all!

To create this card:

Ink the Elements of Style image with Versamark™ Onyx Black, stamp onto white cardstock, apply clear embossing powder and heat set with a heat tool.

Once the image has cooled, watercolor with water-based markers and distress oxide ink.

Using a chevron stencil and a stencil brush, lightly apply distress oxide ink over the background before die cutting with stitched rectangle die, mount onto black cardstock and trim close to the edge.

Mount a piece of textured rose cardstock (approx. 4” x 5 1/4”) to a 4 ¼” x 5 ½” piece of black cardstock.  Adhere the mounted floral image directly to the background panel.

Add a piece of dark green organza ribbon (wrapping the ends behind the panel) before mounting onto a white card base.

Heat emboss the sentiment with white embossing powder onto black cardstock, die cut with a stitched circle die.  Mount the die cut sentiment onto another circle of black cardstock (to give it a bit more strength) and adhere to the card front with chipboard (or dimensional foam).

Finish off the card with a clear glitter pen adding shimmer to the flower petals.

Stamp Sets: Elements of Style (retired Stampin’ Up!), Fear Not (Stamp Simply)

Ink/Mediums: Versafine™ Onyx Black, Versamark™, Stampin’ Write Markers-Pink Pirouette, Blushing Bride, Rich Razzleberry, Rose Red, Old Olive, Pear Pizzazz; Tim Holtz™ Tumbled Glass Distress Oxide; Clear Glitter Pen

Paper/Cardstock: Whisper White, Basic Black, retired textured Rose Red

Accessories/Tools: Gemini, Jr™, My Favorite Things™ Dies- Stitched Rectangle A2 Set 1, Stitched Circles; Embossing Buddy®, Clear and White Embossing Powder, Heat Tool, 1” Forest Green Organza Ribbon, Memory Box™ Chevron Stencil, Clarity™ Stencil Brush

Thanks again for taking the time to visit- I hope you will stop back again soon!

Tuesday, August 29, 2017

SC600 Floral Sympathy


Hi Friends!

Woohoo- it’s time for the new SC600 sketch at Splitcoaststampers!  This is such a fun sketch and wow, our Design Team did a fabulous job with showing off the versatility!

I pulled out a few retired Stampin' Up! stamp sets, Element of Style and Bloom with Hope along with Distress Oxide/Distress Inks for a quick Media card.  


If you have not had a chance to check out the Splitcoaststampers Sketch Gallery or the other challenge galleries yet, I hope you will find the time to do so- as always, gorgeous inspiration from all!

To create this card:

1). Using Tim Holtz® Distress Oxide Inks, press the Picked Raspberry pad onto a silicone craft mat, lightly spritz with water, lay a piece of white cardstock into the ink, lift up and press again.  Dry with a heat tool and repeat the process using Peacock Feathers and Seedless Preserves.  Once you are satisfied with the background, spritz water over the ink, press lightly with a paper towel and dry with the heat tool.

2). De-static the background with an embossing powder tool, ink the Elements of Style stamp set with an archival black ink, apply clear embossing powder and heat set with the heat tool.

3). Use the AquaPainter™ with ink from Tim Holtz® Distress Ink pads- Seedless Preserves and Picked Raspberry to watercolor the flowers and the surrounding background around the flowers.  Color the leaves with the Mowed Lawn TH Distress Marker.  Trim the panel and mount onto a piece of Blackberry Bliss cardstock, trim close to the edge.

4). Trim a piece of white cardstock, mount onto a piece of Blackberry Bliss cardstock, adhere the entire panel to the white card base.

5). Die cut and emboss the scroll corners from Blackberry Bliss cardstock using a Big Shot™ with the Shapeablilites© Fleur de Lis Accents dies, wrap around the corners (per the sketch) and mount the panel onto the card front using dimensional foam.

6). Stamp the sentiment from Bloom with Hope using archival black ink onto white cardstock, apply clear embossing powder, heat set with the heat tool and create the fish tail banner (I used a retired hexagon punch).  Mount onto a piece of Blackberry Bliss cardstock and adhere directly to the card front.

7). Add white accents to the flower centers with an extra fine white paint pen and shimmer to the flower petals with a clear glitter pen. Add a few pearls to the corners to finish off the card.

Stamp Sets: Elements of Style, Bloom with Hope

Ink/Mediums: Stampin’ Archival™ Basic Black; Tim Holtz™ Distress Oxide Ink- Peacock Feathers, Picked Raspberry, Seedless Preserves; TH Distress Inks- Picked Raspberry, Seedless Preserves; Spectrum Noir™ Clear Glitter Pen; Extra Fine White Sharpie® Paint Pen

Paper: Extra Thick Whisper White, Whisper White, retired Blackberry Bliss

Accessories/Tools: AquaPainter™, Big Shot™, Shapeablilites© Fleur de Lis Accents Dies. Embossing Buddy®, Clear Embossing Powder, Heat Tool, Water Spritzer Bottle, retired Hexagon Punch, Pearls

Thanks again for taking the time to stop by! I hope you can find the time to come join us at Splitcoaststampers- we would love to see your artwork in our gallery!  Hugs and have a wonderful week, sweet friends!

Sunday, August 2, 2015

DTGD15LuvLee My Soul Waits

Hi Again Stampers!!

Here is another card that I created as a sample maker for the DTGD15LuvLee Challenge  :-)

As I mentioned in my last post, Dare to Get Dirty 2015 has started at Splitcoaststampers- this is an annual event that allows the Splitcoaststampers’ Fan Club members to participate in several challenges hosted by the Dirty Dozen Girls (current and alumni, like me) in creating cards but also the possibility to receive prizes from the member companies. 

To participate in Dare To Get Dirty, you have to be a Splitcoaststampers’ Fan Club Member, and if you are not a Fan Club member, here is the link to learn more about joining.    This week long event (August 1st- August 7th) is a fun time of chatting in the challenge forums as well as being creative creating cards. 

While the Splitcoaststampers site is free, there are many benefits to becoming a Fan Club member and for the $25.00 a year membership fee (less than 3/4 of a  penny a day), you can help support this wonderful stamping resource!  I personally visit this site several times a day- so for me it seems to be a terrific bargain!!  And no, I do not receive a commission if you sign up- lol!!, I am just one of their unofficial “cheerleaders” since I am one of the Dirty Dozen Alumni and just love the site so much- between the galleries of wonderful inspiration, free tutorials, forums and challenges- this site has helped me immensely with my journey into the world of papercrafting!

One rule of participation in the Dare To Get Dirty Challenges is that the actual challenge details are secret to all except the Fan Club Members…I can share the card but not the details on the actual challenge (unfortunately, any details on this card will reveal the challenge details, so if you have any questions, please let me know in the comment area).  

I hope you enjoy this fun card using one of my favorite retired Stampin’ Up! sets- Elements of Style along with the Our Daily Bread Designs Scripture  :-)

Stamp Sets: Elements of Style, Gorgeous Grunge, ODBD Scripture Collection 9

Ink: Stāz-On® Jet Black Ink, Stampin' Write Markers- Pink Pirouette, Strawberry Slush, Soft Sky, So Saffron, Old Olive

Paper: Whisper White, Basic Black, Strawberry Slush

Accessories: AquaPainter™, White Tea Lace Doily, Pearls, MISTI


Thanks again for stopping by- I will be sharing more of my sample cards for the Dare To Get Dirty challenges over the next few days … hugs to you, my friends!!

Saturday, July 4, 2015

Monochromatic Floral Birthday Wishes- Having Fun with Watercolor :-)

Hi Again Stampers!

I am celebrating the 4th of July in my craft room today since my hubby has to work all day :-(  and I wanted to share another card that I created using a simple watercolor technique.

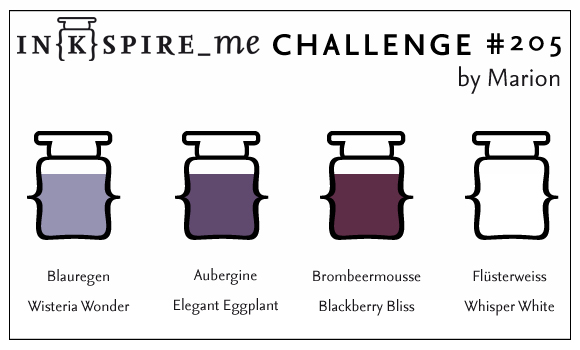
This card was designed using the IN{K}SPIRE_ME #205 Color Challenge along  with the SR284 Flowers Challenge.

Again, I hope you have the time to stop by the above sites to check out the inspiration from both Design Teams as well as the other wonderful gallery entries!

To create this card:

Using the same techniques as noted in this original blog post (minus the masking) stamp the images using Stāz-On® Jet Black Ink onto Whisper White cardstock,  color with the AquaPainter™ using Wisteria Wonder, Elegant Eggplant and Blackberry Bliss Classic Inks and add details with Stampin’ Write markers in the same colors.

Trim the image, mat onto Wisteria Wonder and Elegant Eggplant cardstock, add a few photo corners created with the 1” Square Punch and mounted onto a Whisper White card base to finish off the card.

I just love using inks and markers for watercolor- so relaxing and fun!!

Stamp Sets:  Gorgeous Grunge, retired Elements of Style and Watercolor Trio

Ink: Stāz-On® Jet Black, Blackberry Bliss, Elegant Eggplant, Wisteria Wonder; Stampin’ Write Markers- Blackberry Bliss and Elegant Eggplant

Paper:  Whisper White, Elegant Eggplant, Wisteria Wonder

Accessories: AquaPainter™, 1 “ Square Punch (for photo corners), Hexagon Punch (for banner points on sentiment), Pearls


Thanks again for visiting- have a wonderful weekend, my friends! 

Wednesday, May 13, 2015

TCC35 Mixed Media Vintage Style- Sense of Time :-)


Hi Stampers!!


I was inspired by the woodgrain, and of course, had to add a few rolled flowers in those soft, beautiful colors for my vintage style Mixed Media card. 
  
I combined our Card Concept #35 challenge with the Mixed Media Monthly Challenge #12 "MayFlowers" along with the Splitcoaststampers’  Way To Use It WT529 “It's About Time” Challenge (see details here and gallery here) and the Mix-Ability MIX119 "Texture" Challenge (see details here and gallery here).

The Card Concept is a bi-weekly challenge that has an inspiration photo along with a number of design styles that you can choose from to create your card- Clean and Simple, Clean and Graphic, Clean and Layered, Shabby Chic, Freestyle Collage, Classy and Elegant and Mixed Media.  

So I hope you have time to vist all of the above challenge sites, gather your supplies together and come join in on the fun!! 

To create this card:

Ink the Hardwood background stamp using Versamark™ ink and stamp onto a piece of Basic Gray cardstock.

Use a dry paintbrush to apply Silver Pearl-Ex® Powder and apply a layer of Mod Podge® to seal the cardstock (I have had the Pearl-Ex® for years and never used it- so much fun!!) :-)

Cut the panel into strips, adhere the strips to a piece of Basic Black cardstock and distress the edges using the Distressing Tool.

De-static a piece of Very Vanilla cardstock with the Embossing Buddy®, stamp the clock image from the retired set, Sense of Time using Versamark™ ink, apply Stampin’ Emboss® Early Espresso Embossing Powder and heat with the Heat Tool.

Ink the retired floral image from Elements of Style with Stāz-On® Jet Black Ink, stamp over the clock face and color with Stampin’ Write Markers- Soft Sky, Blushing Bride, So Saffron and Pear Pizzazz.  

Apply a bit of distressing with the Color Spritzer Tool and the Basic Gray Stampin’ Write marker and use a Faber-Castell® White Pitt Pen marker to add a few highlights to the flower centers. 

Apply Crumb Cake Classic Ink with a Sponge Dauber to the edges and center of the inage to “antique” the paper, carefully “fussy-cut” the image out, mount a circle of Basic Black cardstock behind the image and apply a layer of Mod Podge® to seal the surface.

Use the Big Shot™ with the Our Daily Bread Designs (ODBD) Layered Lacy Square Die to cut out a piece of Very Vanilla cardstock.  

Stamp the sentiment from Sense of Time with Stāz-On® Jet Black Ink onto die cut piece, ink the floral image from Elements of Style with Sahara Sand Classic Ink and stamp over the sentiment. 

Punch the sentiment out with the 2” Circle Punch and mount onto another circle of Basic Black cardstock (also punched with the 2” Circle Punch). 

Cut the remaining part of the die cut apart and adhere behind the layered sentiment circle, sponge Crumb Cake Classic Ink to “antique” the paper and use the Color Spritzer Tool and the Basic Gray Stampin’ Write marker to add additional distressing.

Apply a layer of Mod Podge® over the entire sentiment layer and set aside to dry.

Layer the crocheted lace over the background on a diagonal, add the 1” Bllack Satin Ribbon strip to cover the edge of the lace and mount the background panel to the Smoky Slate card base.

Mount the clock face and the sentiment to the card front using Stampin’ Dimensionals®.

Use the Big Shot™ with the My Favorite Things™ (MFT) Royal Rose and Mini Royal Rose Dies to create the rolled roses from Very Vanilla and Blushing Bride cardstock. 

Use the Martha Stewart Leaf Punch with Wild Wasabi cardstock to create the leaves and mount the roses with the leaves to the card front.

Add the Pearls to the sentiment to finish off the card.

Stamp Sets:  Sense of Time, Elements of Style, Hardwood

Ink: Stāz-On Jet Black, Versamark™, Crumb Cake and Sahara Sand Classic Ink; Stampin’ Write Markers- Basic Gray, Blushing Bride, Soft Sky, Pear Pizzazz; Faber-Castell® White Pitt Pen marker

Paper: Very Vanilla, Basic Black, Basic Gray, Blushing Bride, Smoky Slate, Pear Pizzazz

Accessories: Big Shot™, MFT Royal Mini Rose and Royal Rose Dies, ODBD Lacy Square Die, 2” Circle Punch, MS Leaf Punch, Pearls, Silver Pearl-Ex®, Paintbrush, Mod Podge®, Color Spritzer Tool, Sponge Dauber, 1” Black Satin Ribbon (from my stash), crochet lace from my stash


Thanks again for stopping by- I hope you have a wonderful week and come play along with us at The Card Concept!

Wednesday, February 18, 2015

TCC29 Feel Better Soon Mixed Media Card :-)

Hi Stampers!!

It’s time for the new Card Concept #29 “Get Well” Challenge and I had so much fun creating this Mixed Media card (I tried to keep it a bit simpler but it still has quite a few steps) :-)  

The Card Concept is a bi-weekly challenge that has an inspiration photo along with a number of design styles that you can choose from to create your card- Clean and Simple, Clean and Graphic, Clean and Layered, Shabby Chic, Freestyle Collage, Classy and Elegant and Mixed Media.

I was inspired by the bright colors and textures of the crocheted stars...I hope you will have a chance to check out the restof the Design Team projects and create your own project to join in on the fun!

I also decided to incorporate the Splitcoaststampers MIX100 Hue, Tint and Shade Challenge (click here to see the MIX100 Gallery).  

To create this card:

Using a palette knife, apply Gesso on a piece of Whisper White cardstock, allowing it to dry (I like to use a Heat Tool to speed up the drying process). 

The card is a bit brighter IRL- the glare on the butterfly wings made it a bit difficult to photograph :-)
Once the background has dried, apply various Ranger® Tim Holtz® Distress Stains – Salty Ocean, Picked Raspberry, Seedless Preserves  and Old Paper to a craft mat (spritzing with water), lay the Gesso background face down and pull and twist through the ink on the mat.  

Pick up the Gesso background paper, rotate to allow the inks to drain down the panel and dry with the Heat Tool.  Repeat the process until the background is the color and design that you desire (this is a trial and error type process, no right or wrong- love it!!).  

Once this layer has dried, ink the background stamp, Script using Tim Holtz® Old Paper Distress Ink and using your fingers to apply pressure to the paper, stamp randomly and partially across the background panel.

Ink the floral stamp from Elements of Style using Stāz-On Jet Black Ink and stamp onto the background.   Add additional color to the floral images using Rexel® Derwent® Watercolour Pencils.

Using the Balzar Designs® Mini Punchenella stencil, apply Studio 490® Wendy Vecchi® Crackled Texture Paste to the upper corner of the panel and heat with the Heat Tool to speed up the drying process. 

Once dried add additional Ranger® Tim Holtz® Picked Raspberry and Seedless Preserves Distress Stain and again, allow to dry. Tear the edges of the panel by hand and curl a bit with your finger.

Using the large splatter stamp from Gorgeous Grunge (along with Ranger® Tim Holtz® Old Paper Distress Ink) repeatedly stamp onto the Whisper White card base.

Mount the torn background panel onto the card front on an angle.
Ink the sentiment using Stāz-On Jet Black Ink and stamp onto Whisper White cardstock.  

Trim and punch the ends with the Hexagon Punch and mount onto the card front using Stampin’ Dimensionals®.

Stamp the butterflies from Papillon Potpourri onto Whisper White cardstock using Stāz-On Jet Black Ink.  Use Stampin’ Write markers- Marina Mist and Pink Pirouette to color the butterflies, punch out using the Elegant Butterfly Punch and apply Mod-Podge® to the butterfly wings.

Once dried, mount the butterflies to the card front (I like to use Hot Glue for better adhesion). 

Add the white highlights using a Faber-Castelle® White Pitt Pen marker and add the Pearls to finish off the card.

Stamp Sets:  Papillon Potpourri, Gorgeous Grunge, Elements of Style (retired), Script background (retired)

Ink: Stāz-On Jet Black Ink, Stampin’ Write Markers- Marina Mist and Pink Pirouette Ranger® Tim Holtz® Salty Ocean, Picked Raspberry, Seedless Preserves and Old Paper Distress Stains; Ranger® Tim Holtz® Old Paper Distress Ink, Faber-Castelle® White Pitt Pen marker, Rexel® Derwent® Watercolour Pencils

Paper: Whisper White

Accessories: Elegant Butterfly Punch, Hexagon Punch (for sentiment banner points), Gesso, Balzar Designs® Mini Punchenella stencil, Gesso, Studio 490® Wendy Vecchi® Crackled Texture Paste, Mod Podge®, Pearls, Spritzer Bottle, Craft Mat, Heat Tool and Hot Glue Gun (both optional)


Thanks again for taking the time to stop by- again, I hope you will find the time to visit us at The Card Concept and join in on the fun!!

Tuesday, January 20, 2015

Floral Triple Stamping- A Fun Technique

Hi Stampers! 

I was able to spend some more time crafting last night and wanted to create a card for the FM193 FloralTriple Layer Challenge and decided to use one of my favorite retired sets, Elements of Style along with Stampin’ Blendabilities™.

If you have not already visited the Friday Mashup! site, I hope you will do so- wonderful Design Team samples as well as the gallery of entries!!

To create this card:

Using Whisper White cardstock, create three squares- one 2x2, one 3x3 and one 4x4.  Layer and adhere the three together and stamp the floral image over the panels using Memento™ Tuxedo Black Ink (see the SplitcoaststampersTriple Stamping Tutorial here).  

Stamp a few additional flowers to use as accents on another piece of Whisper White cardstock.

Color the flowers using the Calypso Coral, Daffodil Delight, Night of Navy, Old Olive and  Rich Razzleberry Stampin’ Blendabilities™ Collections and add a few shadows with a Stampin' Write Crumb Cake marker.  

Apply Ranger® Tim Holtz® Vintage Photo Distress Ink to age the paper and stamp the Gorgeous Grunge large splatter stamp using Tim Holtz® Vintage Photo Distress Ink.

Mount the individual squares onto Night of Navy cardstock and sponge additional Vintage Photo Distress Ink along the edges.

Use the Distressing Tool to distress the edges of the retired Newsprint Designer Series Paper (DSP) as well as a piece of Raspberry Lemonade DSP.   Layer the two pieces of distressed DSP onto a piece of Night of Navy cardstock and add the horizontal strip of the Raspberry Lemondade DSP- use a sewing machine to sew the panels together.

Mount the sewn background panel onto a Whisper White cardbase and add the ½ White Tea Lace Paper Doily to the side.  

Adhere the Triple Stamped panel on an angle along with the sentiment banner to the lower left hand side using Stampin’  Dimensionals®.

Fussy-cut the additional flowers and add to the side of the panel and  use a Faber-Castell White Pitt Pen to add highlights to the flower centers.

Adhere the Pearls to the upper right hand corner to finish off the card.

Stamp Sets: Elements of Style, Teeny Tiny Wishes, Gorgeous Grunge

Ink: Memento™ Tuxedo Black Ink, Calypso Coral, Daffodil Delight, Night of Navy, Old Olive and  Rich Razzleberry Stampin’ Blendabilities™ Collections; Stampin' Write Crumb Cake Marker, Ranger® Tim Holtz® Vintage Photo Distress Ink; Faber-Castell White Pitt Pen

Paper/Cardstock:  Whisper White, Night of Navy, retired Newsprint and Raspberry Lemonade DSP

Accessories: Hexagon Punch, Pearls


Thanks again for stopping by- I hope all have a terrific week!!

Saturday, May 31, 2014

Life is A Matter of Moments- Another Experiment :-)

Hi Stampers!!

I wanted to share a few more of the background panels I created with my new Gelli Arts® Gel Printing Plate (along with some old acrylic paints I had on hand and various embossing folders).   

Since a few of the cards incorporate metal brads, buckles, etc. they will qualify for the Craft Hoarder’s Anonymous Blog Challenge #8- Show Us Some Metal or Glass as well as the Splitcoaststampers Mix-Ability MIX26 Stencils.  This card was also created using the NachoAverage NAC91 Sketch Challenge.

I am going to create separate posts for each card to help with linking to the various challenge sites- I hope you will have time to check out each link to see the fantastic samples of the Design Teams and other entrants. 

To create this card:

Use the Big Shot™ with the Sizzix™ Tim Holtz® Textured Fades™ Clock Embossing Folder to  emboss a piece of Whisper White cardstock and set aside (for use in a few minutes).

Apply a few drops of gold acrylic paint onto the Gelli Arts® Gel Printing Plate and use a Brayer to thinly spread the paint but make sure it is thick enough not to dry too quickly. 

Lay down a piece of Watercolor Paper over the printing plate (this card was created using a scrap piece of the Watercolor Paper), smooth with the brayer or your hand to cover the paper and carefully peel away from the plate.  Reapply the gold paint and continue with a few more prints.

 FYI- if you are interested in using the Gelli Arts® Gel Printing Plate, there are a few videolinks in the Splitcoaststampers forum as well as searching YouTube®.

Apply a few drops of Soft Black and Midnight Blue Acrylic Paints and smooth with the brayer to mix the paint.  Lay the embossed piece of Whisper White cardstock over the paint, smooth with your hand or a brayer, lift up and set aside for use again.

Lay the gold side of the Watercolor Paper onto the printing plate, smooth with your hand or brayer and lift up (the raised areas of the embossing piece should show against the gold paint).

Continue to repeat the above steps on the additional Watercolor Paper gold panels (if you created more than one)- FYI- I have found that I am creating approximately 10-12 background panels in one session with the printing plate as I experiment with different folders and paint colors (I will be sharing more of the experiments soon).

Once the initial panels were finished and dry (you can use a Heat Tool to speed up the drying process), re-insert the printed piece back into the same embossing folder that was used as the “stencil” and re-emboss using the Big Shot™.

Apply another thin layer of Gold Paint onto the printing plate and roll the paint from the Brayer onto the original Whisper White embossed panel (the one that was used as the “stencil” and is now covered with blue/red paint) – this way you can use the original embossing panels as well as the print panels- nothing is wasted!!

After the layer for this card is dry, gently rub the Silver Encore™ Pigment ink pad across the top of the embossing to give the panel even more of a metallic look.  Trim the panel and apply to a layer of Basic Black cardstock and again onto a layer of Midnight Muse cardstock.

Use the Big Shot™ with the Square Lattice Textured Impressions™ Embossing Folder to emboss a piece of Brushed Gold cardstock.  Mount this embossed piece onto a piece of Midnight Muse cardstock and again onto a piece of Basic Black cardstock, mount the entire panel onto the Whisper White card base.

Stamp (or in this case print the sentiment from My Digital Studio (MDS) using the stamp brush set, Elements of Style) onto Whisper White cardstock.  Trim and create the banner points uing the Hexagon Punch, layer onto Basic Black cardstock and use the punch to create banner points as well and add the small scrap strip of Midnight Muse behind the entire sentiment layer (also creating banner points with the Hexagon Punch).

Adhere the layered printed panel to the card front, add the metal clock embellishment (from the retired Tea Times Trinkets Collection) using Black Hemp Twine to the back of the sentiment (add the Whisper White circle for the clock face behind the embellishment) and adhere the sentiment onto the card front using Stampin’ Dimensionals® to finish off the card.

Stamp Sets: Elements of Style (MDS verison)

Ink: Printer Ink- Black, Encore™ Pigment Ink- Silver, Acrylic Paints- Gold, Soft Black, Midnight Blue

Paper: Whisper White, Basic Black, Midnight Muse, Brushed Gold, Watercolor

Accessories: Big Shot™, Square LatticeTextured Impressions™ Embossing Folder, Sizzix™ Tim Holtz® Texture Fades™ Clock Embossing Folder, Gelli Arts® Gel Printing Plate, Brayer, Hexagon Punch, retired Black Hemp Twine, retired Tea Times Trinkets Collection


Thanks again for taking the time to stop by- I hope all of you have a great weekend and I will be sharing more of the background panels soon!
Related Posts Plugin for WordPress, Blogger...