Showing posts with label Ex Libris. Show all posts

Thursday, April 28, 2016

Psalm 31:24 Be Strong and Take Heart


Hi Again Friends!!

Here is my second card I designed using The Card Concept Challenge #52 Inspiration  Photo (please see my first card in this post).

Again, I was inspired by the beautiful purples in the lilacs for my Mixed Media card (lilacs were my Mother’s favorite along with irises).


I hope will find the time to visit us at The Card Concept as well as the other challenge sites- wonderful inspiration from all!!

To create this card:

Using a foam brush, apply Gesso® over a piece of cardstock (I used a piece of Designer Series Paper that I did not like the pattern- one way to use up “older” paper).
Once the Gesso® dried, apply Ranger® Tim Holtz® Distress Stains to a craft mat (I used Broken China, Frayed Denim and Mowed Lawn), lay the panel into the ink, lift up and allow the ink to spread, spritz with water to dilute a bit and continue to tilt and spread the ink.

Dry the ink with a Heat Tool, apply more ink as desired along with Gelatos® (I used Aqua Dolce and Cotton Candy- spritzing the Gelatos® with water and allowing the color to run across the panel).
Some of the color was a bit bright for me so I added Ranger® Tim Holtz® Picket Fence Distress Stain to tone down some of the brightness.

Once the panel was thoroughly dry, de-static with the Embossing Buddy®, ink the retired Ex Libris background stamp with Versamark® Ink, stamp onto the prepared panel, apply Stampin’ Emboss® White Embossing Powder and heat set with the Heat Tool.

Repeat the above embossing steps with the sentiment from the Our Daily Bread Designs Scripture Collection 3 using Versamark® Ink, then add Elegant Eggplant Classic Ink followed by Clear Embossing Powder.

Trim the background panel, mount onto the Old Olive card base and sponge additional Elegant Eggplant Classic Ink over the embossing in a few areas (wiping off the excess with a lightly dampened paper towel).


Cut the roses from Elegant Eggplant cardstock with the Big Shot™ and the My Favorite Things® (MFT) Royal Rose and Mini Rose Die, crimp the die cuts with the Crimper Tool before rolling into the flower shape and add Gesso® to the flower petals.


Punch the leaves from Old Olive cardstock with the Martha Stewart® (MS) Leaf Punch, add the roses to the leaves and apply Gesso® to the leaves as well.

Mount the roses and leaves onto the card front (I like to use Hot Glue for this step) and add the Pearls to the corners.

Ink the butterflies from Papillon Potpourri with Versamark™ Ink and stamp onto Whisper White cardstock, apply Stampin’ Emboss® Black Embossing Powder and heat set with the Heat Tool.

Punch the butterflies out with the Elegant Butterfly Punch and color with the So Saffron Stampin’ Write Marker.

Add to the card front along with Pearls for the bodies to finish off the card.

Stamp Sets: Papillon Potpourri, retired Ex Libris (SU!), Scripture Collection 3 (ODBD)

Ink/Mediums: Versamark™, Elegant Eggplant; Stampin’ Write Marker- So Saffron; added Ranger® Tim Holtz® Distress Stains-Broken China, Faded Denim, Mowed Lawn, Picket Fence; Gelatos®- Aqua Dolce, Cotton Candy

Paper: Whisper White, Old Olive, Elegant Eggplant, misc piece of DSP (for Gesso® panel)

Accessories: Gesso®, Big Shot™, MFT Royal Rose and Mini Royal Rose Dies, Elegant Butterfly Punch (SU!), MS Leaf Punch, Embossing Buddy®, Heat Tool, Stampin’ Emboss® Clear, White and Black Embossing Powder, Pearls


Thanks again for taking the time to visit- I hope all of you have a wonderful day!!

Wednesday, February 11, 2015

CC517 & SC526 Sunflower Get Well Soon

Hi Stampers! 

I had a chance to play in my craft room and decided to create a Mixed Media card using Stampin' Blendabilities™, Distress Inks and regular Stampin' Write Markers for the Splitcoaststampers CC517 Color Challenge (Bermuda Bay, Coastal Cabana and Old Olive with the dessert option of four layers or more) and the SC526 Sketch (flipped the sketch). 

If you have not already visited the above sites, I hope you will the chance to check out the wonderful Design Team samples as well as the galleries!!

To create this card:

Stamp the main image (Sunflower Collage- non SU!) using Memento™ Tuxedo Black Ink onto Whisper White cardstock. 

Color the image using Stampin’ Blendabilities™- Coastal Cabana for the background (Light and Medium), Old Olive for the leaves and Daffodil Delight for the petals (again, Light and Medium). 

Add a few shadows with the Bermuda Bay Stampin’ Write Marker and distress the panel using Ranger® Tim Holtz® Vintage Photo Distress Ink.

Use a Faber-Castell® Black Pitt Pen Marker to re-define the lines on the image and add a few highlights with a Faber-Castell® White Pitt Pen Marker.

Trim and mount the image onto a piece of retired Soft Sky Designer Series Paper and distress the edges with Ranger® Tim Holtz® Vintage Photo Distress Ink.

Using Bermuda Bay Classic Ink, stamp the Ex Libris background stamp onto a piece of Bermuda Bay cardstock.  Distress the edges with the Distressing Tool and mount onto a piece of Soft Suede cardstock (also using the Distressing Tool to distress the edges). 

Using Coastal Cabana Classic Ink, stamp the En Francais background onto a strip of Coastal Cabana cardstock, distress the edges with the Distressing Tool and mount onto a distressed piece of Soft Suede cardstock.  Adhere this strip to the background panel and mount onto the Whisper White card base.

Cut a White Tea Lace Paper Doily in half and distress with Ranger® Tim Holtz® Vintage Photo Distress Ink.  Mount the doily behind the focal image panel and adhere the focal image to the card front using Stampin’ Dimensionals®.

Stamp the sentiment onto Whisper White cardstock, distress with Ranger® Tim Holtz® Vintage Photo Distress Ink and stamp the Ex Libris background over the image (“huff” to re-moisten the ink before applying to the sentiment).

Cut the banner points using the Hexagon Punch and mount onto the card front using Stampin’ Dimensionals®.

Add the Antique Brad and Pearls to finish off the card.

Stamp Sets: Ex Libris, En Francais, Express Yourself; Sunflower Collage (Inkadinkado®)

Ink: Memento™ Tuxedo Black,  Stampin’ Blendabilities™ Collection- Coastal Cabana, Daffodil Delight, Old Olive;  Stampin’ Write Marker- Bermuda Bay, Ranger® Tim Holtz® Vintage Photo Distress Ink, Faber-Castell® White and Black Pitt Pen Markers

Paper/Cardstock:  Whisper White, Bermuda Bay, Coastal Cabana, Soft Suede

Accessories: Distressing Tool, Sponge Daubers, Hexagon Punch, White Tea Lace Paper Doily, Antique Brad, Pearls


Thanks again for visiting- I hope all of you are having a fabulous week so far!

Tuesday, March 25, 2014

SUO93 Scallop Tag Treat Box

Hi Stampers! 

Time for another SUO-Only Challenge and the SUO93 Challenge is“Boxes, Bags and Baskets” and 3-D is definitely another challenge for me!  I decided to use the new Scallop Tag Punch versus a Big Shot™ die and had a great time!!

If I had this one to do again, I would stamp the cardstock prior to creating the box (trust me, it would have been easier :-))!

I hope you will have the time to visit and check out the rest of the fantastic Design Team projects as well as create your own and share with us
To create this project:
Using the Scallop Tag Punch, punch out two tags 5 ¼” long by 2” wide from So Saffron cardstock, score each tag along the straight edge using the Simply Scored™ Tool at 1 ¼” .
Create the center box with a piece of So Saffron cardstock – this is the part that I had to create the dimensions based off the tag (I neglected to write them down- I believe it was a 4 ¼” x 4 ¼” piece of cardstock, scored at 1 1/8”, 3 1/8” , flip and score again to create a small box for the treat).    If I have the time, I will create another and write down all of the dimensions
Ink the Ex Libris background stamp using Baked Brown Sugar and stamp all of the pieces prior to adhering the box together. 
Hidden Treat of Chocolate- Every Girl's Favorite :-)
Add the rolled flower along with the banner sentiment and ribbon to finish off the project.
Stamp Sets: Ex Libris, Teeny Tiny Wishes
Ink: Baked Brown Sugar, Stampin’ Write Markers- Rose Red, Pear Pizzazz, Crisp Cantaloupe
Paper/Cardstock:  So Saffron, Rose Red, Pear Pizzazz
Accessories: Punches: Hexagon, 1 ¾” Scallop Circle, Bird Builder, Scalloped Tag, 3/8” So Saffron Taffeta Ribbon, Simply Scored™ Tool

Thanks again for visiting - I hope you have a chance to join in on our “Boxes, Bags and Baskets” SU-OnlyChallenge!

Saturday, November 23, 2013

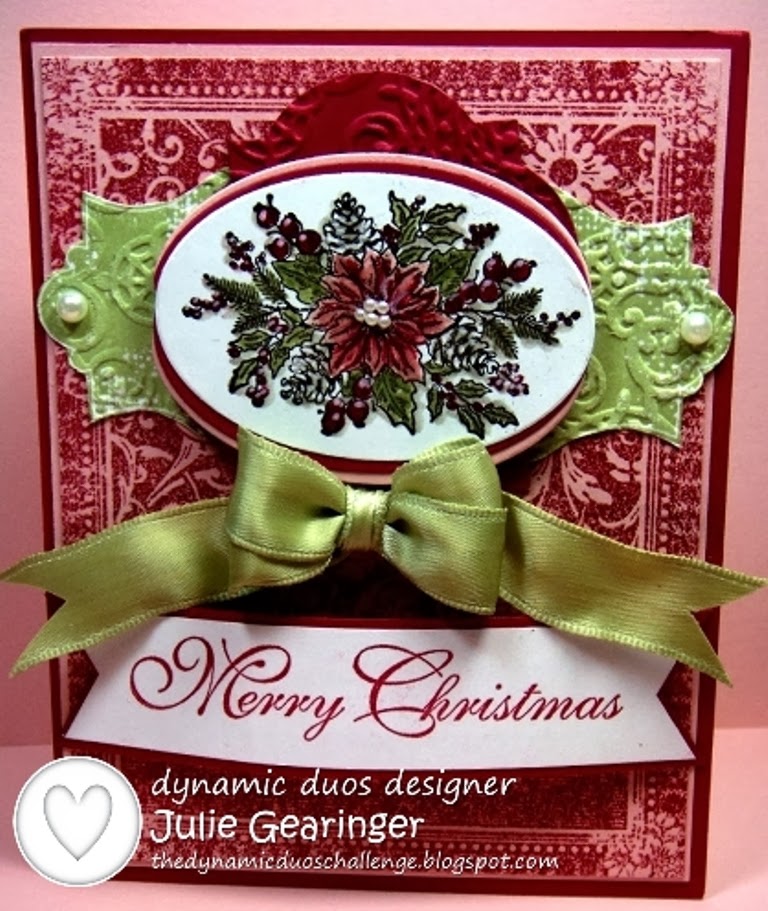
DD80 Triple Threat Christmas

Hi Stampers!  

This week’s Dynamic Duos DD80 “Triple Threat” Challenge uses Blushing Bride, Raspberry Ripple and Pear Pizzazz.   Again, I hope you will find the time to visit the rest of the fabulous Design Team projects- they rocked the challenge this week!!   


Since Christmas is almost here, I decided to create another Christmas card design :-)

To create this card:

I decided to dig into my retired stamp collection and use the poinsettia image from one of the Christmas sets from years ago – My Favorite Frame (Holiday Frame).

Stamp the image using Early Espresso Classic Ink onto Whisper White cardstock and color using Stampin’ Write markers- Blushing Bride and Raspberry Ripple for the petals and berries, Pear Pizzazz for the leaves.  Add a few highlights with the Chalk Marker (this marker will be carried over in the upcoming Occasions Mini- yea!)

Use the Big Shot™ with the Ovals Collection Framelits™ to cut out the image and mount onto a piece of Blushing Bride and Raspberry Ripple cardstock (also cut from the same oval framelit™). 

With the Big Shot™ and the Window Frames Collection Framelits™, cut a window frame from Raspberry Ripple cardstock and emboss with the retired Lacy Brocade Textured Impressions™ Embossing Folder- cut in half by hand in the middle horizontally.

Stamp the label image from Everything Eleanor onto a piece of Whisper White cardstock.  Emboss using the Big Shot™ with the retired Lacy Brocade Textured Impressions™ Embossing Folder and cut around the outline by hand and cut in half vertically in the middle.

Ink the background stamp, Ex Libris with Raspberry Ripple Classic Ink and stamp onto a piece of Blushing Bride cardstock.  Trim to 4 1/8” x 5 3/8”.  Mount onto a piece of Raspberry Ripple cardstock.

Stamp the sentiment from Greetings of the Season using Raspberry Ripple Classic Ink onto Whisper White cardstock and cut the banner points using the Hexagon Punch.  Layer onto a piece of Raspberry Ripple cardstock and mirror cut the points with the Hexagon Punch as well :-)

Layer onto the card base the Everything Eleanor label (with the center spread apart to reach the edges of the card) and add the Window Frame (again spread apart) to cover the split areas of the Pear Pizzazz label at the top and bottom.  Add the Poinsettia focal image and sentiment using Stampin’ Dimensionals®.

Add the double satin ribbon bow and Pearls to finish off the card.  

Stamp Sets:  Greetings of the Season, Ex Libris, Everything Eleanor, retired Favorite Frame (Holiday)

Ink: Early Espresso, Blushing Bride, Pear Pizzazz, Raspberry Ripple, Stampin’ Write 

Markers- Blushing Bride, Pear Pizzazz, Raspberry Ripple, Chalk Marker

Paper: Whisper White, Blushing Bride, Raspberry Ripple

Accessories:  Big Shot™, retired Lacy Brocade Textured Impressions™ Embossing Folder, Window Frames and Ovals Collection Framelits™, Hexagon Punch, Pearls, satin ribbon from my stash


Thanks again for stopping by!  I hope all of you will have a chance to visit us at The Dynamic Duos andplay along in our DD80 “Triple Threat” this week!!  

Tuesday, August 13, 2013

SUO77 Vintage Birthday

Hi Stampers! 

I created this card for the Stampin’ Up! Only SUO77 Birthday Challenge along with the SplitcoaststampersCC437 Color Challenge – please stop by to check out our Design Team projects and the details- hope you will be able to create a project and join us!

To create this card:

Ink the Ex Libris background stamp using Baked Brown Sugar Classic Ink onto Baked Brown Sugar cardstock.  Use the Distressing Tool to distress the edges and adhere to a piece of Strawberry Slush cardstock (distress the edge of this layer as well).

Mount the panel onto a Baked Brown Sugar cardstock base and distress the edges, curling the corners a bit. 

Create the rolled flowers from Strawberry Slush cardstock using the 1 ¼” Scallop Circle Punch (cut into the circle towards the center and roll up- see the Splitcoaststampers tutorial here) and cut the leaves from Pistachio Pudding cardstock using the Big Shot™ with the Little Leaves Sizzlet™.  Add a bit of Baked Brown Sugar Classic Ink using a Sponge Dauber to “antique” the flowers and leaves a bit.

Stamp the label from Everything Eleanor using Baked Brown Sugar onto Strawberry Slush cardstock- carefully cut out by hand and use the Distressing Tool along the edges.  Sponge additional Baked Brown Sugar Classic Ink along the edges and add to the card front.

Ink the sentiment from Wetlands using Baked Brown Sugar Classic Ink and stamp onto Baked Brown Sugar cardstock- punch out using the Large Oval Punch and layer two Large Oval pieces from Pistachio Pudding cardstock behind the sentiment oval.  Distress and add to an XL Oval piece from Quatrefancy Designer Series Paper (distressed and sponged with Baked Brown Sugar Classic Ink).  Layer onto the Strawberry Slush label and add the rolled flowers and leaves. 

Stamp the butterfly from Papillon Potpourri using Baked Brown Sugar onto Strawberry Slush cardstock, punch out using the Elegant Butterfly Punch and add to the card using Mini Glue Dots™. 

To finish off the card, add Pearls to the corners, center of the rolled flowers, butterfly and edge of the label.

Stamp Sets: Ex Libris, Wetlands, Papillon Potpourri
Ink: Baked Brown Sugar

Paper/Cardstock:  Baked Brown Sugar, Strawberry Slush, Pistachio Pudding

Accessories: Big Shot™, Little Leaves Sizzlet™, Distressing Tool, Sponge Dauber, Punches- 1 ¼” Scallop Circle, Large Oval, XL Oval, Elegant Butterfly, Pearls


Thanks again for stopping by!!!  I hope you will have a chance to join us in our challenge- have a great week!

Thursday, July 18, 2013

Vintage Sympathy- Something Old, Something New

Hi Stampers! 

I wanted to create a card using the PP154 colors at this week’s Paper Players Challenge and decided to incorporate five different stamp sets along with one of my new favorite Framelits™- Chalk Talk.  Some the the stamp sets- Everything Eleanor, Ex Libris and Teeny Tiny Wishes have been around for a while ad are "old" favs and the new sets, Best of Butterflies and Lovely Romance are working their way into my favs :-)

If you have the time, and have not already done so, check out their The Paper Players site- the Design Team and other entries are wonderful for this fresh color combination!!

To create this card:

Stamp the flowers from Everything Eleanor and the butterfly from Best of Butterflies using Early Espresso Classic Ink onto Whisper White cardstock.  Watercolor using the AquaPainter™ with ink from the Bermuda Bay and Crushed Curry Classic Ink Pads- add Moonlight Smooch™ Pearlized Accent Paint to the wings of the butterfly. 

Carefully cut out the flowers and the butterfly.  Gently roll up the butterfly wings to give it a more realistic look.

WIth Polka Dot Ribbon Bow 
Using Bermuda Bay, ink the medallion stamp from Lovely Romance, stamp off and stamp onto Whisper White cardstock.  Use the Big Shot™ and the large Chalk Talk Framelit™ to cut a label from the stamped image and another one from Bermuda Bay cardstock.  Cut the Bermuda Bay label in half vertically and layer behind the stamped label.   Ink the antennaw only on the butterfly stamp and stamp towards the bottom left hand corner.

Use Sponge Daubers with Baked Brown Sugar Classic Ink to distress the paper a bit and tone down the Whisper White. 

Stamp the Ex Libris background stamp using Baked Brown Sugar Classic Ink onto Baked Brown Sugar cardstock.   Distress the edges using the Distressing Tool and mount onto a piece of distressed Bermuda Bay cardstock.  Using the Sponge Dauber with Baked Brown Sugar to distress the edges a bit as well.

With Paper Ribbon Bow 
Use Sticky Strip behind the tag and attach the Victorian Crochet Lace- ruffle the lace.   Add the ½” Polka Dot Bermuda Bay Grosgrain Ribbon at the bottom of the Chalk Talk tag to cover the bottom edge, add to the background layer using Stampin’ Dimensionals®.

Add the stamped flowers, butterfly ad triple ribbon grosgrain bow to the tag.  Stamp the sentiment using Baked Brown Sugar Classic Ink and punch out using the Word Window Punch.

Add the Pearls to finish off the card.  *** REVISION ***  Not sure if I like the Polka Dot bow so I revised with a cardstock (paper) bow, Antique Brad and framed the sentiment :-)  If you have a chance, let me know which one you prefer ....

Stamp Sets: Best of Butterflies, Everything Eleanor, Ex Libris, Lovely Romance, Teeny Tiny Wishes

Ink: Baked Brown Sugar, Bermuda Bay, Crushed Curry, Early Espresso

Paper/Cardstock:  Whisper White, Baked Brown Sugar, Bermuda Bay

Accessories: Big Shot™,  Chalk Talk Framelits™,  Word Window Punch, Distressing Tool, AquaPainter™, Sponge Dauber, Pearls, ½” Bermuda Bay Polka Dot Grosgrain Ribbon (retired), revised version- Antique Brad, Large Oval Punch, Modern Label Punch 


Thanks again for stopping by- I hope all of you have a wonderful Thursday!!

Tuesday, July 2, 2013

SUO74 Romantic Mr, Moose :-)

Hi Stampers! 

The Stampin’ Up! Only Challenges theme for the SUO74 Challenge is Favorite Accessories.    I decided to incorporate quite a few of my favorite accessories along with my favorite tools (which I also consider "Accessories" :-)).   I love using Ribbon, Antique Brads, Pearls, Paper Lace Doilies and for tools -I tend to gravitate towards the Big Shot™, Embossing Folders, Framelits™ and lately the AquaPainter™ and Sponge Daubers.

 Originally I had planned on naming this card "Mrs. Moose" (since it is a bit more feminine with the ribbon, pearls and doily) but when I showed my husband the card, he reminded me that in order for it to be a “Mrs.”, it should not have antlers- lol!!!  There goes that idea!!  So this is Mr. Moose trying to entice Mrs. Moose to come his way!

To create this card:

Ink the background stamp, Ex Libris with Pool Party Classic ink and stamp the image onto a piece of Pool Party cardstock.   Emboss with the Big Shot™ and the Honeycomb Textured Impressions™ Embossing Folder, trim the edges and mount onto a piece of Early Espresso cardstock.

“Huff” onto the Ex Libris background stamp (to re-moisten ink) and stamp again onto a piece of Whisper White cardstock. 

 Ink the sentiment from Wetlands using Early Espresso Classic Ink (love the font on these sentiments) and once stamped over the background layer, sponge with Soft Suede Classic Ink.  Punch out using the Large Oval Punch and create a frame from two additional Early Espresso Ovals (using the same punch).

Emboss a piece of Soft Suede cardstock with the Fancy Fan Textured Impressions™ Embossing Folder, adhere to a piece of Early Espresso cardstock and add the 3/8" Soft Suede Taffeta ribbon strip.

Ink the moose image using Early Espresso Classic Ink onto Whisper White cardstock and color the moose using the AquaPainter™ with the ink from the Brown Sugar and Early Espresso Classic Ink Pads, the grass using Gumball Green and the sky using Pool Party.

Using Sponge Daubers, add the distressing to the edges using Soft Suede and Early Espresso Classic Ink.  Add few drops from the Early Espresso re-inker into a Stampin’ Spritzer and add 70% Rubbing Alcohol to create an ink spray and "spritz" a bit of the ink over the image (practice first to make sure you have enough ink and distance away from the paper- this will add a lot more ink than the retired Color Spritzer Tool).

Center the Chalk Talk Framelit™ over the moose image and cut out using the Big Shot™.  Also cut another Chalk Talk die cut using Early Espresso cardstock, trim off the lower edge and layer to create a frame behind the moose image.

Use a Sponge Dauber with Sahara Sand and Soft Suede Classic Ink to “antique” ½ of a Tea Lace Paper Doily and adhere under the strip of Taffeta Ribbon. 

Add the focal image using Stampin’ Dimensionals®, adhere the triple ribbon bow created from 3/8” Soft Suede Taffeta Ribbon along with the Antique Brad in the center. 

Mount the entire panel onto a piece of Soft Suede cardstock, add the Pearls and sentiment to finish off the card.

Stamp Sets:  Walk in the Wild, Wetlands, Ex Libris

Ink: Brown Sugar, Early Espresso, Gumball Green, Pool Party, Sahara Sand, Soft Suede

Paper/Cardstock: Whisper White, Early Espresso, Pool Party, Soft Suede

 Accessories:  Big Shot™, Fancy Fan and Honeycomb Textured Impression ™ Embossing Folders, Chalk Talk Framelits™, Large Oval Punch, Tea Lace Paper Doily, AquaPainter™, Stampin’ Spritzer, Sponge Daubers, Antique Brad, 3/8” Soft Suede Taffeta Ribbon, Pearls

Thanks again for visiting- I hope you have a chance to stop by to visit us at SUO Challenges to see all of the details and what the other Design Team have created- we would love to see you play along with us!!   Have a great week!!

Sunday, March 17, 2013

What is Black, White and Red All Over :-) ?


Hi Stampers!!
 
I wanted to create a card for this week’s FM101 Challenge at The Friday Mashup! and decided to incorporate the colors from the CC302 Splitcoaststampers’ Color Challenge (Basic Black, Whisper White and Real Red) along with the TLC410 Chalkboard Technique.  

If you have a chance, check out the samples at all of these sites- such wonderful galleries!!

To create this card:

Using the Embossing Buddy®, de-static a piece of Basic Black cardstock and stamp the Ex Libris background stamp image using Versamark™ ink.   Apply Stampin’; Emboss® White Embossing Powder and heat with the Heat Tool. 

Trim the background layer to 4” x 5 ¼” and add the 5/8” Basic Black Satin Ribbon at the bottom of the panel.   Mount onto a piece of Basic Black cardstock (4 1/8” x 5 3/8”) and adhere to the Whisper White card base.

De-static, stamp with Versamark™ and heat emboss another piece of Basic Black cardstock with the sentiment from Trust God.  Once cooled, center and cut out with the Big Shot™ and the Adorning Apothecary Accents Framelit™.  Lightly sponge White Craft ink over the image to give the appearance of the chalkboard.

Create the rolled flowers using the 1 ¼” Circle punch to punch out six circles and the 1 3/8" Circle Punch to punch out one circle from Real Red cardstock.  Use the Crimper Tool to crimp all of the circles twice (run thru the Crimper once and then rotate and run thru the Crimper again).

Using scissors, start at the outside of the circle and cut a way spiral following the edge of the circle towards the center until you are in near the center (leave a flat bit of cardstock in the center to add glue and adhere the rolled flower). 

Add the Antique Brad to the sentiment layer and adhere the layer to the embossed background using Stampin' Dimensionals®.    Add the rolled flowers using Mini Glue Dots, add the 5/8" Basic Black Satin Ribbon bow and Pearls to finish off the card.

Stamp Sets: Ex Libris, Trust God

Ink: Versamark™, Craft White

Paper: Basic Black, Whisper White, Real Red

Accessories:  Big Shot™,  Adorning Apothecary Framelits™, Punches- 1 ¼”, 1 3/8” Circle and 1/16" Handheld, Sponge, Embossing Buddy®, Stampin’ Write® White Embossing Powder, Heat Tool, Crimper Tool, Antique Brad, Pearls, 5/8” Basic Black Satin Ribbon (retired)

Thanks again for visiting and I hope all of you have a blessed Sunday!

Sunday, November 4, 2012

Joyful Hearts Meeting- Nov 2012


Hi Stampers!               
                                                                                                
Between the hurricane, internet and power outages and work, I have been busy creating my 26 swap cards for our quarterly Joyful Hearts demonstrator meeting that my lovely upline, Cindy Fodor held today.  She is just the best upline possible and this meeting included her family serving us a wonderful dinner (turkey, beef, veggies, desserts-all of the food was fabulous and so fresh since it is from their farm)!!  Thank you Cindy and family for such a grand evening of fun!!

This card is fairly simple to create:

Stamp the Ex Libris background stamp using Early Espresso Classic Ink onto Very Vanilla cardstock.  Color the flowers, vines and borders with the Aqua Painter using More Mustard, Always Artichoke and Bravo Burgundy Classic Ink (be careful not to use too much water or the Early Espresso ink may run).

Stamp the medium flower image from Everything Eleanor using Early Espresso Classic Ink onto Very Vanilla cardstock.  Again, using the Aqua Painter, watercolor with More Mustard and Bravo Burgundy ink- once dry, add a second layer of ink on some of the areas for dimension.

On Very Vanilla cardstock, stamp the sentiment (with Early Espresso Classic Ink). Cut out the sentiment using the Big Shot™ with the Apothecary Accents Framelits™ Die- lightly sponge the edges with Crumb Cake ink and use the Color Spritzer Tool with the Stampin’ Up! Crumb Cake marker to add additional distressing.
Close-up of Watercolor Background 

Also with the Apothecary Accents Framelits™ Die and the Big Shot™, cut the label from Bravo Burgundy cardstock. 

Use the Big Shot™ with the Lacy Brocade Textured Impressions™ Embossing Folder to emboss the watercolored Ex Libris background panel as well as the Bravo Burgundy label die cut.

Assemble the background panel onto Bravo Burgundy and Always Artichoke cardstock.  Add the embossed label and stamped sentiment along with the flowers along the side.

Attach the ½” Always Artichoke Seam Binding double bow and pearls to finish off the card.

Stamp Sets:  Ex Libris, Everything Eleanor, Blessings from Heaven

 Ink: Early Espresso, Always Artichoke, Bravo Burgundy, More Mustard

Paper:  Very Vanilla, Always Artichoke, Bravo Burgundy, Crumb Cake, Stampin’ Up! Crumb Cake marker  

Accessories:  Big Shot™, Lacy Brocade Textured Impressions™ Embossing Folder, Apothecary Accents Framelits™ , Aqua Painter, Sponge Dauber, Color Spritzer Tool, ½” Always Artichoke Seam Binding, Pearls

Thanks again for stopping by!!  I had a great time making this card for all of my fellow demonstrator “friends” that truly bless my life!

I hope all of you are doing well and have a wonderful week creating and stamping!

Sunday, September 2, 2012

French Poppies #2- Three Background Stamps in One!


Hi Stampers!

Here is the second card created with the other part of the Pleasant Poppies background stamp from the previous post.   Again, this one uses the colors from the CQC152 ColourQ Challenge along with the En Francais and Ex Libris background stamps :-)


To create this card:

As mentioned, the poppies focal image is the left-over piece from the previous post- I stamped the floral image using Basic Gray onto Crumb Cake cardstock and with the watercolor technique, used the Aqua Painter with Gumball Green and Bermuda Bay Classic Ink to add color to the stems and flowers. 

Using a combination of watercolor and markers, I colored in the background with Basic Gray and once dry, used the Basic Gray marker and cross-hatched the background.   FYI- I also used the Basic Gray marker to highlight the centers of the flowers and a few petals.

Ink the En Francais background stamp using Basic Gray and stamp onto Whisper White cardstock.

The background behind the poppies was created using Whisper White cardstock and watercolor with Classic Ink.  Use the Aqua Painter to add water to the lid of the Gumball Green and Bermuda Bay Classic Ink pads and mix with the ink.  Apply to the paper using Sponges to achieve the desired effect.  Apply Basic Gray Classic ink to the Ex Libris background stamp and stamp over the slightly damp watercolor background (this will give you a soft muted appearance). 

Layer the poppy focal image onto Whisper White and add the ½” Crumb Cake Seam Binding bow and lightly sponge Crumb Cake ink to soften the white edges.
  
Tear and curl the edges of the Ex Libris background and sponge with Crumb Cake ink to distress.  Mount onto the Whisper White layer and then onto Basic Gray.


Use the SU! White Watercolor pencil to add highlights to the flowers to finish off the card.  

Again, I purposely did not add a sentiment yet- I will wait until I need it for a special occasion and then add the sentiment.

Stamp Sets:  Pleasant Poppies, En Francais, Ex Libris (all three are background stamps)

Ink: Basic Gray, Gumball Green, Bermuda Bay (retired)

Paper: Whisper White, Basic Gray, Crumb Cake, Bermuda Bay (retired)

Accessories:  Aqua Painter, Sponges, SU! White Watercolor Pencil, ½” Crumb Cake Seam Binding

Thanks again for stopping by to visit !  If you have the time to view the previous post and compare to this one, let me know which one you prefer.  I like this one better since it shows more of the cross-hatching and the white highlights on the flowers seem to brighten them a bit :-)  

I hope all of you have a blessed week and a restful Labor Day!
Related Posts Plugin for WordPress, Blogger...