Showing posts with label Modern Medley DSP. Show all posts

Friday, November 13, 2015

Matthew 22:37- Love the Lord Your God


Hi Stampers! 

I had a chance to spend some time this evening and decided to create a card using the Hand Stamped Sentiments HSSCC224 Color Challenge along with the Splitcoaststampers’ SC566 Sketch (I flipped the sketch upside down :-))


I hope you will have a chance to visit and check out all of the wonderful Design projects and other entries at the above sites!

To create this card:

Ink the Our Daily Bread Designs (ODBD) Scripture Collection #9 using Stāz-On® Jet Black Ink and stamp onto Very Vanilla cardstock.

Use the Big Shot™ with the My Favorite Things (MFT) Stitched Oval STAX die to cut out the sentiment and mount onto another oval cut with the Ovals Collection Framelits™ from Blackberry Bliss cardstock.

Cut the Blackberry Bliss oval cut in half, adhere the halves behind the stitched oval sentiment showing just a part of the frame.

Ink the retired Musical Score background stamp using Delightful Dijon Classic Ink and stamp onto a piece of Delightful Dijon cardstock.

Trim the edges of the background stamped panel, add the crochet lace and re-adhere the edges.

Add the strips of Blackberry Bliss cardstock to cover the seam.

Using the 1 ¼” Circle Punch, punch four circles to create the scallop design, place on the back side of Modern Medley Designer Series Paper (DSP) and trace along  the edge with pencil.

Cut the DSP along the traced edge and trim the sides to size.

Use the Distressing Tool to distress the paper, add Range punch four circles to create the scallop design (per the sketch), place on the back side of Modern Medley Designer Series Paper (DSP) and trace along the edge with pencil.

Hand-cut the DSP along the traced edge and trim the sides to size.

Use the Distressing Tool to distress the paper, add Ranger® Tim Holtz® Tea Dye Distress Ink to age the paper and use the Crimper Tool to crimp the panel.

Add the DSP to the front panel and mount the entire panel onto Blackberry Bliss cardstock.

Add the crochet lace to the top of the panel, adhere a piece of Delightful Dijon cardstock (stamped with the Musical Score background stamp) and add the 3/8” Stitched Blackberry Bliss Satin Ribbon bow.

Mount the entire panel onto the Delightful Dijon card base (also stamped with the Musical Score background stamp using Delightful Dijon Classic Ink).

Mount the oval verse using dimensional foam and add the Blackberry Bliss cardstock roses and leaves (roses cut from Blackberry Bliss cardstock with the Big Shot™ using MFT Royal Mini and Royal Rose Dies and the leaves from Mossy Meadow cardstock using the Martha Stewart (MS) Leaf Punch).

Add a few Pearls to finish off the card.
Stamp Sets: Musical Score (retired Stampin’ Up!), Scripture Collection #9 (ODBD)
Ink: Stāz-On® Jet Black Ink, Delightful Dijon
Paper/Cardstock:  Very Vanilla, Blackberry Bliss, Delightful Dijon, Mossy Meadow; Modern Medley DSP (retired)
Accessories: Big Shot™, My Favorite Things- Stitched Oval Dies, Royal Mini Rose, Royal Rose; Ovals Collection Framelits™, Crimper Tool, Sponge Daubers, Crochet Lace Trim (from my stash), MS Leaf Punch, Pearls

Thanks again for stopping by- I hope you have a wonderful day!!

Sunday, September 29, 2013

Music is in their Soul- Tic-Tac-Toe for Two Lovely Nieces :-)

Hi Again Stampers!!

Today we celebrated my stepmother’s belated birthday and the birthday of my twin nieces who are now eighteen years old!!  Time surely flies by and they have grown into two lovely young ladies who love the Lord and have been blessed with so much talent in music and art!

Their mother is an accomplished pianist and they have had piano lessons since they were very young and both of them are extremely gifted in music- they have just started playing the violin and cello and these two instruments have been extremely easy so far for them since they have such an extensive background in music. 

I have seen many cards in the galleries that were punch art of a piano and thought I would use that idea for one of the cards and a violin from an old retired set, Musical Medley  for the other…..

I checked out this week's The Paper Players PP165 Tic-Tac-Toe Challenge from Ann and both cards qualify... in fact, combined, they are a "three way" Tic-Tac-Toe- Ribbon, Designer Paper and  Birthday; Ribbon, Embossing and Banners and Birthday, Pearls and Banners...love the Tic-Tac-Toe Challenges!!   I hope you can take the time to check out their site- so much inspiration!!

To create the first card:

Layer the Modern Medley cardstock onto the Basic Black card base and distress a bit by hand and using a Sponge Dauber with Crumb Cake Classic Ink.

Create the angle of the “piano” by drawing it by freehand onto Basic Black cardstock and cut out with Paper Snips.  

De-static this angled piece using the Embossing Buddy® and ink the retired Musical Score background stamp using Versamark™ ink (could not located my current Music wheel- where did that go??).  Apply Stampin’ Emboss® Clear Embossing Powder and heat with the Heat Tool to melt the powder. 

Create the piano keys using the Word Window punch and punching out pieces of Very Vanilla and Basic Black cardstock- adhere to the bottom of the card in a keyboard layout with Two-Way Glue.

Add the sentiment banner created from My Digital Studio(MDS) using the retired stamp set, Feeling Sentimental from the 2013-2014 Sale-A-Bration (printed onto Very Vanilla cardstock and distressed with the Distressing Tool) and the banner points are created by hand or you can use the 1" Square Punch. 

Add the triple 5/8” Basic BlackSatin Ribbon bow and adhere the "piano top" to the card, adding the Pearls to finish off the card.

To create the second card:

De-static a piece of Very Vanilla cardstock using the Embossing Buddy® and ink the retired Musical Medley violin stamp using Versamark™ ink.  Apply Stampin’ Emboss® Black Embossing Powder and heat with the Heat Tool to melt the powder.

Color the image using Stampin’ Write Markers in Sahara Sand and Crumb Cake.  Create a shadow and hand draw the “table” or “floor” area with the Basic Black Stampin’ Write marker (mask the rest of the image and add a bit of distressing with the Color Spritzer Tool and the Basic Black Stampin’ Write marker on the shadowed area).   Ink the background stamp, En Francais with Crumb Cake Classic Ink and stamp over the image. 

Use the Big Shot™ with the Ovals Collection Framelits™ to cut out the oval shape and mount onto the Basic Black frame (created with the Big Shot™ and the Window Frame Collection Framelits™).

Distress the edges of a piece of Modern
Medley Designer Series Paper and adhere to the Basic Black Card Base.   Add the focal image along with the banner sentiment (same one as in the first card above) and the triple 5/8” Basic Black Satin Ribbon bow with a few Pearls to finish off the card.  

Stamp Sets:  Feeling Sentimental (MDS, retired SAB), Musical Score, Musical Medley (both retired), En Francais

Paper:  Basic Black, Very Vanilla, Modern Medley DSP

Ink: Versamark™, Crumb Cake, Printer Ink- Black, Stampin’ Write Markers- Sahara Sand, Crumb Cake, Basic Black

AccessoriesEmbossing Buddy®, Stampin’ Emboss® Black Embossing Powder, Heat Tool, Big Shot™, Ovals and Window Frame Collections Framelits™, Sponge Daubers, Punches- Word Window, 1” Square (for banner points), 5/8” Black Satin Ribbon (retired). Pearls

Thanks again for stopping by- both of my nieces seemed to be thrilled with the cards and of course, the gift cards inside helped as well! 

Have a great Monday and have fun stamping!

Saturday, August 24, 2013

Sensible Woman in a Polka Dot Dress :-)


Hi Stampers! 

I wanted to create a card to start off the weekend and decided to use the Freshly Made Sketches #FMS100 Challenge (congrats on 100!) along with the SR190 colors from Stampin’ Royalty.   

Hope you take the time to visit both sites- so many examples of projects (no two the same- love it!! :-))

To create this card:

Stamp the script image from Notable Notions using Basic Black Classic Ink onto Crumb Cake cardstock and adhere to a piece of Basic Black cardstock.

Add the Pistachio Pudding DSP (from Venetian Romance Designer Series Paper) onto a layer of Basic Black cardstock and mount onto the background layer at an angle per the sketch.

Use the Big Shot™ with the Dress Up Framelits™ to cut the dress from the Modern Medley Designer Series Paper and use the Delicate Doilies Sizzlits™ L with a piece of Very Vanilla.  

Add the 1/2” Crumb Cake Seam Binding for the waistband (fold in half first) across the dress and adhere behind the dress with Glue Dots. 

To create the paper roses- Use the 7/8” Scallop Circle Punch and 1 ¼” Scallop Circle Punch to punch out circles from Crisp Cantaloupe cardstock (one with the 7/8” Punch and three with the 1 ¼” Punch).   

Take your scissors and cut a wavy spiral cut around the flower- start from the outside and follow the circle around towards the center leaving an area in the middle for the glue, scrunch the paper a bit and roll the cardstock up starting from the outside edge towards the center.  Add a bit of Multipurpose Liquid Glue to the center of the flower to hold in place and add a Pearl (Splitcoaststampers has a photo tutorial here).

Use the Bird Builder Punch to punch out the leaves from Pistachio Pudding Cardstock (I cut a few leaves off the stem for the small rose) and adhere behind the flowers using Glue Dots.     Add the small rose to the waist of the dress with a Glue Dot.

Adhere a strip of Crisp Cantaloupe DSP (from Birthday Basics) to a piece of Basic Black cardstock and add to the front of the card overlapping the Pistachio Pudding and Doily a bit. 

 I decided to use a previously printed My Digital Studio™  (MDS) sentiment from Favorite Thoughts (love this sentiment and the download is still current :-))  and hand cut the banner points.  To handcut, using Paper Snips cut toward the sentiment on the end (in the middle) and then hand cut from the corners to meet the end of the center cut  (again toward the sentiment).   I have also cut the banner points in the past using the 1" Square Punch but decided to go the hand cut way this time :-)

Using Stampin’ Dimensionals® add the banner and the dress- finish off the card adding the roses to the corner of the sentiment.

Stamp Sets:  Notable Notions, Favorite Thoughts (MDS)

Ink: Basic Printer Ink- Black, Black Classic Ink

Cardstock: Very Vanilla, Basic Black, Crumb Cake, Designer Series Paper- Birthday Basics, Modern Medley and Venetian Romance


Accessories:  Big Shot™, Dress Up Framelits™, Delicate Doilies Sizzlits™ L, 7/8” and 1 ¼” Scallop Circle Punches, ½” Crumb Cake Seam Binding Ribbon, Pearls 

Thanks again for taking the time to visit- it is so encouraging to me!!  Have a great weekend and God Bless!!

Tuesday, July 23, 2013

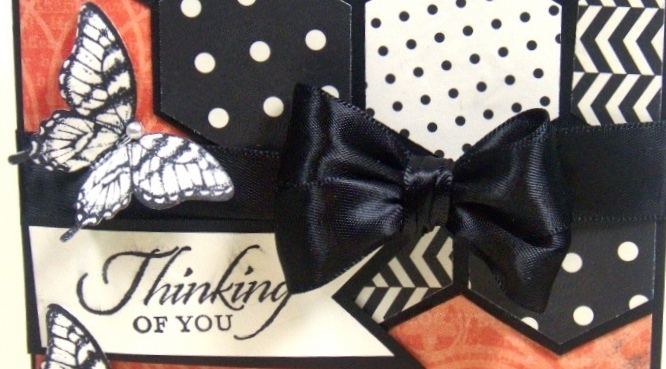
Thinking of You- A Sketch and Color Challenge

Hi Again Stampers!!

I am having a great time in my stamping room today so I think this may be a record for posts in one day for me..

While my hubby watches his baseball games, I decided to create a card using the HSSSC164Sketch at Hand Stamped Sentiments (I flipped the sketch over) and the DD62 Challenge Colors from The Dynamic Duos.  

Again, if you have not visited these sites yet- stop by and check out all of the inspiration!!

To create this quick CAS card:

Using the hexagon punch, punch out various pieces from the Modern Medley Designer Series Paper (DSP).  Adhere the hexagons per the sketch onto Basic Black cardstock and carefully trim around the outer edge by hand.

Adhere this panel onto a piece of Calypso Coral DSP from Epic Day This and That.  Add the 5/8” Basic Black Satin Ribbon bow along with the banner sentiment. 

Mount the entire panel onto Basic Black cardstock and add the butterflies and pearls to finish off the card.

Stamp Sets:  Papillon Potpourri, Wetlands

Ink: Basic Black

Paper: Very Vanilla, Basic Black, Epic Day This and That DSP, Modern Medley DSP

Accessories:  Punches- Elegant Butterfly, Hexagon, 1” Square, Pearls, 5/8” Basic Black Satin Ribbon (retired)

I think I will have to make this card again in a different color combo- it was definitely quick and easy!!  


Thanks again for stopping by and I hope you have a wonderful Wednesday!!

Sunday, July 21, 2013

PPA164- Three Cards from One Terrific Sketch :-)

Hi Stampers! 

What a wonderful weekend so far!!   Yesterday we held our Ladies Ministry Card Making class and had a fabulous time- I will post the cards and instructions later this evening or early Monday (depending on my internet connection during our stormy or threatening of stormy weather :-)).  

In the meantime, I wanted to create a card using this week’s PPA164 sketch at Pals Paper Arts (love their sketches) but once I started, I ended up creating three separate cards with the same sketch- I love it when that happens!!! 

Again, if you have not already visited the Pals Paper Arts site, I urge you to take the time to do so- not only are the Design Team samples fabulous but they also have a wonderful gallery of the entries using this sketch.

To create card #1- Sunflower Sympathy:

Stamp the Sunflower background stamp using So Saffron Classic Ink onto Whisper White cardstock and cut into strips for the sketch.   Carefully cut part of the Whisper White cardstock away from the petals on the ends of the strips and bend the ends upwards.

Use the Big Shot™ to emboss a piece of Whisper White cardstock using the Pretty Print Textured Impressions™ Embossing Folder.  Layer the trimmed Sunflower strips, cut to size and mount onto a piece of Basic Gray cardstock.

Stamp the sentiment from Love & Sympathy onto a piece of Whisper White cardstock and punch out with the 1 3/8” Circle Punch.  Layer two 1 3/8” Circles from Basic Gray cardstock behind the sentiment to create a frame.

Layer the So Saffron cardstock to the card base, add the Basic Gray cardstock layer, the Designer Series Paper (from the Eastern Elegance series) and add the focal image layer along with the sentiment.

Add the Pearls to the corner and sentiment to finish off the card. 
  

Stamp Sets: Sunflower (background), Love & Sympathy

Ink: So Saffron, Basic Gray

Paper/Cardstock:  Whisper White, Basic Gray, So Saffron, Eastern Elegance DSP

Accessories: Big Shot™,  Pretty Prints Textured Impressions™ Embossing Folder,  1 3/8” Circle Punch, Pearls

To create the second card- Masculine Thank You (already gave this card to a man who does so much for others and we are so blessed to have him in our lives...)

With the Big Shot™ and the Woodgrain Textured Impressions™ Embossing Folder, ink the smooth interior of the folder lightly using Early Espresso Classic ink and emboss a piece os Sahara Sand and Soft Suede cardstock.  Gently distress the edges using the Distressing Tool and sponge Early Espresso Classic Ink over the edges to “antique or age” the cardstock.

Cut the Soho Subway Designer Series Paper into strips and distress the edges with the Distressing Tool.  Tear the outside edge by hand and sponge Early Espresso Classic Ink over the edges, again, to further “age” the paper.

Mount the cardstock strips to the Sahara Sand Woodgrain layer, add the three Antique Pewter Hodgepodge Hardware brads and mount onto the Soft Suede Woodgrain layer- add this panel to your card base.

Stamp the clock from Clockworks (I used a previously printed and cut out clock from MDS that I had on hand)- color the brass areas with the Summer Starfruit Stampin’ Write marker and lightly age the clock face using a Sponge Dauber with Sahara Sand Classic Ink.  Add a few highlights with the White Gel Pen and sponge Early Espresso over the Summer Starfruit areas to “antique” the clock.

Add the Gold Trim (retired years ago) as a clock chain along with the sentiment to finish off the card.     

Stamp Sets: Clockworks, Teeny Tiny Wishes

Ink:  Early Espresso, Sahara Sand, Stampin’ Write Markers- Summer Starfuit

Paper: Sahara Sand, Soft Suede,  Soho Subway Designer Series Paper

Accessories:  Big Shot™,  Woodgrain Textured Impressions™ Embossing  Folder, Sponge Daubers, Antique Pewter Hodgepodge Hardware (retired), Gold Twine (retired)

To create the third card- Trust in The Lord Musical Medley 

Use the Big Shot with the Lacy Brocade Textured Impressions™ Embossing Folder to emboss a piece of Modern Medley Designer Series Paper(DSP). 

Mount this layer onto Very Vanilla Cardstock and again onto Basic Black.

Cut the strips from the musical note paper from the Modern Medley DSP and adhere to the card per the sketch.

Stamp the verse from Trust God using Basic Black Classic Ink onto Very Vanilla cardstock, punch out with the  1 3/8” Circle Punch and add the additional 1 3/8” Circles from Basic Black and Very Vanilla behind the sentiment to create the frame. 

Use the Big Shot with the Chalk Talk Framelits™ to cut the frame out of Basic Black, add the sentiment and 5/8” Basic Black Satin Ribbon bow.

Add to the card using Stampin’ Dimensionals™ and add the Pearls to finish off the card. Quick and easy- again, I love the simplicity of this sketch!!

Stamp Sets: Trust God

Ink:  Basic Black

Paper: Very Vanilla, Basic Black, Modern Medley DSP

Accessories:  Big Shot™,  Lacy Brocade (retired) Textured Impressions™ Embossing  Folder, Chalk Talk Framelits™, 5/8” Basic Black Satin Ribbon (retired), Pearls

Thanks again for stopping by!  If you have the time, let me know which card you prefer- my husband and I have differing opinions so you can help us solve our discussion :-))


Have a wonderful day and I will be posting the Ladies Card Ministry directions soon (I promise)-  God Bless!
Related Posts Plugin for WordPress, Blogger...