Showing posts with label Wonderful Wings. Show all posts

Wednesday, March 15, 2023

TCC191 Blue Butterfly


Hi Friends!

Welcome to our #191 {Signs of Spring} or {Blue Butterfly} at The Card Concept! The Card Concept is a bi-weekly challenge and we would love for you to create a card based on our inspiration photo and join us! Every month, the second challenge will have two photos to choose from for your card design. 

The colors and the butterfly of the second photo were what inspired my Elegant and Classy/Mixed Media card. 

As many of you who follow my blog also know, I enjoy participating with other online challenges (I know how much work goes into maintaining a challenge blog and want to give support).  I will be linking this card to the Tic-Tac-Toe #199 Featured Designer Jeanie Challenge (across Die Cut-Green-Layers), the Stamping Sensations “Anything Stamped with opt of Wings and Tails” Challenge and the Retro Rubber Blog Challenge #201 Anything Goes Challenge.  One of the requirements of the Retro Rubber Challenge Blog is to use a stamp that is at least one year old (the Stampin’ Up! Wonderful Wings image is from 2001).


If you have not had a chance to check out the galleries at the challenge sites, I hope you will take time to check them out!  Also, we hope you will stop by The Card Concept to see the rest of the DT designs and which photo they chose-  we would love to have you participate with us!

The background panel was a piece of retired Stampin' Up! Bashful Blue cardstock that I had in my stash (with the oval already die cut). 

The retired Tin Tile 3D Embossing Folder (Stampin' Up!) was used to emboss the blue panel, then Distress Oxide along with Distress Stains and glitter pens were used to finish the background.


The Wonderful Wings butterfly (2001 Stampin’ Up!) was heat embossed using clear embossing powder and colored with water-based markers. After coloring, fussy-cut and shimmer was added with a clear glitter marker.


The sentiment was also heat embossed with clear embossing powder from the Farmhouse Scriptural Quotes stamp set from Stamp Simply.  After die cutting a piece of black cardstock with another oval die, the card was layered along with ribbon and lace.

I love the fonts used on this stamp set as well as the encouraging Scripture verses!

The card was finished off with a few silver rhinestones.

Stamp Sets: Farmhouse Scriptural Quotes (Stamp Simply)

Inks/Mediums: Versafine Onyx Black, Broken China Distress Oxide, Broken China, Chipped Sapphire, Mowed Lawn Distress Stain; Stampin’ Write Markers- Balmy Blue, Tempting Turquoise; Wink of Stella Clear and Silver Glitter Markers

Cardstock/Paper: White, Black, Bashful Blue

Accessories/Tools: Gemini, Jr., Sizzix Ovals Dies, Tin Tiles 3D Embossing Folder;  Embossing Powder Tool, Clear Embossing Powder, Heat Tool, ¼” Black Satin Ribbon, White Lace (from my stash), Silver Rhinestones  

Thanks again for taking the time to visit! I hope you are inspired to create a card and join us for our #191 {Signs of Spring} or {Blue Butterfly} Challenge.


Wednesday, September 7, 2022

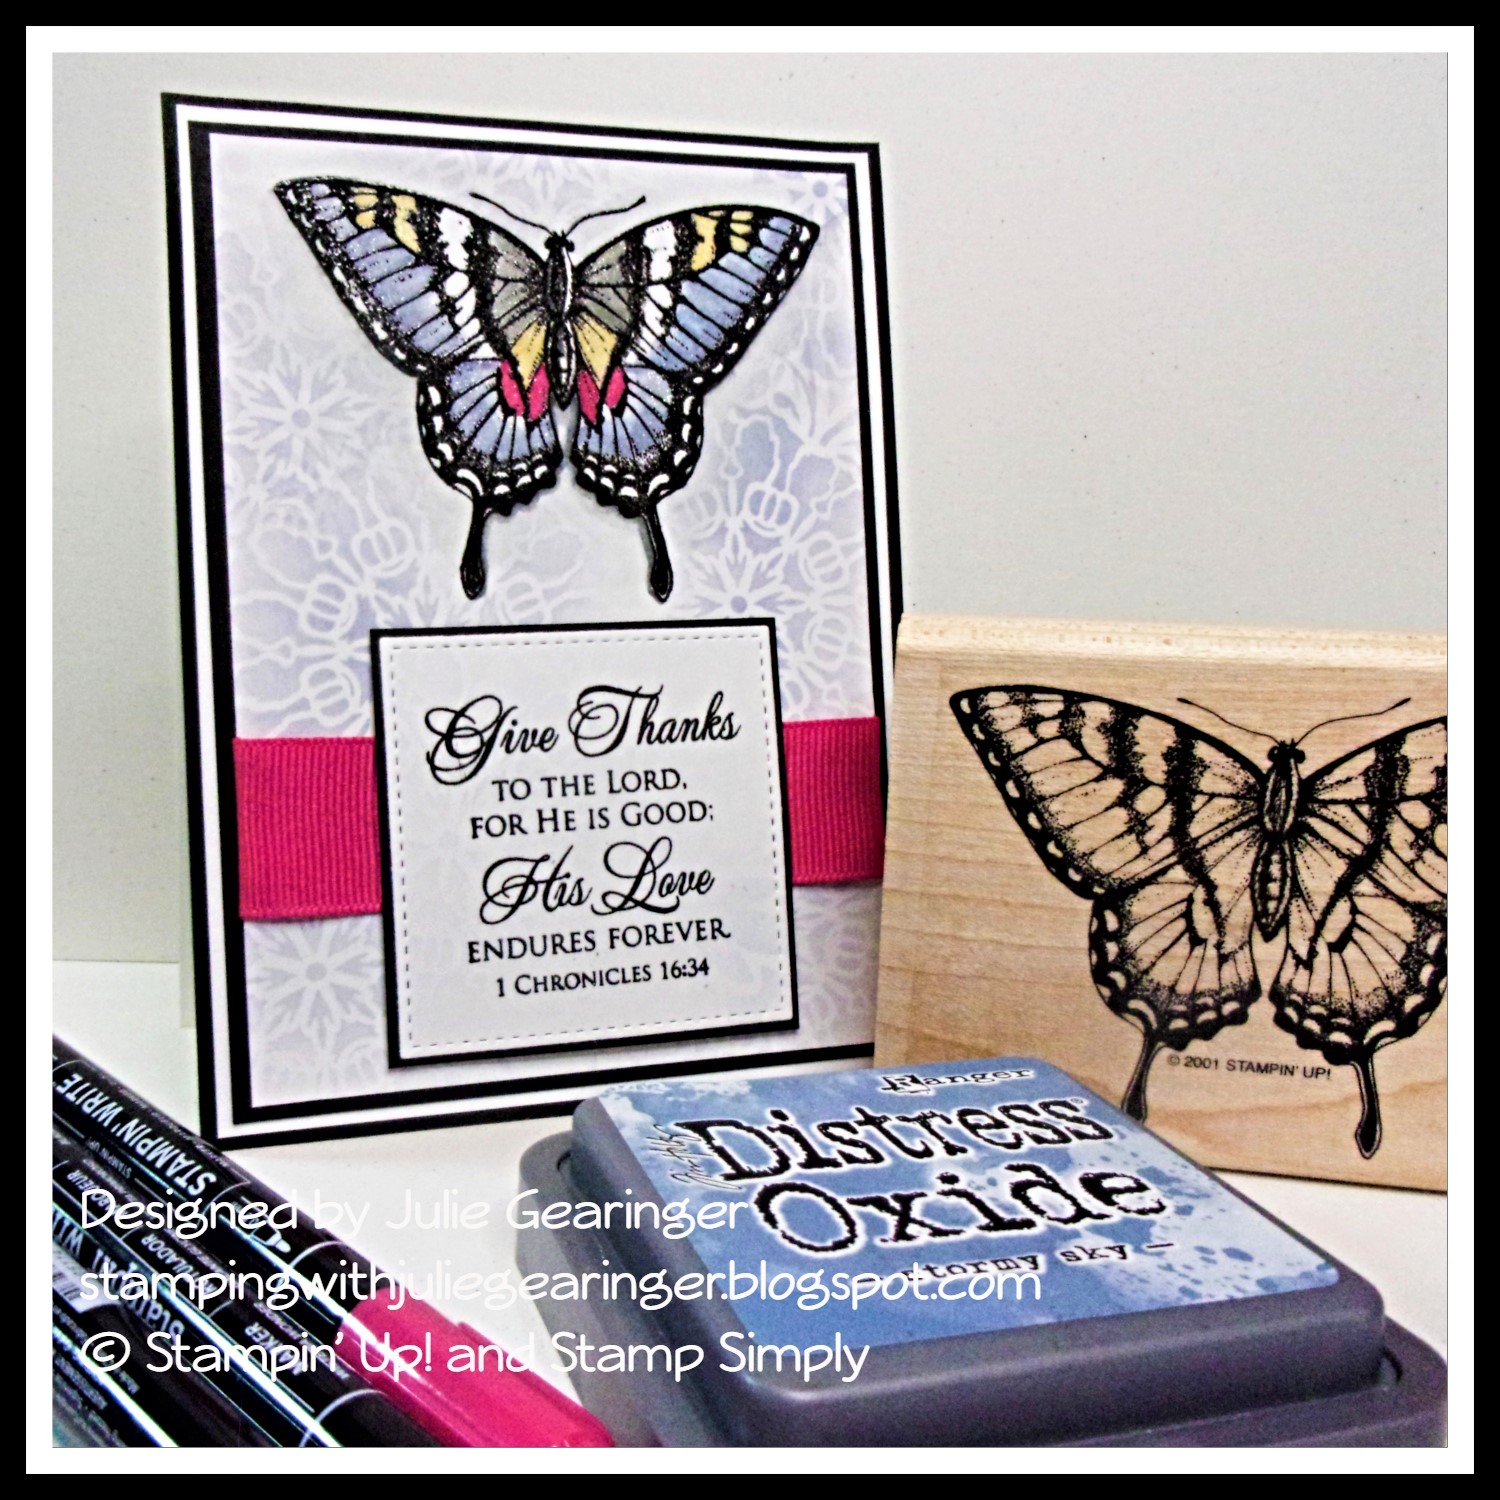
TCC179 Give Thanks


Hi Friends!

Welcome to The Card Concept #179 {Change of Season} Challenge!  I am so thrilled that we are back for our fall/winter session and I hope you will have time to check out our new Design Team and all of their beautiful inspiration!


I love butterflies and felt inspired by the color dots as well as the butterfly to create a Clean and Layered/ Mixed Media card. 

As I have mentioned in previous posts, I have a personal goal to create cards using stamps and supplies that I already own (and have not inked up in a while) and I love this older retired stamp from Stampin’ Up! (Wonderful Wings from 2001) and paired it with a verse sentiment from the Give Thanks stamp set (currently available at Stamp Simply).

I enjoy participating with online challenges and will be playing along with the Simon Says Monday “Stamp It” Challenge and the Word Art Wednesday #559-#560 “Anything Goes” Challenge.

If you have not had a chance to visit us at The Card Concept or the other challenge sites, I hope you will find time to do so- wonderful inspiration from all!


To create this card:


De-static a piece of white cardstock with an embossing powder tool, stamp the swallowtail butterfly image with Versafine™ Onyx Black ink, apply clear embossing powder and heat set with a heat tool.

Once the embossing has cooled, color the image with water-based markers. 

Create a mask with a sticky note, apply distress oxide ink with a stencil brush over the flourish stencil.

Trim the panel, add the grosgrain ribbon and wrap the ends behind the panel.


Mount onto a piece of black cardstock, trim again and mount onto white cardstock, trim again and mount onto black cardstock before mounting onto a white card base.

De-static another piece of white cardstock with an embossing powder tool, stamp the verse sentiment with Versafine™ Onyx Black ink, apply clear embossing powder and heat set with a heat tool.

Once the embossing has cooled, die cut with a stitched square die, mount onto black cardstock trimming close to the edge.

Use the stencil brush with distress oxide ink to add a bit of stenciling over the sentiment.

Mount onto the card front with dimensional foam.

Finish off the card using a clear glitter pen.

Stamp Sets:  Wonderful Wings (retired Stampin’ Up! from 2001), Give Thanks (Stamp Simply)

Ink/Mediums:  Versafine™ Onyx Black, Stormy Sky Distress Oxide, Stampin’ Write Markers- Flirty Flamingo, Wisteria Wonder, Smoky Slate; Zig Wink of Stella Clear Glitter Marker

Cardstock/Paper: Whisper White, Basic Black

Accessories/Tools: Gemini, Jr., My Favorite Things Stitched Square STAX Dies, Embossing Powder Tool, Clear Embossing Powder, Heat Tool, Memory Box

Thanks again for taking the time to visit- again, I hope you will be able to join us at The Card Concept! We would love to see your cards in our gallery. 

Wednesday, March 17, 2021

TCC151 Do Not Be Anxious


Hi Friends!

Welcome to The Card Concept #151 {Butterfly Brilliance} Challenge!  

For those of you who are not familiar with our bi-weekly challenge, we offer an inspiration photo to inspire you to design your card (in your choice of card-making style and/or styles).  We ask that you include our inspiration photo in your blog post along with an explanation of what inspired you from our photo for your card. 

I love this beautiful butterfly and was inspired by the green background, the jewel tones of the butterfly to create a Mixed Media card!

In my continuing effort to use some of my older stamps, I paired a few retired Stampin’ Up! stamps with a verse from a current stamp set, Scripture Collection 4 (Divinity Designs, LLC).  I also used various mediums- watercolor crayons and powders, water-based markers, shimmer paint, washi tape, ModPodge®, white paint pen, Nuvo® jewel drops- the entire kitchen sink from my stash!  

Most of you know that I enjoy participating with online challenges and am also playing along with the Addicted to Stamps and More #401 Make Your Mark Challengethe WatercoolerWednesday WWC311 “Kath’s Challenge: All Things Feminine”  and the Retro Rubber #154 “Anything Goes” Challenge.  

One of the requirements from the Retro Rubber Challenge is to use stamps that are over one year old- the butterfly stamp is from 2011 and music background stamp is from 2000.  

If you have not had a chance to visit The Card Concept, or the other challenge sites yet, I encourage you to do so- wonderful inspiration from all! 

To create this card:

On a piece of white cardstock, scribble watercolor crayons over the background (I used Gable Green, Green Galore and Always Artichoke), spritz with water and spread with a water brush.  Dry with a heat tool.

Sprinkle a small amount of Leaf Green Brushos® over the background, spritz with water, tilt the paper to spread the water, blot off the excess and dry with a heat tool.

Ink the Music Score background stamp with Mowed Lawn Distress Ink and randomly press the background panel onto the background stamp.

De-static the upper right-hand area of the panel with an embossing powder tool, ink the verse sentiment from Scripture Collection 4 with Versafine™ Onyx Black ink, stamp onto the prepared panel, apply clear embossing powder and heat set with a heat tool.

Apply Frost White Shimmer Paint over the background with a water brush and stamp a few splatters with a small stamp from Timeless Textures with Mowed Lawn Distress Ink.

Distress the edges with a distressing tool, add the strips of washi tape and mount onto a piece of black cardstock.  Adhere the entire panel onto a white card base.

Ink the Wonderful Wings image using Versafine™ Onyx Black ink, stamp onto the prepared panel, apply clear embossing powder and heat set with a heat tool. 

Once the embossing has cooled, scribble the watercolor crayons onto a glass surface and use a water brush to watercolor the image.  Add additional coloring with water-based markers and once dry, fussy-cut the image.


Use a black Pitt-Penn™ marker to cover the cut edges and mount onto the card front.

Use a foam brush to apply Gloss ModPodge® to the butterfly wings and an extra fine white paint pen to add a few white splatter dots in the background.

Finish off the card with Nuvo™ Morning Dew Jewel Drops.

Stamp Sets:  Scripture Collection 4 (Divinity Designs LLC); retired Stampin’ Up! sets- Wonderful Wings, Musical Score Background, Timeless Textures

Ink/Mediums: Versafine™ Onyx Black Ink, Tim Holtz™ Mowed Lawn Distress Ink; retired Stampin’ Up! Watercolor Crayons- Green Galore, Gable Green, Always Artichoke, Pink Passion, Orchid Opulence, Tempting Turquoise; Stampin’ Write Markers- Gorgeous Grape, Rich Razzleberry, Tempting Turquoise; Pitt Penn™ Black Pen, Leaf Green Brushos®, Frost White Shimmer Paint, Nuvo™ Morning Dew Jewel Drops, Sharpie® Extra Fine White Paint Pen, Gloss ModPodge®

Paper/Cardstock: Whisper White, Basic Black

Tools/Accessories: Embossing Powder Tool, Clear Embossing Powder, Heat Tool, Graphic45 Washi Tape. Misc. Washi Tape, AquaPainter™, Distressing Tool

Thanks again for taking the time to visit!  We would love for you to create a card based on our inspiration photo and join us at The Card Concept! The challenge is open until March 29th  at noon EDT.

Thursday, August 6, 2020

It is the Gift of God


Hi Friends!

This mainly one layer Mixed Media card was designed using a current set from Stamp Simply, Grace (for the verse sentiment) along with the butterfly image from the retired Wonderful Wings stamp set (Stampin’ Up!).

I wanted to participate with a few online challenges and will be playing along with the Double “D” 08/05“Butterflies” Challenge and the Word Art Wednesday #450- #451 “Anything Goes” Challenge.

If you have not had a chance to check out the above challenge sites yet, I encourage you to do so- gorgeous inspiration from all!

To create this card:

De-static a piece of white cardstock with an embossing powder tool, ink the Wonderful Wings stamp image with Versamark™ ink, stamp onto the prepared cardstock, apply white  embossing powder and heat set with a heat tool.

Once the embossing has cooled, color the butterfly with water based markers (gently wipe off the excess ink with a paper towel being careful note to spread the ink beyond the butterfly image).

Create a mask for the butterfly and once the mask is in place, apply broken china distress oxide over the background using a sponge dauber. 

Once you are satisfied with the results, apply chipped sapphire distress oxide ink with a sponge dauber using a flourish stencil.  Lightly spritz with water and re-apply ink as needed.  Dry the background with a heat tool (being careful around the butterfly).

De-static the background below the butterfly with an embossing powder tool, ink the sentiment from Grace (Stamp Simply) with chipped sapphire distress oxide ink, apply clear embossing powder and heat set with a heat tool.

Once the embossing has cooled, trim the panel, mount onto midnight cardstock, trim and mount onto a white card base.

Finish off the card by applying shimmer to the butterfly wings using a clear glitter pen.

Stamp Sets: Wonderful Wings (retired Stampin’ Up!), Grace (Stamp Simply)

Ink/Mediums: Versamark™ , Tim Holtz™ Distress Oxide- Broken China, Chipped Sapphire; Stampin' Write Markers- Crushed Curry, Tangerine Tango, Poppy Parade, Early Espresso; Spectrum Noir™ Clear Glitter Pen

Paper/Cardstock: Whisper White, Midnight Muse

Accessories/Tools: Embossing Buddy®, White and Clear Embossing Powder, Heat Tool, Sponge Daubers, Memory Box™ Heartwood Stencil

Thanks again for taking the time to visit- I hope all of you have a great week!

Sunday, June 2, 2019

Trust An Unknown Future to A Known God


Hi Friends!

This card was designed for a sweet young lady who graduated this year and I was able to use up quite a few pieces from my stash.

The sentiment is from the As You Graduate stamp set (retired Our Daily Bread Designs now Divinity Designs LLC) and the rest of the card was from my “stash” of unfinished projects using retired Stampin' Up! images- lol!

I love participating with online challenges and will be linking to the Global Design Project #191 Theme Challenge along with the Simon Says Wednesday “Anything Goes” Challenge and the Time Out #136 Inspiration Challenge (I was inspired by all the bright summery colors).

If you have not had a chance to visit the above challenge galleries yet, I encourage you to do so- wonderful inspiration from all!

To create this card:

1). De-static a piece of white cardstock with an embossing tool, stamp the sentiment from As You Graduate with Versafine™ Onyx Black ink, apply clear embossing powder and heat set with a heat tool.  Once the sentiment has cooled, die cut with a stitched rectangle die, mount onto black cardstock and trim close to the edge.

2). Repeat the stamping/embossing steps above with the small butterflies from Papillon Potpourri and large butterfly from Wonderful Wings (both retired Stampin’ Up!).  Once the embossing has cooled, color the butterflies using water-based markers.  Fussy-cut the large butterfly image and use the matching butterfly punch (also retired) to punch out the two small butterflies (I already had all three of these butterflies in my stash ready to go :-)).

3). Using an acetate envelope (or you could cut open a ziploc bag), press the oxide inks onto the acetate, lightly spritz with water, fold the envelope or bag over the ink and smoosh around with your finger a bit, re-open the envelope or bag and press a piece of white cardstock into the ink.  Repeat the process with another piece of white cardstock to use up the remaining ink (this is how I had this panel in my stash).

4). Stamp the distressing image from Timeless Textures with Versafine™ Onyx Black ink to add additional texture and die cut with a rectangle stitched die.  Mount onto a piece of black cardstock, trim close to the edge and mount onto a piece of 4 ¼” x 11” piece of white cardstock in half for the card base. 

5). Mount the sentiment using dimensional foam.

6).  Add the butterflies to the card front and use a clear glitter pen to add shimmer to their wings.

Stamp Sets: Wonderful Wings, Papillon Potpourri, Timeless Textures (retired Stampin’ Up!), As You Graduate (retired Our Daily Bread Designs)

Ink: Versafine™ Onyx Black, Stampin’ Write Markers- Daffodil Delight, Crushed Curry, Tangerine Tango; Tim Holtz® Distress Oxide- Broken China, Peacock Feathers, Tumbled Glass; Spectrum Noir™ Clear Glitter Pen

Paper: Whisper White, Basic Black

Accessories: Embossing Buddy®, Clear Embossing Powder, Heat Tool , AquaPainter™, Elegant Butterfly Punch (retired SU!), My Favorite Things™ Dies- Stitched Rectangles A2 Set 1 & 2

Thanks again for taking the time to stop by!!   Hugs and I hope you can visit again soon!

Tuesday, July 11, 2017

CAS Wonderful Wings

Hi Friends!!

Today I am sharing another fairly quick CAS card that I created using an image from the retired Stampin’ Up! Wonderful Wings stamp set along with a sentiment from the current Our Daily Bread Designs, Scripture Collection 4.


If you have not already had a chance to visit the above challenge sites, I hope you will do so- they all have wonderful Design Teams as well as gorgeous inspiration in their galleries.

To create this card:

1). Ink the Wonderful Wings image with Versafine™ Onyx Black ink, stamp onto a piece of Bristol Smooth paper and heat set with the Heat Tool.

2). Create a mask of the image using sticky note paper and mask the butterfly.  Using a sponge dauber with Broken China Distress Oxide Ink, stencil the background with the Memory Box™ Modern Chic Chevron stencil.  Lightly spritz with water and heat set with the Heat Tool.

3). Watercolor the butterfly with Zig® Clean Color Real Brush Markers- I used Yellow, Blue and Orange.  Dry with the Heat Tool and add a shadow with the Pale Gray Marker and darken the body and areas on the wings with the Black Marker.  Once you are satisfied with the watercolor, use the Spectrum Noir™ Clear Glitter Pen to add shimmer to the wings. Add a few white highlights to the wings with the Sharpie® Extra Fine White Paint Pen.

4). Stamp the Scripture Collection 4 (ODBD) verse using Versafine™ Onyx Black ink onto the panel.

5). Trim the panel and mount onto the Basic Black card front before adhering to the white card base.

6). Finish off the card by adding a few Nuvo™ Gloss Black Crystal Drops .

Stamp Sets: Wonderful Wings (retired Stampin’ Up!), Scripture Collection 4 (Our Daily Bread Designs)

Ink/Mediums: Versamark™ Onyx Black Ink, Broken China Distress Oxide Ink, Zig® Clean Color Real Brush Markers- Yellow, Orange, Blue, Black, Pale Gray;  Nuvo™ Gloss Black Crystal Drops, Spectrum Noir™ Clear Glitter Pen, Sharpie® Extra Fine White Paint Pen

Paper: Bristol Smooth, Basic Black, Extra Thick Whisper White

Accessories:  AquaPainter™, Heat Tool, Memory Box™ Modern Chic Chevron Stencil, Sponge Dauber


Thanks again for stopping by- I hope all of you have a blessed week, sweet friends!

One Layer Wonderful Wings


Hi Friends!!

I am sharing a One Layer Mixed Media card that I created this evening using a retired Stampin’ Up! butterfly image from the Wonderful Wings stamp set along with a sentiment from the brand new Stampin’ Up! Ribbon of Courage stamp set.

I decided to participate in the CAS-ual Fridays #177 Tic-Tac-Toe Challenge (Butterflies, One Layer, Stripes), the FUSION “Sand, Beach” Challenge (I was inspired by the colors in the sign), the Alphabet Challenge “I for Insects”Challenge and the Tuesday Throwdown #351 "One Layer" Challenge.

If you have not already had a chance to visit the above challenge sites, I hope you will do so- they both have fabulous Design Teams as well as inspiration in their galleries.

To create this card:

1). Fold a 4 ¼” x 11” piece of Crumb Cake cardstock in half and score for the card base.

2). De-static the front of the card with an Embossing Buddy®, ink the Wonderful Wings image using archival black ink, stamp onto the card front, apply Stampin’ Emboss® Clear Embossing Powder and heat set with the Heat Tool.

3). Once the embossing has cooled, watercolor the image with Stampin’ Up! Watercolor Pencils- Daffodil Delight, Pumpkin Pie and Pacific Point blending with a water brush.  Add additional color to the wings with the Pumpkin Pie Stampin’ Write Marker (blending the color with the water brush) and when dry, add white highlights with an Extra Fine White Sharpie® Paint Pen.  Add shadows with the Tip Top Taupe Stampin’ Write Marker (also blending with the water brush).

4). Using Tim Holtz® Vintage Photo Distress Oxide Ink, a sponge dauber and the Memory Box™ Texture Line Up Stencil, add stripes to the background.  Add a bit more color to the stripes with Broken China Distress Oxide Ink and use a water spritzer to add water droplets.  Dry carefully with a Heat Tool and apply Nuvo™ Fresh Copper Embellishment Mousse with your finger to a few of the stripes.

5). Use a Spectrum Noir™ Clear Glitter Pen to add shimmer to the wings of the butterfly and apply Nuvo™ Grey Mist Crystal Jewel Drops to the background finish off the card.

Stamp Sets: Wonderful Wings (retired), Ribbon of Courage (both Stampin’ Up!)

Ink/Mediums: Versamark™ Onyx Black, Stampin’ Up! Watercolor Pencils- Daffodil Delight, Pacific Point, Pumpkin Pie; Stampin’ Write Markers- Pumpkin Pie, Tip Top Taupe; Nuvo™ Fresh Copper Embellishment Mousse & Gray Mist Crystal Jewel Drops, Spectrum Noir™ Clear Glitter Pen, Sharpie® Extra Fine White Paint Pen

PaperCardstock: Crumb Cake

Accessories: Embossing Buddy®, Stampin’ Emboss® Clear Embossing Powder, Heat Tool, Memory Box™ Texture Line Up Stencil, Sponge Daubers

Thanks again for taking the time to visit- I hope you have a blessed week, sweet friends!

Wednesday, February 4, 2015

The Card Concept #28- Thinking of You Mixed Media Easel Card

Hi Stampers!!

I had a great time creating this Mixed Media card for The Card Concept #28 Romantic Roses Challenge using the gorgeous photo for inspiration.  I was inspired by the neutral colors of the roses along with the wooden box :-)

Side view of easel card fold 
The Card Concept is a bi-weekly challenge that has an inspiration photo along with a number of design styles that you can choose from to create your card- Clean and Simple, Clean and Graphic, Clean and Layered, Shabby Chic, Freestyle Collage, Classy and Elegant and Mixed Media. 

I hope you will have a chance to check out the rest of the Design Team projects and create your own project to join in on the fun!


To create this easel card:

The background is a combination of Gesso on a 5" square piece of Whisper White cardstock, allowing it to dry and then applying various Ranger® Tim Holtz® Distress Stains and Alcohol Inks (spritzing with water and allowing the inks to drain down the panel, drying with the Heat Tool and repeating until the background is the color that you desire).

Ink the retired background stamp, French Script with Memento™ Tuxedo Black Ink and randomly stamp onto the background panel. 
Background panel before adding gesso stencil 

Add additional Gesso using a honeycomb stencil and allow to dry, trim the panel and mount onto a piece of Blushing Bride cardstock, trim again and mount onto a 5 ½” x 5 ½” Early Espresso panel.

Add the die cut border along with the 5/8” Early Espresso Satin Ribbon bow. 

Tear a piece of designer paper and distress the edges using a Distressing Tool and Ranger® Tim Holtz® Vintage Photo Distress Ink.   Adhere the torn panels to the background panel with one of the panels overlapping the ribbon and apply Mod Podge® to the torn panels.

Add the banners in the upper left hand corner attached to the Natural Linen knotted rope.

Using My Digital Studio (MDS), print out the bird image from Nature Walk onto Whisper White cardstock, color using Ranger® Tim Holtz® Distress Vintage Photo Distress Ink.  Apply Mod Podge® over the bird to give it more substance. 

Cut the heart die from brushed gold cardstock and add to the background panel.  Adhere the bird image and add the highlight to the eye with a Faber-Castell White Pitt Pen.

Create the easel card base (see tutorial here at Splitcoaststampers) and distress the cardstock using Ranger® Tim Holtz® Vintage Photo Distress Ink and randomly stamp the background stamp using Memento™ Tuxedo Black Ink.

Add the panel of distressed designer paper to the lower portion (mounted onto Blushing Bride cardstock and again onto Early Espresso cardstock), distress the paper with Ranger® Tim Holtz® Vintage Photo Distress Ink and add Mod Podge® to the entire designer paper panel.

Create the rolled flowers from Blushing Bride and retired Buckaroo Blue cardstock using the 1 ¾” and 1 ¼” Scallop Circle Punches (see basic tutorial here).  

Close up on angle - gesso stencil a bit more apparent
“Antique” the roses and edges of the panels using Ranger® Tim Holtz® Vintage Photo Distress Ink and add the roses to the center of the die cut heart as well as the inside panel with leaves created with the Bird Builder Punch from Mossy Meadow cardstock.

Apply Mod Podge® over the roses and leaves (the roses look ceramic up close) :-)

Print out the Wonderful Wings image using MDS onto Whisper White cardstock, color using a Blushing Bride Stampin’ Write Marker and Ranger® Tim Holtz® Old Paper Distress Ink.  

Add the butterfly to the lower portion of the card along with the stamped and distressed sentiment and apply additional Mod Podge® to the butterfly wings and sentiment.

Add the Pearls to the corners of the sentiment, lower panel and upper panel and adhere the main focal image panel to the easel card. 


Close up of opened bottom panel of card 
Adhere the Antique Brad to the center of the Satin Ribbon bow to finish off the card.

Stamp Sets:  Nature Walk (MDS), Wonderful Wings (MDS), Gorgeous Grunge, Kind and Caring Thoughts, French Script

Ink: Printer Ink- Black, Memento™ Tuxedo Black Ink, Ranger® Tim Holtz® Tattered Rose, Worn Lipstick, Frayed Burlap, Vintage Photo, Old Paper and Silver Metallic Distress Stains; Tim Holtz® Adirondack® Gold Alcohol Ink,  Ranger® Tim Holtz® Vintage Photo and Old Photo Distress Ink

Paper: Whisper White, Blushing Bride, Early Espresso, Mossy Meadow, retired Buckaroo Blue, Brushed Gold, Tim Holtz® Idea-ology® Wallpaper Designer Paper

Accessories: Big Shot™, Beautiful Borders Die (ODBD), Ornate Hearts Die (ODBD), Punches- Banner, Hexagon Punch (for sentiment banner points), Bird Builder, Scallop Circle- 1 ¾” and 1 ¼”, Gesso, Balzar Designs® Mini Punchenella stencil,  5/8” Early Espresso Satin Ribbon, Antique Brad, Pearls, Natural Linen Thread, Sponge Daubers


Thanks again for taking the time to stop by- again, I hope you will find the time to visit us at The Card Concept and join in on the fun!!
Related Posts Plugin for WordPress, Blogger...