Showing posts with label Natures Pace. Show all posts

Sunday, October 25, 2015

HYCCT1522 Adopt the Pace of Nature

Hi Friends!!

This card was created for the Splitcoaststampers’  “Hope You Can Cling To”  HYCCT1522 Angie’s “Tears Can Be A Good Thing” Challenge to use the  Wrinkle-Free Distress background technique (FYI- I used distress stains versus inks) :-))

If you have not had a chance to do so, I hope you will find the time to visit the above gallery- wonderful inspiration from all!!

To create this card:

Apply Ranger® Tim Holtz® Forest Moss, Chipped Sapphire and Brushed Corduroy Distress Stains onto a craft mat, spritz with water and lay a piece of watercolor paper over the ink. 

Press the paper into the ink, twist as you lift up the panel turning to allow the ink to run and merge.

Use the Heat Tool to dry the panel, spritzing with water, re-apply additional ink and drying with the Heat Tool until you are satisfied with the results.

De-static the panel with the Embossing Buddy®, stamp the image using Versamark™ Ink, apply Stampin’ Emboss® White Embossing Powder, heat with the Heat Tool to melt the powder and allow the embossed image to cool.

Use the Big Shot™ with the My Favorite Things™ (MFT) Horizontal Stitched Banners Die to cut out the image, mount onto a piece of Whisper White cardstock, trim and mount onto a piece of Mossy Meadow cardstock, trim and mount onto a piece of Delightful Dijon cardstock.

Ink the large solid splatter stamp from Gorgeous Grunge using Delightful Dijon Classic Ink and stamp onto the upper part of a piece of Whisper White cardstock.

Ink the large splatter stamp using Mossy Meadow Classic Ink and stamp onto the panel as well.

Trim and mount onto Delightful Dijon cardstock, trim and mount onto the Whisper White card base.

Mount the embossed panel onto the card front using dimensional foam and add the Pearls to finish off the card.

Stamp Sets:  Nature’s Pace (retired), Gorgeous Grunge

Ink: Versamark™, Delightful Dijon, Mossy Meadow; Ranger® Tim Holtz® Distress Stains- Forest Moss, Chipped Sapphire and Brushed Corduroy

Paper: Watercolor, Whisper White, Delightful Dijon, Mossy Meadow

Accessories: Big Shot™, Honeycomb Textured Impressions™ Embossing Folder,  MFT Horizontal Stitched Banners Dies, Embossing Buddy®, Stampin’ Emboss® White Embossing Powder, Heat Tool, White Crochet Lace, 5/8” Olive Satin Ribbon, Pearls


Thanks again for taking the time to stop by- I hope you have a wonderful Monday, my friends!

Monday, September 8, 2014

Bible Verse Memory Album- Psalm 107:1 Give Thanks to the Lord

Hi Again Stampers! 

Here is page four of the heart album that I created for the SplitcoaststampersDivine Design Bible Verse BVC14 Challenge.  

I have linked the initial post here that describes the basic steps for the cover of the album along with a few more details on the steps for each page of the album…

The verses used are free digital images from Word Art Wednesday (downloaded into My Digital Studio (MDS) and printed onto Very Vanilla cardstock).
Page Four:
“Oh, give thanks to the Lord for He is good”  Psalm 107:1
In addition to the steps taken in the first post (adhere the retired Beau Château DSP DSP to the Heart Chipboard Album page, “antique” using  Ranger™ Tim Holtz® Tea Dye and Vintage Photo Distress Stain, add the 3/8” Venetian Crochet Trim and the 5/8” Early Espresso Satin Ribbon and add the strings of Pearls.
Use the Big Shot™ with the Hearts Collection Framelits™ to cut out the heart from the Beau Château DSP, distress with the Distressing Tool and adhere to the panel.
Ink the bee image from Nature’s Pace using Memento™ Tuxedo Black Ink onto Very Vanilla cardstock.  Color the image using Stampin’ Write markers- Pink Pirouette, Baja Breeze, Pear Pizzazz and Hello Honey- add a few shadows with the Sahara Sand Stampin’ Write marker.
Cut the bee image out using the Big Shot™ with the Sizzix™ Ovals Framelits™.  “Antique” the Very Vanilla cardstock using Ranger™ Tim Holtz® Tea Dye and Vintage Photo Distress Stain, stamp the Gorgeous Grunge splatter stamp using Soft Suede and mount onto a piece of Early Espresso cardstock (the Early Espresso layer was crimped with the Crimper Tool and the edges were hand torn around the oval).
Trim the verse and create the banner points using the Hexagon Punch (“antique” the Very Vanilla cardstock using Ranger™ Tim Holtz® Tea Dye and Vintage Photo Distress Stain), stamp the Gorgeous Grunge splatter stamp using Soft Suede Classic Ink. 
Mount the verse onto the panel using Stampin’ Dimensionals®.
Add the rolled flowers (created with the 1 ¾” and 1 ¼”” Scallop Circle Punches from Pink Pirouette cardstock and Baja Breeze Designer Series Paper along with leaves using the Bird Builder Punch from Early Espresso cardstock) to finish off the panel.
Stamp Sets:  Nature’s Pace, Gorgeous Grunge, Verse- free Digital Image from Word Art Wednesday
Ink: Memento™ Tuxedo Black Ink, Soft Suede Classic Ink; Printer Ink- Black, Ranger™ Tim Holtz® Tea Dye and Vintage Photo Distress Stain
Paper: Very Vanilla, Early Espresso, Pink Pirouette, retired Baja Breeze DSP, retired Beau Château DSP
Accessories:  Big Shot™, Oval Framelits™, Punches: 2 ⅜”, 1 ¾” and 1 ¼” Scallop Circle, Bird Builder; 3/8” Venetian Crochet Lace Trim, Pearls, Crimper Tool, Distressing Tool

Thanks again for visiting- I will post the instructions for page 5 and 6 tomorrow evening....I hope you have a blessed Monday!

Monday, January 6, 2014

Je T'aime- Happy Anniversary!

Hi Stampers!!

This week my husband and I celebrate our wedding anniversary and I thought the CQC222 ColourQ Challenge colors would be perfect for a card with a masculine vintage feel. 

My husband and I love to go "antiquing" and on our honeymoon, found our first antique honey dish.  Once of the criterias for our collecting the honey dishes has been that they have to have a bee image, beehive or the square honeycomb shape so when I found this paper from Graphic 45 with a few bee images, I thought it would be perfect for our anniversary card.  

Again, if you have not already done so, I hope you will find the time to stop by the ColourQ site and check out all of the designs- such inspiration!!

To create this card:

Stamp the images from Off the Grid, Gorgeous Grunge and Established Elegance using Basic Gray Classic Ink onto a piece of Whisper White cardstock. 

Stamp the bee image from Nature’s Pace using Basic Black Classic Ink, color using Stampin’ Write markers (Sahara Sand and Smoky Slate) and create a few gold highlights with the Stampin’ Dazzle Gold Marker and white highlights with the Chalk Marker.   Sponge a bit of Crumb Cake Classic Ink to distress the paper a bit

Trim the image and mount onto a piece of Gold Metallic paper and again onto a piece of Basic Black cardstock.  Add a few scraps of Gold Metallic paper to the sides and mount the focal image using Stampin’ Dimensionals®. 

Add the sentiment banner and chipboard accent to finish off the card.

Stamp Sets: Nature’s Pace, Gorgeous Grunge, Off the Grid, Teeny Tiny Wishes

Ink: Basic Black, Basic Gray, Crumb Cake

Paper: Whisper White, Basic Black, Gold Metallic Paper, Graphic 45 DSP

Accessories: Sponge Dauber, Antique Brad, Hexagon Punch, Graphic 45 Chipboard piece


Thanks for visiting- I hope you have a wonderful week!

Tuesday, May 21, 2013

SUO71 Favorite Retiring Stamp Set- Three of My Favorites in One!!


Hi Stampers! 

The SUO71 Challenge is to use your Favorite Retiring Stamp Set and we welcome all entries using Stampin’ Up! Only products!  So pull out those soon to be retired stamp sets and let’s highlight them for all to see! 

In my normal fashion, I could not decide on just one set so I used three of my favorite retiring sets, French Foliage, Nature’s Pace and Nature Walk.  I love the line drawn realistic images in all of these sets and they will definitely have a permanent place in my collection.

To create this card:

Use the Big Shot™ with the soon to be retired Vintage Wallpaper Textured Impressions™ Embossing Folder to emboss a piece of Pistachio Pudding cardstock - ink the interior of the folder using Sahara Sand Classic Ink prior to embossing. Mount this layer onto a piece of Early Espresso cardstock.

Using Early Espresso Classic Ink, stamp the images from the stamp sets onto Sahara Sand cardstock and color using Stampin’ Write markers- Wisteria Wonder for the grapes and flowers, So Saffron on the bees and an Aqua Painter™ with ink from the Pistachio Pudding and Crisp Cantaloupe stamp pads for the eggs, leaves, flowers and robin’s breast. 

Stamp the French Foliage script using Sahara Sand Classic Ink over the images as well as the seal image on a few of the corners.  Cut the images to size and distress the edges using the Distressing Tool and sponge more Sahara Sand Classic Ink with a Sponge Dauber.

Mount the panels onto Early Espresso cardstock and position for the collage effect.  Add the Early Espresso ½” Taffeta Triple Ribbon bow to the bee wreath panel and add the diamond shape bee image and sentiment using Stampin’ Dimensionals®.

Use the Color Spritzer Tool (also retiring) along with the Early Espresso Stampin’ Write marker to distress the card a bit and add Frost White Shimmer Paint to the bee’s wings on the center panel.

Add a few Pearls to the corners to finish off the card.

Stamp Sets:  Nature Walk, Nature’s Pace, French Foliage

Ink: Early Espresso, Sahara Sand, Pistachio Pudding, Crisp Canteloupe, Stampin’ Write Markers- Wisteria Wonder, So Saffron, Early Espresso

Paper/Cardstock: Sahara Sand, Early Espresso, Pistachio Pudding

Accessories:  Big Shot™, Vintage Wallpaper Textured Impression ™Embossing Folder, Sponge Dauber, Color Spritzer Tool, ½” Early Espresso Taffeta Ribbon, Distressing Tool, Pearls

Thanks again for visiting!  Since I personally need to work on patience, I may keep this card as a reminder in my craft room :-).  

 I hope can take the time to create a project to share with us at SUO Challenges for this SUO71 Favorite Retiring Stamp Set Challenge- look forward to seeing your creations :-)

Monday, May 20, 2013

Nature's Pace Sympathy- A Sketch, A Color Challenge and A Stepped Up Version :-)


Hi Again Stampers! 

I wanted to create a card using the Create with Connie and Mary CCMC252 Colors and incorporated them with the Splitcoaststampers SC433 Sketch Challenge


 Again, if you have the time, check out both sites for wonderful inspiration!

To create this card:

Use the Big Shot™ to emboss a piece of a piece of Soft Suede DSP and a piece of So Saffron cardstock with the Honeycomb Textured Impressions™ Embossing Folder.  Lightly sand the DSP to soften up the fibers and hand cut a few of the hexagons and them randomly onto the embossed background.  

FYI- I had both of these background pieces already pre-embossed/sanded in my scraps- love when that happens :-)   

First attempt- decided to step it up- see next image  :-)
Sponge additional Soft Suede Classic Ink over the background panel and mount onto Soft Suede cardstock and again onto Sahara Sand cardstock (sponging additional Soft Suede ink to “antique” the Sahara Sand base).

Stamp the bee image from Nature’s Pace onto Sahara Sand cardstock and color using Stampin’ Write markers in So Saffron, Sahara Sand and Soft Suede (add the White Gel Pen highlights at the end to highlight some of the flowers/bee wings).  Use the Sponge Dauber with Soft Suede Classic Ink to lightly sponge around the oval. 

Use the Big Shot™ with the Ovals Collection Framelits™ to cut out the bee image and also cut two additional ovals from the same size framelit for the layers behind the stamped image.   Add the Modern Label “ends” with the Pearl accents. 

Added Script background and Rolled Flowers to Step It Up :-)
Create the vertical banner strip using Sahara Sand Designer Series Paper (DSP) and the 1 3/8” Square Punch (to create the banner points).  Mount onto Soft Suede cardstock and adhere to the card per the sketch.

Mount the focal image onto the banner strip, add the sentiment and ½” Soft Suede Taffeta triple ribbon bow to finish off the card.


For my first attempt card, I left the DSP blank and did not have the rolled flowers on the card but felt that the card needed something at the top to balance it out, so I decided to "Step It Up" :-) 

So I took this one carefully apart and stamped the script background stamp from French Foliage in Soft Suede randomly over the banner and bee image.  I also added the So Saffron rolled flowers (fyi- they are very easy to make..punch regular circles or in this case scallop circles and hand cut a spiral towards the center of the circle and then hand roll :-)  Here is a great tutorial for the rolled flowers).  


Mount the focal image onto the banner strip, add the sentiment and ½” Soft Suede Taffeta triple ribbon bow to finish off the card.

Stamp Sets: Nature’s Pace, French Foliage, Teeny Tiny Wishes

Ink: Soft Suede, Stampin’ Write Markers- Sahara Sand, So Saffron, Soft Suede

Paper/Cardstock:  Sahara Sand, So Saffron, Soft Suede

Accessories: Big Shot™,  Honeycomb Textured Impressions™ Embossing Folder, Ovals Collection Framelits™, Punches- 1 1/4" Scallop Circle, 1 3/8" Square, Modern Label Punch, Small Oval (retired),  Sponge Daubers, White Gel Pen, Pearls

Thanks again for stopping by- hope you have a great Monday!!  Stop by again tomorrow for the new SUO Challenge :-).

Monday, April 29, 2013

Farewell to Nature's Pace - Another One of My Favorites :-)


Hi Stampers! 

I wanted to share another set of projects created with one of my favorite soon-to-be retired set- Nature’s Pace.

Again, there are some wonderful new sets on the horizon, but I will miss having the one in our current catalog.   The bee image in particular, is one that I favor in this set (reminds me of my husband and I searching for antique honey dishes).


I hope you enjoy this farewell to Nature’s Pace- again,
 this set is only available until May 31st.
Thanks again for visiting- have a wonderful Monday !!


Saturday, January 26, 2013

CQC173- Three Cards with One Color Challenge :-)


Hi Stampers!!

Another week has passed and time for another ColourQ Challenge.  I love the colors for the CQC173 Challenge- they are soft and a bit on the pastel side so while I had them out, I decided to make three cards using these fabulous colors plus for the first card I used the FMS70 Freshly Made Sketch.   Again, both sites have wonderful examples – if you have a chance, check them out!!

All three cards incorporate embossing, die cuts and a little bit of stamping (plus I was able to use scraps from the first card to create the second and third).

To create the first CAS card with the FMS70Sketch:

Ink the interior of the Lacy Brocade Textured Impressions™ Embossing Folder with Dusty Durango Classic Ink.  Emboss a piece of Apricot Appeal, Crumb Cake, Blush Blossom and a small piece of Very Vanilla  cardstock (in that order- the more you emboss the lighter the ink will appear on the background). 

Layer the Blush Blossom embossed panel onto Dusty Durango cardstock.  Layer a small piece of Apricot Appeal onto Dusty Durango and a larger piece of Crumb Cake onto Dusty Durango as well for the vertical piece of the sketch.  Add the ½” Very Vanilla Seam Binding Ribbon along with the Pearls.

Ink the Paisley Background stamp using Dusty Durango Classic Ink and stamp this image onto Blush Blossom cardstock.  Cut the flower using the Blossom Punch from the stamped piece of Blush Blossom and another flower from Dusty Durango cardstock.  Cut the Dusty Durango flower into pieces (each petal towards the center) and mount the Dusty Durango behind the flower petals of the stamped flower.

Using the 1 ¼” Scallop Circle Punch to cut out the flower center from the embossed Very Vanilla cardstock.  Add the Antique Brad to complete the flower.

Use the Bird Builder Punch to punch out the leaves from Dusty Durango cardstock.  Add the stamped sentiment with the lace from the Artisan Embellishment Kit and leaves to finish off the card.

Stamp Sets: Feeling Sentimental, Paisley Print (background)

Ink:  Dusty Durango

Paper: Very Vanilla, Crumb Cake, retired- Apricot Appeal, Blush Blossom, Dusty Durango

Accessories:  Big Shot™, Lacy Brocade Textured Impressions™ Embossing  Folder,  Punches- Blossom, 1 ¼” Scallop Circle, Bird Builder; Artisan Embellishments Kit (18” Scalloped Lace) , Antique Brad, Pearls


To create the second card:

Use the Blossom Punch to punch out a flower from the embossed Apricot Appeal (scrap from the first card). Using the medallion circle stamp from Madison Avenue, stamp using Dusty Durango onto Blush Blossom cardstock and punch out using the 1 ¼” Circle Punch. Punch out another circle using the 1 3/8” Dusty Durango cardstock, layer and add the Antique Brad in the center.


With the Big Shot™ and the Lacy Brocade Textured Impressions™ Embossing Folder, emboss the die cut that the lace was wrapped around in the Artisan Embellishments Kit (love being able to re-purpose items:-)).  Also emboss a piece of Blush Blossom with the Square Lattice EF and a piece of Apricot Appeal Designer Series Paper (DSP) with the Fancy Fan EF.

Add the 5/8” Satin Ribbon to the embossed layer of Blush Blossom.  Also add the ribbon to the tag along with pieces of the 18” Scalloped Lace from the Artisan Embellishments kit.   Stamp the Tiny Tag sentiment and background, punch out with the Jewelry Tag Punch and attach to the tag using a Vintage Trinket pin.

Layer all of the embossed panels onto the Blush Blossom card front, add the tag and flower to finish off the card.  I need to order some more Pearls to add a few strands of the pearl ropes- what do you think- would pearls make a difference?

Stamp Sets: Madison Avenue, Tiny Tags

Ink:  Dusty Durango

Paper: Blush Blossom, Dusty Durango, Apricot Appeal DSP (all retired)

Accessories:  Big Shot™, Textured Impressions™ Embossing  Folders- Fancy Fan, Lacy Brocade,  Square Lattice; Punches- Blossom, 1 ¼” and 1 3/8” Circle, Jewelry Tag; Artisan Embellishments Kit (18” Scalloped Lace) and tag die cut, Antique Brad, Vintage Trinkets, 5/8" Satin Ribbon (from my stash)


To create the third card:

With the Big Shot™ and the Lacy Brocade Textured Impressions™ Embossing Folder, emboss a piece of Crumb Cake and Dusty Durango cardstock and a piece of retired Apricot Appeal DSP.  Also emboss a piece of Blush Blossom with the Needlepoint Border EF and a piece of Very Vanilla using the Delicate Designs (Lace) EF.

Layer the embossed Dusty Durango cardstock, Blush Blossom embossed panel and Very Vanilla embossed lace panel.  Add the embossed Apricot Appeal DSP layer and add two circles from the Crumb Cake embossed cardstock (using the 2 ½ Circle Punch and layered to form a modified oval).   

Stamp the bee image using Early Espresso Classic Ink onto Very Vanilla cardstock and color using the Blush Blossom, Apricot Appeal and Crumb Cake Stampin’ Write markers, lightly sponge Crumb Cake ink along the edges.

Cut the stamped image out using the Big Shot™ and the Apothecary Accents Framelits™ die, cutting a second die cut for layering from Dusty Durango cardstock.  Once layered with the Dusty Durango (cut the die cut in half lengthwise to layer), add the Antique Brads, 18” Scalloped Lace from the Artisans Embellishments Kit and center to adhere to the Crumb Cake circle panel.

Add the stamped sentiment, 5/8 “Satin Ribbon bow and pearls to finish off the card.

Stamp Sets: Nature’s Pace, Teeny Tiny Wishes

Ink:  Early Espresso, Stampin’ Write Markers- Apricot Appeal, Blush Blossom, Crumb Cake

Paper: Very Vanilla, retired Blush Blossom, Dusty Durango, Apricot Appeal DSP

Accessories:  Big Shot™, Textured Impressions™ Embossing  Folders- Lacy Brocade,  Needlepoint Border, Delicate Designs (Lace) ; Apothecary Accents Framelits™ Die, Sponge Daubers, Punches- 2 ½” Circle, Word Window, Modern Label, Artisan Embellishments Kit (18” Scalloped Lace) , Antique Brads, Pearls, 5/8" Satin Ribbon (from my stash) 

Thanks again for stopping by and if you have the time, let me know which card you prefer (I was surprised that my husband likes card #2 the best- I thought he would choose #3 since it had a bee :-)).

Have a wonderful week stamping and creating- God Bless!

Monday, January 14, 2013

CQC171 Sympathy


Hi Again, Stampers!

I took some time to unwind this evening in my craft room to create a card and decided to use the colors from this week’s CQC171 ColourQ Challenge- if you have not had a chance to visit their site yet, take some time and check them out :-)!!    Each week they provide such inspiration from their talented Design Team and all of the entries- love their site!

This week’s colors were somewhat masculine but I decided to go with a Vintage theme featuring one of my favorite subjects in stamps, bees.  I am allergic to their sting but for some reason, my husband and I love the antique honey dishes and the bee images .

To create this card:

On Whisper White cardstock, use a sticky note to create a frame and with a Sponge Dauber, apply Daffodil Delight Classic Ink in a spiral motion.

Repeatedly stamp the bee image using Night of Navy Classic Ink and color the leaves with a Stampin’ Write Basic Gray and Crumb Cake marker.  Use the Color Spritzer Tool with the Crumb Cake marker to add a bit of distressing to the sponged image.  Remove the sticky notes and trim the white edge and mount onto Basic Gray cardstock.   

On a piece of Crumb Cake cardstock, use the Color Spritzer Tool with the Night of Navy marker to add a bit of interest to the background layer and emboss using the Big Shot™ with the Lacy Brocade Textured Impressions™ Embossing Folder to emboss (ink the interior of the Lacy Brocade EF with Crumb Cake Classic Ink to give a bit of dimension).

Emboss a small piece of Night of Navy cardstock using the Big Shot™ with the Square Lattice Textured Impressions™ Embossing Folder.  Layer a small piece of the 18” Scalloped Lace from new Artisan’s Embellishment kit behind the embossed Night of Navy strip- adhere to the Crumb Cake background layer. 

Mount the entire background panel onto Basic Gray and add the 5/8” Basic Gray Satin Ribbon over the Night of Navy strip.  Add the focal panel with Stampin’ Dimensionals and mount entire card onto the Whisper White card base.

Stamp the sentiment using Night of Navy Classic Ink onto Vellum- trim and create the banner points with the 1 3/8” Square Punch.  Add to the card with Two-Way Glue and cover the interior points of the banner using pearls from the retired Pretties kit.

Stamp Sets:  Nature’s Pace, Blessings from Heaven

Ink: Daffodil Delight, Night of Navy, Stampin’ Write marker- Basic Gray, Night of Navy, Crumb Cake

Paper: Whisper White, Basic Gray, Night of Navy, Vellum

Accessories:  Big Shot™, Lacy Brocade and Square Textured Impressions™ Embossing Folders, Sponge Dauber, Color Spritzer Tool, 1 3/8” Square Punch, 18” Scalloped Lace (from Artisan Embellishments), Pearls (retired Pretties kit), 5/8” Basic Gray Satin Ribbon (retired)

Thanks again for your visit – I hope all of you have a wonderful week and are able to take some time to stamp and relax!  

Tuesday, May 15, 2012

May12 Vintage Swap Card


Hi Stampers! 

I have been extremely busy the past few weeks with creating projects for the Creative Crew MayChallenge on Splitcoast Stampers and swap cards for our quarterly group meeting.  My upline, Cindy Fodor spends so much time preparing a great meeting for us- she is the best and we had such a wonderful time- thanks Cindy and family! 

Our swaps must have at least two layers and two embellishments.  I love to use ribbon and brads and lots of layers, so thankfully not a problem on that end....but for some reason I always seem to struggle with the design of my swap cards.  Not sure why my “mojo” seems to disappear and this year with the catalog transition (and the discontinuation of my favorite satin ribbon), I really had a tough time... which means that I am up to the wee hours of the morning the few nights leading up to the meeting trying to finish.  Who needs sleep anyway? :-) 

I finally decided to create a semi-vintage card using Nature’s Pace- love that little bee.    I am really allergic to bee stings so I do not like bees outside in the yard but I think that the images are so cool!

To create this card:

Stamp the bee image onto Whisper White cardstock using Basic Black Classic Ink.  Color the bee and flowers with Stampin’ Up! Watercolor Pencils. 

Use the Big Shot™ with the Designer Oval Frame Textured Impressions™ Embossing Folder, cut out carefully around the oval and sponge a bit of Crumb Cake and Soft Suede to “antique” the paper.

Mount onto embossed Early Espresso (using the Square Lattice Textured Impressions™ Embossing Folder and Decorative Label Punch). 

Emboss a piece of Crumb Cake and Wild Wasabi with the Vintage Wallpaper Textured Impressions™ Embossing Folder (first ink the smooth interior of the embossing folder with Crumb Cake ink to add dimension). 

Add the Not Quite Navy layer (embossed with the Stripes Textured Impressions™ Embossing Folder and punched with the Scallop Trim Border Punch).  Adhere the ½” Crumb Cake Seam Binding ribbon with Antique Brad to finish off the card.

I did not add a sentiment so that an appropriate one could be added later.  Occasionally I like to have cards on hand that can be customized to the specific need at the time :-)

Stamp Sets:  Nature’s Pace

Cardstock: Whisper White, Crumb Cake, Wild Wasabi, Not Quite Navy

Ink:  Basic Black, Crumb Cake, Soft Suede

Accessories:  Big Shot™, Textured Impressions™ Embossing Folders- Decorative Frame (oval), Perfect Polka Dots, Square Lattice, Stripes, SU! Watercolor Pencils, Punches- Decorative Label, Scallop Trim, ½” Crumb Cake Seam Binding, Antique Brad, Sponge Daubers

Thanks again for stopping by!  I hope you like this little bee card- have a great week stamping and creating! 

Sunday, April 8, 2012

CQC131- Two Cards- One Color Challenge!


Happy Easter!! 

This morning, we had a wonderful celebration of the Resurrection of our Lord and Savior!   Alleluia, He is Risen, He is Risen Indeed!

I decided to relax this afternoon and finish up a few cards that I started yesterday.  Two of the cards were for this week’s CQC131 ColourQ Challenge – the soft spring-like colors Blushing Bride, Peach Parfait, Pear Pizzazz, So Saffron and Whisper White.  I love these colors but they did pose a bit of a challenge for me (I struggle with pink and yellow together).

For the first card, I used the Sunflower background stamp.  Ink with the background stamp with Versamark™ , stamp onto So Saffron cardstock and heat emboss with Stampin’ Emboss® Clear Embossing Powder.  Once cooled, overstamp with the En Francais background stamp (inked with Peach Parfait) and using Sponge Daubers, apply Blushing Bride, Peach Parfait and Pear Pizzazz.  Wipe off the excess ink from the embossed image and reapply ink as needed (I ended up adding a bit of Early Espresso to the center to bring out some more of the details).

Layer the panel onto Whisper White, Peach Parfait and Blushing Bride.  Add the Pear Pizzazz Seam Binding Bow, Hemp Twine with the Tiny Tag sentiments and the Antique Brad flower, mount into one more layer of Pear Pizzazz to finish off the card.

Stamp Sets:  Sunflower and En Francais (background), Nature’s Pace

Ink: Versamark™, Blushing Bride, Pear Pizzazz, Peach Parfait, Early Espresso

Paper: Whisper White, Blushing Bride, Pear Pizzazz, Peach Parfait, So Saffron

Accessories:  Heat Tool, Sponge Daubers, ½” Pear Pizzazz Seam Binding, Hemp Twine, Punches- Jewelry Tag and Boho Blossom, Antique Brad


The second card has the same color scheme but utilizes more texture with just a bit of stamping.

Ink the En Francais background stamp with Peach Parfait and stamp onto a piece of glossy Designer Series Paper (I used a piece from the retired Bridal Specialty DSP- see below if you do not have glossy DSP).

Use a Sponge Dauber with Blushing Bride and Peach Parfait to tone down the stamped white glossy DSP.  Before the next step of embossing with the Big Shot, punch out the large flower using the Blossom Punch and set aside.
Emboss the remainder of the DSP (from the step above)  with the Big Shot™ and the Vintage Wallpaper Textured Impressions™ Embossing Folder (I inked the interior smooth side of the folder with Pear Pizzazz ink before inserting the paper and embossing).

If you do not have a glossy Designer Series Paper, you could do the same steps above on Whisper White. After punching out the flower and embossing the background, lightly spray with Frost White Shimmer Paint (mixed with 70% alcohol :-)).
Punch out one more large flower using the Blossom Punch from Peach Parfait cardstock and with your paper snips, cut the petals apart (I generally cut across towards the center for each petal and end up with six petals that have a point on the end). 

Take each of these little petals and adhere behind the blossoms of the stamped flower (punched in step 1 above).  

 Punch the center of the flower out of a piece of Peach Parfait using the Boho Blossom punch (large flower from the Boho Blossom Punch).  Align the center in the middle of the large flower, punch a hole for the brad using the 1/16" Hand Held Punch or Piercing Tool and add the Antique Brad.

Layer with the 5/8” White Satin Ribbon bow, Whisper White border (this was a scrap that I had previously embossed with Snow Burst EF- I punched along the edge with the Eyelet Border Punch and then ran thru the Crimper Tool to soften the fibers and it almost looks like fabric :-)). 

Add the little tags, leaves and layer to finish off the card.

Stamp Sets:  En Francais, Tiny Tags

Ink:  Blushing Bride, Pear Pizzazz, Peach Parfait

Paper: Whisper White, Blushing Bride, Pear Pizzazz, Peach Parfait, So Saffron, Bride Specialty Designer Series Paper 

Accessories:  Big Shot™, Vintage Wallpaper and Snow Burst Textured Impressions™ Embossing Folder, Punches- Boho Blossom, Blossom, Eyelet Border, Jewelry Tag, 5-Petal Flower, 1/16” Handheld, Sponge Daubers, 5/8”  White Satin Ribbon, Metallic Brad, Crimper Tool

Thanks again for stopping by- I hope all of you had a wonderful Easter- may the Lord richly bless you this week! 

Saturday, March 24, 2012

Guest Designer- Sunny Challenge 33/12


Hi Stampers! 

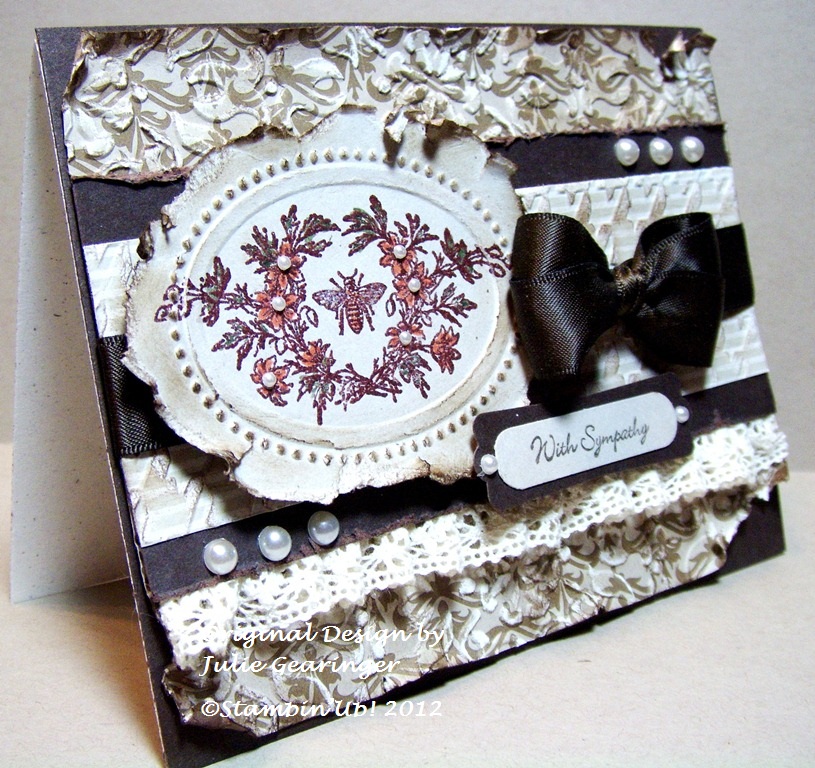
I have been invited to be a Guest Designer for this week’s SC33/12 Challenge at Sunny Challenges and Creations!  If you have the time, stop by their blog and check out the inspiration from the Design Team as well as the other Guest Designers (and while you’re at it, why not join us for this challenge)?

To create this card:

De-static a piece of Sahara Sand cardstock with  Versamark™ ink and apply Stampin’ Emboss®  Brown Embossing Powder (retired).  Heat with the Heat Tool, let the image cool and color with Stampin’ Write Markers in Tangerine Tango and Always Artichoke.

Use the Big Shot™ with the Oval Designer Frame Textured Impressions™ Embossing Folder and emboss over the image.  Tear around the outside, distressing with your finger and sponge Soft Suede to gently “antique” the image.

Emboss a piece of the Mocha Morning Specialty DSP with the Vintage Wallpaper Textured Impressions™ Embossing Folder and a piece of Sahara Sand DSP with the Herringbone Textured Impressions™ Embossing Folder.  Lightly sand both layers with the Sanding Block and lightly sponge Soft Suede ink over the layers to bring out the texture.

Distress the edges of the Mocha Morning layer and mount onto Early Espresso cardstock.

Mount the Sahara Sand layer onto Early Espresso, distress the edges of the Early Espresso with the Distressing Tool, add Sticky Strip along the bottom edge and attach the Victoria Lace Trim (ruffling as you attach it to the Sticky Strip). 

Layer onto the Mocha Morning panel, add the 5/8” Early Espresso Satin Ribbon (retired) and sentiment.  Apply 2-Way Glue and Dazzling Diamonds to the wings of the bee, add a few pearls and the card is finished!

Stamp Sets:  Nature’s Pace, Teeny Tiny Wishes

Paper: Early Espresso, Sahara Sand, Morning Morning DSP, Sahara Sand DSP

Ink: Versamark™, Early Espresso, Stampin’ Write Markers- Tangerint Tango, Always Artichoke

Accessories:  Big Shot™, Textured Impressions™ Embossing Folders- Oval Designer Frame, Vintage Wallpaper and Herringbone, Embossing Buddy®, Heat Tool, Stampin’ Emboss® Brown Embossing Powder (retired), Punches- Word Window, Modern Label; Victoria Lace Trim, Pearls, Dazzling Diamonds, Sponge Dauber, Sanding Block, Distressing Tool

Thanks again for visiting and if you have the time, join us for this sketch/technique challenge- it helps relieve your stress with "distressing" (trust me, it is a lot of fun)! 
Related Posts Plugin for WordPress, Blogger...