Showing posts with label Tags. Show all posts

Saturday, November 20, 2021

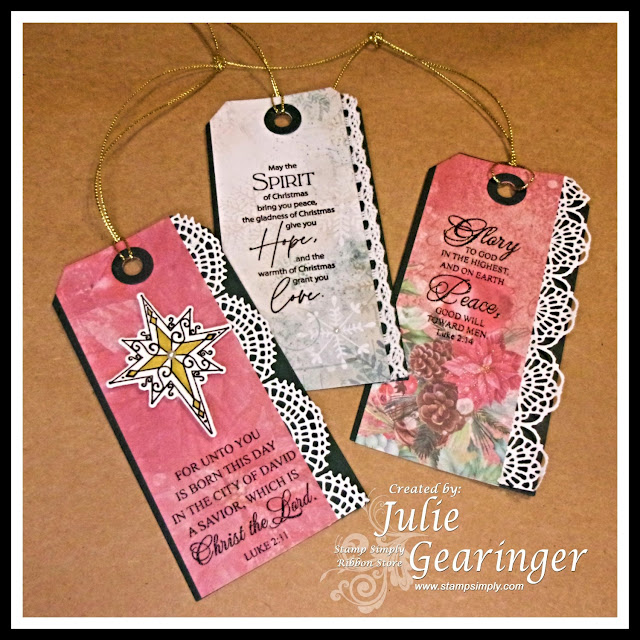
Sending Joy- A Trio of Tags


Hi Friends! 

Today I am sharing a three quick Christmas tags designed with the new Studio Light Sending Joy 6x6 paper pad, the Christmas Peace  and Merry Christmas stamp sets and other items all from Stamp Simply.

These tags were very quick to create- I used the 2” strips from the scraps from a few cards that I designed recently using the Sending Joy paper pad plus I also had a few of the lace die-cuts already die cut and ready to go (love using up my stash, lol)!

Many of you who follow my blog, know that I enjoy participating with online challenges! I will be linking this card to the Tic-Tac-Toe #140 Challenge (bottom row across- Die Cut, Sequins/Gems, Red), the Craft Rocket #87 Winter/Snow Challenge and the Word Art Wednesday #517-#518 “Anything Goes” Challenge.

If you have not had a chance to visit the Stamp Simply blog or the other challenge sites yet, I encourage you to do so- wonderful inspiration from all!

To create this card:

Die cut the various strips of Sending Joy patterned paper using the medium tag die from the Tim Holtz Tag Collection Dies (my strips were only 2” wide so I positioned them in the die to allow the patterned paper to be layered onto the die cut tags from the dark green cardstock.


Die cut three additional tags (using the same size die) from dark green cardstock.

Die cut the paper lace using the Tim Holtz Crochet Dies from white cardstock.

De-static the patterned tag strips with an embossing powder tool, stamp the verse sentiments from Christmas Peace and Merry Christmas with Versafine Onyx Black ink, apply clear embossing powder and heat set with a heat tool.

Layer the die cut paper lace on two of the patterned paper tag pieces before adhering to the green die cut tags.


Layer a strip of white crochet lace onto the remaining strip of patterned paper tag, adhere to the remaining green tag.

Stamp and heat emboss the star from the Merry Christmas stamp set, die cut with the Merry Christmas coordinating die, and mount onto the tag with dimensional foam.

Color the star using a gold water-based marker.

Die cut three of the hole re-enforcers from the Tag Collection Dies from dark green cardstock and adhere to the tags.

Use a clear glitter marker to add shimmer to the poinsettias, snowflakes and other items on each of the tags and adhere a pearl to the center of the star along with the snowflake on the Spirit of Christmas tag.

Loop pieces of gold twine to finish off the tags.

Stamps:  Christmas Peace, Merry Christmas (Stamp Simply)

Ink/Mediums: Versamark™, Zig Wink of Stella Brush- Clear Glitter Marker; Gold Water-based Marker

Cardstock/Paper: White, Dark Green; Studio Light Sending Joy 6x6 Paper Pad


Accessories/Tools: Gemini, Jr.™, Sizzix Thinlits Dies by Tim Holtz- Crochet,  Sizzix Thinlit Dies by Tim Holtz- Tag Collection,  Stamp Simply Steel Dies- Merry Christmas, May Arts ¼” Crochet Lace- 15 yd spool- White, May Arts Metallic String- 300 Yard Spool- Gold, Kaisercraft Self-Adhesive Round Pearls- Pearl, Embossing Powder Tool, Clear Embossing Powder, Heat Tool

Don't forget our November Special- 15% off plus free shipping on qualified orders- use code SSCS15.  


Thanks again for taking the time to visit- I hope all of you have a great week/weekend!


Sunday, May 23, 2021

Stamp Simply Blog Hop


 Hi Friends! 

WELCOME to the GRAND OPENING of STAMP SIMPLY'S new location!


Enjoy a 20% storewide code with a FREE shipping option and this fun Blog Hop with 9 stops and fabulous prizes at each stop. 

The prize offered at my blog is the Encouragement Bundle set and the Sizzix Thinlits Dies by Tim Holtz- Tag Collection.


We hope you can HOP along with us!  If the winner at any stop has already purchased the prize being offered, other sets of an equal value may be selected.


To be in the running, just COMMENT at each stop.


Sharon Johnson/Stamp Simply Blog

Michelle Woerner

Julie Gearinger    (you are here)

Deb Saaranen

Deb Felts

Jill Hilliard

Esther Asbury

Holly McMillen

Sheri Holt


Comments will be accepted through 7 am EDT Wednesday, 5/26Winners will be randomly selected and announced on Thursday evening, 5/27.


Please feel free to get acquainted with our NEW STOREFRONT and enjoy 20% OFF storewide with a FREE SHIPPING option. 


Front view with ribbon closure


I created a vintage style tri-fold card using several of the verses from the individual stamp sets and tag dies along with designer paper, lace, seam binding and other supplies. 


Back view open with inserted tags


 To create this card:


Die cut three of the largest tags from the Tag Collection Die Set from cream cardstock, die cut six additional tags from black cardstock and set aside.

Create the hinges for between the tags with cream and black cardstock (I used scrap pieces approx. 1 ¾” wide and as tall as the outside edge of the tag).  Score each hinge at ¾”, 1”, 1 ⅛” and 1 ¼” to create the gusset. 

Attach the three cream hinges to the sides of the cream tags and attach the three black hinges to the black tags.

Adhere the black tags to the cream tags, lining up the tags and hinges.


Inside view with inserted tags/journaling card


Using the large tag die as a "stencil", trace the inside of the three additional black tags with a pencil and carefully trim (just on the outside of that traced line) to create a slightly smaller tag layer.

Adhere the black tags to the cream tags (this will cover up the hinge edges).

Trace six of the large tags from several pieces of the Autumn Sunset designer paper, use the outside edge for three of the layers and the inside edge for the other three.  FYI-  You could also die cut and then trim a bit for the smaller layers (the inside layer).

Inside without the tags

Layer the designer paper tags over the tri-fold base.


Create pockets from scraps of the Autumn Sunset designer paper mounted onto black cardstock using hinges created from ½” black scraps (making sure that the hinges are a bit smaller that the lengths of the pocket edges, score the hinges at t ¼”).  FYI- I also used a circle punch on a few to create an opening to make it easier to insert the smaller tags.


Die cut six tags using the medium die from the Tag Collection (two from cream cardstock and four from black cardstock).  Also, die cut an additional six cream cardstock tags (using the same medium die)- adhere the six cream medium die cut layers to the back of each tag for journaling. 


Using scraps of the Autumn Sunset designer paper  and cream cardstock, de-static and stamp the verses from Fear Not and Words of Encouragement with Versafine Onyx Black ink, apply clear embossing powder and heat set with a heat tool.   


Die cut with "Be still and know that I am God" verse with the Small Standard Circles Dies from Spellbinders  and hand trim the Philippians 4:13 verse to a rectangle. 


Mount the circle verse sentiment  onto another circle die cut from black cardstock and mount the rectangle verse sentiment onto black cardstock as well (trim close to the edges of the rectangle).  Add the "Be Still" verse to the inside pocket and the "I can do all things through Christ" to the center inside panel.


Adhere the layers to the smaller tags, add pewter eyelets to the holes in the tags and loop the moss and fig seam binding through the tops of the tags and tri-fold card base. Knot the natural thread to help hold the seam binding together. 


Back  view without inserted tags

Add lace and scraps of cardstock to cover the lace edges as desired before inserting the tags into the pockets.

Fold the card up and use black seam binding to create a ribbon tie to hold the entire card together.

I had fun creating this project and will be linking to the following challenges:

Simon Wednesday “Use Dies and/or Punches” Challenge

Word Art Wednesday #491-#492 “Anything Goes” Challenge


Stamp Sets:  Fear Not, Words of Encouragement (the Encouragement Bundle) from Stamp Simply


Ink/Mediums: Versafine Onyx Black, Tim Holtz Antique Linen Distress Ink


Cardstock/Paper: Vanilla, Black; Autumn Sunset 8x8 Paper Pad by Prima

Accessories/Tools:  Gemini, Jr., Sizzix Framelit Dies by Tim Holtz- Tag Collection, Spellbinders Die- Standard Circles- Small, May Arts Burlap String- Natural 400 yd spool, Seam Binding- Moss, Black, Fig Beige, Venise Lace- .75”- Lucia Ivory, , Pewter Brads, Crop-A-Dile, Circle Punch, Corner Punch

Please do not forget to comment, link to the next blog on the hop and leave a comment for them as well. There will be a random draw for the winner for each blog on the hop and the winners will be announced on Thursday evening (05/27) at the Stamp Simply blog.

Sharon Johnson/Stamp Simply Blog

Michelle Woerner

                     Julie Gearinger    (you are here)

Deb Saaranen

Deb Felts

Jill Hilliard

Esther Asbury

Holly McMillen

Sheri Holt

Good luck and thanks again for stopping by!  We hope that we have inspired you to get creative this week :-)

Thursday, November 5, 2020

Merry Christmas and Warm Winter Wishes- Set of Four Tags


 Hi Friends! 


Today I am sharing a set of four tags designed with stamps, dies and designer papers from Stamp Simply.  Sharon is sharing this set of tags today on the Stamp Simply blog and she will be sharing tags from the rest of the Design Team all week!  


 I generally do not create tags (other than simple ones for presents), but I had so much fun creating this tag set- I see more tags in my future, lol! 


If you have not had a chance to check out the  Stamp Simply blog yet, we hope you will do so- gorgeous inspiration from the Design Team! 


To create this set of tags:


Cut the four pieces 3” x 5 ½” from heavyweight white cardstock.   Create the tag top by cutting an angle on one of the rectangles, then using the piece that you cut off, flip it over and use it as a template for cutting the angle on the other side.   


Cut a 3” x 2 ½” piece of woodgrain designer paper from the Peace & Joy paper pad by Kaisercraft and mount to the lower part of each of the tags (I was able to just use one piece of the 6.5" x 6.5" paper for all four tags).


On two of the tags, add the embossed white piece of paper from the same paper pad (this is very difficult to see in the photo but shows up a bit on the top of the poinsettia wreath tag).  


Once the designer papers are applied to the tags, distress the edges of the tags with a distressing tool (or use the side of one of your scissor blades).   


For the wreaths on the tags, I pulled out the wreath page from the  Peace & Joy paper pad (this piece of paper has the wreath different wreaths on one page).  Fussy-cut each wreath for the tags (four tags from one sheet of paper).  Adhere each of the wreaths to the tags, this helps to cover the raw edge of the woodgrain paper. 


Die cut the "lace" from white cardstock using the  Sizzix Thinlit Dies by Tim Holtz- Crochet , trim the die cut to fit the tag, and adhere to the lower part of the tag.  


Add a strip of black cardstock to cover the edge of the die cut (distressing the edges).   Using the thin border strips from another sheet of designer paper from the  Peace & Joy paper pad, trim to fit the tag and adhere to the middle of the black strip,  FYI- these thin border strips were only on one part of the paper, so there are cut-a-parts that can be used for more tags or cards- this Peace & Joy paper pad is amazing for creating quite a few cards!  


Stamp the buck image from  A Godly Man using Versafine Onyx Black Ink  onto white cardstock, apply clear embossing powder and heat set with a heat tool.   Die cut the buck with the coordinating  A Godly Man’s Buck  and adhere to the tags using dimensional foam (or chipboard).   


Stamp the sentiments from Typewritten Year Round Greetings with Versamark onto black cardstock, apply white embossing powder and heat set with a heat tool.  Cut the sentiments apart by hand, mount onto the tags using dimensional foam or chipboard.   

Use a stapler to attach the ½" black seam binding in a loop (to create the tails) and adhere the ½” black seam binding bow to cover the staple. 


 To finish off the tags, use a clear glitter pen to add shimmer to the wreaths and white Nuvo crystal drops to the poinsettia wreath centers.   


The following Stamp Simply supplies to create this card: 


Other Supplies from my stash: 

  • Heat Tool 

  • White and Black Cardstock 

  • Nuvo White Crystal Drops 

  • MISTI tool 

  • Gemini, Jr. 


Thanks again for taking the time to stop by and I hope I have inspired you to create something today! 

Related Posts Plugin for WordPress, Blogger...