Showing posts with label A Godly Man. Show all posts

Thursday, January 19, 2023

TCC187 May the God of Hope


Hi Friends!

Welcome to our #187 {Winter Cocoa} or {Winter Snow} Challenge at The Card Concept!  We are a bi-weekly challenge and the second challenge of every month, we offer two inspiration photos vs one.

I was inspired by the #187b {Winter Snow} Challenge- the colors as well as the greenery.  I pulled out a few stamp sets, dies as well as paper and other supplies from Stamp Simply to create a card that could be used for Christmas or possibly an encouragement/get well card.

As many of you who follow my blog also know, I enjoy participating with other online challenges. I know how much work goes into maintaining a challenge blog and want to give them support.  

I will be linking this card to one of my favorite card challenge sites- the Word Art Wednesday #579-#580 “Anything Goes” Challenge.

I hope you will have a chance to check out the rest of the Design Team cards at The Card Concept- we would love to have you participate with us!


This card incorporates heat embossing, die cutting and layering.  A simple card and relatively flat for mailing.
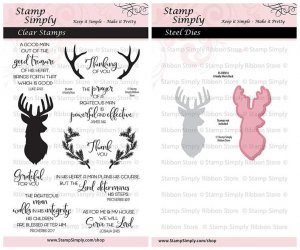
Stamp Sets: A Godly Man Bundle, Wonder of Christmas Sentiments (Stamp Simply)

Inks/Mediums: Versafine Onyx Black, Versamark

Cardstock/Paper: White, Black, Echo Park Little Lumber Jack 6x6 Paper Pad

Accessories/Tools: Gemini, Jr., Stamp Simply Steel Dies- A Godly Man Buck, Two Sprigs; Spellbinders Nestabilities- Standard Ovals LG, Fig Seam Binding, Kaisercraft Self Adhesive Pearls- Pearls

FYI- In the past, I have provided detailed every step of creating my cards on my blog (over 2000 posts).  When I first created my blog in 2012, there were many who were new to stamping so I felt the need to explain each step.  It is taking me longer to create my blog posts now with all of the detail than to design the cards, lol!  Since my hubby passed away, I do not have as much spare time as in the past.

Due to this, I plan to post a summary of the steps going forward to save time.  If you ever have any questions on a technique, please ask in the comments and I will explain in greater detail.  

Thanks for understanding and taking the time to visit! I hope you are inspired to create a card and join us for our #187 {Winter Cocoa} or {Winter Snow} Challenge at The Card Concept!

Saturday, February 19, 2022

Hope and a Future


 Hi Friends!

Today I am sharing a graduation card using the new Craft Consortium Patina 6x6 Paper Pad along with stamps, dies and twine from Stamp Simply.

The Craft Consortium Patina 6x6 paper pad has such deep, rich colors, texture and patterns- wonderful for masculine and feminine cards!


Also, Jeremiah 29:11 is one of my favorite verses and I love the font in the Scripture for Graduation and Beyond stamp set, don’t you ? It pairs perfectly with the Graduation Sentiments and also comes as a bundle

I am linking this card to the Watercooler Wednesday #335 “Anything Goes “Celebrating the End” (FYI- this is their final challenge).

If you have not already had a chance to do so, I hope you visit the Stamp Simply blog to see all of the inspiration from the rest of the SS Design Team as well as the final Watercooler Wednesday Challenge- beautiful galleries from all!

To create this card:

Using ground espresso distress ink, repeatedly stamp the subway style background stamp from the Graduation Sentiments (part of the Graduation Bundle) onto a panel from the Craft Consortium Patina designer paper.


Distress the edges, mount onto a piece of rust cardstock and mount onto a white card base.

De-static a piece of white cardstock with an embossing powder tool, ink the A Godly Man buck image and the verse sentiment with archival black ink, apply clear embossing powder and heat set with a heat tool.


Die cut the verse sentiment using the outer die from the
medium pierced rectangle die, mount onto a piece of rust cardstock and trim close to the edge.

Add the knotted kraft baker’s twine  to three of the corners, add to the card front using dimensional foam or chipboard.

Die cut the buck image with the Buck Die, die cut two additional bucks from white cardstock to layer behind the stamped die cut buck.


Mount the buck image with dimensional foam (or chipboard) and add a few black rhinestones to finish off the card.


Stamp Sets: Scripture for Graduation and Beyond, Graduation Sentiments (both included in the Graduation Bundle), A Godly Man (part of A Godly Man Bundle)- all from Stamp Simply

Ink/Mediums: Versafine Onyx Black, Tim Holtz Ground Espresso Distress

Cardstock/Paper: White, Rust; Craft Consortium Patina 6x6 Paper

 Accessories/Tools:  Gemini. Jr., Stamp Simply Dies- Buck Die single or part of A Godly Man Bundle, Spellbinders Celebrations - Pierced Rectangle Dies , May Arts Baker’s Twine- 110 Yard Spool- Kraft, Kaisercraft Self-Adhesive Round Rhinestones- Black, Embossing Powder Tool, Clear Embossing Powder, Heat Tool

Thanks again for stopping by- I hope you will check out the February sale at Stamp Simply!


Saturday, May 22, 2021

A Godly Man- His Children Are Blessed After Him


Hi Friends!

Today I am sharing a masculine card using A Godly Man Bundle along with Echo Park Little Lumber Jack 6x6 paper, the Lumber 3D Embossing Folder and a few other supplies (all available from the new Stamp Simply store)!


Even though this card was designed for a good friend’s birthday, but I think it would also be a great Father’s Day card!


I was able to incorporate the Splitcoaststampers SC229 Sketch into the layout (yea, another one of the 850+ sketches completed!) and will also be linking to the Simon Says Monday “Four Legged Friends” Challenge along with the Word Art Wednesday #491-#492 “Anything Goes” Challenge.

If you have not had a chance to visit the Stamp Simply blog or the other challenge sites yet, I encourage you to do so- gorgeous inspiration from all!

To create this card:

Emboss a piece of white cardstock with the 3D Texture Fades Lumber Embossing Folder, trim to 4” x 5 ¼” and mount onto a 4 ¼” x 5 ½” piece of black cardstock.

Mount the panel onto a white card base.

Trim the plaid and printed designer papers from the Little Lumber Jack paper (for the vertical panels), mount onto black cardstock and adhere to the card front.


Add a strip of the plaid paper to the inside bottom of the card (this was a scrap that I had from trimming down the 6x6 paper).

De-static a piece of white cardstock with an embossing powder tool, stamp the verse sentiment from A Godly Man using Versafine Onyx Black ink onto the prepared cardstock, apply clear embossing powder and heat set with a heat tool.

Trim the panel to a rectangle, and mount onto black cardstock.

Create the “photo corners” by starting with a small square of black cardstock, cut on the diagonal, then carefully trim along the inside edges to create the shape (I use small scissors for this step). 

Adhere to the corners of the sentiment layer and use a piercing tool to create the holes for the pewter brads.

Wrap the knotted Kraft Baker’s Twine along the top, wrap the ends behind the panel and mount onto the card front with dimensional foam (or chipboard).

De-static a piece of white cardstock with an embossing powder tool, stamp the Godly Man buck image with Versafine Onyx Black ink, apply clear embossing powder and heat set with a heat tool.


Once the embossing has cooled, die cut the buck image with the coordinating A Godly Man Buck Die , also die cutting two additional pieces from white cardstock.  

Adhere the two additional die cuts behind the embossed image and mount the layered buck image onto the card front with dimensional foam (or chipboard) to finish off the card.


Stamp Sets:   A Godly Man Bundle (stamp and die set) from Stamp Simply

Ink/Mediums: Versafine Onyx Black

Cardstock/Paper: White, Black, Little Lumber Jack 6x6 Paper Pad by Echo Park

Accessories, Tools:  Gemini., Jr., Stamp Simply Steel Dies- A Godly Man Buck,

Sizzix 3D Texture Fades A6 Embossing Folder- Lumber , May Arts Bakers Twine- Kraft- 100 yd Spool, Embossing Powder Tool, Clear Embossing Powder, Heat Tool, Pewter Brads, Piercing Tool

Thanks again for taking the time to visit!  I hope all of you will join us tomorrow for our Stamp Simply Blog Hop (there will be a great discount plus prizes)!!  

Saturday, January 2, 2021

Clean and Simple Thank You


 Happy New Year Friends!

We are focusing on Clean and Simple (CAS) thank you cards this week on the Stamp Simply blog and today I am sharing a very quick CAS card that I designed using several Stamp Simply stamp sets along with the coordinating die.  

As many of you who follow my blog know that I enjoy participating with online challenges.  I will be linking this card to the Word Art Wednesday #470-#472 Christmas Blog Hop Challenge along with the Double Trouble#73- December “Die-Lirious” Challenge  (I used a Gemini, Jr. to cut out my die for option #1 plus I used silver twine for the Twisted Sister option as well:-)) and the Bitten by the Bug
2 "Die-Lirious Holiday Season Partnering with Double Trouble" Challenge (
they loosened up their rules for this challenge- need to use a die cut, which I did :-)). 

If you have not had a chance to visit the Stamp Simply blog yet (to check out all of the gorgeous cards from the rest of the Design Team), or the other challenge sites,  I hope you will find the time to do so- fabulous inspiration from all


To create this card:

De-static a piece of white cardstock with an embossing powder tool. Ink the buck image from A Godly Man with Versafine Onyx Black ink, stamp onto the prepared cardstock, apply  clear embossing powder and heat set with a heat tool. 

Once the embossing powder has cooled, die cut the image with the coordinating A Godly Man Buck die. Using the same buck die, die cut a few more bucks from white cardstock and mount the plain dies behind the embossed image (to create a thicker die cut).

On a 4” x 5 ¼” piece of white cardstock, repeat the stamping/embossing steps above with the “Thank You” sentiment from A Godly Man, stamping into the lower left hand part of the panel and once cooled, mount the panel onto a piece of 4¼” x 5 ½” piece of black cardstock before adhering the entire background panel to a white card base.

Trim a piece of plaid designer paper to approx. 4” x 2¼” and mount onto a piece of black cardstock, trimming close to the edge.  Add this panel directly to the card front.

Add the looped silver twine using glue dots to hold into place and mount the die cut buck image with dimensional foam over the twine.

Add a few silver rhinestones to finish off the card.


Stamp Sets:  A Godly Man (Stamp Simply)

Ink/Mediums: Versafine Onyx Black

Cardstock/Paper:  White, Black; Memory Box Christmas Plaid with Foil 6x6

Tools/Accessories:  Gemini, Jr., Stamp Simply Dies- A Godly Man Buck, Embossing Powder Tool, Clear Embossing Powder, Heat Tool, Silver Twine, Silver Rhinestones

Thanks again for taking the time to visit- I hope all of you have a wonderful New Year weekend!!

Wednesday, November 18, 2020

TCC144 Wonder of Christmas


Hi Friends!


It is time for the #144 {Holiday Home} Challenge at 
The Card Concept!

I was inspired by the white, black, buffalo plaid as well as the evergreen to create a Clean and Layered card using Stamp Simply stamps.

I am also participating with the Simon Says Monday “Happy Holidays” Challenge , the Simon Says Wednesday "Christmas" Challenge  and the Word Art Wednesday #466-#467 "Anything Goes" Challenge. 

If you have not had a chance to visit The Card Concept or the other challenge sites yet, I encourage you to do so- fabulous inspiration from all! 


I absolutely love this buck image from A Godly Man, don’t you?  Perfect for all occasion masculine cards as well as Christmas/Winter. 

The heat embossed buck image was die cut with the coordinating die and paired with a heat embossed sentiment, die-cut greenery as well as fun buffalo check designer paper and black and white gingham ribbon.

A clear glitter marker adds shimmer to the greenery and a few rhinestones finishes off the card.

Stamp Sets: A Godly Man , Wonder of Christmas Sentiment
s
  (Stamp Simply)

Ink/Mediums: Versafine Onyx Black, Zig Wink of Stella- Clear Glitter Marker

Paper/Cardstock: White, Green, Black; Little Lumberjack by Echo Park

Tools/Accessories: Gemini, Jr., Stamp Simply Dies- A Godly Man Buck, Floral Clusters & Sprigs, May Arts 3/8” Black Gingham Ribbon, Heat Tool, Embossing Powder Tool, Clear Embossing Powder, Silver Rhinestones

Thanks again for taking the time to visit! 


I hope you can find the time to create a card based on our{Holiday Home } photo and link up to our gallery at The Card Concept- we would love to see what inspired you! 

The challenge is open until November 30th at noon EDT.


Thursday, November 5, 2020

Merry Christmas and Warm Winter Wishes- Set of Four Tags


 Hi Friends! 


Today I am sharing a set of four tags designed with stamps, dies and designer papers from Stamp Simply.  Sharon is sharing this set of tags today on the Stamp Simply blog and she will be sharing tags from the rest of the Design Team all week!  


 I generally do not create tags (other than simple ones for presents), but I had so much fun creating this tag set- I see more tags in my future, lol! 


If you have not had a chance to check out the  Stamp Simply blog yet, we hope you will do so- gorgeous inspiration from the Design Team! 


To create this set of tags:


Cut the four pieces 3” x 5 ½” from heavyweight white cardstock.   Create the tag top by cutting an angle on one of the rectangles, then using the piece that you cut off, flip it over and use it as a template for cutting the angle on the other side.   


Cut a 3” x 2 ½” piece of woodgrain designer paper from the Peace & Joy paper pad by Kaisercraft and mount to the lower part of each of the tags (I was able to just use one piece of the 6.5" x 6.5" paper for all four tags).


On two of the tags, add the embossed white piece of paper from the same paper pad (this is very difficult to see in the photo but shows up a bit on the top of the poinsettia wreath tag).  


Once the designer papers are applied to the tags, distress the edges of the tags with a distressing tool (or use the side of one of your scissor blades).   


For the wreaths on the tags, I pulled out the wreath page from the  Peace & Joy paper pad (this piece of paper has the wreath different wreaths on one page).  Fussy-cut each wreath for the tags (four tags from one sheet of paper).  Adhere each of the wreaths to the tags, this helps to cover the raw edge of the woodgrain paper. 


Die cut the "lace" from white cardstock using the  Sizzix Thinlit Dies by Tim Holtz- Crochet , trim the die cut to fit the tag, and adhere to the lower part of the tag.  


Add a strip of black cardstock to cover the edge of the die cut (distressing the edges).   Using the thin border strips from another sheet of designer paper from the  Peace & Joy paper pad, trim to fit the tag and adhere to the middle of the black strip,  FYI- these thin border strips were only on one part of the paper, so there are cut-a-parts that can be used for more tags or cards- this Peace & Joy paper pad is amazing for creating quite a few cards!  


Stamp the buck image from  A Godly Man using Versafine Onyx Black Ink  onto white cardstock, apply clear embossing powder and heat set with a heat tool.   Die cut the buck with the coordinating  A Godly Man’s Buck  and adhere to the tags using dimensional foam (or chipboard).   


Stamp the sentiments from Typewritten Year Round Greetings with Versamark onto black cardstock, apply white embossing powder and heat set with a heat tool.  Cut the sentiments apart by hand, mount onto the tags using dimensional foam or chipboard.   

Use a stapler to attach the ½" black seam binding in a loop (to create the tails) and adhere the ½” black seam binding bow to cover the staple. 


 To finish off the tags, use a clear glitter pen to add shimmer to the wreaths and white Nuvo crystal drops to the poinsettia wreath centers.   


The following Stamp Simply supplies to create this card: 


Other Supplies from my stash: 

  • Heat Tool 

  • White and Black Cardstock 

  • Nuvo White Crystal Drops 

  • MISTI tool 

  • Gemini, Jr. 


Thanks again for taking the time to stop by and I hope I have inspired you to create something today! 

Related Posts Plugin for WordPress, Blogger...