Showing posts with label Mercy. Show all posts

Saturday, February 24, 2024

Living Hope


Hi Friends!

I hope all of you are having a fabulous week so far!

Today I am sharing a card for Easter designed with stamps, dies and a brand new paper pad paper all from Stamp Simply.  

I decided to pair the He Lives stamp bundle (for the floral image) along with a verse sentiment from the Mercy stamp set with a piece of designer paper from the Studio Light In Loving Memory 8x8 paper pad.


The In Loving Memory8x8 pad has several gorgeous soft scenes perfect for sympathy as well as other all occasion cards.

I thought that the daffodil image from He Lives Bundle blended well with the lilies on the paper and the florals on this paper remind me of Easter.


To create this card:

De-static a piece of white cardstock with an embossing powder tool.

Ink the daffodil image from the He Lives Bundle with Versafine Onyx Black Ink, stamp two images onto the prepared white cardstock, apply clear embossing powder and heat set with a heat tool.

Once the embossing has cooled, color the daffodils with various gray and black colored pencils before die cutting with the coordinating die.  (FYI- I also die cut an additional daffodil from plain white cardstock to layer behind the colored images).


Trim the lily patterned paper from In Loving Memory to 4” x 5 ¼”.

De-static the lower right hand area of the designer paper with an embossing powder tool, ink the verse sentiment from Mercy with Versafine Onyx Black Ink, stamp onto the prepared designer paper, apply clear embossing powder and heat set with a heat tool.

Mount the sentiment panel onto white cardstock, trim close to the edge and mount onto black cardstock.

Adhere the layered card front to a white card base.

Add a strip of the cut-off designer paper to the inside of the card base. 


Trim the stem area off one of the daffodil images and adhere directly to the card front. 

Add the second daffodil image with dimensional foam and finish off the card with a few pearls in the upper right hand corner.

If you have not had a chance to check out my Sister Design Team cards on the Stamp Simply,I hope you will do so- wonderful inspiration from all!!


I enjoy playing along with online challenges and will be linking this card to the Simon Says Wednesday “Beautiful Blooms” Challenge along with the Word Art Wednesday #635-#636 “Anything Goes” Challenge.


Stamp Sets: He Lives Bundle,  Mercy (Stamp Simply)

Ink/Mediums: Versafine Onyx Black, Prismacolor Pencils- Grays, Black

Cardstock/Paper:  White, Black, Studio Light In Loving Memory 8x8 Paper Pad

 Accessories/Tools:  Gemini, Jr.,  Stamp Simply Stamps- He Lives Bundle, Embossing Powder Tool, Clear Embossing Powder, Heat Tool, Kaisercraft Self-Adhesive Round Pearls- Pearl


Don’t forget to stop by and check out the current specials at Stamp Simply!

Thanks again for visiting and I hope you have a great weekend! 

Wednesday, August 5, 2020

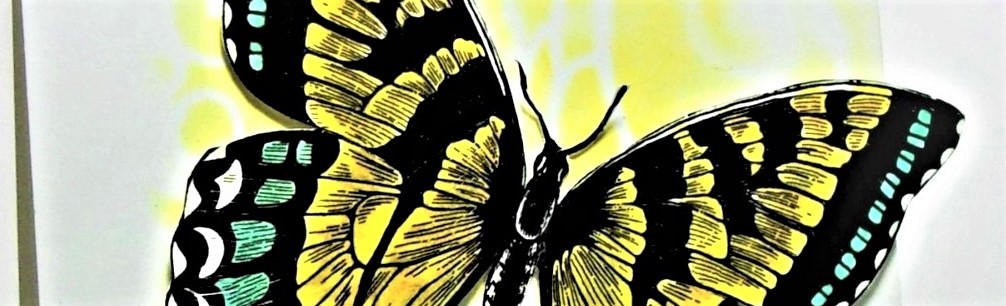
CAS Mixed Media Butterfly


Hi Friends!
Today I am sharing a quick Mixed Media card designed using the retired Stampin’ Up! Swallowtail background stamp along with a sentiment from the Mercy stamp set (Stamp Simply). 

I wanted to participate with a few online challenges and was inspired by the 
FUSION  “Summer” Challenge (the lemon yellow along with the soft green) and am also linking to the Creative Knockouts #361 Tic-Tac-Toe Challenge (middle row down- Embossing (heat) Image and Sentiment) and the Simon Wednesday “Anything Goes” Challenge.


If you have not had a chance to check out the above challenge sites yet, I encourage you to do so- fabulous inspiration from all!

To create this card:

This was another butterfly I had printed out using the My Digital Studio™ program onto white cardstock (I found in my stash when organizing). 

Color the butterfly with water-based markers- see the colors used below and once satisfied, fussy cut the image. Use a foam brush to lightly apply a layer of Mod Podge™ to the entire butterfly and set aside to dry.

Fold a piece of 4 ¼” x 11” cardstock in half and using a flourish stencil with a stencil brush, apply Squeezed Lemonade Distress Oxide ink to part of the background .

De-static the lower corner with an embossing powder tool, stamp the sentiment with Versafine™Onyx Black ink, apply clear embossing powder and heat set with a heat tool.
Add the butterfly to the card front to finish off the card.

Stamp Sets: Swallowtail (retired Stampin’ Up!- digi version), Mercy (Stamp Simply)

Ink/Mediums: Printer Ink- Black; Versafine™ Onyx Black, Stampin’ Write Markers- Pineapple Punch, Coastal Cabana, Bermuda Bay; Tim Holtz® Squeezed Lemonade Distress Oxide; Favber-Castell™ Pitt Penn Black

Paper/Cardstock: Whisper White

Accessories/Tools: Embossing Buddy™, Heat Tool, Clear Embossing Powder, Flourish Stencil, Stencil Brush

I am so thankful that you took the time to stop by!  We will be posting the new Card Concept Challenge at 8 am- I hope you can check it out and join us!


Wednesday, April 17, 2019

TCC113 A Living Hope


Hi Friends!


Doesn’t this photo showcase Spring?  I love the colors of the flowers, the greenery  as well as the Easter theme.  

This weekend we will be celebrating Good Friday as well as Resurrection Sunday so  
I decided to focus on the real meaning of Easter and create a Shabby Chic/Mixed Media card!

The scripture verse used on this card (from the Stamp Simply set, Mercy) is a reminder that Christ has given us a living hope in His resurrection!  We have a living Savior- the Lord Jesus Christ offers the free gift of salvation to all who truly believe and put their faith and trust in Christ alone for forgiveness of their sins!  Alleluia, what a Savior!!


If you have not had a chance to visit us at The Card Concept or the other challenge sites yet, I hope you will find time to do so- gorgeous inspiration from all!

To create this card:

1). De-static two pieces of white cardstock with an embossing powder tool.   Using Versafine™ Onyx Black Ink, stamp the floral image from Very Vintage (current Stampin’ Up! hostess) onto one piece and the verse sentiment from Mercy (Stamp Simply)  onto the other piece, apply clear embossing powder and heat set with the heat tool. 

2). Once the embossing has cooled, watercolor the flower images using water-based markers (the colors I used are listed below).  Once you are satisfied with the coloring, trim the floral panel into a rectangle and die cut the sentiment with a stitched circle die.

3). Using a water brush, apply Vintage Photo distress ink to the background of the floral image as well as the sentiment (I was inspired also by the wooden table in the photo for this step).  Mount the rectangle focal image onto a piece of black cardstock, trim close to the edge.  Die cut a piece of black cardstock with a circle die and mount the sentiment.

4). Die cut a piece of white cardstock with a rectangle stitched die, mount onto a piece of black cardstock.  Add the strip of designer paper to the bottom edge, add the white crochet trim and wrap a piece of 1” black satin ribbon over the top of the lace trim.

5). Mount the focal image using dimensional foam or chipboard.  Add the sentiment also with chipboard or foam.

6).  To finish off the card- add a few pearls to the corners of the background panel as well as the sentiment.  Use a  clear glitter pen to add shimmer to the flower petals and an extra fine white paint pen to add a few white highlights to the floral centers.

Stamp Sets:  Very Vintage (Stampin’ Up!), Mercy (Stamp Simply)

Ink/Mediums: Versafine™ Onyx Black,  Stampin’ Write Markers-Blushing Bride, Flirty Flamingo, Melon Mambo, retired Wild Wasabi, Green Gable, Wisteria Wonder; Tim Holtz® Vintage Photo Distress; Spectrum Noir™ Clear Glitter Pen, Sharpie® Extra Fine White Paint Pen

Cardstock/Paper: Whisper White, Basic Black, retired Stampin’ Up! Park Lane Designer Series Paper

Tools/Accessories:  Big Shot™, MFT Dies- Stitched Rectangle A2 STAX, Stitched Circles, ODBD Dies- Circles; AquaPainter™, Embossing Buddy®, Clear Embossing Powder, Heat Tool, Chipboard, White Crochet Lace, 1” Black Satin Ribbon

Thank you for taking the time to visit!  Just a reminder that The Card Concept is a bi-weekly challenge that has an inspiration photo along with a suggestion of design styles that you can choose from to create your card- Clean and Simple, Clean and Graphic, Clean and Layered, Shabby Chic, Freestyle Collage, Classy and Elegant and Mixed Media (or you can combine several styles for your own style).

I hope I have inspired you to create your own card based on our {Spring Celebration} photo and link up to our gallery at The Card Concept- we would love to see your interpretation!! The challenge is open until Monday, April 29th at noon (EDT).

Related Posts Plugin for WordPress, Blogger...