Wednesday, October 31, 2018

The Card Concept #101 {Rustic Fall}- Give Thanks


Hi Friends!


I absolutely love this wonderful inspiration photo that Lesley, the creator of The Card Concept Challenge,  chose with the vintage dark blue truck and gorgeous pumpkins- don't you?  

I was inspired by the color of the pumpkins as well as the other autumn colors to create a Shabby Chic/Mixed Media card using digital images from Power Poppy along with traditional watercolor and other techniques.

I am also participating with the Simon Says Work It Wednesday October "Give Thanks" Challenge along with the As You Like It “Favourite Halloween or Autumnal Colors” (I absolutely love all of the oranges, yellows and reds of autumn on the East Coast :-)) and the Word Art Wednesday #358-#359 “Anything Goes” Challenge.

***  Just a reminder that The Card Concept is a bi-weekly challenge that has an inspiration photo along with a suggestion of design styles that you can choose from to create your card- Clean and Simple, Clean and Graphic, Clean and Layered, Shabby Chic, Freestyle Collage, Classy and Elegant and Mixed Media (or you can combine several styles for your own style). ***

If you have not had a chance to visit us at The Card Concept or the other challenge sites yet, I hope you will find time to do so- fabulousl inspiration from all!

To create this card:

1). Using a photo editing software (I used the retired My Digital Studio™ from SU!), import the digital images from Painted Pumpkins and Bittersweet Wreath (both Power Poppy by Marcella), re-size as needed and print out onto white cardstock (this cardstock was from my stash and has a linen finish).

2). Using Tim Holtz Distress Inks along with various water-based markers,  watercolor the Painting Pumpkins digital image until you're satisfied with the results (I will list the items used below in the card recipe). Use a waterproof marker to draw a table edge, trim the image and use a distressing tool to distress the edges.  Apply Vintage Photo Distress Ink with a sponge dauber along the edges and distressing with the small splatter image (Timeless Textures-SU!).   Mount the finished image onto a piece of Not Quite Navy cardstock and distress the edges with a distressing tool.

3). Die cut the sentiment with a stitched rectangle die, mount onto Not Quite Navy cardstock (retired SU!), distress the edges of the Not Quite Navy layer with a distressing tool, sponge Vintage Photo Distress Ink around the edges and add a bit of splatter with the Timeless Textures stamp.

4). Distress the edges of a piece of patterned paper (I used a piece from my stash), apply Vintage Photo Distress Ink along the edges, mount the panel onto a piece of retired Not Quite Navy cardstock and distress the edges of the cardstock as well.

5). Die cut a piece of Not Quite Navy cardstock with one of the MFT Stitched Horizontal Strip Dies, split the die cut (the split will be covered with the sentiment panel) and mount the pieces onto the distressed panel.  Adhere the pieces of dark brown polished hemp twine (wrapping the ends behind the panel) and mount the entire panel onto a white card base.

6). Mount the main image onto the card front as well as the sentiment using dimensional foam.   Add the looped polished hemp twine bow with the pumpkin button (I used hot glue to adhere the bow).

7).  Use a clear glitter pen to add shimmer to the pumpkins to finish off the card.

 Stamp Sets: Painted Pumpkins, Bittersweet Wreath (Power Poppy), Timeless Textures (Stampin Up!)

Ink/Mediums: Printer Ink- Black, Stampin’ Write Markers- Cajun Craze, Pumpkin Pie, Smokey Slate; Arteza™ Real Brush Markers- A146 Olive Green, A167 Ocean Blue, A140- Cadium Orange, A112- Orange, A178- Ginger, A102- Chocolate; Tim Holtz® Distress Ink- Vintage Photo, Brushed Corduroy, Crazed Pumpkin; Spectrum Noir™ Glitter Pen, Sharpie®  Extra Fine Black Marker

Cardstock/Paper: Not Quite Navy (retired SU!), designer paper (Authentique- not sure of collection), misc. linen and HD white cardstock from my stash (for images and base)

Tools/Accessories:  My Digital Studio™ (retired SU!), Big Shot™, My Favorite Things™ (MFT) Dies-Stitched A2 Rectangle, Stitched Horizontal Strip; Distressing Tool, Polished Hemp Twine, retired Pumpkin Pie button (SU!), Printer

Thanks again for taking the time to stop by- I hope you will join us for our {RusticFall} Challenge at The Card Concept- we would love to see your card in our gallery!!

Wednesday, October 17, 2018

TCC100 Elegant Fall


Hi Friends!


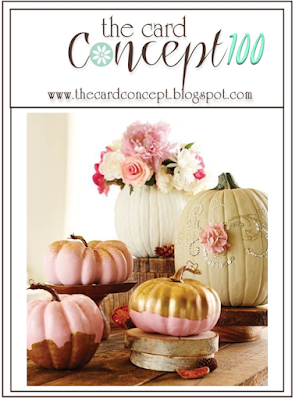
Woohoo! We are celebrating the 100th challenge at The Card Concept with a gorgeous inspiration photo and a special surprise!  To help us celebrate, all of our designers invited a special guest designer so we have 24 different cards to inspire you!!

I love this beautiful inspiration photo that Lesley found and was inspired by the colors, the roses as well as the gold to create a Shabby Chic/Mixed Media card! These colors worked perfect for my niece’s wedding this past weekend (her colors were burgundy, light pink, white/ivory and gold). 


Just a reminder that the Card Concept is a bi-weekly challenge that has an inspiration photo along with a suggestion of design styles that you can choose from to create your card- Clean and Simple, Clean and Graphic, Clean and Layered, Shabby Chic, Freestyle Collage, Classy and Elegant and Mixed Media (or you can combine several styles for your own style).

If you have not had a chance to visit us at The Card Concept or the Word Art Wednesday site yet, I hope you will find time to do so- gorgeous inspiration from all!

To create this card:

1). Apply clear gesso to a 5 ½” square piece of white cardstock, use a heat tool if necessary to speed up the drying process.
2). Once the panel has dried, use Tim Holtz® Distress Oxide Inks, Alcohol Inks along with acrylic paint until you achieve the color that you desire (see colors used below).  Add TH Picket Fence Distress Stain to tone down the color in areas and add a bit of crackle texture paste with a honeycomb stencil.

3). Once the crackle paste has dried, stamp the background with the retired En Francais background stamp (SU!) using Staz-On™ Stone Gray ink, add a bit of distressing with the small splatter stamp from Timeless Textures (SU!) and Stone Gray ink, distress the edges of the panel and mount onto a 5 ½” square white card base.

4). Create the rolled flowers using MFT Mini Royal and Royal Rose Dies from Cherry Cobbler, Whisper White and Pretty in Pink cardstock.  Use a crimper tool to soften the paper before rolling the flowers (I use hot glue to adhere the base).  Die cut the leaves from Wild Wasabi cardstock using ODBD Bitty Blossoms Dies and the scrolls from gold foil using ODBD Fancy Foliage Dies.

5). De-static a piece of white cardstock with an embossing powder tool, stamp the sentiment from Occasional Quotes (retired SU! hostess set)  with Versamark™ Ink, apply gold embossing powder and heat set with a heat tool.  Once the embossing has cooled, die cut with an ornate rectangle die and add a bit of gold mousse over the edges.

6). Mount the sentiment onto the card front using dimensional foam,  Add the rolled roses along with the leaves and scrolls around the sentiment (I used hot glue to adhere the floral elements).

7). Add a few pearls to the corner of the sentiment and upper left corner of the card.  Use a clear glitter pen to add shimmer to the roses to finish off the card.

 Stamp Sets: Occasional Quotes, En Francais (both retired Stampin’ Up!), Timeless Textures (current SU!)

Ink/Mediums: Versamark™, Staz-On™ Stone Gray,  TH Distress Oxide- Antique Linen, Picket Fence, Spun Sugar, Worn Lipstick, Vintage Photo; Adirondack™ Alcohol Inks- Cranberry and Gold Mixatives™, Ken Oliver™ Metallic Rose Liquid Metals, Liquidtex™ Clear Gesso, Wendy Vecchi™ Crackled Texture Paste, Nuvo™ Indian Gold Embellishment Mousse, Spectrum Noir™ Glitter Pen

Cardstock/Paper: Whisper White, Cherry Cobbler, Pretty in Pink, Wild Wasabi, Gold Foil (all SU!), misc. HD white cardstock from my stash (for base and panel)

Tools/Accessories:  Big Shot™, MFT Royal and Mini Royal Rose Dies;  Our Daily Bread Dies- Fancy Foliage, Bitty Blossoms; Embossing Buddy®, Gold Embossing Powder, Heat Tool, Distressing Tool, Crafters Workshop Punchinella 6x6 Stencil, Palette Knife

Thanks again for taking the time to visit! I hope you will find the time to check out all of the wonderful cards at The Card Concept and if you have a chance, create a card based on our {Elegant Fall} photo- we would love to see your interpretation!!

Wednesday, October 3, 2018

TCC99 Sunflower Barn- So Very Thankful


Hi Friends!

Welcome to The Card Concept #99 {Sunflower Serenade} Challenge!!  What a wonderful photo- I love the sunflowers with the barn and it inspired me to pull out a few older stamps to create a Shabby Chic/Mixed Media card!


Just a reminder that the Card Concept is a bi-weekly challenge that has an inspiration photo along with a suggestion of design styles that you can choose from to create your card- Clean and Simple, Clean and Graphic, Clean and Layered, Shabby Chic, Freestyle Collage, Classy and Elegant and Mixed Media (or you can combine several styles for your own style).

If you have not had a chance to visit us at The Card Concept or visit the other challenge sites yet, I hope you will find time to do so- gorgeous inspiration from all!

To create this card:

1). De-static a piece of Naturals White cardstock with an embossing powder tool, ink the Sunflower Barn (Impressions Obsession) image with Versafine™ Onyx Black ink, stamp onto the prepared panel, apply clear embossing powder and heat set with a heat tool.
2). Water color the image using Distress Inks and Distress Markers (see colors listed below) and use watercolor pencils and additional water-based markers with a water brush until you are satisfied with the coloring.  Once the panel has dried, die cut with a stitched rectangle die, mount onto espresso cardstock and trim close to the edge of the die cut. 

3). Use a distressing tool to lightly distress the edges of two pieces of designer paper, mount onto a piece of espresso cardstock.  Adhere a piece of 7/8” stitched satin ribbon, wrap the ends behind the panel, add the pieces of hemp twine and mount onto the white card base.

4). Add a bit of cheesecloth at the corners and mount the focal image with dimensional foam.

5). De-static a piece of white cardstock with an embossing powder tool, stamp the sentiment from Pretty Patches: Apple (Wplus9) with Versafine™ Onyx Black Ink, apply clear embossing powder and heat set with a heat tool.  Use the smallest splatter stamp image from Timeless Textures (Stampin’ Up!) with vintage photo distress ink to add a bit of distressing.

6). Trim the sentiment and create the banner, distress the edges with a distressing tool, mount onto espresso cardstock, distress the edges a bit more and add a piece of knotted hemp twine (wrapping the ends behind the sentiment).

7). Mount the sentiment with dimensional foam onto the card front and finish off the card with a twine bow and button.

 Stamp Sets: Sunflower Barn (Impressions Obsession), Pretty Patches:Apple (Wplus9 Studio), Timeless Textures (Stampin’ Up!)

Ink/Mediums: Versafine™ Onyx Black, TH Distress- Tumbled Glass, Mustard Seed, Forest Moss, Vintage Photo; Distress Markers- Festive Berries, Squeezed Lemonade; Spectrum Noir™ Glitter Pen, Sharpie® Extra Fine White Paint Marker

Cardstock/Paper: Whisper White, Naturals White, Early Espresso, retired Designer Paper – cannot recall the name (all Stampin’ Up!)

Tools/Accessories:  Big Shot™, MFT Stitched A2 Rectangle Set 2 Dies;  Embossing Buddy®, Clear Embossing Powder, Heat Tool, Distressing Tool, 7/8” Stitched Chocolate Satin Ribbon (from my stash), Polished Hemp Twine, retired SU! button

Thanks again for taking the time to drop by! I hope I have inspired you to create your own card based on our {Sunflower Serendade} photo and link up to our gallery at The Card Concept- we would love to see your interpretation!!

Related Posts Plugin for WordPress, Blogger...