Hi
Stampers!
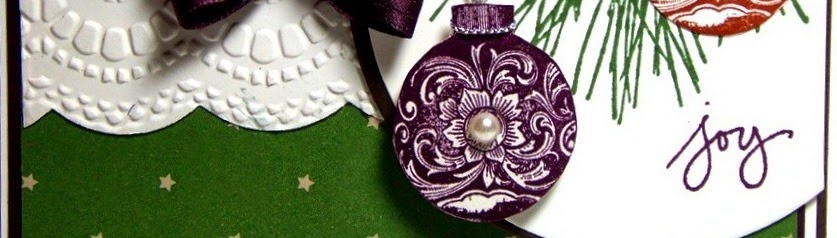
Here is the second card I created using the Ornamental Pine set from the 2014 Holiday Mini catalog.
 This
card was created for the Creative Challenge Club #17 Sketch Challenge along
with another Christmas card for the CCC14 Christmas Card Challenge atSplitcoaststampers.
This
card was created for the Creative Challenge Club #17 Sketch Challenge along
with another Christmas card for the CCC14 Christmas Card Challenge atSplitcoaststampers.
As always, if
you have not already visited the challenge sites, I hope you will find the time
to do so- there are so many wonderful examples from the Design Teams and the
galleries!
 To
create this card:
To
create this card:
Using
the large branch stamp from Ornamental Pine, ink the image using Garden Green
Classic Ink. Wipe the branch portion off
using a baby wipe and color the branch with the Early Espresso Stampin’ Write
marker.
Use
the Big Shot™ with the Circle Collection Framelits™ to cut out the image along
with another circle from Early Espresso cardstock.
Carefully
cut along the branch to allow an opening for the Silver Cord (retired) used on
the ornament.
Ink
the sentiment from Endless Wishes using Blackberry Bliss Classic Ink and stamp onto
the circle under the branches.
Stamp
the ornaments using Blackberry Bliss and Cajun Craze Classic Ink onto Whisper
White cardstock. Carefully cut out (“fussy-cut”)
each ornament and wrap the retired Silver Cord around the top of the ornaments.
Adhere
the Cajun Craze ornament directly onto the pine branch image and insert the
silver cord into the opening cut around the branch.
Mount
the Early Espresso cardstock circle behind the pine branch circle.
Mount
a piece of Trim the Tree Designer Series Paper (DSP) to a piece of Blackberry
Bliss cardstock, trim and mount onto a piece of Whisper White cardstock.
Add
the paper lace (created using the Big Shot™ along with the Large Scallop
Edgelit™ and embossed with the Delicate Designs Lace Framelit™) and top with
the 3/8’ Blackberry Bliss triple ribbon bow.
Mount
the Blackberry Bliss ornament image onto the pine branch circle using Stampin’
Dimensionals® , tuck the silver cord behind the circle and add the circle to
the card front.
Trim
the edge of the circle on the card front per the sketch and mount the entire
panel onto the Early Espresso card base.
Add
a few Pearls to the upper left hand corner to finish off the card.
Stamp
Sets: Ornamental Pine, Endless Wishes
Ink: Blackberry Bliss, Cajun Craze, Garden Green; Stampin’ Write Marker-
Early Espresso
Paper:
Whisper White, Blackberry Bliss, Early Espresso, Trim the Tree DSP Pack
Accessories: Big
Shot™, Circle Collection Framelits™, Large Scallop Edgelit™, Delicate Designs
Textured Impressions™ Embossing Folder, Pearls, retired Silver Cord
Thanks again fortaking the time to visit :-) I have one more card to share using this stamp set- I am having so much
fun with this one!
Have a great weekend,
my friends!!


