Monday, April 30, 2018

Rose Banner #2- Vintage Birthday


Hi Friends!

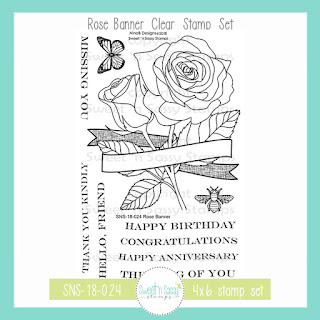
This is the second card that I am sharing today using the  Sweet ‘n Sassy Stamps  April Stamp of the Month, Rose Banner along with the previously released Texture Tiles I stamp set (if interested, please see this post for my first card).

Just a reminder, today is the final day that you can receive the April Stamp of the Month, Rose Banner free with any $75 (US) net order (after all discounts and before shipping and handling) plus any $75 US order ships for free!

I decided to create a Vintage Mixed Media card for this card and will be linking this card to the Seize the Birthday “Anything Goes” Challenge along with the Word Art Wednesday #332-#333 “Anything Goes” Challenge.

If you have not had a chance to visit the above challenge sites or the SNSS Blog/FB Page yet, I encourage you to do so- wonderful inspiration from all!

To create this card:

1). Ink the Rose Banner image along with the sentiment with archival black ink, stamp onto white cardstock, apply clear embossing powder and heat set with a heat tool.  Watercolor with water-based markers and distress inks (see below for details).  FYI- I was not satisfied with my initial colors so I have multiple layers of color.  Once you are satisfied, fussy-cut the image.

 
2). Stamp the sentiment from Rose Banner using archival black ink and heat emboss with clear embossing powder.

3). Press antique linen distress ink onto a craft mat, spritz with water and press a piece of white cardstock into the ink.  Dry with a heat tool and using the script image from Texture Tiles I, stamp the background repeatedly with the same distress ink.  Use a stencil brush with a flourish stencil to apply a bit of mermaid lagoon distress oxide ink.  Distress the edges with a distressing tool and mount onto a piece of black cardstock.

4). Add the ivory crochet lace and a piece of black satin ribbon, wrapping the edges behind the panel.

5). Mount the fussy-cut Rose Banner image with dimensional foam and use a clear glitter pen to add shimmer to the flower petals.  Add a few pearls in the corners and clear crystal drops on the petals and sentiment to finish off the card.


Ink/Mediums: Versafine™ Onyx Black, Tim Holtz® Distress Ink- Antique Linen, Wild Honey, Worn Lipstick, Fired Brick, Mermaid Lagoon; Mermaid Lagoon Distress Oxide Ink; Stampin’ Write Markers- Flirty Flamingo, Melon Mambo; Spectrum Noir™ Clear Glitter Pen, Nuvo™ Morning Dew Crystal Drops

Paper: Whisper White, Basic Black (both Stampin’ Up!)

Accessories: Clarity™ Stencil Brush, Memory Box™ Texture Flourish Stencil, Heat Tool, AquaPainter™, 5/8” Black Satin Ribbon, Ivory Crochet Lace, Distressing Tool

 Thanks again for taking the time to visit! I will be sharing the last card I designed with the Rose Banner stamp set shortly- hugs and I hope you can stop by again soon!

Rose Banner #1- Happy Anniversary


Hi Friends!

Today I am sharing several blog posts with cards designed using the  Sweet ‘n Sassy Stamps  April Stamp of the Month, Rose Banner. 


Today is the last day that you can receive the April Stamp of the Month, Rose Banner Clear Stamp Set free with any $75 (US) net order (after all discounts and before shipping and handling) plus any $75 US order ships for free!

I also used the script image from the previously released Texture Tiles I stamp set for this mixed media card.


If you have not had a chance to visit the above challenge sites or the SNSS Blog/FB Page yet, I encourage you to do so- wonderful inspiration from all!

To create this card:

1). De-static a piece of watercolor paper with an embossing powder tool, ink the Rose Banner with Versamark™ ink, stamp onto the prepared panel, apply white embossing powder and heat set with a heat tool.  Once the embossing has cooled, use a water brush along with ink from water-based markers to color the image (see below for colors). 

2). Stamp the sentiment from Rose Banner using archival black ink and heat emboss with clear embossing powder.


3). Watercolor the background with distress ink, stamp the script image from Texture Tiles I with distress ink and use a stencil brush with a chevron stencil to finish off the background.  Trim the panel and mount onto a piece of white cardstock, trim and mount onto the black card front.

4). Add shimmer with a clear glitter pen and a few crystal drops to finish off the card.


Ink/Mediums: Versafine™ Onyx Black, Versamark™, Tim Holtz® Salty Ocean Distress Ink, Zig® Clean Color Markers- 025 Pink 041 Light Green, 040 Green; Stampin’ Write Markers- Flirty Flamingo, Melon Mambo; Spectrum Noir™ Clear Glitter Pen, Nuvo™ Morning Dew Crystal Drops

Paper: Whisper White, Basic Black (both Stampin’ Up!), Watercolor

Accessories: Clarity™ Stencil Brush, Memory Box™ Modern Chic Chevron Stencil, Embossing Buddy®, Clear and White Embossing Powder, Heat Tool, AquaPainter™

 Thanks again for taking the time to visit- I will be sharing the other cards I created with the Rose Banner stamp set in the next few posts.  I hope you will be able to stop by again soon- hugs and God Bless! 


Tuesday, April 24, 2018

Be Unique- Be You!


Hi Friends!

Today I am sharing another quick card using Sweet ‘n Sassy Stamps  Be Unique from the April 2018 release and the previously released Texture Tiles I.


Be Unique is such a cute stamp set and would work well for all sorts of occasions!

Also, don't forget, there are a few days left to receive the April Stamp of the Month- Rose Banner.  You will receive this stamp set free with any $75 (US) net order (after  all discounts and before shipping and handling) plus any $75 US order ships for free!


I incorporated The Paper Players PP390 Sketch Challenge, the Simon Says Wednesday“Sparkle & Shine” Challenge (in addition to the rhinestones, the unicorn is very sparkly but a bit difficult to see the shimmer in the photo) and the JustUs Girls #437 Color Week “Predominantly Purple” Challenge into the design.
 
If you have not had a chance to visit the above challenge sites or the SNSS Blog/FB Page yet, I encourage you to do so- gorgeous inspiration from all!

To create this card:

1). De-static a piece of white cardstock with an embossing powder tool, ink the unicorn image from Be Unique with archival black ink, stamp onto the prepared panel, apply clear embossing powder and heat set with a heat tool.  Once the embossing has cooled, use a water brush along with ink from water-based markers to color the image.  Fussy-cut and use a clear glitter pen to add shimmer over the entire unicorn.

2). De-static a piece of raspberry designer paper with an embossing powder tool, position the words from Be Unique onto a clear block, stamp with Versamark™ ink onto the prepared panel, apply white embossing powder and heat set with a heat tool.  Continue to emboss additional sentiments on the panel to create your own background paper.  Trim the panel, mount onto a piece of white cardstock, trim again, mount onto a piece of black cardstock, trim once more and mount onto the white card base.


3). Die cut a circle from white cardstock with a stitched circle die. Using Distress Oxide ink, pat the ink onto a silicone craft mat, lightly spritz with water, press the die cut circle into the ink, smoosh and lift the circle (repeat until you are satisfied).   Heat with a heat tool to dry the ink and stamp a bit splatter with the Texture Tiles I splatter image.  Mount the circle onto a piece of  black cardstock (die cut from a circle die).

4). De-static a scrap piece of black cardstock with an embossing powder tool, stamp the words from Be Unique to create the sentiment with Versamark™ ink, apply white embossing powder and heat set with a heat tool.   Trim and mount onto the card front for the horizontal layer in the sketch.

5).  Add the die cut circle with dimensional foam and adhere the unicorn image directly onto the circle.

6). Add a few rhinestones to finish off the card.
 

Ink/Mediums: Versafine™ Onyx Black, Versamark™, Stampin’ Write Markers- Berry Burst, Rich Razzleberry, Sweet Sugarplum, ; Tim Holtz® Seedless Preserves Distress Oxide Ink, Spectrum Noir™ Clear Glitter Pen

Paper: Whisper White, Basic Black (both Stampin’ Up!), misc designer series paper

Accessories: Big Shot™, MFT Stitched Circle Dies, SU! Circle Framelits, Embossing Buddy®, Clear and White Embossing Powder, Heat Tool, Rhinestones

Thanks again for taking the time to visit!  Hugs and I hope you can stop by again soon!

CAS New Creature


Hi Friends!

It feels like it has been forever since I had a chance to share a card with all of you!  I apologize for my delay in posting- my hubby had recent surgery on his bladder and has been diagnosed with bladder cancer (this is in addition to his non-Hodgkins lymphoma known as WM for Waldenstroms macroglobulinemia).  

Thankfully he was being scanned regularly as a follow-up to his chemo for the WM and the small bladder tumor was detected early.  He will be having the first chemo treatment this week for his bladder cancer and will have to have the treatments once every six weeks.  

Again, we are so thankful that the bladder cancer seems to have been caught in the early stages although the doctor noted that his tumor is considered an agressive type.  We are praying that the initial treatments will "kill" all remaining cancer cells and he will be in follow-up mode only after the treatments conclude :-)

Believe it or not, I have been stamping in between the surgery and doctor's appointments but am finding it difficult getting my blog posts completed (oh, did I mention that my laptop "crashed" during all of this and had to be repaired?) :-)  You know what happens when you pray for patience, right?  

But I am comforted by this verse-
"And we know that all things work together for good to those who love God, to those who are called according to His purpose." Romans 8:28 (NKJV)

We are so thankful that the Lord has protected us through all of this and we know that He is in control- what a wonderful Savior, is Jesus our Lord!! 

Today I am sharing a clean and simple (CAS) Mixed Media Watercolor card with Sweet ‘n Sassy Stamps Birds & Blooms (from the March release) and the previously released stamp set, New Creature.

 
If you have not had a chance to visit the above challenge sites or the SNSS Blog/FB Page yet, I encourage you to do so- wonderful inspiration from all!

To create this card:

1). De-static a piece of white cardstock with an embossing powder tool, ink the bird image from Birds & Blooms along with the sentiment from New Creature with archival black ink, stamp onto the prepared panel, apply clear embossing powder and heat set with a heat tool.  Once the embossing has cooled, use a water brush along with ink from water-based markers to color the bird and distress ink for the background (please see below for colors and supplies used).

2). Die cut the panel with a stitched rectangle die, mount onto a piece of indigo cardstock (also die cut with a stitched rectangle die) before adhering to the white card base.

3). Use an Extra Fine White Paint Pen to add a highlight to the bird’s eye and use a clear glitter pen to add shimmer to the bird’s feathers.

4). Finish off the card with a few crystal jewel drops.
  

Ink/Mediums: Versafine™ Onyx Black, Stampin’ Write Markers- Flirty Flamingo, Island Indigo; Tim Holtz® Tumbled Glass Distress Oxide Ink, Sharpie® Extra Fine White Paint Pen, Spectrum Noir™ Clear Glitter Pen, Nuvo™ Sea Breeze Crystal Jewel Drops

Paper: Whisper White, Island Indigo (all Stampin’ Up!)

Accessories: Big Shot™, MFT Stitched A2 Rectangle STAX Set #1 & #2, Embossing Buddy®, Clear Embossing Powder, Heat Tool

Thanks again for taking the time to stop by- I hope all of you have a wonderful week and visit again soon!  Lord Willing, I will be sharing several more cards over the next few days :-)

Wednesday, April 18, 2018

SNSS A Mother's Love


Hi Friends!

Today I am sharing another card designed with the new Sweet ‘n Sassy Stamps A Mother’s Love Clear Stamp Set from the SNSS April Release and the previously released stamp set, Grunge Elements 2.

With Mother’s Day only a few weeks away, A Mother’s Love Clear Stamp Set is perfect for quick and easy cards as well as more layered cards not to mention, new Mother cards or overall general encouragement.

I decided to use the Splitcoaststampers SC691 for the layout and am also linking to the Word Art Wednesday #330-#331 “Anything Goes” Challenge.

If you have not had a chance to visit the above challenge sites or the SNSS Blog/FB Page yet, I encourage you to do so- fabulous inspiration from all!

To create this card:

1). De-static a piece of white cardstock with an embossing powder tool, ink the mother/child image along with the hearts and sentiment from A Mother’s Love with archival black ink, stamp onto the prepared panel, apply clear embossing powder and heat set with a heat tool.  Once the embossing has cooled, die cut the image with a stitched rectangle die.  Mount onto a piece of black cardstock, trim close to the edge.

 
2). Ink the heart image from Grunge Elements 2 with distress oxide ink and stamp onto the Mother’s Day panel. Wipe off any excess ink from the images with a paper towel.

3). Trim a piece of designer paper to approx..4” x 5 ¼”, mount onto a piece of black cardstock, trim and add the horizontal strip of black cardstock.  Adhere the entire panel onto the white card base.

4). Mount the Mother’s Day image onto the card front with dimensional foam. 

5). Add the triple satin ribbon bow with a button to the corner of the panel.

6). Add a few black crystal drops onto the lower portion of the Mother’s Day panel and rhinestones to the center of the embossed hearts to finish off the card..


Ink/Mediums: Versafine™ Onyx Black, Tim Holtz® Wilted Violet Distress Oxide Ink, Nuvo™ Black Gloss Crystal Drops

Paper: Whisper White.  Basic Black, retired designer paper (all Stampin’ Up!)

Accessories: Big Shot™, MFT Stitched Rectangle STAX Set #1, Embossing Buddy®, Clear Embossing Powder, Heat Tool, Rhinestones, 1/8” Black Satin Ribbon, retired button

Thanks again for taking the time to stop by! I hope all of you have a wonderful week and visit again soon- hugs, sweet friends!

TTC91 Trust in the Lord


Hi Friends!


Woohoo! It’s time for the new #91 {Blossoms in Blue} Challenge at The Card Concept! Isn’t that a gorgeous dress?  I was inspired by the overall feminine feel, the beautiful blue and pink as well as the sheerness of the fabric to create a vintage Mixed Media card.

I decided to pull out a few retired Stampin’ Up! Stamp sets and am also linking to the Dragonfly Journey's #116 "April Showers Bring May Flowers" Challenge, the Word ArtWednesday #330-#331 “Anything Goes” Challenge.

Just a reminder that the Card Concept is a bi-weekly challenge that has an inspiration photo along with a number of design styles that you can choose from to create your card- Clean and Simple, Clean and Graphic, Clean and Layered, Shabby Chic, Freestyle Collage, Classy and Elegant and Mixed Media (or you can combine several styles for your own style).


If you have not had a chance to visit us at The Card Concept or visit the other challenge sites yet, I hope you will find time to do so- wonderful inspiration from all!

To create this card:


1). Ink the vintage girl image from Friendship's Journey with archival black ink, stamp onto a piece of white cardstock, apply clear embossing powder and heat set with a heat tool.  Once the embossing has cooled, color the image using ink from markers along with a water brush.  Die cut the image with a stitched rectangle die.

2). Stamp the verse sentiment from Trust God with archival black ink, stamp onto a piece of vellum, apply clear embossing powder and heat set with a heat tool.  Once the embossing has cooled, trim and gently distress the lower edge.

3). For the panel on the background, use a stencil brush with distress oxide ink to lightly stencil the area before die cutting with a stitched rectangle die and mounting onto stitched die cut rectangle panel from white cardstock.

4). Add the sentiment to the card front using a strip of 5/8" black satin ribbon to hide the seam (wrapping the ends behind the panel).

5).  Mount the layered vintage girl panel onto the card front with dimensional foam.

6). Add the single floral image from Flower Shop (retiring this month) along with punched leaves from green cardstock.   ***FYI- I had this image already stamped, colored and punched out in my stash from a project a few years ago (I am such a hoarder :-))***. 

7). Use an extra fine white paint pen to add highlights to the flower centers and a clear glitter pen to add shimmer to all of the petals. Use a gold marker to add metallic highlights to the cord and locket type image under the Eiffel Tower. 

8).  Add pearls to the corners to finish off the card.

Stamp Sets: Friendship's Journey, Trust God, Flower Shop (all retired Stampin' Up!)

Ink/Mediums: Versafine™ Onyx Black, Tim Holtz® Distress Markers- Salty Ocean; TH Distress Oxide Salty Ocean Ink,  SU! Markers- Blush Blossom, Berry Burst, Flirty Flamingo, Hello Honey, Baked Brown Sugar, Early Espresso; Spectrum Noir® Clear Glitter Pen, Sharpie® Extra Fine White Paint Pen, Faber-Castell® Gold Pitt Pen Marker

Cardstock/Paper: Whisper White, Basic Black, Vellum

Tools/Accessories:  Big Shot™, My Favorite Things™ Dies- A2 Stitched Rectangles STAX Set 1 & 2, Embossing Buddy®, Heat Tool, Clear Embossing Powder, Claritystamps™ Stencil Brush, Memory Box™ Distressed Tula Stencil, 5/8” Black Satin Ribbon, SU! Flower Punch Pearls

Thanks again for stopping by! I had fun designing this card and hope you will have a chance to come play along with us at The Card Concept!!

Related Posts Plugin for WordPress, Blogger...