Showing posts with label Paper Craft Crew Challenge. Show all posts

Sunday, September 1, 2019

I Can Do All Things Through Christ


Hi Friends!

I created several one-layer cards using the retired Stampin’ Up! set, Choose Happiness for the leaves and flowers along with a verse sentiment from Words of Encouragement (a current set still available at the Stamp Simply Ribbon Store).  

The background was created with splattered distress oxide ink and the flowers were adhered to the front.


If you have not had a chance to stop by the challenge sites, I hope you will find the time to do so- wonderful galleries and inspiration from all!

To create this card:

Fold a piece of white cardstock in half for the card base.  Press the Distress Oxide ink pads (see colors below) onto a silicone mat, spritz with water and “smoosh” the front of the card base into the ink to create the splattered background.  Once the background has dried, stamp the leaves and sentiment with Versafine™ Black Onyx ink and heat embossed with clear embossing powder.


The flowers were also stamped with Versafine™ Black Onyx ink onto another piece of white cardstock  and heat embossed with clear embossing powder.  Once the embossing has cooled, watercolor the flowers and leaves with water-based markers and fussy-cut the flowers.

Adhere the flowers directly onto the card front (I split one of the flower petals in half), allowing the edges of the central flower to "curl" up from the card front.

Finish off with a clear glitter pen on the petals and a white paint pen for the flower centers.

Stamp Sets: Choose Happiness (retired Stampin’ Up!), Words of Encouragement (Stamp Simply)

Ink/Mediums: Versafine™ Onyx Black,  Tim Holtz® Distress Oxide- Tumbled Glass, Broken China; Stampin’ Write Markers- Pink Pirouette, Sweet Sugarplum, Rich Razzleberry, Blushing Bride, Sweet Sugarplum, Mossy Meadow, Sage Shadow; Spectrum Noir™ Clear Glitter Pen, Sharpie® Extra Fine White Paint Pen

Cardstock/Designer Paper: Whisper White

Accessories: Embossing Buddy®, Clear Powder, Heat Tool, AquaPainter™

Stay tuned for the rest of the "set" created with these images- I plan to share them in a later post :-)

Thanks again for taking the time to stop by- hugs and I hope you have a great Labor Day week!

Tuesday, December 11, 2018

Peace I Leave With You


Hi Friends!

Today I am sharing another card designed with the new Doves of Peace (designed by Krista Hamrick), Texture Tiles 3 and the previously released stamp set, Peaceful Peonies (designed by NinaB Designs)from Sweet ‘n Sassy Stamps.

I am participating with the Paper Craft Crew Challenges #317 Sketch Challenge  (oops! just noticed the square notation but converted mine into a normal A2 size) along with the {PIN}Spirational #230 Inspiration Challenge (I was inspired by the blues, white and peaceful feeling) and the Word Art Wednesday #364-#365 “AnythingGoes” Challenge.

If you have not had a chance to visit the above challenge sites or the SNSS Blog/FB Page yet, I encourage you to do so- gorgeous inspiration from all!

To create this card:

1). De-static a piece of white cardstock with an embossing powder tool, ink the texture image from Texture Tiles 3 with Versamark™ ink, apply white embossing powder and heat set with a heat tool.  Once the embossing has cooled, use a sponge dauber to apply Tim Holtz™ Tumbled Glass Distress Oxide Ink, use a damp paper towel to remove the excess ink and die cut with a stitched strip die.  Mount onto black cardstock, trim close to the die cut edge and adhere to a piece of white cardstock trimmed to 4” x 5 ¼”.

 2).  Stamp the dove image from Doves of Peace with Versafine™ Onyx Black ink onto a piece of white cardstock, apply clear embossing powder and heat set with a heat tool.  Once the embossing has cooled, use water-based markers to color the image and fussy-cut around the edges.  Use a clear glitter pen to add shimmer to the globe area.

3). De-static a piece of black cardstock with an embossing powder tool, stamp the sentiment from Peaceful Peonies with Verasmark™ ink, apply white embossing powder and heat set with a heat tool.  Die cut with a stitched oval die and mount onto another die cut from the same size oval (to give the sentiment additional stability). 

4). Die cut a circle from white cardstock with a stitched circle die, mount onto another circle die cut from black cardstock.  Die cut the banner from black cardstock using a stitched banner die, split the banner in half, adhere to the card front and mount the entire panel onto a piece of black cardstock before mounting onto the white card base.

5). Add the die cut stitched circle with dimensional foam, adhere the looped silver cord and mount the sentiment with dimensional foam.  Add the fussy-cut dove image and finish off the card with a few rhinestones.


Ink/Mediums: Versafine™ Onyx Black, Versamark™, Stampin’ Write markers- Pear Pizzazz, Pool Party; Tim Holtz™ Tumbled Glass Distress Oxide Ink, Spectrum Noir™ Clear Glitter Pen

Cardstock/Designer Paper: Whisper White, Basic Black (Stampin’ Up!)

Accessories/Tools: Big Shot™,  My Favorite Things Dies- Stitched Circle , Stitched Horizontal Strip; Circle Dies (retired SU!), Our Daily Bread Designs Double Stitched Banner Dies, AquaPainter™, Embossing Buddy®, White and Clear EP, Heat Tool, Rhinestones, Silver Cord

Thanks again for taking the time to stop by- I hope all of you have a blessed week!

Monday, April 30, 2018

Rose Banner #1- Happy Anniversary


Hi Friends!

Today I am sharing several blog posts with cards designed using the  Sweet ‘n Sassy Stamps  April Stamp of the Month, Rose Banner. 


Today is the last day that you can receive the April Stamp of the Month, Rose Banner Clear Stamp Set free with any $75 (US) net order (after all discounts and before shipping and handling) plus any $75 US order ships for free!

I also used the script image from the previously released Texture Tiles I stamp set for this mixed media card.


If you have not had a chance to visit the above challenge sites or the SNSS Blog/FB Page yet, I encourage you to do so- wonderful inspiration from all!

To create this card:

1). De-static a piece of watercolor paper with an embossing powder tool, ink the Rose Banner with Versamark™ ink, stamp onto the prepared panel, apply white embossing powder and heat set with a heat tool.  Once the embossing has cooled, use a water brush along with ink from water-based markers to color the image (see below for colors). 

2). Stamp the sentiment from Rose Banner using archival black ink and heat emboss with clear embossing powder.


3). Watercolor the background with distress ink, stamp the script image from Texture Tiles I with distress ink and use a stencil brush with a chevron stencil to finish off the background.  Trim the panel and mount onto a piece of white cardstock, trim and mount onto the black card front.

4). Add shimmer with a clear glitter pen and a few crystal drops to finish off the card.


Ink/Mediums: Versafine™ Onyx Black, Versamark™, Tim Holtz® Salty Ocean Distress Ink, Zig® Clean Color Markers- 025 Pink 041 Light Green, 040 Green; Stampin’ Write Markers- Flirty Flamingo, Melon Mambo; Spectrum Noir™ Clear Glitter Pen, Nuvo™ Morning Dew Crystal Drops

Paper: Whisper White, Basic Black (both Stampin’ Up!), Watercolor

Accessories: Clarity™ Stencil Brush, Memory Box™ Modern Chic Chevron Stencil, Embossing Buddy®, Clear and White Embossing Powder, Heat Tool, AquaPainter™

 Thanks again for taking the time to visit- I will be sharing the other cards I created with the Rose Banner stamp set in the next few posts.  I hope you will be able to stop by again soon- hugs and God Bless! 


Tuesday, November 21, 2017

SUO188 Star of Light


Hi Friends!   

It’s time for the #188 “Celebrate Winter Holidays!” Challenge at SU-Only Challenges and since I still need a few more Christmas cards, I chose to create a quick card using the Star of Light stamp set with the coordinating Starlight Thinlit™ Dies.    

I have owned this stamp set with the dies since last year and this is the first time I had a chance to create a card- pitiful, I know :-)  I have so many stamps and so little time!! I love the intricate cuts on the inner star and think that this set may become one of my new favorites!! :-)


If you have not had a chance to stop by the SU-Only Challenge site to check out the rest of the Design Team’s samples or the other challenge sites yet, I encourage you to do so- fabulous inspiration from all!

To create this card:

1). De-static a piece of Whisper White cardstock with an Embossing Buddy®, stamp the flourish image along with a few of the miscellaneous small star images from the Star of Light stamp set with Versamark™ ink, apply Stampin’ Emboss® Silver Embossing Powder and heat set with the Heat Tool. 

2). Once the embossing has cooled, use largest circle from the Stitched Shapes Framelits™ to die cut the circle element.  Use the Simply Scored™ Tool to score a few vertical lines along the left hand side of the remaining panel, trim to 4” x 5 ¼” and mount onto a piece of Perfect Plum cardstock. Mount the entire card front onto the Extra Thick Whisper White card base.

3). Die cut a circle from Perfect Plum cardstock using the retired Circle Framelits™ and mount behind the circle cut in the above step.  Adhere the layered circle onto the card front (lining up the flourish image) using Stampin’ Dimensionals®.

4). Using the Starlit Thinlits™, die cut the open star from Perfect Plum cardstock and the large intricate star from Silver Foil.  Layer the two together and set aside.

5). De-static a scrap of Whisper White cardstock with an Embossing Buddy®, stamp the sentiment from the Star of Light stamp set with Versamark™ ink, apply Stampin’ Emboss® Silver Embossing Powder and heat set with the Heat Tool.  Trim and create the flag banner points by hand (I used the retired Hexagon Punch). Mount onto Perfect Plum cardstock, trim and adhere to the card front with Stampin’ Dimensionals®. 

6). Add the layered die cut star and finish off the card with a Rhinestone in the center of the star image. 

Stamp Sets: Star of Light, Painted Harvest

Ink/Mediums: Versamark™

Paper: Whisper White, Perfect Plum, Silver Foil, Extra Thick Whisper White

Accessories/Tools: Big Shot™, Stitched Shapes Framelits™ , Starlit Thinlits™,  Framelits™, retired Circle Framelits™,  Embossing Buddy®, Stampin’ Emboss® Silver Embossing Powder, Heat Tool, Simply Scored™ Tool, Rhinestone,

Thanks again for taking the time to stop by and I hope that you will create your own Stampin’ Up! Only project and join us for our “Celebrate Winter Holidays!” challenge!

Friday, May 12, 2017

You Can Never Cross The Ocean


Hi Friends!

I had a chance to create a card this evening using the Artistic Outpost stamp sets, The Captain and Grunge Elements along with the Vagabond Treasures Collection 6x6 Paper Pad and the ODBD Custom Dies- Pierced Circles and Pierced Rectangles (all items are available from Our Daily Bread Designs).


If you have not had a chance to check out the Artistic Outpost blog or the other challenge sites yet, I encourage you to do so!  Inspiration is posted throughout the week on the AO Blog and the challenge galleries have gorgeous samples as well!

To create this card:

1). Ink the young boy image from The Captain with archival black ink and stamp onto vanilla cardstock.  Heat set the ink with a heat tool and use a water brush to “watercolor” tea dye and vintage photo distress ink over the image, trim and mount onto black cardstock.

2). Ink the sentiment from The Captain with archival black ink, stamp onto vanilla cardstock and heat set the ink with a heat tool.  Use the large splatter and grid images from Grunge Elements along with tea dye distress ink to add distressing followed by sponging with vintage photo distress ink.  Hand trim the sentiment into two, layer onto black cardstock (creating the flag banners by hand).

 
3). Repeat the same distressing steps above on another piece of vanilla cardstock, trim to fit within the black cardstock frame (this frame was die cut and embossed with the PiercedRectangles Dies).

4). Mount the young boy image onto the layered vanilla/black frame and set aside.

5).  Ink the compass image from The Captain with archival black ink, stamp onto vanilla cardstock, het set with the heat tool and distress with tea dye distress ink using sponges and the large splatter image from Grunge Elements.

6). Die cut and emboss the compass with the Pierced Circles Dies and add the copper brad to the center.

7). Distress the edges of the Vagabond Treasures Collection 6x6 Paper with a distressing tool, mount onto vanilla cardstock (that has been distressed along the edges with the same technique as in step 2), mount onto the black card front and sponge additional vintage photo distress ink along the edges.

8). Create the background banners by hand from  scraps of Vagabond Treasures Collection 6x6 Paper, mount onto black cardstock, lightly distress with a distressing tool and add to the card front.

9). Ink the coffee stain and small splat image from Grunge Elements with walnut stain distress ink and add to the background (for the sketch elements).  Mount the banners to directly to the card front, add the young boy image directly as well and finish off the card by mounting the sentiment banners along with the compass using dimensional foam.

I think that the sentiment on this card would be great for an encouragement card or even a graduation card- what do you think?

Thanks again for taking the time to stop by and visit- hugs and I hope you have a wonderful weekend!

Wednesday, October 19, 2016

TCC60 All That We Behold is Full of Blessing


Hi Friends!!

Woohoo!  It’s time for the #60- Chevron Pumpkin Challenge at The Card Concept!  Our inspiration photo is gorgeous and can be interpreted in so many ways- the colors, the chevron, the pumpkin, the sunfowers, the wood , the glass, the leaves, etc.  

In fact, there is no right or wrong way when it comes to photo interpretation and we would love to see your card in our gallery!!

I was inspired by the sunflowers as well as the chevron and the colors- they remind me of fall and Thanksgiving!  I decided to pull out a few retired Stampin’ Up! stamp sets- Sunflower Serenade, Full of Blessings and Positively Chevron (background stamp) along with the current Timeless Textures to design this shabby chic card.


I hope you have a chance to visit us at The Card Concept and check out the rest of our Design Team samples as well as the other challenge sites- wonderful inspiration from all!!

To create this card:

Ink and stamp the Positively Chevron background onto retired Color Me Autumn Designer Series Paper (DSP) with Cajun Craze Classic Ink, trim and distress with the retired Distressing Tool and mount onto Early Espresso cardstock (distressing the edges of the Early Espresso cardstock layer as well).

Distress the edges of a strip of retired Orchard Harvest DSP, layer onto Early Espresso cardstock, mount onto the layered chevron background and add the 5/8” Rust Satin Triple Ribbon bow (wrapping the ends of the ribbon behind the back of the layers) before adhering the entire panel onto the Cajun Craze card base.

Stamp the retired Sunflower Serenade image and the sentiment from the retired Full of Blessings stamp set with Stāz-On® Jet Black Ink onto Very Vanilla cardstock, color with an AquaPainter™ using Derwent® Watercolor Pencils, Stampin’ Write Markers, Tumbled Glass Distress Ink followed by a layer of Picket Fence Distress Ink (to tone down the brightness of the Tumbled Glass background).

Using the Big Shot™ with the MFT Stitched Oval STAX Dies, die cut the sunflower image along with an oval from the same size die from Early Espresso cardstock.

Split the Early Espresso oval die cut in half and layer behind the sunflower image.

Trim the sentiment and layer onto a piece of Early Espresso cardstock.

Use a Sponge Dauber to apply Vintage Photo Distress Ink over the edges of the sunflower and sentiment layer.

Ink the small splatter stamp from Timeless Textures with Vintage Photo Distress Ink, stamp off before stamping onto the sentiment and sunflower layers.

Finish off the card by adhering the sunflower and sentiment with dimensional foam and adding a bit of shimmer with a clear glitter pen to the centers of the sunflowers.

Stamp Sets: Sunflower Serenade, Positively Chevron, Full of Blessings, Timeless Textures

Ink: Stāz-On® Jet Black, Cajun Craze Stampin’ Write Marker, Derwent® Watercolor Pencils, Distress Inks- Tumbled Glass, Vintage Photo, Picket Fence; Clear Glitter Pen

Paper: Very Vanilla, Early Espresso, Cajun Craze; Retired Color Me Autumn DSP, retired Orchard Harvest DSP

Accessories: Big Shot™, MFT™ Stitched Oval STAX Dies, AquaPainter™, Distressing Tool, 5/8” Rust Satin Ribbon

 Thanks again for taking the time to stop by!  I hope all of you have a fabulous week and hope you can join us for the #60 Chevron Pumpkin Challenge at The Card Concept!

Tuesday, March 29, 2016

By The Tide- Thinking of You

Hi Friends!

I hope all of you are having a great week so far!  I decided to create a masculine card using one of my favorite Stampin’ Up! sets, By The Tide along with Gorgeous Grunge and Teeny Tiny Wishes.

I just love the By The Tide stamp set for masculine as well as feminine cards and can always use a few "Thinking of You" cards in my stash :-)

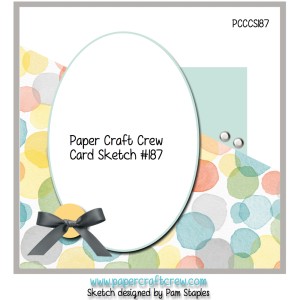
This card was designed using the Paper Craft Crew Challenge #187 Sketch along with the Can You Case It #113 Color Challenge and the Just Us Girls #336 InspirationPhoto for inspiration.

If you have not had a chance to visit the above galleries yet, I hope you will find the time to do so- wonderful designs by all!

All items used to create this card are from Stampin’ Up! with basic stamping techniques- if you have any questions, please feel free to let me know in the comments :-)

Stamp Sets: By The Tide, Gorgeous Grunge, Teeny Tiny Wishes

Ink: Basic Gray, Crumb Cake, Night of Navy, Stāz-On® Jet Black, Champagne Mist Shimmer Paint, White Gel Pen

Paper: Whisper White, Basic Gray, Crumb Cake, retired Crumb Cake and Pocketful of Posies DSP

Accessories: Big Shot™, Oval Framelits™, retired Fancy Fan Textured Impressions™ Embossing Folder, Hexagon Punch, Word Window Punch, Brayer, retired Crumb Cake Button, Natural Linen Thread, Rhinestones


Thanks again for taking the time to visit- hugs and I hope you have a fabulous week!!
Related Posts Plugin for WordPress, Blogger...