Saturday, July 31, 2021

Autumn Blessings


Hi Friends!

This week Stamp Simply has a sale on all Fall stamps, dies and paper!


For my fall card, I decided to pull out the Autumn Blessings stamp set along with the Sizzix Thinlit Dies by Tim Holtz -Skeleton Leaves, the new Doodlebug Design Pumpkin Spice 6x6 paper pad and other dies/supplies from Stamp Simply.


As many of you who follow my blog know, I enjoy playing along with online challenges and will be linking this card to the 
Addicted to Stamps and More #410 “Die Cuts and/or Stencils” Challenge and the Word Art Wednesday “#501-#502 Anything Goes” Challenge.

If you have not had a chance to visit the Stamp Simply blog or the other challenge sites yet, I encourage you to do so- gorgeous inspiration from all!

To create this card:

Using the Sizzix Thinlit Dies by Tim Holtz -Skeleton Leaves, die cut several leaves from the gold, silver and copper metallic sheets in the Luxury Pearlescent Metallic 105# Cardstock pack.

For the background panel, trim a piece of the gold metallic cardstock to 4 ¼” x 5 ½”.

Also, trim a piece of copper metallic cardstock to approx. 4 ⅛” x 5 ¼” and mount onto the gold panel. FYI- I love the Luxury Pearlescent Metallic 105# Cardstock  - it is a solid color cardstock with the colors on both sides.

Emboss a piece of 4” x 4” piece of white cardstock with the Darice Wire Fence Embossing Folder, adhere to the copper panel.

Add a strip of the teal plaid paper from the Doodlebug Design Pumpkin Spice 6x6 Paper Pad, adhere to the card front overlapping the embossed white panel.


Adhere the die cut gold, copper, and silver leaves, keeping the ends toward the area that will be covered with the ribbon and sentiment.

Add a strip of the May Arts ⅜” White Crochet Lace to the front of the card (overlapping the die cut leaves).

Adhere a strip of the May Arts ⅝” Teal Twill Ribbon  wrapping the ends behind the panel and mount the background panel onto a white card base.

Add a few strands of the gold and copper metallic cardstock (these were “trimmings” from the edges of the background panels that I would normally recycle or trash).  FYI- I “curled” the ends around a pencil to help break down the fibers and distress the strands. 


De-static a piece of white cardstock with an embossing powder tool, stamp the verse sentiment from Autumn Blessings with Versafine Onyx Black ink onto the prepared panel, apply clear embossing powder and heat set with a heat tool.

Once the embossing has cooled, die cut the sentiment with the Spellbinders Paper Grace- Hemstitch Ovals Die (I used the second largest oval die).  Die cut two additional ovals from white cardstock to layer behind the verse sentiment. 

Mount the sentiment onto the card front using dimensional foam or chipboard.

Finish off the card with bronze rhinestones


Stamp Sets:  Autumn Blessings (Stamp Simply)

Ink/Mediums: Versafine Onyx Black

Cardstock/Paper: White, Doodlebug Design Pumpkin Spice 6x6, Luxury Pearlescent Metallic 105# Cardstock- 24 ct

Accessories/Tools: Gemini, Jr., Sizzix Thinlit Dies by Tim Holtz Skeleton Leaves, Spellbinders Paper Grace- Hemstitch Oval Dies, Darice Embossing Folder- Wire Fence, May Arts ⅜” Crochet Lace- 15 yd spool- White, May Arts ⅝” Twill- 30 yd spool- Teal , Kaisercraft Self-Adhesive Round Rhinestones- Bronze

Thanks again for taking the time to visit! I hope I have inspired you to be creative this week, sweet friends!

Saturday, July 24, 2021

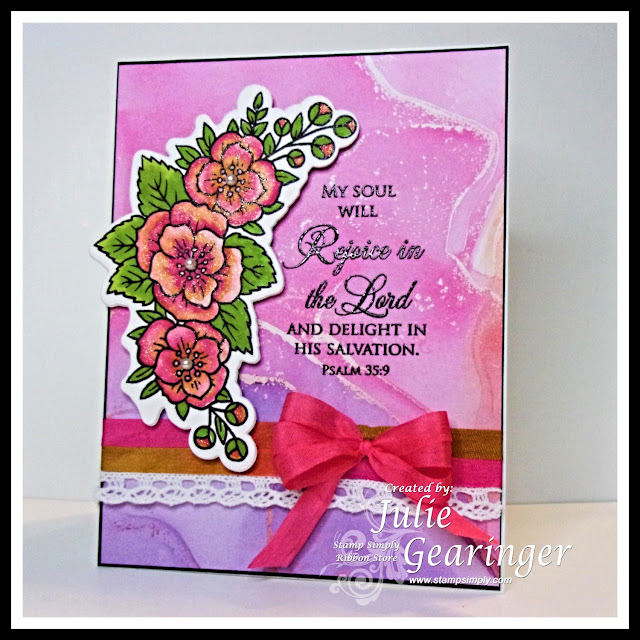
My Soul Will Rejoice


Hi Friends!

Woohoo, check out the sale at Stamp Simply on all May Arts Ribbon Spools- save 25% off with code: MAYARTS25 through July 25th!


To celebrate the sale, I created a simple floral card using two different ¼” silk ribbons as well as May Arts white crochet lace along with two different stamp sets and the new Craft Consortium Ink Drops- Candy 6x6 paper all from
Stamp Simply!


I enjoy playing along with online challenges and will be linking this card to the Double D “Colors of Summer” Challenge (I was inspired by the pinks, oranges, greens) along with the All Sorts #633/4 “Feminine/for a Lady” Challenge and the Word Art Wednesday #501-502 “Anything Goes” Challenge.

If you have not had a chance to visit the Stamp Simply blog or the other challenge sites yet, I encourage you to do so- fabulous inspiration from all!

To create this card:

Trim a piece of the Craft Consortium Ink Drops-Candy 6x6 Paper Pad to 4” x 5¼”.


De-static the Candy Ink Drops paper with an embossing powder tool, stamp the sentiment from He Has Risen with Versafine™ Onyx Black ink, apply clear embossing powder and heat set with a heat tool.


Mount the panel onto a piece of black cardstock and trim close to the edge.

Add a strip of the May Arts ⅜” White Crochet Lace and layer two strips of the ¼” May Arts Variegated Silk Ribbon- Fushia/Green over the top edge (wrap the ribbon ends behind the panel).

Mount the panel onto a white card base and add a bow created from the May Arts ¼” Fushia Silk Ribbon.

Ink the floral image from Floral Cluster Summer Roses using Versafine™ Onyx Black ink onto a piece of white cardstock.   Heat set the ink with a heat tool and watercolor with water-based markers.


Die cut the image with the coordinating Floral Clusters and Sprigs Dies (die cutting two additional pieces from white cardstock to layer behind the colored images). 

Mount the floral image with dimensional foam (or chipboard). 

Finish off the card by applying shimmer with a clear glitter marker and pearls to the flower centers. 


Stamp Sets:  He Has Risen, Floral Cluster Summer Roses (Stamp Simply)

Ink/Mediums: Versafine™ Onyx Black ; Zig Wink of Stella Brush- Clear Glitter Marker

Cardstock/Paper:  White, Black; Craft Consortium Ink Drops- Candy 6x6

Accessories/Tools: Gemini. Jr., Stamp Simply Steel Dies- Floral Clusters and Sprigs, May Arts ¼” Variegated Silk Ribbon- Fushia/Green, May Arts ¼” Silk Ribbon- Fushia, May Arts ⅜” Crochet Lace-White, Kaisercraft Self-Adhesive Round Pearls- Pearl

Thanks again for taking the time to visit- I hope all of you have a blessed week!


Saturday, July 17, 2021

Joy to the World


Hi Friends!

This week we are celebrating Christmas in July at Stamp Simply


For the week long celebration, I decided to create a Clean and Simple (CAS) card using the Christmas Joy Bundle along with other dies/supplies from Stamp Simply.

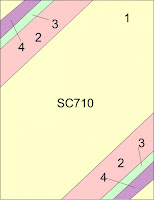
As many of you that follow my blog know, I am working on making a card for each of the over 850+ sketches at Splitcoaststampers and I was able to incorporate the SC710 Sketch into the layout (I decided to create a CAS card so used scoring for the diagonal layers :-)).   

I also enjoy participating with online challenges and will be linking this card to the Tic-Tac-Toe #122 Challenge (Die Cut, Sentiment, Metallic), the Watercooler Wednesday Dawn’s Challenge #320 “All About Occasions” Challenge along with the Simon Says Wednesday “Emboss It” Challenge.

 If you have not had a chance to visit
the 
Stamp Simply blog or the other challenge sites yet, I encourage you to do so- fabulous inspiration from all!

To create this card:

De-static a piece of white cardstock, stamp the Christmas Joy ornament and ornament hanger images with Versamark ink, apply gold embossing powder and heat set with a heat tool.

Once the embossing has cooled, die cut with the coordinating Christmas Joy dies.

Score the upper left hand and lower right-hand corners of a folded white card panel (A2 size 4 ¼” x 11” folded in half).


De-static the panel with an embossing powder tool, stamp the sentiment from Christmas Joy with Versamark ink, apply gold embossing powder and heat set with a heat tool.


Die cut several sprigs from white and gold mirror cardstock using the sprig die from the Two Sprigs Dies (or the Floral Clusters and Sprigs Dies).

Add dimensional foam (or chipboard) to the back of the ornament and bow ornament hanger images.


Add the white and gold die cut sprigs onto the card front and adhere the ornament and ornament hanger onto the card front.

Add a pearl to the center of the word “Joy” to finish off the card.

Stamp Sets: Christmas Joy Bundle (Stamp Simply)

Ink/Mediums:  Versamark

Cardstock/Paper: White, Bazzill Mirror Cardstock- Gold - 8.5 x 11- 15 ct

Accessories/Tools: Gemini, Jr., Stamp Simply Dies- Christmas Joy Bundle, Two Sprigs (or Floral Clusters and Sprigs), Embossing Powder Tool, Gold Embossing Powder, Heat Tool, Scoring Tool, Pearls

Thanks again for taking the time to stop by! I hope all of you have a wonderful week!

Saturday, July 10, 2021

God is Our Refuge


Hi Friends!

I hope all of you are having a great summer so far! This week we are celebrating July with a special on all Kaisercraftpapers, embellishments, etc. at Stamp Simply!


Today I am sharing a floral card designed with the new Pretty Poppies Bundle along with a verse sentiment from the Fear Not stamp set , Kaisercraft Pen & Ink paper and Kaisercraft Self-Adhesive Pearls  (plus other dies/supplies from Stamp Simply)!


Most of you who follow my blog know that I love to participate with online challenges- I will be linking this card to the Tic-Tac-Toe #121 Challenge (Pink, Embossing, Lace/Doily plus Bouquet, Embossing, Glitter), the Watercooler Wednesday Helen’s Challenge #319 “All Things Feminine” Challenge and the Word Art Wednesday #499-#500 “Anything Goes” Challenge.

If you have not had a chance to visit the Stamp Simply blog or the other challenge sites yet, I encourage you to do so- gorgeous inspiration from all!

To create this card:

From the Kaisercraft Pen & Ink 6x6 paper pad, trim a piece of the script design as well as the lace design from to approx. 4” x 2 ¾”. 

Distress the outside edges of each piece of designer paper and mount onto a piece of dark brown cardstock (overlapping a bit in the middle).

 Use a stencil brush to apply antique linen distress ink (to “age” the paper).


To cover the raw edges of the designer paper in the center of the panel, add a strip of 3/8” Natural Crochet Lace (approx. ½” below the top of the raw edge). 


Cover the top of the lace with a piece of May Arts ⅝” Sage Twill, wrapping and adhering the twill ribbon behind the panel.

Mount the background panel onto a white card base.

Ink the poppy floral image from Pretty Poppies with Versafine™ Onyx Black ink, stamp onto white cardstock and heat set the ink with a heat tool. 

Watercolor the image with water-based markers and die cut with the coordinating Pretty Poppies Die (FYI- I also die cut two additional poppies from white cardstock to layer behind the watercolor image).


De-static another piece of white cardstock with an embossing powder tool, stamp the verse sentiment from
Fear Not with Versafine™ Onyx Black ink, apply clear embossing powder and heat set with a heat tool.

Once the embossing for the sentiment has cooled, die cut with the Spellbinders Amazing Grace- Hemstitch Ovals Dies (I used the frame only of the second largest oval).

Die cut two additional ovals from white cardstock and adhere behind the sentiment oval.

Use a stencil brush to apply antique linen distress ink (to “age” the paper) and mount the sentiment oval to the card front with dimensional foam and/or chipboard.

Adhere the floral image to the card front with dimensional foam (and/or chipboard).

Use a clear glitter marker to add shimmer to the flower petals and a white paint pen to add a few highlights to the flower centers.

Finish off the card by adding Kaisercraft Self-Adhesive Pearls to the edge of the sentiment oval as well as the upper left and lower right-hand corners of the background.


Stamp Sets:  Pretty Poppies  (part of Pretty Poppies Bundle), Fear Not (Stamp Simply)

Ink/Mediums: Versafine™ Onyx Black, Stampin’ Write Markers- Blushing Bride, Flirty Flamingo, Melon Mambo, Wild Wasabi, Granny Apple Green;  Tim Holtz™ Antique Linen Distress,  Zig Wink of Stella Brush- Clear Glitter Marker; Extra Fine White Paint Pen

Cardstock/Paper: White, Chocolate; Kaisercraft Pen & Ink 6x6 Paper Pad

Accessories/Tools:  Gemini, Jr. , Stamp Simply Steel Dies- Pretty Poppies (Pretty Poppies Bundle), Spellbinders Amazing Grace- Hemstitch Ovals, Embossing Powder Tool, Clear Embossing Powder, Heat Tool, Distressing Tool, May Arts 5/8” Twill- 30 yd spool, Sage, May Arts 3/8” Crochet Lace- 15 yd spool- Natural, KaisercraftSelf-Adhesive Pearls- Pearl, Blending Brush

Thanks again for taking the time to visit- praying that you have a wonderful week, sweet friends!

Saturday, July 3, 2021

Catch of the Day- Another Easel Card

Hi Friends!

Today I am sharing a card designed with the new Graphic 45 Catch of the Day 8x8 Paper Pad and a sentiment from the Stamp Simply Words of Encouragement stamp set along with dies/supplies (from Stamp Simply)!


I absolutely love this Graphic 45 Catch of the Day  paper!  

So many gorgeous patterns and perfect for summer cards as well as for masculine cards for the men in your life!

I decided to create another easel card was able to incorporate the Splitcoaststampers’ SC488 Sketch into the layout!  FYI- those of you who follow me know that I have a personal goal to create a card for each of the over 850+ SCS sketches- one more to mark off my list, woohoo!

I am also participating in the  Simon Says Monday “Red, White and/or Blue” Challenge  and the Simon Says Wednesday “Anything Goes” Challenge.  

If you have not had a chance to visit the Stamp Simply blog or the other challenge sites yet, I encourage you to do so- fabulous inspiration from all!

To create this card:

Create the easel card base from 4 ¼” x 11” white cardstock (score at 5 ½” and on one of the 5 ½” panels, score again at 2 ¾”)- see the   Splitcoaststampers’ Easel Card tutorial for additional instructions.


Trim the panels from the Graphic 45 Catch of the Day paper – for the card front (sketch layer #5) from the red background paper- trim to approx. 3 ¾” x 5” .  For sketch layer #3 (from the dark blue patterned rectangle)- trim to approx. 2 ½” x 3 ½”.  Trim the lighthouse (for layer #4) from the cut-apart paper to approx. 3 ¼” x 4 ¼”.  


For the lower easel part of the card: from the red background paper- trim a piece approx. 3 ¾” x 2 ½”. Trim the strip of postage stamp border to approx. 3 ¾”.

Mount each of the above trimmed panels onto white cardstock, trim close to the edge.  Using a blending brush, apply Antique Linen Distress ink to the edges to “antique” the paper. Mount all onto navy cardstock and trim again, close to the edge.


To create the main card front panel, add the dark blue patterned rectangle (layer #2) directly to the red patterned background panel (layer #1).

Adhere a few pieces of cheesecloth to the upper and lower right-hand area, and to the middle left-hand near the top edge of the dark blue rectangle panel.

Adhere the lighthouse panel with dimensional foam (or chipboard)- for layer #4.

Fussy cut the postage stamp images from the designer paper, mount onto navy cardstock and trim close to the edge.

Adhere two postage stamps over the cheesecloth on the left (for layer #3 of the sketch) and one on the lower right (for layer #5).

De-static a piece of white cardstock with an embossing powder tool, stamp the sentiment from Words ofEncouragement with Versafine Onyx Black  ink, apply clear embossing powder and heat set with a heat tool.

Die cut the sentiment with a circle die, mount onto a piece of navy cardstock (die cut with a larger circle die).  Use a blending brush to apply Antique Linen Distress ink to “antique” the paper.

Adhere the layered postage stamp strip to the red patterned paper rectangle (for the easel base) and mount the sentiment using dimensional foam and/or chipboard.


Adhere the sentiment panel onto the lower portion of the easel base with dimensional foam (or chipboard).

To finish off the card, adhere the layered lighthouse card front to the upper part of the easel base.

Stamp Sets: Words of Encouragement (Stamp Simply)

Inks/Mediums: Versafine Onyx Black

Cardstock/Paper: White, Navy, Graphic 45 Catch of the Day 8x8 Paper Pad

Accessories/Tools: Gemini, Jr., Spellbinders Nestabilities- Standard Circles SM , Spellbinders Nestabilities- Standard Circles LG, Embossing Powder Tool, Clear Embossing Powder, Heat Tool, Dritz Cheesecloth- 36" x 3 yds

Thanks again for taking the time to stop by! Hugs and I hope all of you have a wonderful 4th of July weekend!

Related Posts Plugin for WordPress, Blogger...