Showing posts with label Autumn Days. Show all posts

Wednesday, October 12, 2011

10 Minute CAS Card without the Big Shot™ :-)


Hi Stampers! 

I was not planning on stamping this evening but the colors from this week’s FM27 Friday MashUp "Double, Double, Toil and Trouble"  were too enticing…Basic Black, Concord Crush, Pumpkin Pie and Lucky Limeade.... 

I decided to create a very simple CAS card using the masking technique and it took me approx. 10 minutes and "be still my heart"- no Big Shot™ or punches (although they played a part prior to the creation) :-)  

Only one image set, one sentiment set, a few sponge daubers, scrap of DSP and satin ribbon- of course!  

Note-  a few of you have inquired on how I tie my bows.  Sometimes I create them right from the roll, other times, believe it or not, I use a water bottle and lately a wooden jig that my upline secured for us (I will try to take time to write a tutorial soon).

To create this card:

I had a scrap piece of Whisper White cardstock that had a 3” Circle cut from it (previously created by a die cut with the Big Shot and a small circle punched out of it already, so I used these openings as the mask for the scene and the sun.   I also tore another scrap piece of Whisper White to use as the mask for the "hills".  One thing about masking, you can improvise with cardstock, scrap paper, sticky notes- almost anything that will protect your paper from the ink.  

Position the large circle onto a piece of Whisper White cardstock where you would like to have your main image and layer the mask for the "hill" area and the open circle for the sun.  With a Sponge Dauber and Pumpkin Pie Classic Ink, sponge the sun.  Remove the mask for the sun, re-position your “hill” mask and sponge Concord Crush for the hill area.  Continue to sponge the Concord Crush ink to create the lighter and darker areas, with another Sponge Dauber use Lucky Limeade in the foreground and lightly sponge Pumpkin Pie to finish off the sky (keeping the large 3” Circle mask in place the entire time).

While still keeping the 3" Circle mask in place, stamp the foliage in Basic Black.  Remove the mask and stamp the sentiment in Basic Black as well.

Layer the piece of Pumpkin Pie DSP (scrap from yesterday's project) onto the Basic Black cardstock and layer this onto Concord Crush.  Adhere the focal image and attach the 5/8” Basic Black Satin Ribbon bow to finish off the card.

Stamp Sets:  Autumn Days, Blessings from Heaven

 Ink: Basic Black, Concord Crush, Lucky Limeade, Pumpkin Pie

Cardstock:  Whisper White, Basic Black, Concord Crush, Pumpkin Pie DSP

Accessories:  Sponge Daubers, 5/8” Basic Black Satin Ribbon


Thanks again for stopping by- I hope this has encourage you to get back to basics :-)  Have a great week and God Bless! 

Sunday, August 14, 2011

Friend to Friend- Two Challenges in One!

Hi Stampers!  

The colors from this week’s CQC97 ColourQ Challenge are so bright and beautiful I just had to make a card, so I decided to combine the colors with the CCMC162 Sketch Challenge at Create with Connie and Mary (I flipped the sketch upside down- that's what I love about sketch challenges)!  If you have the time, check out both sites for fabulous inspiration....
This card incorporates another one of my favorite techniques- masking and sponging and it is fairly easy to make.

First you will need to create a few masks- Use the 1 3/8” Circle Punch to punch out a circle from Whisper White cardstock and set the circle aside.  Using the piece that has the hole punched out of it, place it over another piece of Whisper White (positioning the hole where you would desire your sun image) and with a Sponge Dauber and in a circular motion, apply Tangerine Tango Classic ink to the center of the circle. 

Remove this mask and place the circle cut-out mask over the recently sponged sun and with Sponge Daubers, apply Pool Party Classic ink to the upper part of the sky, Tangerine Tango Classic ink to the center and Melon Mambo Classic ink to the lower portion (I generally just hold this mask with my other hand and move it slightly as I sponge the sky so I can apply ink close to the edges of the sun.

Tear a piece of scrap cardstock to create a jagged edge to use as the mask to protect the sky portion and sponge Basic Black Classic ink along the bottom of the scene.  

Stamp the wheat image and other floral image from Autumn Days with Basic Black Classic ink .   After stamping the images, sponge more Basic Black Classic ink along the bottom.    Mount onto Basic Black cardstock and again onto Pool Party cardstock.

Emboss a piece of Melon Mambo with the Big Shot™ and the Square Lattice Textured ImpressionsEmbossing Folder.  Mount the focal image onto the embossed piece of Melon Mambo and add the 5/8” Black Satin Bow.  Layer this onto Basic Black cardstock and again onto Pool Party cardstock. 

With Basic Black Classic ink, stamp the sentiment onto Whisper White cardstock, punch out with the Word Window Punch, sponge Pool Party  Classic ink around the edges and adhere to the ribbon.

Stamp the leaf images from French Foliage with Basic Black Classic ink onto Whisper White cardstock and cut out the leaves.  Apply Tangerine Tango Classic ink , Melon Mambo  Classic ink and Basic Black Classic ink with Sponge Daubers.  Arrange as desired and adhere to the card with Mini Glue Dots®.  Add the Antique Brad and pearl to finish off the card.  


Stamp Sets:   Autumn Days, French Foliage, Teeny Tiny Wishes
Ink: Basic Black, Melon Mambo, Pool Party, Tangerine Tango
Cardstock:  Whisper White, Basic Black, Melon Mambo, Pool Party
Accessories:  Big Shot™, Square Lattice Textured Impressions™ EF,  5/8” Black Satin Ribbon, Word Window and 1 3/8” Circle Punch, Sponge Daubers, Mini Glue Dots®

Thanks again for visiting and I hope you have a blessed week!

Tuesday, June 14, 2011

Happy Father's Day!

Hi Stampers!  

I wanted to share with you the card that I created for my Dad for Father’s Day (I pretty sure that he does not check my blog- if so, Dad, sorry I ruined the surprise:-)).   

My father loves the outdoors and is an avid hunter and fisherman, so I thought I would create a card that represents the world he loves so much.  

This week's  Pals Paper Arts PPA97 Challenge is Fashion Inspiration “Show Your Style”. I hope they mean your paper crafting/card making style (or at least that is what I am sharing) :-).   

It depends on my mood for the day, but I tend to feel more comfortable creating cards that have a distressed or vintage feel.  I love the Clean & Simple (CAS) style and try to create a CAS card occasionally, but I struggle with adding elements and seem to gravitate to creating cards with embossed images, sponged scenes and anything that seems to “age” the card a bit, so I guess my style would be classified as more of a  Vintage Style. 

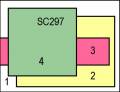
I also used the SC297Sketch from Splitcoast Stampers- loved the simplicity of the layout and it seemed to suit the masculinity of the card.  

If you have a minute, take some time to check out both sites- the Pals Paper Art’s Design Team is just wonderful and Splitcoast has so many ideas- fair warning, you can spend hours on their site alone :-) !

To create this card:

Use the 1/38" Circle Punch to create a mask for the sun image ( I generally use a sticky note).  With the mask revealing the circle opening, use a Sponge Dauber with Daffodil Delight ink and sponge the circle for the sun onto Very Vanilla (VV).  Remove the mask and place the punched out circle portion over the Daffodil Delight.  Using Sponge Daubers with More Mustard, Pumpkin Pie and Cajun Craze ink continue to sponge ink over the sky area and lightly sponge a bit over the Daffodil Delight.

Repeatedly stamp the wheat stamp from Autumn Days in Early Espresso (also stamping off to give various tones to the wheat) and lightly sponge Early Espresso over the wheat stalks to tone down the VV.   

Stamp the leaf image around the top perimeter using Always Artichoke, Cajun Craze and Early Espresso.  Distress the sides of the image with the Distressing Tool and sponge Early Espresso over the edges.

Use the Big Shot with the Square Lattice EF to emboss a piece of Early Espresso and Always Artichoke DSP.  Attach the Early Espresso strips to the top and bottom of the focal image and insert the brads (from the retired Antique Brass Hardware Kit).
Lightly sand the Always Artichoke embossed panel and sponge Early Espresso over the white core areas.

Use a brayer to apply Early Espresso ink to the Vintage Wallpaper EF (apply the ink to the flat side of the EF) and emboss a piece of Cajun Craze and More Mustard.

Stamp the sentiment and a few leaves onto VV and punch out the sentiment layer with the 1 3/8” Circle Punch (sponge More Mustard over the VV to tone down the brightness of the cardstock).  

Use the Sponge Daubers with More Mustard, Always Artichoke and Early Espresso to “pounce” color onto the pheasant stamp.  Stamp onto VV and cut the image out.  Apply additional Early Espresso over the edges and color the eye area with a Cherry Cobbler SU! Marker.  Lightly spray Champagne Shimmer Mist onto the pheasant and adhere to the scene with a glue stick.  

Assemble the layers and attach the Natural Hemp Twine over the Always Artichoke layer to finish off the card.

Stamp Sets:  Autumn Days , Teeny Tiny Wishes
 Ink: Always Artichoke, Daffofil Delight, Cajun Craze, Pumpkin Pie, Early Espresso, More Mustard
Cardstock:  Very Vanilla, Always Artichoke DSP, Cajun Craze, Early Espresso, More Mustard
Accessories:  Big Shot, Square Lattice and Vintage Wallpaper EF, Brayer, Antique Brass Brads, 1/16” Handheld Hole Punch, 1 3/8” Circle Punch, Natural Hemp Twine, Sponge Daubers, Champagne Mist Shimmer Paint Spray

I had fun making this card and I hope my Dad likes it.  I am so thankful that he is still alive and pray that he will have many more days to enjoy the outdoors and the wildlife that he loves so much! 

Thanks again for stopping by- have fun stamping!     

Friday, December 10, 2010

Merry Christmas- CAS Challenges!

Hi Stampers!

  I created this CAS (Clean and Simple) card for the SUO Challenge #7 – quick to reproduce Christmas cards (see http://suochallenges.com/) and the Splitcoast CAS99- Ways to Use Bows (see the gallery of other CAS99 entries at http://www.splitcoaststampers.com/gallery/showgallery.php?cat=all&si=CAS96&what=keywords ).

To create this card:

Using the Big Shot, emboss a Whisper White panel with the Petals-A-Plenty EF.


On smaller piece of Whisper White, use the berry type wheat stamp from Autumn Days and stamp in a circular pattern first with Always Artichoke and repeat with Cherry Cobbler to create the wreath.  Punch the lower edge of this panel with the Eyelet Border Punch and sponge the edges with Always Artichoke. 

Stamp the sentiment with Cherry Cobbler and attach the bow.

Stamp Sets: Autumn Days, Christmas Greetings
Cardstock:  Whisper White
Ink: Always Artichoke, Cherry Cobbler        
Accessories: Big Shot, Petals-A-Plenty EF, Sponge Dauber, Eyelet Border Punch, 5/8” Satin Ribbon (from my stash)

Thanks again for visiting- I hope you are having fun getting ready for Christmas!  
Related Posts Plugin for WordPress, Blogger...