Showing posts with label Mix-Ability Challenge. Show all posts

Saturday, May 7, 2016

Artistic Outpost- Bottle Caps Faux Wood Background


Hi Friends!

Today I am sharing this fun Mixed Media card on the Artistic Outpost (AO) blog using the new AO Spring 2016 Release stamp, Bottle Caps Background from Our Daily Bread Designs.

I am also linking this card to the Splitcoaststampers’ MIX1 47 “In Abundance” Challenge (see details here and gallery here) along with the CAS374 "Let the Background Talk" Challenge.

I hope you have a chance to visit us at the Artistic Outpost blog as well as the Splitcoaststampers' galleries – fabulous inspiration from all!

This card is fairly simple to create- the most difficult part was patience in allowing the layers to dry- lol!

To create this card:

Ink the Bottle Caps  Background stamp with Stāz-On® Jet Black Ink and stamp onto a piece of Whisper White cardstock.

Color the images with Ranger® Tim Holtz® Distress Markers (I researched each of the vintage bottle caps online to try to match the colors).

Using a Sponge Applicator, apply Ranger® Tim Holtz® Tea Dye Distress Ink lightly over the images and when finished, use a foam brush to apply Ranger® Tim Holtz® Distress Collage Vintage Medium over the entire panel.

Once the panel as dried, apply Ranger® Tim Holtz® Distress Collage Crazing Medium over the background and set aside to dry.

Cut the dried background panel into three pieces and mount each piece onto Basic Black cardstock.

Mount the outer two panels onto the Basic Black card base and add the center panel with dimensional foam to finish off the card.

FYI- I decided not to add a sentiment at this time since I loved the way the panels look like wood and did not want to cover up any of the bottle caps :-)

Stamp Sets: Bottle Caps Background (Artistic Outpost)

Ink/Mediums: Stāz-On® Jet Black, Ranger® Tim Holtz® Tea Dye Distress Ink;  Ranger® Tim Holtz® Distress Collage Vintage and Crazing Medium

Paper: Basic Black, Whisper White

Accessories: Sponge Applicator, Foam Brush  

Don’t forget, we would love to see what you are creating with your Artistic Outpost stamps- click here for details on how to join in on our May Show Us Your AO Art Challenge.

Thanks again for stopping by- hugs and I hope all of you have a wonderful weekend!

Monday, May 2, 2016

Love Begins in A Moment


Hi Friends!!

This Mixed Media card was created using the ColourQ #339 Challenge along with the Splitcoaststampers’ MIX2 “It’s Not Hard To Resist”  Challenge (details here and gallery here) and the Simon Wednesday “Anything Goes” Challenge.

If you have not visited the above galleries yet, I hope you will find the time to do so- great inspiration from all!

To create this card:

Die cut a piece of Whisper White cardstock using the My Favorite Things® (MFT) Blueprints 16 Stitched Rectangle Die and de-static with the Embossing Buddy®.

Ink the retired Day of Gratitude medallion with Versamark™ ink and stamp repeatedly onto the prepared panel, apply Stampin’ Emboss® White Embossing Powder and heat set with the Heat Tool.

Once the embossing powder has cooled, use a Sponge Dauber to sponge Pumpkin Pie Classic Ink over the entire panel, wipe off the excess from the embossed images.

Use a Sponge Dauber to “pounce” Night of Navy and Marina Mist Classic Inks onto the retired En Francais background stamp and lay the embossed panel over the stamps, pressing down randomly to ink the panel.

Gently wipe the blue inks off the embossed images with a paper towel and mount the panel onto a piece of Night of Navy cardstock.

Wrap a strip of 1 ¼” Navy Grosgrain Ribbon over the panel, add the 5/8” Organza Ribbon along with the retired ⅜” Pumpkin Pie Taffeta Ribbon and add a strand of Pearls to the center of the Pumpkin Pie ribbon layer.

Mount the background panel onto a Whisper White card base.

Create the roses with Marina Mist cardstock using the Big Shot™ and the MFT Royal Rose and Large Royal Rose Dies.  Use the Crimper Tool to crimp the die cut roses before rolling up and adhering with glue in the center (I use Hot Glue for this step).

Create the leaves from Pear Pizzazz cardstock with the Martha Stewart® (MS) Leaf Punch, add the leaves to the back of the roses (again, I used Hot Glue) and apply Gesso® to the flower petals and leaves with your fingers or a paint brush.

Ink the sentiment from the retired Stampin’ Up! Occasional Quotes using Stāz-On® Midnight Blue Ink onto a piece of Vellum, use the Hexagon Punch to create the banner ends.

Layer the vellum on top of a piece of Whisper White cardstock (stamped with the Timeless Textures stamps using Pumpkin Pie and Marina Mist Classic Ink).

Mount the sentiment using dimensional foam and add the roses to finish off the card.

Stamp Sets: Day of Gratitude, Occasional Quotes, Timeless Textures, En Francais background stamp

Ink: Stāz-On® Midnight Blue, Versamark™, Classic Ink- Pumpkin Pie, Marina Mist, Night of Navy

Paper: Whisper White, Night of Navy, Marina Mist, Pear Pizzazz; Vellum

Accessories: Big Shot™, MFT Blueprints 16 Die, Royal Roses Dies,  1 ¼” Dark Navy Grosgrain Ribbon (from my stash), Stampin’ Up! Ribbon- ⅝” Organza and ⅜” Pumpkin Pie Taffeta, Pearls, Embossing Buddy®, Stampin’ Emboss® White Embossing Powder, Heat Tool, Hexagon Punch, MS Leaf Punch, Sponge Dauber 


Thanks again for taking the time to stop by- I hope you have a terrific week, my friends!

Saturday, April 30, 2016

Artistic Outpost- Harvest with Seed Packets and Grunge Elements

Hi Friends!

Today I am sharing this Mixed Media card on the Artistic Outpost (AO) blog using the new AO Spring 2016 Release stamps, Harvest, Seed Packets Background and Grunge Elements.

I am linking this card to the Splitcoaststampers’ MIX1 “Yin Yang” Challenge- see details here and gallery here  (the very first Mix-Ability Challenge from January 2013- thankfully, there is no time limit with the SCS Challenges :-)).

 I hope you have a chance to visit us at the Artistic Outpost blog as well as the Splitcoaststampers challenge gallery – fabulous inspiration from all!


To create this card:

De-static a piece of Crumb Cake cardstock with the Embossing Buddy®, stamp the sentiment from Harvest with Versamark™ ink onto the prepared cardstock and heat emboss with Stampin’ Emboss® Black Embossing Powder.

Once the embossing powder has cooled, ink the Grunge Elements splatter stamp with Ranger® Tim Holtz® Vintage Photo Distress Ink and stamp over the sentiment.

Trim the sentiment panel, mount onto Basic Black cardstock, trim once more and set aside.

For the background panel, ink the Seed Packets Background stamp with Stāz-On® Jet Black Ink and stamp onto Crumb Cake cardstock.

Tear the edges by hand and distress the paper using a Sponge Dauber with Ranger® Tim Holtz® Vintage Photo Distress Ink.

Mount the background panel onto a piece of distressed Basic Black cardstock and add the stenciling using a honeycomb stencil with Crackle Texture Paste.

Once the paste has dried, apply Tim Holtz® Distress Collage Crazing Medium over the background and set aside to dry.

Once the background has dried, add the 1 ¼” Black Grosgrain Ribbon on a diagonal and adhere the strips of Burlap Ribbon in the center (the glue will be hidden by the focal image).

Mount the entire panel onto the Whisper White card base and lightly sponge Ranger® Tim Holtz® Tea Dye Distress Ink around the edges to age the white card base.

Stamp the young farmer with Stāz-On® Jet Black Ink and stamp onto Crumb Cake cardstock and use the Faber-Castell® White Pitt Pen Marker to add highlights to the image.

Trim and mount onto a piece of Basic Black cardstock and apply Tim Holtz® Distress Collage Crazing Medium over the entire image.

To finish off the card, mount the focal image panel along with the sentiment using dimensional foam.

Stamp Sets: Harvest, Seed Packets Background, Grunge Elements (Artistic Outpost)

Ink/Mediums: Stāz-On® Jet Black, Faber-Castell® White Pitt Pen Marker, Ranger® Tim Holtz® Vintage Photo and Tea Dye Distress Ink; , Ranger® Tim Holtz® Distress Collage Crazing Medium, Crackle Texture Paste

Paper: Crumb Cake, Basic Black, Whisper White

Accessories: Embossing Buddy®, Stampin’ Emboss® Black Embossing Powder, Heat Tool, 1 ¼” Black Grosgrain Ribbon, strands from 1 ¼” Burlap Ribbon, Honeycomb Stencil  


Thanks again for stopping by- hugs and I hope all of you have a fabulous weekend!

Saturday, March 12, 2016

The Ornament of A House....


Hi Friends!

I am sharing my Mixed Media card on the Artistic Outpost blog today and I am featuring the Artistic Outpost stamp set,  The Outpost .

I love the images and sentiments in this stamp set and designed my card using the top row colors in the Splitcoaststampers’ CC573 Bingo Color Challenge  along with the MIX163 “To Die For” Challenge (I used a rectangle die for the main image) as well as the Mixed Media Card Challenge #21 Trees (with optional bird).  

I hope you will find the time to visit the Artistic Outpost Blog as well as the Splitcoaststampers' galleries for the challenge sites linked above- so many creative ideas and inspiration!

To create this card:

Use an Embossing Buddy® to de-static a piece of Whisper White cardstock and using Versamark™ Ink, stamp the main house image from The Outpost onto the prepared panel.

Apply Stampin’ Emboss® Early Espresso Embossing Powder and heat with the Heat Tool.

Once the embossing powder has cooled, create a mask with a 1 ¾” Circle Punch and add the mask to the panel (also create a mask for the house image).

Use a Sponge Dauber to apply Strawberry Slush and Soft Sky Classic Ink to the sky area and an Aqua Painter to add Old Olive Classic Ink to the foreground.

Ink the script stamp from The Outpost using Soft Sky Classic Ink and stamp over the sky area (a bit difficult to see in the photo).

Use the Big Shot™ with the Our Daily Bread Designs (ODBD) Double Stitched Rectangle Dies to cut the panel (I used the die that fit the height of the image but it was a bit too long on the length, so after the initial die cut, I re-inserted the panel back into the die on the one end and ran it back through the Big Shot™ to shorten the rectangle length).

Mount the die cut panel onto Early Espresso cardstock, trim and mount onto Soft Sky cardstock. 

Use a Sponge Dauber with Early Espresso Classic Ink to add a bit of “antiquing” to the image., create the “photo corners” using a 1” Square Punch and add to the opposite  corners of the main die cut panel using Antique Brass Brads.

Mount a piece of Soft Sky cardstock to the Early Espresso 5.5” square card front, use a Distressing Tool to distress the edges of a piece of Beautiful Boho Collection 6x6 Paper (ODBD) and use a Sponge Dauber to apply Early Espresso Classic Ink to the edges.

Add the strip of Old Olive cardstock at the bottom of the card front and cover the edges with white lace and 1” Dark Brown Satin Ribbon (both were from my sewing stash).

Mount the entire layered panel onto a 5.5” square white card base, add the lace to the corner of the focal image and mount the embossed house panel onto the card front with dimensional foam.

Using Stampin’ Emboss® White Embossing Powder, emboss the sentiment onto prepped Early Espresso cardstock and allow the powder to cool before cutting the words apart.

Add the sentiment to the card front using dimensional foam and add pearls to the upper right hand corner as well as diagonally on the lace corner of the house image panel to finish off the card.

Stamp Sets: TheOutpost (Artistic Outpost)

Ink: Versamark™, Stampin’ Up! Classic Ink- Old Olive, Soft Sky, Early Espresso, retired Strawberry Slush

Paper: Whisper White, Early Espresso, Soft Sky; Beautiful Boho 6x6 Paper Collection (ODBD)

Accessories: Big Shot™, ODBD Double Stitched Rectangle Dies, AquaPainter™, Embossing Buddy®, Heat Tool, Stampin’ Emboss® White and Early Espresso Embossing Powder, Pearls, Ounches- 1 ¾” Circle, 1” Square; Antique Brass Brads, 1” Dark Brown Satin Ribbon and White Flat Lace (from my stash)


Thanks again for stopping by- hugs and I hope all of you have a wonderful weekend!

Sunday, November 15, 2015

CAS Lighthearted Leaves- So Grateful For You


Hi Again Stampers!!

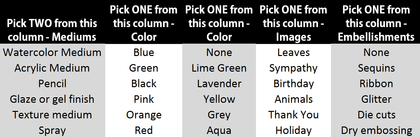
This Clean and Simple (CAS) card was created for the CASology #177 Give Challenge using the Splitcoaststampers’ CC555 Color Challenge with the MIX-Ability MIX145 "Enter the MatrIX" Challenge (Watercolor, Glaze, Green, Lavender, Leaves and Ribbon- Gold Cording in this case :-)).


To me the cue word "Give" this time of year means "Give Thanks" so I decided to create a "Thank You" card using a few leftovers from a previous project :-)

Again, if you have not had the chance to do so, I hope you will find the time to visit all of the above challenge sites- tremendous inspiration from all!

To create this card:

Stamp the Lighthearted Leaves images using Stāz-On® Jet Black Ink onto Whisper White cardstock. 

Color the images using Stampin’ Write Markers- Rich Razzleberry, Mossy Meadow and Soft Suede.  Spritz with water, dry with the Heat Tool and once dried, cut the images out with the coordinating die (for the larger leaf) and fussy-cut the smaller leaves.

Use a foam brush to apply Mod Podge® to the leaves and allow to thoroughly dry.

Use the Simply Scored™ tool to score the Whisper White cardstock, stamp the sentiment using Rich Razzleberry Classic Ink, trim and adhere to the Soft Suede cardstock.

Add the Gold Cold Trim and mount the panel onto the Whisper White card base.

Add the three leaves with Stampin’ Dimensionals® along with the Gold Cord bow to finish off the card.

Stamp Sets: Lighthearted Leaves

Ink: Stāz-On® Jet Black, Stampin’ Write Markers- Mossy Meadow, Rich Razzleberry, Soft Suede

Paper: Whisper White, Soft Suede

Accessories: Big Shot™, Leaves Framelits™, Mod Podge®, Simply Scored™ Scoring Tool, Gold Cord Trim


Thanks again for stopping by- I hope you have a fantastic week, my friends!
Related Posts Plugin for WordPress, Blogger...