Showing posts with label White Christmas. Show all posts

Tuesday, December 8, 2015

SUO137 Snowman Fun

Hello Friends!   

It’s time for the new SUO137 “Cards or Gifts for Children” Challenge – create a card or project for children for the Christmas holiday or any other holiday of your choice.

I have to admit, this was a tough one for me...since we no longer have young children in our family, I do not have many current “cutesy” Stampin’ Up! sets... so I decided to go with punch art (I used Pinterest for inspiration and there are so many great ideas out there :-))

I hope you will have a chance to check out my sister Design Team member samples at the SU-Only Challenge site, pull out your Stampin’ Up! supplies and create your own “Stampin’ Up! Only” project for our challenge gallery. 

I am also linking to the Dragonfly Journeys #34 "Do You Wanna Build A Snowman?" Challenge (thanks, Jeannie for letting me know about your challenge) :-)  

This is a very easy card to make:

Punch two circles from Whisper White cardstock for the snowman’s body, the arms are from Early Espresso cardstock using the Tree Builder Punch, the hat is created from the 1 ⅜” Square Punch and a few scraps of cardstock, the holly is from the Bird and Owl Builder Punches and the carrot nose was cut free-hand.

The sentiment banner is from the White Christmas stamp set (stamped using Memento™ Tuxedo Black Ink and colored with the Delightful Dijon Stampin’ Write Marker).

Quick and fun- do you think a child would enjoy this card? Or maybe even an adult who likes snowmen?  I know I giggled as I made this card so hopefully someone would like to receive it :-)

Stamp Sets:  White Christmas

Ink:  Memento™ Tuxedo Black, Smoky Slate (sponging around the body); Stampin’ Write Markers-  Delightful Dijon and Sahara Sand; White Gel Pen
Paper/Cardstock: Whisper White, Basic Black, Delightful Dijon, Cucumber Crush, Cherry Cobbler
Accessories: Big Shot™, Decorative Dots Textured Impressions™ Embossing Folder, Sponge Dauber, Punches- 1 ¾” and 2 ½” Circle, Bird Builder, Owl Builder, Tree Builder, 1 ⅜” Square

Thanks again for stopping by and we hope to see your Stampin’ Up! Only project in our “Cards orGifts for Children” Challenge gallery!  Hugs and have a blessed week, my friends!

Tuesday, September 23, 2014

SUO106 Fall Colors- A Thankful Greeting :-)

Hi Stampers! 

Time for the new SU-Only Challenges SUO106 Fall Colors  Challenge!  We are encouraging you to create a new project using your Stampin’ Up! products with Fall Colors.   I decided to use the White Christmas stamp set from the Holiday Mini to show that it can be used all year round :-)

I hope that you will visit us at SUO-Challenges to check out the rest of the Design Team projects and join in on in on the fun with your Stampin’ Up! Only creations!

I decided to incorporate the Around the World AW25 Thanks Challenge in honor of their first "birthday" as well- check this link out to see their fabulous Design Team and projects :-)


To create this project:
Ink the Post Card background stamp using Memento™ Tuxedo Black Ink- remove the ink off the vertical strip in the center using a baby wipe and stamp the image onto Whisper White cardstock. 
Create a mask for the horizon line and stamp the tree stamp from White Christmas using Memento™ Tuxedo Black Ink.
Using the larger splatter stamp from Gorgeous Grunge with Tangelo Twist Classic Ink, stamp over the branches to create the illusion of fall leaves and repeat the steps using Old Olive and Cajun Craze Classic Ink.  Add a bit more detail using the Cajun Craze Stampin’ Write marker. 
Color the grassy area using a Stampin’ Write Old Olive Marker and add a bit of Cajun Craze for the leaves on the ground and add details around the scroll areas at the top of the Post Card area. Draw a line for the horizon using the Basic Black Stampin’ Write marker. 
Use an AquaPainter™ with Pool Party Classic Ink to fill in the sky area being careful around the leaves.
Use the Basic Black Stampin’ Write marker to add a few birds to the sky.  Distress the panel using the Distressing Tool and use a Sponge Dauber to add Crumb Cake Classic Ink over the entire sky/image to “antique” the paper a bit.
Add the panel to a piece of Moonlight Designer Series Paper (DSP) and distress the edges using the Distressing Tool.  Stamp the DSP panel using the splatter stamp with Crumb Cake Classic Ink and mount onto a piece of Pool Party cardstock. 
Distress the Pool Party layer with the Distressing Tool as well and add additional distressing to all of the layers using a Sponge Dauber with Crumb Cake Classic Ink. 
Mount the entire panel onto an Early Espresso card base.
Stamp the California Quail image from Walk in the Wild as well as the acorn, piece of wood and sentiment from Truly Grateful using Memento™ Tuxedo Black Ink onto Whisper White cardstock. 
Color the acorn and wood image using Stampin’ Write Crumb Cake and Baked Brown Sugar markers.  Color the quail using So Saffron, Crumb Cake, Smoky Slate and Basic Black Stampin’ Write markers.   
Carefully cut out the quail, acorn and wood image and add a few highlights to the acorn and quail using the Chalk Marker.
Create a banner for the sentiment using the Hexagon Punch and stamp the large splatter stamp from Gorgeous Grunge using Crumb Cake Classic Ink.  Use the Distressing Tool to distress the edges.
Add the banner, quail, wood and acorn to the card front using Stampin’ Dimensionals® to finish off the card.
Stamp Sets: White Christmas, Walk in the Wild, Truly Grateful, Gorgeous Grunge, Post Card 
Ink: Memento™ Tuxedo Black Ink,  Cajun Craze, Crumb Cake, Old Olive, Pool Party, Tangelo Twist Classic Ink; Stampin’ Write Markers- Baked Brown Sugar, Basic Black, Cajun Craze, Crumb Cake,  Old Olive, Smoky Slate; Chalk Marker
Paper/Cardstock:  Whisper White, Early Espresso, Pool Party, Moonlight DSP
Accessories:  AquaPainter™, Hexagon Punch, Sponge Dauber

Thanks again for stopping by - I hope you have a chance to join in on our “Fall Colors” Challenge- have a great week!!

Wednesday, September 17, 2014

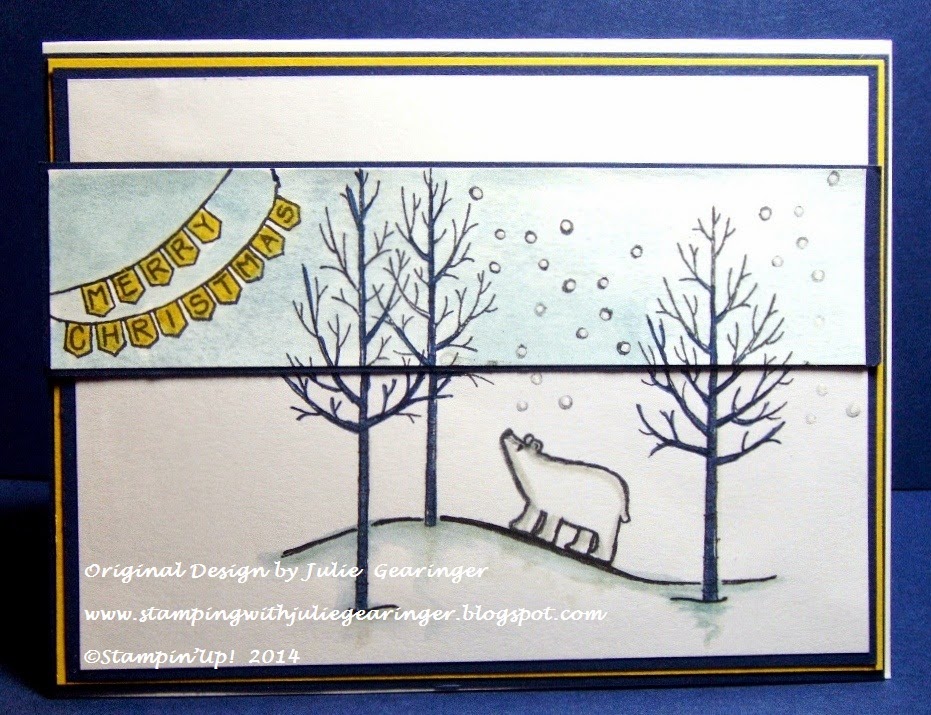
CAS Merry Christmas


Hi Stampers!!

This Clean and Simple (CAS) card was created using the CAS Colours and Sketches #91Challenge along with the Hand Stamped Sentiments HSSC194 Color Challenge.

I hope you will have a chance to visit both sites to check out the fabulous Design Team samples as well as their galleries!

To create this card:

Ink the tree image from White Christmas using Memento™ Tuxedo Black Ink and stamp two images onto Whisper White cardstock.  On one of the images, also stamp the Merry Christmas banner in the upper left hand corner per the sketch and the other, add the polar bear image.

On the image with the banner, use the AquaPainter™ to watercolor Marina Mist Classic Ink over the sky area.  Use Stampin’ Write markers to color the images- Hello Honey for the Christmas banner and Night of Navy for the trees.  Trim the panel and mount onto Night of Navy cardstock.

On the panel with the polar bear, color the trees using the Night of Navy Stampin’ Write marker, add a few shadows with the Sahara Sand Stampin’ Write marker as well as the AquaPainter™ with Marina Mist Classic Ink on the snow banks.

Mount the polar bear panel onto a piece of Night of Navy cardstock, trim and mount onto a layer of Hello Honey cardstock, trim again and mount onto Night of Navy cardstock. 

Add the Merry Christmas banner strip to the card front per the sketch and stamp a few snowflakes onto the watercolored banner strip as well as the main panel.
 
Color the snowflakes with the Chalk Marker and adhere the entire panel to the Whisper White card base to finish off the card.

Stamp Sets: White Christmas

Ink: Memento™ Tuxedo Black Ink , Marina Mist Classic Ink; Stampin’ Write markers- Night of Navy, Sahara Sand; Chalk Marker

 Paper: Whisper White, Night of Navy, Hello Honey

Accessories: AquaPainter™


Thanks again for stopping by- have a wonderful Wednesday, my friends!

Saturday, August 23, 2014

White Christmas- Sneak Peek :-)

Hi Stampers!

Here is another “sneak peek” of an upcoming set in the new Holiday Mini, White Christmas.  This set will be available on August 28th and has so many possibilities!!   


Again, I hope you will take the time (if you have not done so already) to visit the challenge sites to check out all of the Design Team entries as well as the galleries- fabulous inspiration from all!

To create this card:

Ink the tree and snow bank image using Memento™ Tuxedo Black Ink and stamp onto a piece of Whisper White cardstock. 

Using Memento™ Tuxedo Black Ink, stamp the polar bear to the hillside and also stamp the banner and birds on a separate piece of Whisper White cardstock.  Color the banner using the Wisteria Wonder Stampin’ Write marker and the birds with the Rich Razzleberry Stampin’ Write marker- carefully “fussy-cut” the banner and birds out by hand.

Use an AquaPainter™ with Soft Sky Classic Ink to watercolor the sky area, trim and mount the panel onto a piece of Soft Sky cardstock, trim again and mount onto a piece of Old Olive cardstock.

Create the background panel using a piece of Whisper White cardstock- adhere a piece of Wisteria Wonder Designer Series Paper (DSP) to the lower portion along with a strip of Old Olive paper in the center.

Mount this panel onto a piece of Soft Sky cardstock, trim and mount onto a piece of Old Olive cardstock, trim and mount onto a Rich Razzleberry card base.

Add ½ of a White Tea Lace Paper Doily to the lower portion of the card base and mount the focal image using Stampin’ Dimensionals®.
Stamp the sentiment onto a piece of Whisper White cardstock using Memento™ Tuxedo Black Ink , create the banner points using the Hexagon Punch, mount onto a piece of Soft Sky, Rich Razzleberry and Old Olive cardstock (mirroring the banner points using the Hexagon Punch as well).

Mount the sentiment banner onto the focal image using Stampin’ Dimensionals®.  Add the ½” Soft Sky Seam Binding Ribbon bow with the layered Frosted Sequins to the center of the bow. 

Add the “fussy-cut” banner and birds to the focal image and a few Rhinestones to finish off the card.

Stamp Sets: White Christmas

Ink:  Memento™ Tuxedo Black Ink, Soft Sky, Stampin’ Write Markers- Rich Razzleberry, Wisteria Wonder

Paper: Whisper White, Old Olive, Rich Razzleberry, Soft Sky, Wisteria Wonder DSP

Accessories: AquaPainter™, White Tea Lace Doily, Frosted Sequins, Rhinestones, ½” Soft Sky Seam Binding Ribbon, Hexagon Punch, Rhinestones


Thanks again for taking stopping by!  Have a great weekend and if you have time to visit again, I will be posting a few more cards later today- hugs to all of you, my friends!!  :-)
Related Posts Plugin for WordPress, Blogger...