Saturday, July 1, 2023

I Am The Vine


Hi Friends!

This week at the Stamp Simply blog, the Stamp Simply Design Team have been sharing floral cards.  If you have not had a chance to check out their cards, I hope you will do so- gorgeous inspiration from all!

I decided to create a floral fruit card using stamps, paper and supplies all from Stamp Simply!  Plus, both the stamp set and paper used on this card are currently on sale for 35% off!


This card was quick and easy- trim the piece of the Graphic 45 Fruit & Flora 8x8 paper to approx. 4” x 5 ¼”, distress the edges and adhere to a piece of eggplant cardstock.

Add the dark purple layer of the Fruit & Flora paper to the front, distressing the edges and adhere the lace.

Using one of the cut-a-parts from the Graphic 45 paper, de-static with an embossing powder tool, ink the sentiment from the Fruit of the Spirit stamp set using Versafine Onyx Black, stamp onto prepared panel, add clear embossing powder and heat set with a heat tool.
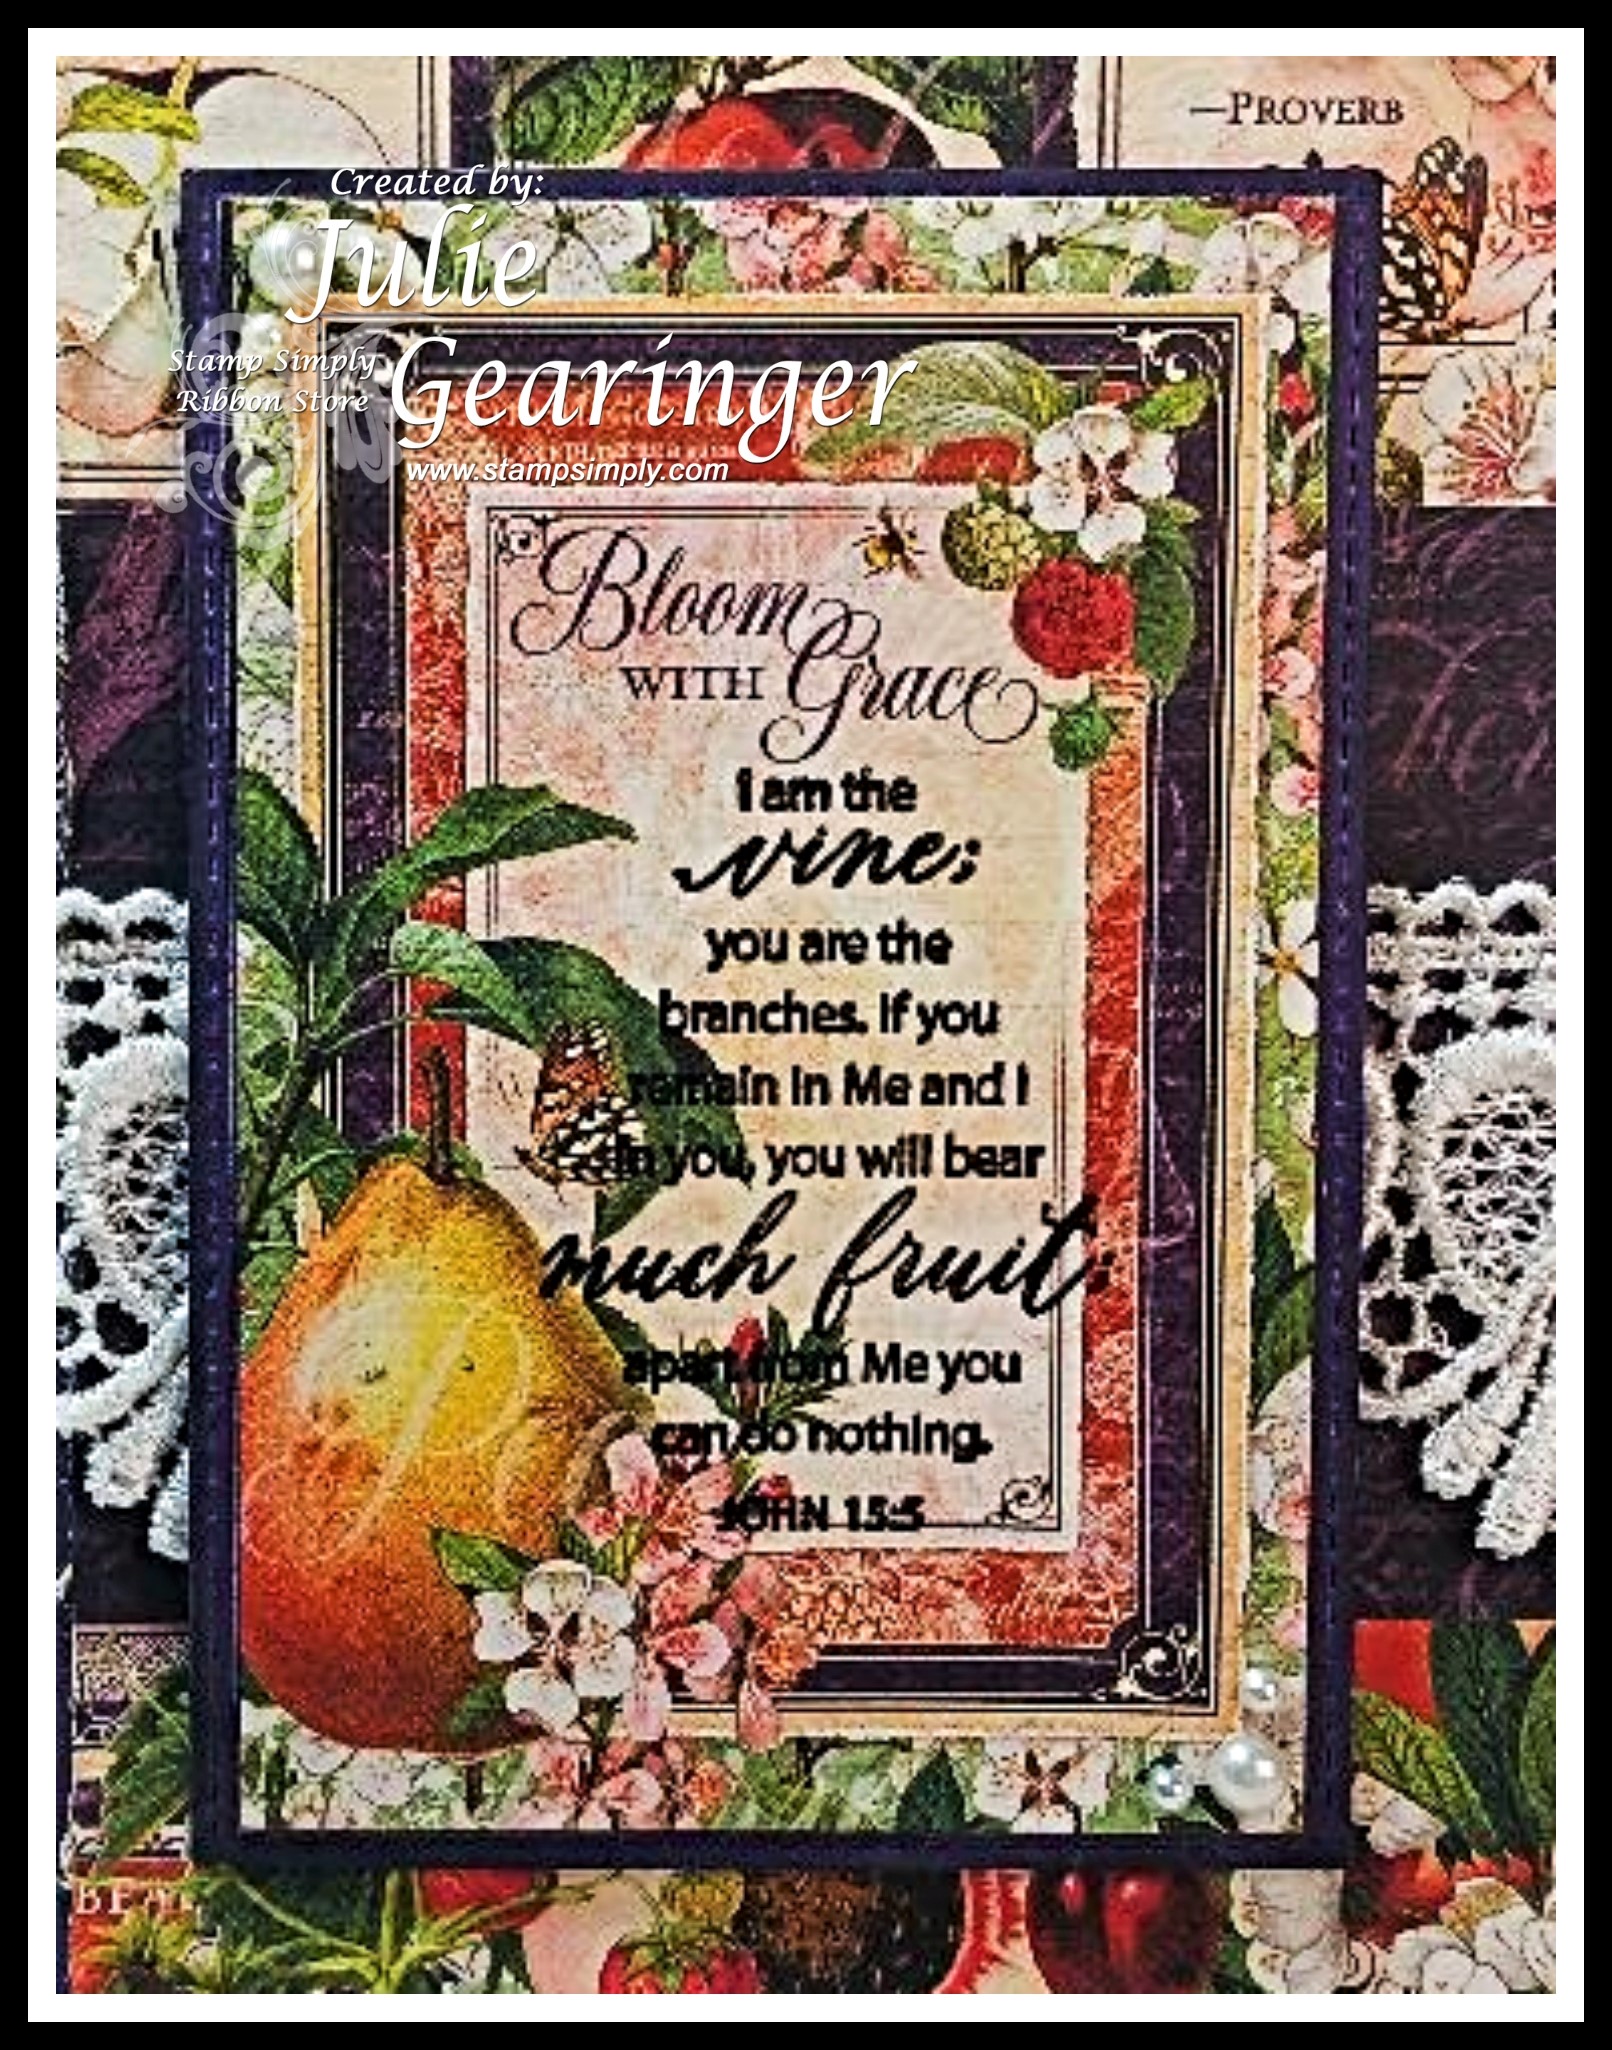


Adhere to a piece of eggplant cardstock and mount onto the card front with dimensional foam.

Add a few pearls to finish off the card.

As many of you who follow my blog know, I enjoy playing along with online challenges and am linking my card to the Simon Wednesday “Anything Goes” Challenge  and the Double D Color Challenge (purple and yellow).   

If you have not had a chance to stop by the Stamp Simply blog yet, I hope you will do so.  Fabulous inspiration from the rest of the Stamp Simply Design Team as well as inspiration at both the Simon Says Wednesday and Double D Challenge sites.

Stamp Sets: Fruit of the Spirit (Stamp Simply)

Inks/Mediums: Versafine Onyx Black

Cardstock/Paper: Eggplant, Graphic 45- Fruit & Flora 8x8 Paper Pad 

Accessories/Tools: Embossing Powder Tool, Clear Embossing Powder, Heat Tool, Distressing Tool, Venise Lace 1.75” Gabriella- 1 yd- Ivory, Kaisercraft Self-Adhesive Round Pearls- Pearl

Don’t miss out on the current special of 35% off all Graphic 45 and select stamp sets plus more items on sale at Stamp Simply!  

Thanks again for stopping by!  I hope I have inspired you to create a card this weekend!


Thursday, June 22, 2023

One Nation Under God


Hi Friends!

This week at the Stamp Simply blog, the Stamp Simply Design Team have been sharing patriotic cards.  If you have not had a chance to check out their cards, I hope you will do so- gorgeous inspiration from all!

I absolutely love all things Americana and Patriotic and decided to create a Clean and Simple card using the Old Glory Bundle from Stamp Simply!


This card was quick and easy- stamp the flag USA image using Versafine Onyx Black onto white cardstock, heat set the ink with a heat tool and color the image with watercolor pencils and markers.

Once the image was colored, die cut the image with the coordinating die (also die cut two additional pieces from white cardstock to layer behind the colored image).

De-static a piece of white cardstock with an embossing powder tool, ink the sentiments from Old Glory with Versafine Onyx Black ink and stamp in the upper area and lower right hand area. 


Apply clear embossing powder and heat set with a heat tool.

Trim and mount onto a piece of red cardstock.

Add the layered die cut image of the flag USA  with dimensional foam to finish off the card.


I enjoy playing along with online challenges and am participating with the Fab ’n Funky #575 Use A Sentiment Challenge, the Tic Tac Toe #214 Featured Designer Joanne Challenge (right hand row down- Die Cut, Bright Colors, CAS)  along with the Word Art Wednesday #601-#602 “Anything Goes” Challenge.


Stamp Sets: Old Glory Bundle (Stamp Simply)

Inks/Mediums: Versafine Onyx Black, Watercolor Pencils- Derwent and Stampin' Up!, Stampin' Write Markers- Poppy Parade, Midnight Muse

Cardstock/Paper: White, Red

Accessories/Tools: Gemini, Jr., Old Glory Bundle , Embossing Powder Tool, Clear Embossing Powder, Heat Tool


Don’t miss out on the current special at Stamp Simply!  Save 20% off the entire store (even on items already on sale)- use code JUNE20.  Sale ends on June 24th

Thanks again for stopping by!  I hope I have inspired you to create a card this weekend!

Wednesday, June 21, 2023

TCC198 Our Help


Hi Friends!

Welcome to our #198 {Summertime Fun} Challenge at The Card Concept! 

This will be our last challenge before our summer break.  The Card Concept Challenge will return with new inspiration challenges in the fall. 

I thought that each of these pillows have great summertime images and I was inspired by the top left with the pelican, lighthouse and compass (in addition to the colors) for my Clean and Layered Mixed Media card.

I enjoy participating with other online challenges and will be playing along with A Place To Start “Anything Goes” Challenge.

If you have not already visited us at The Card Concept, I hope you will find the time to do so.  Wonderful inspiration from the rest of my DT sisters as well as at the A Place to Start site.

This was a very easy card to create:


Ink the lighthouse collage image with Versafine Onyx Black ink onto a prepared piece of white cardstock, apply clear embossing powder and heat set with a heat tool.

Once the embossing has cooled, lightly water-color the image using ink from water-based markers.  

Trim the image close to the edge and mount onto black cardstock.

Emboss a piece of white cardstock with a diamond embossing folder, trim to approx. 4” x 5 ¼”, add a piece of turquoise seam binding (wrapping the ends behind the panel) and mount onto a piece of black cardstock.

Heat emboss the sentiment from Scripture Collection 3 (Divinity Designs LLC)  onto white cardstock (using the same steps as the lighthouse), trim close to the edges before mounting onto black cardstock.

Layer the lighthouse image panel directly to the card front and add the sentiment with dimensional foam.

Use a clear glitter marker pen to add shimmer to the compass image. 

Stamp Sets: Lighthouse Collage, Scripture Collection 3 (Divinity Designs LLC)

Inks/Mediums: Versafine Onyx Black; Stampin’ Write Markers- Tempting Turquoise, Balmy Blue, Crushed Curry, Early Espresso; Clear Wink of Stella Marker

Cardstock/Paper: Whisper White, Basic Black

Accessories/Tools: Gemini, Jr., Diamond Embossing Folder (retired Stampin’ Up!), Embossing Powder Tool, Clear Embossing Powder, Heat Tool, AquaPainter 

Thanks again for taking the time to visit! I hope you are inspired to create a card and join us for our #198 {Summertime Fun} Challenge at The Card Concept!

Saturday, June 17, 2023

Sunflower Season


Hi Friends!

This week the Stamp Simply Design Team have been sharing their favorite stamp sets.  I always have trouble picking a favorite since I love all of the stamp sets at Stamp Simply!

I love the sunflower image as well as the fonts on the sentiments in the Sunflower Season stamp set.  I also love the coordinating die in the Sunflower Season bundle and how it matches the floral image perfectly.


I enjoy playing along with online challenges and since sunflowers are also one of my favorite flowers, I am participating with The Flower Challenge #81 “Use Your Favorite Flower” Challenge.  I am also playing along with the Word Art Wednesday #599-#600 Anything Goes Challenge.


To create this card:

Ink the sunflower image using Versafine Onyx Black ink, stamp onto white cardstock, apply clear embossing powder and heat set with a heat tool.

Once the embossing has cooled, color with water-based markers and die cut with the coordinating die.

Die cut two additional flowers from plain white cardstock and layer behind the colored image.


Trim a piece of Craft Consortium Ink Drops – Earth designer paper to 4” x 5 ¼”. I loved this particular piece of paper since it looked like a painted landscape and thought it would be a perfect backdrop for the sunflower :-)


De-static the lower right hand area and upper left hand area with an embossing powder tool.

Ink the sentiments from Sunflower Season with Versafine Black Onyx ink, stamp onto the prepared areas, apply clear embossing powder and heat set with a heat tool.

Mount onto a piece of black cardstock and adhere to a white card base.

Mount the die cut sunflower image with dimensional foam.

Use a clear glitter pen to add shimmer to the petals and add a few rhinestones to finish off the card.


Stamp Sets: Sunflower Season Bundle (Stamp Simply)

Inks/Mediums: Versafine Onyx Black, Wink of Stella Clear Glitter Marker

Cardstock/Paper: White, Black, Craft Consortium Ink Drops 6x6 Paper Pad- Earth

Accessories/Tools: Gemini, Jr., Stamp Simply Dies- Sunflower Season Bundle, Kaisercraft Round Rhinestones- Split Pea, Embossing Powder Tool, Clear Embossing Powder, Heat Tool

Thanks again for stopping by!  I hope I have inspired you to check out the rest of the gorgeous stamp sets available at Stamp Simply!

Monday, June 12, 2023

TCC197 Happy Fathers Day


Hi Friends!

Welcome to our #197 {Industrial Modern} or {Nature Calls} Challenge at The Card Concept!  

 I loved the feeling of both of these photos!  I was inspired by the corrugated texture of the rusty wall as well as the colors in the Industrial Modern photo and the fishing images in the Nature Calls photo for my Clean and Layered with a bit of shabby Father's Day card. 

I hope you will take the time to visit The Card Concept Challenge to check out the rest of the Design Team cards- fabulous inspiration from all!

As many of you who follow my blog know, I enjoy participating with other online challenges and used the Splitcoaststampers Sketch SC867 for the layout. 

I am also be playing along with the Simon Monday “Masculine” Challenge along with the Word Art Wednesday #599-#600 Anything Goes Challenge.

If you have not already visited us at The Card Concept, I hope you will find the time to do so.  Wonderful inspiration from the rest of my DT sisters as well as the other challenge sites.


The fishing hat/creel basket image from the retired Stampin’ Up! Angler stamp set (from 2004) was stamped with Versafine Onyx Black ink onto white cardstock, then heat embossed with clear embossing powder.  This is one of my favorite images for Father's Day cards, especially for my Dad who loves to fish :-)

Once the embossing had cooled, the image was colored with water-based markers and distressing ink.  

Die cut the colored image with the Hemstitch Square Die and layer onto a piece of chocolate cardstock. 

The teal background panel was crimped with a crimping tool (this tool is at least twenty years old as well). 

The lure stamp images from Angler and Fly Fishing (both long ago retired Stampin’ Up! sets) were inked with Hickory Smoke distress oxide ink before stamping over the rust background panel.

The sentiment from the A Man of Knowledge stampset (Stamp Simply) was inked with Versafine Onyx Black ink and heat embossed with clear embossing powder.

Once the sentiment cooled, die cut with a fishtail banner die, score ⅛” on both sides of the sentiment and fold to create the banner. Layer onto another banner die cut from chocolate cardstock.

Layer the main image panel along with the sentiment with dimensional foam.


Stamp Sets: A Man of Knowledge (Stamp Simply), retired Angler and Fly Fishing (Stampin’ Up!)

Inks/Mediums: Versafine Onyx Black; Stampin’ Write Markers- Creamy Caramel, River Rock, Taken with Teal, Really Rust, Basic Gray, Basic Black, Soft Suede, Wild Wasabi, Crushed Curry; Hickory Smoke Distress Oxide, Ground Espresso Distress  

Cardstock/Paper: Whisper White, Chocolate Chip, Really Rust, Taken with Teal

Accessories/Tools: Gemini, Jr, Fishtail Sentiment Banners Die (Stamp Simply), Spellbinders Hemstitch Square Dies.  Embossing Powder Tool, Clear Embossing Powder, Heat Tool, Crimper Tool. AquaPainter 

Thanks again for taking the time to visit! I hope you are inspired to create a card and join us for our #197 {Industrial Modern} or {Nature Calls} Challenge at The Card Concept! 

Thursday, May 25, 2023

TCC196 Patriotic Poppies


Hi Friends!

Welcome to our #196 {Patriotic Picnic} Challenge at The Card Concept!

 I was inspired by the beautiful flowers as well as the patriotic theme, the gingham, stripes and colors for my Elegant and Layered Mixed Media card (with a bit of shabby to boot, lol!).

I hope you will take the time to visit The Card Concept Challenge to check out the rest of the Design Team cards- fabulous inspiration from all!

I will also be playing along with the A Place to Start “Anything Goes with an optional twist, Add Another Thing” Challenge.  I added a flower and the “other” is the patchwork designer paper. 

If you have not already visited us at The Card Concept, I hope you will find the time to do so.  As I mentioned, gorgeous inspiration from the rest of my DT sisters as well as the A Place to Start challenge site.


The poppy image from the Pretty Poppies Bundle was stamped with Versafine Onyx Black ink onto white cardstock, heat set with a heat tool, then water-colored using watercolor pencils and markers.  White highlights were added with an extra fine white paint pen and shimmer was added to the petals with a clear glitter marker.

Once the poppy image was colored, I die cut with the coordinating die, and stacked it onto another die cut from white cardstock to add thickness to the image.

I have been organizing my craft room and getting inspired to start quilting again.  I used to create quilt blocks about twenty-five years ago (before I started stamping) and have a massive stash of cotton fabric for quilting.  I need to get busy finishing up my UFO’s (unfinished projects) and was inspired by the gingham patterns in our photo to create a paper quilt.


The paper quilt was created by trimming the designer papers from The Fourth of July 6x6 paper pad (Carta Bella) to 1.5” square, then cutting each piece on the diagonal.  The pieces were attached to a piece of white cardstock with just a bit of adhesive and then stitched with a zigzag stitch using white thread.

The entire square was then cut again on the diagonal, stitched along the cut line and adhered to the white card front.


A piece of white crochet lace was added on the upper edge of the lower right hand “quilt” piece.

The sentiments from The American Eagle stamp set were stamped with Versafine Onyx Black ink and heat embossed with clear embossing powder.  The outline image was colored with extra fine water based markers.


The background panel was added to the dark navy print from The Fourth of July paper pad, then adhered onto a white card base.

The poppy image was added using dimensional foam and red rhinestones were added to finish off the card.


Stamp Sets: Pretty Poppies Bundle, The American Eagle (Stamp Simply)

Inks/Mediums: Versafine Onyx Black; Derwent Watercolor Pencils, Stampin’ Write Markers- Poppy Parade, Granny Apple Green, Extra Fine White Paint Pen, Clear Glitter Marker

Cardstock/Paper: White, The Fourth of July 6x6 Paper Pad (Carta Bella)

Accessories/Tools: Gemini, Jr, Stamp Simply Dies- Pretty Poppies BundleSewing Machine, White Thread, Embossing Powder Tool, Clear Embossing Powder, AquaPainter, May Arts 3/8” Crochet Lace- 15 yd spool- White, Kaisercraft Self-Adhesive Rhinestones- Red

 Thanks again for taking the time to visit! I hope you are inspired to create a card and join us for our #196 {Patriotic Picnic} Challenge at The Card Concept


Also, don’t forget to check out the rest of the wonderful Patriotic stamps, papers and other supplies at Stamp Simply!


Tuesday, May 23, 2023

RRCB207 Be Strong and Courageous


Hi Friends!

I am so honored to be a Guest Designer, again, for The Retro Rubber Challenge Blog!  The Retro Rubber Challenge Blog is a bi-weekly challenge that focuses on stamps that are over one year old (or older). If you are chosen as a winner, you have a chance to Guest Design and I was thrilled and humbled to be chosen as a winner for two challenges in a row.

I decided to pull out some stamps that are over 15+ years old for The Retro Rubber Challenge Blog #207 “Anything Goes” Challenge.


For this card, I used the hostess set, Ageless Adornment (I believe from the year 2000).
  This was one of the first sets that I received with my hostess points and I love every single image in the set.  This is one that I will keep in my stash forever, lol!

I paired the image with a sentiment from the stamp set, Scripture Collection 3 (originally Our Daily Bread Designs now known as Divinity Designs LLC).  I believe this stamp is originally from the low-mid 2000’s.

I also have a personal goal to try to create a card for each of the over 900+ sketches at Splitcoaststampers and this card uses the SC47 Sketch for the layout. SC47 is a basic sketch that I slightly modified (see below about the black strips, lol!)

I am also playing along with the Simon Says Monday “Watercolor” Challenge along with the Cards 4 Galz #199 Backgrounds Challenge.   The background panel was created with distress oxide inks, lots of water and stenciling.

This card was fun to create- it is a “back to basics” type card.  No dies, just ink, stamps, a stencil, heat embossing and watercolor. I enjoy getting inky and having fun with backgrounds!

The background on this card was designed by applying distress oxide inks onto a silicone mat, adding water, pressing a piece of white cardstock into the wet ink, smoothing and lifting, then repeating until I was satisfied with the colors.  In hindsight, I should have used watercolor paper, lol!

The stenciling was applied with distress oxide ink (after I was finished with the smooshed background).


I used an embossing powder tool to de-static the background and heat embossed the sentiment from the Scripture Collection 3 using Versafine Onyx Black ink and clear embossing powder.

The butterfly image was stamped with Versafine Onyx Black ink, heat embossed with clear embossing powder before being water-colored with water-based markers and fussy cut.

The card was layered onto a white card base.  The black cardstock strips were added at the top and bottom (this helped with the waves created by the water, lol!)

The butterfly image from Ageless Adornment was mounted with dimensional foam and a few white highlights were created with an extra fine white paint pen.  Use a clear glitter marker to add shimmer on the wings.

The card was finished off with a few sequins from my stash.

Stamps: Scripture Collection 3 (Divinity Designs LLC), retired Ageless Adornment (Stampin’ Up!)

Ink/Mediums: Versafine Black Onyx, Tim Holtz Distress Oxide- Tumbled Glass. Broken China, Picked Raspberry; Stampin’ Write Markers- Coastal Cabana, Bermuda Bay, Gorgeous Grape, Melon Mambo, Blushing Bride; Wink of Stella Clear Glitter Marker, Extra Fine White Paint Marker

Cardstock/Paper: White, Black

Accessories/Tools: Embossing Powder Tool, Clear Embossing Powder, Heat Tool, Memory Box Heartwood Stencil, Stencil Brush, Sequins 

I hope you have time to check out the rest of the Design Team cards at The Retro Rubber Challenge Blog and possibly, create a card with an older stamp (at least a year old) and join us at The Retro Rubber Challenge Blog #207 “Anything Goes” Challenge!

Thanks again for stopping by- have a blessed week, sweet friends!

Related Posts Plugin for WordPress, Blogger...