Showing posts with label Scripty Thoughts. Show all posts

Tuesday, June 26, 2018

So Blessed


Hi Friends!

I hope all of you are having a wonderful week so far! 

My hubby and I were able to take a trip to Shenandoah National Park today (our favorite daycation spot). We saw one young bear, several deer, numerous squirrels and bunnies, a few chipmunks as well as a gorgeous male Scarlet Tanager and several male Indigo Buntings!  This was all in addition to the spectacular views along Skyline Drive- a veryfun and relaxing day for sure!

I had a chance to stamp several cards in the last few weeks and am trying to get caught up with my blog posts (the blog posts take almost as long to create as the cards :-)).

Tonight I am sharing another card designed with  Sweet ‘n Sassy Stamps July release stamp sets, Brotherly Love and Texture Tiles 2 along with previously released stamp sets, Scripty Thoughts and Scripture & Sentiment Companions.

I am participating with the Try Stampin’ on Tuesday “For the Boys” Challenge, the My Time to Craft #373 “Stamped Background” Challenge, the Word Art Wednesday #340-#341“Anything Goes” Challenge.  I also incorporated the May 27th Paper Players PP395Sketch Challenge (the deadline for the PP395 Sketch was 06/01 but I wanted to give credit to LeAnne for her great sketch!). 

If you have not had a chance to visit the above challenge sites or the SNSS Blog/FB Page yet, I encourage you to do so- fabulous inspiration from all!

To create this card:

1). Ink the individual components for the male image from Brotherly Love using archival black ink and stamp onto white cardstock. Layer the images using masks- I stamped the glasses first, then masked the glasses, stamped the hair next, masked the hair, then stamped the face.  Next stamp the neck/shoulders and add the neckline for the shirt. Stamp the moustache to finish the image.

2). Color the images with water-based and alcohol markers and once you are satisfied with the coloring, fussy-cut the image.

3). Die cut the banners, circle and background rectangles using stitched and regular dies.  On the light green rectangle panel, stamp the Texture Tiles 2 image using light green ink to create the background.

4). Stamp the “So Blessed” sentiment from Scripty Thoughts onto the plaid banner using archival ink, layer the banner and add the polished hemp twine.  Adhere a corduroy brad to the polished hemp twine bow (I removed the brad points from the brad and adhered to the center of the bow and strands with hot glue).

5). Layer the light blue stitched rectangle die cut onto a piece of light green cardstock, trim close to the edge, add the stamped light green background and mount the large banner with the twine bow.

6). Add the fussy-cut Brotherly Love image to the espresso circle die cut, mount onto the card front with dimensional foam.

7). Ink the sentiment from Scripture & Sentiment Companions with archival black ink, stamp onto a piece of light green cardstock, add clear embossing powder and heat set with a heat tool.  Trim the sentiment, create the flag banner (I used a punch), add a strip of light blue cardstock and use a handheld punch to create the holes for the antique brass brads.  Insert the brads and adhere the entire card front to a white card base.

8). Finish off the card using a clear glitter pen to add shimmer to the glasses.


Ink/Mediums: Versafine™ Onyx Black, retired Mellow Moss Classic Ink; Stampin’ Write Markers- Chocolate Chip, Early Espresso, Baja Breeze; Spectrum Noir™ Alcohol Markers- EB1, TB4; Spectrum Noir™ Clear Glitter Pen

Cardstock/Designer Paper: Whisper White, retired Baja Breeze, Certainly Celery and Murfield DSP (all Stampin’ Up!)

Accessories/Tools: Big Shot™, Dies- MFT Stitched A2 Rectangle Set 1 & 2, retired Stampin’ Up! Banner Framelits™, Embossing Buddy®, Clear Embossing Powder, Heat Tool, Polished Hemp Twine, retired Soft Sky Corduroy Brad

I had fun creating this “dude” for my card and am looking forward to creating more images in the future :-)

Don’t forget, Texture Tiles 2 is the June Stamp of the Month- free with a net $75 (US$ order after all discounts and before shipping).  Plus, remember there is free shipping on any net $75 US!


Thanks again for taking the time to visit- I hope you will find the time to stop by again soon!

Sunday, May 6, 2018

Scripty Thoughts- Thinking of You


Hi Friends!

I had fun designing a few cards this past weekend using the previously released Sweet ‘n Sassy Stamps, Long Stem Silhouettes and Texture Tiles I along with May Stamp of the Month, Scripty Thoughts.

I wanted to create a quick and easy card so I used the CAS(E) This Sketch #270 SketchChallenge for the layout and am also participating with the Double D “May Flowers”Photo Inspiration Challenge (I was inspired by the soft pastel colors).

Just a reminder, you can receive the Sweet ‘n Sassy Stamps May Stamp of the Month, Scripty Thoughts free with a net $75 US$ order (after all discounts and before shipping) plus any net $75 US receives free shipping! 


Plus, if you love the new release as much as I do, you can order the Early Bird Pre-Order for $75 (US$) by May 9th, save over $10 off the regular price plus receive the May Stamp of the Month, Scripty Thoughts free along with free shipping and handling- what a great deal!

If you have not had a chance to visit the above challenge sites or the SNSS Blog/FB Page yet, I encourage you to do so- wonderful inspiration from all!

To create this card:

1). Create a mask using sticky note paper (hand tearing the edges), mask a piece of white cardstock and sponge Tim Holtz® Distress Oxide inks- I used Fossilized Amber, Picked Raspberry and Broken China-  to create the horizontal stripes.  Ink the Texture Tiles I script image using the same color ink and stamp in the sponged areas. Apply a bit of splatter with the splatter image from Texture Tiles I  using the same ink colors, heat set with a heat tool to help dry the ink.

 
2). De-static the inked panel, stamp the wildflower image from Long Stem Silhouettes along with the sentiment from Scripty Thoughts with archival black ink, apply clear embossing powder and heat set with a heat tool. 

3). Die cut the panel with a stitched rectangle die.

4). Die cut the white card base with a stitched rectangle die (a few sizes up from the die cut panel in step #3) allowing the fold of the card to be down from the top edge of the die (so it will not be cut).  Ink the edges with Broken China Distress Oxide ink to mimic cardstock (heat set with a heat tool to dry the ink).

 5). Adhere the panel to the card base.

6). Add a few Nuvo™ Morning Dew Crystal Drops to finish off the card.


Ink/Mediums: Versafine™ Onyx Black, Tim Holtz® Distress Oxide- Fossilized Amber, Picked Raspberry, Broken China; Nuvo™ Morning Dew Crystal Drops

Paper: Whisper White

Accessories: Big Shot™, MFT Dies- Stitched A2 Rectangle Dies Set #1 & #2; Embossing Buddy®, Clear Embossing Powder, Heat Tool, Sponge Daubers, Masking Paper

Thanks again for taking the time to stop by and visit! I hope all of you have a blessed week!

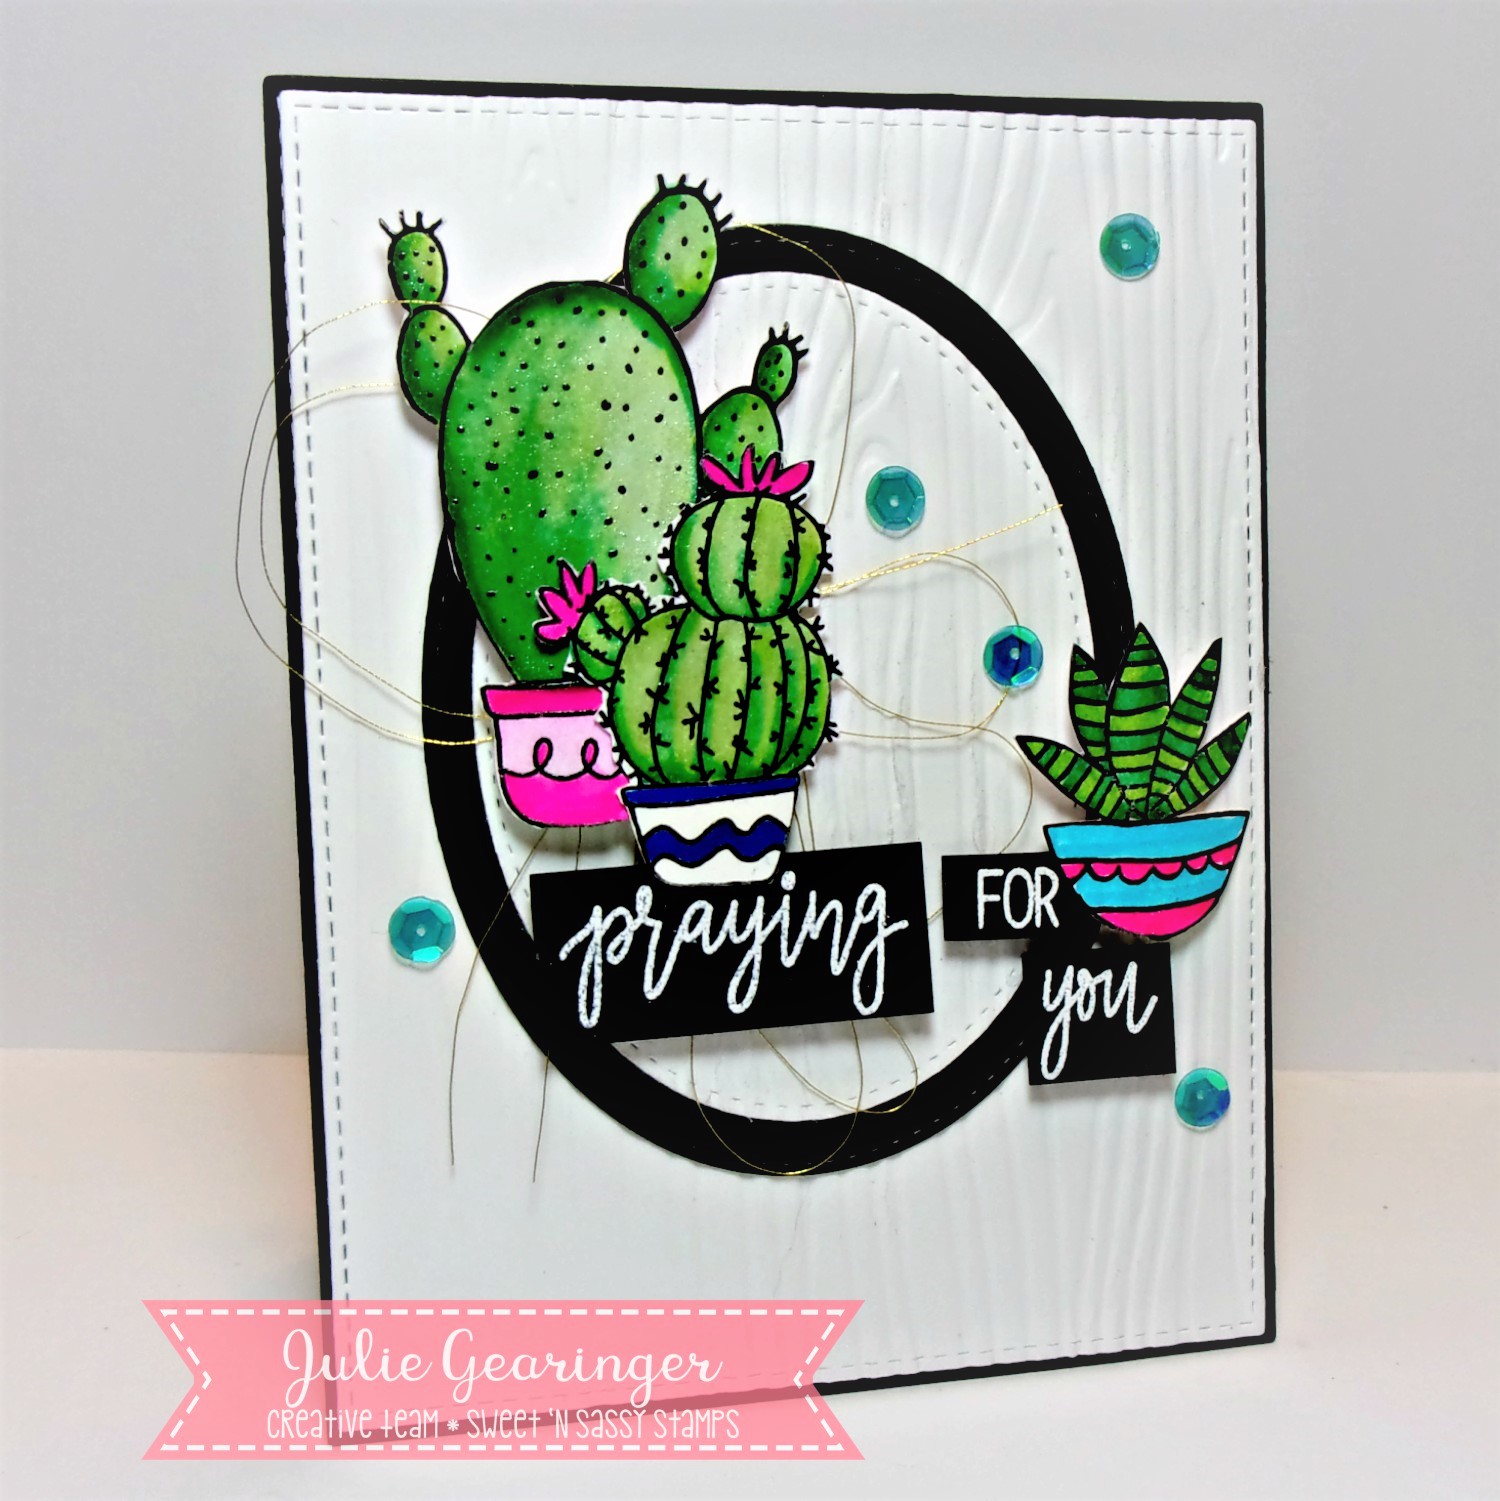
Refresh My Soul


Hi Friends!

I am sharing another card that I designed using the Sweet ‘n Sassy Stamps May release stamp sets, Refresh My Soul and May Stamp of the Month, Scripty Thoughts.

I love the cute cactus images as well as the sentiments in the Refresh My Soul stamp set- perfect for cards, scrapbook pages, Bible Art Journaling and so much more!  Also, the May Stamp of the Month, Scripty Thoughts has so many possibilities for sentiments- a wonderful set to add to your "stash" :-)


Also, don’t forget that you can receive the Sweet ‘n Sassy Stamps May Stamp of the Month, Scripty Thoughts free with a net $75 US$ order (after all discounts and before shipping) plus any net $75 US receives free shipping! 
Plus, if you love the new release as much as I do, you can order the Early Bird Pre-Order for $75 (US$) by May 9th, save over $10 off the regular price plus receive the May Stamp of the Month, Scripty Thoughts free along with free shipping and handling- what a great deal!

I enjoy participating in online challenges- they help me stretch my creativity a bit and get out of my “box”, so to speak.  I used the Freshly Made Sketches FMS335 Sketch for the layout and am also participating with the Just Add Ink “Just Add ‘O’” (O= Oval) along with the Dragonfly Journeys #117 “Just Add Sequins” Challenge.


If you have not had a chance to visit the above challenge sites or the SNSS Blog/FB Page yet, I encourage you to do so- wonderful inspiration from all!


To create this card:

1). De-static a piece of white cardstock with an embossing powder tool, stamp the various cactus images from Refresh My Soul with archival black ink onto the prepared cardstock, apply clear embossing powder and heat set with a heat tool.  Watercolor the images with water-based markers and fussy-cut each image.

2). Die cut a stitched oval from a piece of white cardstock. Die cut another oval from the next largest die from black cardstock. 

3). Die cut another piece of white cardstock with a stitched rectangle die.  Emboss the rectangle panel and oval with a woodgrain embossing folder.  Mount the die ovals together and mount the stitched rectangle panel onto the black card front.  Adhere both to the white card base.

4). De-static a scrap piece of black cardstock with an embossing powder tool, stamp the sentiments from Scripty Thoughts with embossing ink onto the prepared cardstock, apply white embossing powder and heat set with a heat tool.  Trim the sentiment apart.

5). Loop a bit of metallic gold thread onto the card front, adhere the fussy cut cacti images along with the sentiment to the card front with dimensional foam.

6). Use a clear glitter pen to add shimmer to the images and finish off the card with a few blue sequins.


Ink/Mediums: Versafine™ Onyx Black, Versamark™, Zig® Clean Color Markers- Green, Lt. Green, Pink, Purple, Blue, Lt. Blue; Spectrum Noir™ Clear Glitter Pen

Paper: Whisper White, Basic Black (both Stampin’ Up!)

Accessories: Big Shot™, MFT Dies- Stitched Oval STAX, A2 Rectangle Dies Set #1 &2; Woodgrain Textured Impressions™ Folder,  Embossing Buddy®, Clear and White Embossing Powder, Heat Tool, AquaPainter™, Blue Sequins, Gold Metallic Thread

 Thanks again for taking the time to stop by and visit! Hugs and I hope you have a wonderful week!

Tuesday, May 1, 2018

Praying for You


Hi Friends!

I hope all of you are having a great week so far! Today we are celebrating the May Release at  Sweet ‘n Sassy Stamps and I absolutely love all of the stamps in this new release!

There are so many versatile images and sentiments- perfect for all sorts of cards, scrapbooking, paper crafts, home décor as well as Bible Art Journaling! 

I decided to create a mixed media card featuring the May Stamp of the Month, Scripty Thoughts along with the new Refresh My Soul (Creative Worship) stamp set and the previously released stamp set, Texture Tiles I using the Match The Sketch #226 Challenge for the layout and also participating with the Simon Says Wednesday “Anything Goes” Challenge. 


Plus, if you love the new release as much as I do, you can order the May Release Early Bird Pre-Order for $75 (US$) and save over $10 plus receive the May Stamp of the Month, Scripty Thoughts free along with free shipping and handling- what a great deal!

If you have not had a chance to visit the above challenge sites or the SNSS Blog/FB Page yet, I encourage you to do so- gorgeous inspiration from all!

To create this card:

1). De-static a piece of white cardstock with an embossing powder tool, stamp the various cactus images from Refresh My Soul with archival black ink onto the prepared cardstock, apply clear embossing powder and heat set with a heat tool.  Watercolor the images with water-based markers and fussy-cut each image.

2). Die cut a stitched circle from a piece of white cardstock.

3). On a silicone mat, press peeled paint distress ink onto the mat, lightly spritz with water, press the remainder of the die cut panel of white cardstock (from step #2 above) into the ink, lift and continue to repeat until you are satisfied with the background.  Repeat the process and press the actual die cut circle into the ink as well.  Dry all thoroughly with a heat tool.

4). Add a bit of distressing with the splatter image from Texture Tiles I using archival black ink, die cut the main panel with a stitched rectangle die and mount onto a piece of black cardstock (die cut with a larger stitched rectangle die).

5).  Mount the entire card front onto a white card base.

6). De-static the die cut circle with an embossing powder tool, stamp the “Praying” sentiment from Scripty Thoughts with archival black ink and heat emboss with clear embossing powder.  Mount onto a die cut circle from black cardstock and adhere to the card front with dimensional foam (covering up the original circle area that was die cut).

 7).  De-static a scrap piece of black cardstock with an embossing powder tool, stamp the “For You” sentient from Scripty Thoughts with embossing ink and heat emboss with white embossing powder.  Create the fishtail banner by hand and mount onto the card front.  Add the two cactus images onto the circle with dimensional foam and mount the cactus at the lower righthand corner directly to the card front.

8). Use a clear glitter pen to add shimmer to the floral areas of the cacti and finish off the card with a few crystal drops.


Ink/Mediums: Versafine™ Onyx Black, Versamark™, Tim Holtz® Peeled Paint Distress Ink, Zig® Clean Color Markers- various colors, Spectrum Noir™ Clear Glitter Pen, Nuvo™ Morning Dew Crystal Drops
 
Paper: Whisper White, Basic Black (both Stampin’ Up!)

Accessories: Big Shot™, MFT Dies- Stitched Circle, A2 Rectangle Dies Set #1 & 2, at Tool, Embossing Buddy®, Clear and White Embossing Powder, Heat Tool, AquaPainter™

 Thanks again for taking the time to stop by and visit! Hugs and I hope you have a wonderful week!

Related Posts Plugin for WordPress, Blogger...