Showing posts with label Verve Stamps. Show all posts

Saturday, July 29, 2017

Psalm 34:8- O Taste and See That The Lord Is Good

Hi Friends!

I had a chance to create a card this weekend using a digital stamp from Power Poppy along with a brand new verse sentiment from Verve Stamps.  

I had printed out and watercolored the digi image a while back but had not completed a card, so when I noticed that the As You See It Challenge #155 Challenge is “When I lose my craft mojo, I ____”, I thought this would be a good time to finish this project.  

If I am struggling with figuring out a design (or as we call it in the crafty world "mojo"), I generally find that if I focus on only one or two stamp sets and use a sketch/or color challenge, it helps with my “mojo”.  I have so many stamps, designer papers, inks, mediums, etc. that it can get a bit overwhelming since I want to use them all!   I am also a bit of a perfectionist with an "Attention Deficit Disorder" (all of those supplies keep grabbing my attention:-)) so limiting my choices helps me immensely.


Since I wanted to get my "mojo" back, I incorporated the Tuesday Morning Sketches #413 Sketch Challenge and the Just Us Girls #404 Wild Card Week “Use Something Old/and or New” Challenge (I have owned the Power Poppy digi stamp for a while, the DSP, Embossing Folder and Banner Punch were retired years ago, the gingham ribbon is several years old and the Verve Stamps image is " brand new to me").

If you have not had a chance to check out the above challenges yet, I hope you will find the time to do so- great inspiration from all!

To create this card:

1). Using a digital software program or Word, re-size and print out the Power Poppy Apples In Season image onto white cardstock.  Using watercolor pencils along with an AquaPainter™ (very little water so the paper will not pill), water color the image.  Once you are satisfied with the colors, die cut the image with the MFT Stitched Ovals STAX Dies.  Die cut a piece of black cardstock using the same size oval die (split the die in half) and set aside.

2). De-static the colored oval image with an Embossing Buddy® powder tool, stamp the Verve Stamps Scripture Medley 4 image with Versafine™ Onyx Black ink and heat emboss with clear embossing powder.  Once the powder has cooled, use a clear glitter pen to add shimmer to the apples and blossoms and an extra fine white paint pen to add highlights.

3). Layer the die cut oval image onto the split black die cut (allowing just the black die to show a bit) and set aside.

4). Use the Big Shot™ with the retired Lacy Brocade Texture Impressions™ Embossing Folder to emboss a piece of retired designer series paper (Stampin’ Up!), mount onto a piece of black cardstock and distress lightly with a sanding block.  Mount onto the red card front and adhere to the white card base.

5). Add the horizontal strip of retired dsp onto a smaller piece of black cardstock (per the sketch) and adhere a piece of black and white gingham.  Adhere to the card front and mount the focal image using dimensional foam.

6). The small flag banners were in my stash (punched from black cardstock using the retired Banner Punch (SU!) – punch two smaller banners using the red dsp for the middle area.  Using a copper spiral clip, add the banners to the corner.

7). Finish off the card with the double black and white gingham bow.

Stamp Sets: Apples In Season (digi- Power Poppy), Scripture Medley 4 (Verve Stamps)

Ink/Mediums: Printer Ink- Black; Versafine™, Derwent™ Watercolor Pencils, Spectrum Noir™ Clear Glitter Pen, Extra Fine White Sharpie® Paint Pen

Paper: Whisper White, Basic Black, Riding Hood Red, retired DSP- SU!

Accessories/Tools: Big Shot™, MFT Stitched Ovals STAX Dies, retired Lacy Brocade Textured Impressions™ Embossing Folder, retired Banner Punch, Copper Spiral Clip, 1” Black and White Gingham Ribbon, Sanding Block, Embossing Buddy®, Clear EP, Heat Tool


Thanks again for taking the time to stop by- hugs and I hope all of you have a great weekend !

Wednesday, May 10, 2017

TCC73 Vintage Notes


Hi Friends!

It’s time for The CardConcept #73 Vintage Notes Inspiration Challenge!  I absolutely love our inspiration photo with the birds, butterflies, script, lace and buttons- so much to use for inspiration. 

I am also linking to the Mixed Media Monthly #36 “Put A Stamp On It” Challenge along with the Alphabet Challenge “D for Decoupage” Challenge into the design of my Mixed Media/Shabby Chic card.

If you have not had a chance to visit us at The Card Concept yet, I hope you will find time to do so as well as check out the other two challenge sites- fabulous inspiration from all!

To create this card:

1). Ink the robin image from the retired Nature Walk (SU!) and the frame image from the retired Notably Ornate (SU!) sets with Stampin’ Archival™ Basic Black ink and stamp onto Very Vanilla cardstock.

2). Color the frame and the robin images with an AquaPainter™ and Distress Inks- Vintage Photo, Gathered Twigs, Walnut Stain and Antique Linen and Ripe Persimmon for the robin.

3). Fussy cut both images and sponge additional Vintage Photo Distress Ink over the edges.

4). Use a foam brush to apply ModPodge™ over both images and set aside to dry.

5). On another piece of Very Vanilla cardstock, stamp the retired Musical Score background stamp (SU!) with Stampin’ Archival™ Basic Black ink, distress the paper with a sponge using Vintage Photo Distress Ink.  Use a palette knife with Crackle Textured Paste and a honeycomb stencil to apply texture paste to the background and allow to dry.

6). Add color to the texture paste with Adirondack™ Alcohol Inks- Caramel, Espresso and Old Paper Distress Stain and Picket Fence Distress Stain.  Allow to dry, distress the edges by tearing and using a distressing tool and adhere to a piece of Basic Black cardstock.

7). Apply a layer of ModPodge™ over the entire background and allow the panel to dry.

8). Stamp the egg images from Nature Walk using Stampin’ Archival™ Basic Black ink onto Very Vanilla cardstock, heat set the ink and watercolor with an AquaPainter™ using Distress Ink – Walnut Stain, Vintage Photo and the Pool Party Stampin’ Write Marker. Fussy cut out each egg, round the eggs to create a slight cup and apply ModPodge™ to the surface, set aside to dry.

8). Add the 1” Dark Brown Satin Ribbon strip and cream lace to the background panel, wrap the ends behind the panel.  Mount the entire background panel to a white card front, distress the edges using Vintage Photo Distress Ink.

Close-Up of Distressing and Watercolor
9). Adhere the ornate frame, robin and eggs with dimensional foam to the card front.
 
10). Ink the verse sentiment from Scripture Medley 3 (Verve Stamps) using  Stampin’ Archival™ Basic Black ink  and stamp onto Very Vanilla cardstock.  Use a Heat Tool to heat set the ink, apply Vintage Photo Distress Ink with a sponge dauber over the paper, distress the edges with a distressing tool and stamp the splatter image from Timeless Textures (SU!) with Vintage Photo Distress Ink. Mount the sentiment onto a piece of Basic Black cardstock.

11). Mount the sentiment onto the card front with dimensional foam to finish off the card.

Stamp Sets: Nature Walk, Notably Ornate, Musical Score background stamp (all retired Stampin’ Up!), Timeless Textures, Scripture Medley 3 (Verve Stamps)

Ink/Medium: Stampin’ Archival™ Basic Black; Distress Inks- Vintage Photo. Walnut Stain, Gathered Twigs, Antique Linen, Ripe Persimmon; Distress Stain- Old Paper, Picket Fence; Stampin’ Write Markers- Pool Party; Crackled Texture Paste; ModPodge™

Paper/Cardstock:  Very Vanilla, Basic Black

Accessories: AquaPainter™, Sponge Daubers, Foam Brush, 1” Dark Brown Satin Ribbon, Ivory Crochet Lace, Distressing Tool  

Thanks again for taking the time to visit!  Hugs and I hope you have a wonderful week!

Wednesday, February 1, 2017

TCC66 His Love Endures Forever

Hi Friends!!


Our inspiration photo is so soft and lovely and I was inspired by the beautiful rose as well as the overall romantic feeling of love to create a shabby chic card.

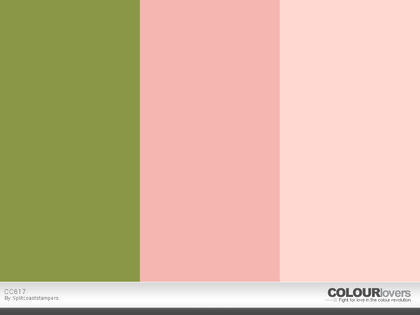
I have been hoarding this gorgeous Graphic 45 Botanical Tea designer paper and incorporated the Splitcoaststampers CC617 Color Challenge (with the dessert option of spring) into the design.


I hope you will find the time to check out the wonderful Design Team cards at The Card Concept as well as the other two challenge galleries- gorgeous inspiration from all!

To create this card:

1). Distress the edges of the Graphic 45 Botanical Tea designer paper, apply Vintage Photo Distress Ink over the edges, mount onto Soft Suede cardstock, trim and mount onto Blushing Bride cardstock.

2). Trim the Graphic45 Botanical Tea Cut-A-Way panel, distress with Antique Linen Distress Ink and stamp the platters with the Stampin’ Up! Timeless Textures small splatter stamp using Vintage Photo Distress Ink (stamping off prior to stamping on the panel).  Mount onto Soft Suede cardstock and mount onto the front of the card panel.

3). Add the crochet lace and olive satin ribbon, wrapping the ends of the ribbon behind the panel before mounting onto the white card base.

4). Ink the sentiment from Scripture Medley 3 (Verve Stamps) with Brushed Corduroy Distress Ink and stamp onto Very Vanilla cardstock.  Die cut and emboss the sentiment using the medium frame from Spellbinders™ Timeless Rectangles Dies, stamp the small splatter stamp from SU! Timeless Textures stamp (“huff” onto the stamp to re-moisten the ink). Mount onto the card front with dimensional foam.

4). Create the rolled roses using the MFT Royal Rose dies from Pink Pirouette and Blushing Bride cardstock. Use the MS Leaf Punch to add leaves from Old Olive cardstock – adhere the flowers to the card front (I used hot glue for this step) and add a few pearls in the corners to finish off the card.

Stamp Sets: Timeless Textures (Stampin’ Up!), Scripture Medley 3 (Verve Stamps)

Ink/Mediums: Distress Ink- Vintage Photo, Antique Linen, Brushed Corduroy

Paper: Very Vanilla, Blushing Bride, Old Olive, Pink Pirouette, Soft Suede, Extra Thick Whisper White; Graphic 45 Botanical Tea

Accessories: Big Shot™, MFT Royal Roses Dies, MS Leaf Punch, Distressing Tool, Crochet Lace and Satin Ribbon (from my stash)

I am so thankful that we can give thanks to the Lord for He is Good, His Love Endures Forever!!  I am resting in His Promises for sure!!

Thanks again for taking the time to stop by!  I hope all of you have a fabulous week and you will be able to join us for the #66 “Love & Romance” Challenge at The Card Concept!  Hugs and God Bless!


Wednesday, October 5, 2016

TCC59 "Give Thanks"


Hi Friends!

Today we have the brand new SC613 Sketch Challenge at Splitcoaststampers as well as the new TCC59 “Sweet Treats” Inspiration Challenge at The Card Concept!  

I have designed a vintage shabby chic creation inspired by the colors of the ice cream and I flipped the sketch to fit the design of the pretty background paper.

I am also linking this card to a few other favorite online challenges- Word Art Wednesday #250-#251 "Anything Goes" Challenge as well as the Inkspirational #118 "Glamour" Challenge.  

I hope you will find the time to visit my Design Team sisters at The Card Concept along with the Splitcoaststampers SC613 Sketch Challenge as well as the rest of the inspiration at the other challenge sites :-)

To create this card:

Ink the sentiment from the Verve Stamps, Scripture Medley 3 with archival black ink and stamp onto a piece of Very Vanilla cardstock.
Die cut the sentiment panel with the Spellbinders™Timeless Rectangles Dies (I used the medium frame), apply  Gathered Twigs Distress Ink with a sponge dauber over the edges and stamp a bit of distressing with the small splatter stamp from Timeless Textures (Stampin’ Up!).

Use a Distressing Tool to distress the edges of the piece of Kirby Teesdale Paper Pack (Paper Studio) designer paper, mount onto a piece of Rose Red cardstock, trim and distress the edges before mounting onto a piece of Early Espresso cardstock (distressing the edges of the Early Espresso base as well).

Adhere the entire panel onto the white card base.

Cut strips of another piece of Kirby Teesdale Paper Pack (Paper Studio) designer paper (the pink scroll and a pink doily design) as well as the scrap pieces from the background panel, distress and add to Rose Red cardstock, layering onto Early Espresso as well.

Layer the horizontal and vertical strips per the sketch and mount the sentiment die cut with dimensional foam.

Die cut the flowers from Rich Razzleberry, Sweet Sugarplum and Peekaboo Peach cardstock using the Big Shot™ with MFT™ Scallop Rose Die, use a crimper tool to break down the fibers a bit on the die cut flowers, roll up and adhere with adhesive on the bottom (I like to use hot glue for this step).

Punch the leaves from mossy green textured cardstock (from my stash) using the Martha Stewart® Leaf Punch, add the leaves with the roses to the card front (again, I used hot glue for this step).

Use the Spectrum Noir™ Clear Glitter Pen to add glitter to the roses and color the flowers and leaves on the dress form image using Stampin’ Write Markers- Peekaboo Peach and Wild Wasabi.

Add a few pearls to finish off the card.

Stamp Set: Scripture Medley 3 (Verve Stamps), Timeless Textures (Stampin’ Up!)

Ink/Medium: Archival Black Ink; Stampin’  Write Markers- Peekaboo Peach, Wild Wasabi; Distress Ink- Gathered Twigs; Spectrum Noir™ Clear Glitter Pen

Paper/Cardstock:  Very Vanilla, Early Espresso, Peekaboo Peach, Rich Razzleberry, Rose Red, Sweet Sugarplum; Kirby Teesdale Paper Pack (Paper Studio) DSP

Accessories/Tools:  Big Shot™,  MFT Scallop Rose Die, Spellbinders Timeless Rectangles Dies, MS Leaf Punch, Distressing Tool, Pearls

The Card Concept is a bi-weekly challenge that has an inspiration photo along with a number of design styles that you can choose from to create your card- Clean and Simple, Clean and Graphic, Clean and Layered, Shabby Chic, Freestyle Collage, Classy and Elegant and Mixed Media. 

The SCS Sketch Challenge is a weekly challenge but technically does not expire :-)  so I hope you can find some time to gather your supplies together and come join in on the fun!! 


Thanks again for visiting- hugs and have a fabulous week, my friends!

Wednesday, September 21, 2016

TCC58 He Has Made Everything Beautiful


Hi Friends!

Today we have the brand new SC611 Sketch Challenge at Splitcoaststampers as well as the new TCC58 Inspiration Challenge at The Card Concept!

It is a truly an honor to be on both Design Teams and I decided to combine the two for my Shabby Chic card (I have moved from the Mixed Media category at The Card Concept to the Shabby Chic category :-)).


To create this card:

Ink the sentiment from the Verve Stamps, Scripture Medley 3 with archival black ink and stamp onto a piece of Whisper White cardstock.

Die cut the sentiment panel with the MFT Stitched Rectangle STAX Dies and distress the edges with a distressing tool.

Place the Memory Box (MB) Pattern Heartwood Stencil over the die cut sentiment panel and use a Clarity Stencil Brush to lightly apply Fossilized Amber Distress Ink, mount this panel onto another piece of Whisper White cardstock (trimming approx. 1/8” from to the edge) and distress the edges.

Die cut a piece of the green flourish pattern paper from the Echo Park Style Essentials 6x6 Paper Pad with the MFT Stitched Rectangle STAX Dies and mount onto a piece of Whisper White cardstock, distress the edges.

Die cut the yellow floral pattern  paper from the Echo Park Style Essentials 6x6 Paper Pad with the MFT Blueprints 13 Dies, mount onto a piece of Whisper White cardstock, distress the edges with the Distressing Tool.

Mount the yellow floral background panel onto the white card base, add the green flourish panel on an angle (per the sketch) and trim the edges off the side and top, as needed.

Add the sentiment panel to the card front and adhere the Daffodil Delight ½” Seam Binding Triple Ribbon Bow.

Create the roses with the MFT Royal Rose Die and Mini Royal Rose Dies from Melon Mambo and Pink Pirouette cardstock  ( I die cut the roses and use the Crimper Tool to crimp the paper before rolling and gluing the rose together).

Punch the leaves from the scrap piece of the green flourish pattern paper used for the background panel with the Martha Stewart (MS) Leaf Punch, add the leaves to the card front before mounting the roses.

Use a clear glitter pen to apply glitter to the roses and add a few pearls to the corners to finish off the card!

Stamp Set: Scripture Medley 3 (Verve Stamps)

Ink/Medium: Archival Black Ink; Fossilized Amber Distress Ink; Clear Glitter Pen

Paper/Cardstock:  Whisper White, Melon Mambo, Pink Pirouette; Echo Park Style Essentials 6x6 Paper Pad

Accessories/Tools:  Big Shot™, MFT Stitched Rectangle STAX Dies, MFT Royal Rose Dies, MFT Mini Royal Rose Dies, MFT Blueprints 13 Dies, MS Leaf Punch, Distressing Tool, MB Pattern Heartwood Stencil, Crimper Tool

Just a reminder- The Card Concept is a bi-weekly challenge that has an inspiration photo along with a number of design styles that you can choose from to create your card- Clean and Simple, Clean and Graphic, Clean and Layered, Shabby Chic, Freestyle Collage, Classy and Elegant and Mixed Media.  

I hope this card inspires you to create a project this week, and if so, we would love to see your artwork in The Card Concept gallery as well as the Splitcoaststampers Sketch gallery!

Thanks again for visiting- hugs and I hope you have a fabulous week, my friends!
Related Posts Plugin for WordPress, Blogger...