Saturday, April 12, 2025

He Has Made Everything Beautiful


Hi Friends!

I am creating a quick card using a retired verse sentiment from Verve stamps and a retired bunny image from Impression Obsession. 

If you follow my blog, you know it is a personal goal of mine to create cards using my older stamp sets and I have not inked up either one of these images in years.


This card was so easy to create since the stamps do all the work, lol!
  The main image and sentiment were both stamped with Versafine Black Onyx ink onto white cardstock and heat embossed with clear embossing powder.

A bit of coloring with distress oxide inks and water-based markers, stenciling with distress oxide ink and a few rhinestones help finish off the main layer.

The background panel was framed with soft yellow cardstock and mounted onto a black card front to finish off the card.

I enjoy playing along with online challenges and will be linking this card to the Double D “Easter” Challenge (inspired by the bunnies and chicks in the photo), the Tic-Tac-Toe #268 Challenge (diagonal left to right, Stencil- Free- Embellishments) and the C.R.A.F.T. “Spring/Easter/Anything Goes” Challenge. 


If you have not had a chance to check out the galleries at the challenge sites yet, I would encourage you to do so- wonderful inspiration from each of the Design Teams as well as the galleries!

Stamp Sets: G2535 Impression Obsession, Inc. (I could not find the name- Bunny and Chick?), Scripture Medley 3 (retired Verve Stamps)

Ink: Versafine Black Onyx, Distress Oxide Inks- Tumbled Glass, Hickory Smoke; Stampin’ Write Markers- So Saffron, Soft Suede, Granny Apple Green, Calypso Coral, Crisp Cantaloupe, Perfect Plum, Twisted Citron

Paper/Cardstock: White, Black, So Saffron

Accessories: Tin Tile Stencil (Casual Fridays). Stencil Brush, Embossing Powder Tool, Clear Embossing Powder, Heat Tool, Rhinestones

Thanks again for visiting- hugs and I hope you all have a wonderful Easter week!

Wednesday, April 9, 2025

TCC216 Charm is Deceptive


Hi Friends! 

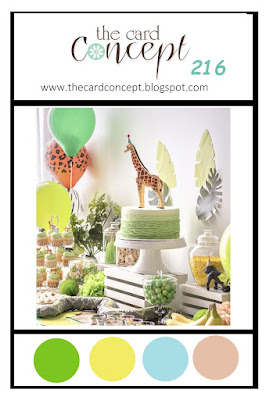
It’s time for our April #216 “Spring Celebrations” Challenge at The Card Concept!

I was inspired by the colors, graphic elements and the leaves on the wall for my Clean and Layered Mixed Media card.

I bought the Bird Collage 4 image from Impression Obsession several years ago and have not had a chance to ink it up in years.  I love this sweet image and was so sad to hear that I/O has gone out of business (but, you may find this stamp on the secondary market).

I decided to pair the bird image with a verse from Words of Encouragement (Stamp Simply) and a stencil from Simon Says Stamp.


I enjoy playing along with online challenges and will be linking this card to the Tic-Tac-Toe #267 Challenge (middle row across Pastels-Free-Birds or Chicks) and the Allsorts #820 Anything Goes optional Spring Flowers Challenge. 


This card was so simple to create-

Heat emboss the bird image onto white cardstock, mask the bird and apply distress oxide inks with the stencil for the background.

Add the black gingham ribbon and embossed sentiment, finish off the card with shimmer paint and pearls.  

FYI- I created the card first without the shimmer paint (see above and in the header), but decided to add it to the background to soften it a bit.  I diluted the frost white shimmer paint with water and used a water brush to layer the paint over the entire background and bird.  It is hard to see in the photo below but it gives a soft shimmer over the entire card. 

Another fairly quick and flat card for mailing!


I hope you have stopped by The Card Concept to see how the rest of the Design Team were inspired as well as check out the other challenge gallery entries!

Stamp Sets: Words of Encouragement (Stamp Simply), Bird Collage 4 (retired I/O Stamps)

Inks/Mediums: Versafine Black Onyx, Distress Oxide Inks- Broken China, Scattered Straw, Mowed Lawn; Stampin’ Write Markers- Hello Honey; Frost White Shimmer Paint

Cardstock/Paper: White, Black

Accessories/Tools: Gemini, Jr., My Favorite Things Stitched Circle STAX Dies, Debra Stencil (Simon Says Stamp), Stencil Brush, Embossing Powder Tool, Clear Embossing Powder, Heat Tool, ⅜” Black Gingham Ribbon, Pearls

Thanks again for taking the time to stop by! I hope you are inspired to create a card and join us for our #216 Spring Celebrations at The Card Concept!  The deadline to play along is Monday, May 11th at noon EDT.  

Sunday, March 23, 2025

Cast All Your Cares on Him


Hi Friends!

I am sharing two different cards using the same retired background stamp, Paisley (Stampin’ Up!) and a verse sentiment from the retired Verve stamp set, Faith Medley.  

It is a personal goal of mine to create cards using my older stamp sets as well as a card for each one of the over 1,000 sketches at Splitcoastampers.

I was able to use two different sketches for the design plus the Paisley background stamp is at least 20 years old, meeting both of my personal goals :-) !

Both of the background panels were created the same way:

Press Distress Oxide inks onto a silicone mat, spritz with a bit of water and “smoosh” a white cardstock panel into the ink.

Repeat the process to cover the cardstock, drying each layer with a heat tool.

Once the panels are dry, ink the Paisely background with Versamark Black Onyx ink, stamp onto the inked panel, apply clear embossing powder and heat set with a heat tool.

Trim and layer the inked background panels (per the sketch), mount onto a white card base and add the framed heat embossed sentiment.

Add a few sequins to finish off the card.


I also enjoy playing along with other online challenges and will be linking the first card to The TGIF Friday #517 “Bold Background” Challenge and the second card to the Word Art Wednesday #691-692 “Anything Goes” Challenge.

The first card uses the Splitcoaststampers SC231 Sketch Challenge for the layout and the second card uses the SC65 sketch for the layout. 


If you have not had a chance to check out the galleries at the challenge sites yet, I would encourage you to do so- gorgeous inspiration from each of the Design Teams as well as the galleries!

Stamp Sets: Paisley Background (retired Stampin’ Up!), Faith Medley (retired Verve Stamps)

Ink: Versafine Black Onyx, Distress Oxide Inks- Picked Raspberry, Salty Ocean, Twisted Citron

Paper/Cardstock: White, Black

Accessories: Embossing Powder Tool, Clear Embossing Powder, Heat Tool, Sequins

Thanks again for visiting- hugs and I hope you all have a fabulous week!

Nature Silhouettes


Hi Friends! 

I am sharing another quick card designed using Distress Oxide inks for the background and heat embossed silhouettes from Creative Worship Stamps (formerly Sweet ‘n Sassy Stamps).

I enjoy playing along with online challenges and wanted to play along with The Color Throwdown #829 Challenge as well as the Shopping Our Stash #543 “Think Ink”Challenge and the Word Art Wednesday #691-692 “Anything Goes” Challenge.

All three stamp sets used are several years old and have not been inked in a while.  The Shopping Our Stash Challenge is one that encourages you to use your stash, perfect for my own personal challenge to use what I have.  

If you have not had a chance to check out the galleries at the challenge sites yet, I would encourage you to do so- beautiful inspiration from each of the Design Teams as well as the galleries!

To create this card:

Press Twisted Citron Distress Oxide ink onto a silicone mat, spritz with water and press a piece of white cardstock into the ink. 


Use a heat tool to dry the ink and repeat the process with Broken China and Peacock Feathers Distress Oxide ink, continuing to layer the ink.

Thoroughly dry the ink and use and embossing powder tool to de-static the panel.

Ink the Nature Silhouettes 1 and 2 stamp images with Versafine Black Onyx ink, stamp onto the prepared background, apply clear embossing powder and heat set with a heat tool.

Once the embossing powder has dried, die cut the background panel with a stitched rectangle die, mount onto a piece of black cardstock and trim close to the edge.

Die cut a piece of white cardstock with a stitched rectangle die, mount onto black cardstock and adhere to a white card base.

Ink the script image from Texture Tiles 1 with Peacock Feathers Distress Oxide ink, repeatedly stamp over the white and background panel.

Add white highlights with an extra fine white paint pen to finish off the card.

Stamp Sets: Nature Silhouettes, Nature Silhouettes 2, Texture Tiles 1 (Creative Worship formerly Sweet ‘n SassyStamps)

Ink: Versafine Black Onyx, Distress Oxide Inks- Broken China, Twisted Citron, Peacock Feathers; Extra Fine White Paint Pen

Paper/Cardstock: White, Black

Accessories: Big Shot™, MFT Stitched Rectangle A2 STAX Dies Set 1 and 2, Embossing Powder Tool, Clear Embossing Powder, Heat Tool  

Thanks again for visiting- hugs and I hope you all have a wonderful week!

Wednesday, March 12, 2025

TCC215 Floral Wreath


Hi Friends!

It’s time for our March #215 “Floral Heart” Challenge at The Card Concept!

I was inspired by the florals in our photo and the clean white background for my Clean and Layered card.

I bought the Be Bold Blooms dies (Spellbinders) a few months ago and have not had a chance to use them yet. (I thought that this challenge would be a perfect chance).   

This card was so simple to create, just die cut the flowers and leaves from colored cardstock, layer onto a white background and add a heat embossed sentiment. 


That’s it, simple and flat for mailing!

For those of you who follow my blog, you know that I do enjoy playing along with other online challenges and will be linking this card to The Flower Challenge #100 Add Circles (I thought my wreath would be a great circle :-)).


I hope you have stopped by The Card Concept to see how the rest of the Design Team were inspired as well as check out The Flower Challenge gallery to see their gorgeous DT and gallery entries!


Stamp Sets: Words of Encouragement (Stamp Simply)

Inks/Mediums: Versamark

Cardstock/Paper: Forest Green, Flirty Flamingo, Melon Mambo, Balmy Blue, Daffodil Delight, Gable Green, Granny Apple Green, Early Espresso (Stampin’ Up!)

Accessories/Tools: Gemini, Jr.,  (retired Stampin’ Up!), Be Bold Blooms Dies (Spellbinders), Tupelo Wreath Die (retired Memory Box),  Embossing Powder Tool, Clear Embossing Powder, Heat Tool

Thanks again for taking the time to stop by! I hope you are inspired to create a card and join us for our #215 Floral Heart Challenge at The Card Concept!  The deadline to play along is Monday, April 7th at noon EST.  


Thursday, February 13, 2025

Galilee Rose


Hi Friends!

Today I am sharing a quick card designed using a retired background stamp from Divinity Designs, LLC .  

Many of you who follow my blog know that one of my goals to ink up my older stamps and this pretty background stamp is from around 2014 or so.

Sometimes you just need a quick card to send to encouragement a friend and this one was very quick to create, plus a bonus, it is fairly flat to mail.

I enjoy playing along with online challenges and will be linking to The Flower Challenge #99 “Feature the Color Pink” Challenge and the Word Art Wednesday #687-#688“Anything Goes” Challenge.

If you have not had a chance to check out the galleries at the challenge sites yet, I would encourage you to do so- gorgeous inspiration from the Design Teams as well as the galleries!

To create this card:

Ink the Galilee Rose background stamp with Versamark ink, stamp onto a piece of white cardstock, apply clear embossing powder and heat set with a heat tool.

Using water-based markers and a water-soluble graphite pencil, color the background image.


Die cut a piece of light pink cardstock with a wonky stitched rectangle die.  Trim to approx. 4 ⅛” x 5 ⅜”.

Cut around the outline of the background image and mount onto the above die cut panel.

Adhere the entire panel onto a 4 ¼” x 5 ½” piece of black cardstock and mount onto a white card base.

Use a clear glitter pen to add shimmer to the flower petals to finish off the card.

Stamp Sets: Galilee Rose (retired Divinity Designs, LLC formerly Our Daily Bread Designs)

Ink: Versafine Black Onyx, Stampin’ Write Markers- Blushing Bride, Melon Mambo, Granny Apple Green, Mossy Meadow; Water-Soluble Graphite Pencil, Clear Wink of Stella®

Paper/Cardstock: Whisper White, Basic Black, Blushing Bride

Accessories: Big Shot™, MFT Wonky Stitched Rectangle STAX Dies, Embossing Powder Tool, Clear Embossing Powder, Heat Tool

Thanks again for visiting- hugs and I hope you all have a fabulous week!

Wednesday, February 12, 2025

TCC214 Love Is In The Air


Hi Friends!

It’s time for our February #214 “Valentine Fun” challenge at The Card Concept!

I know that not everyone mails Valentine cards, but the theme of love is one that can be used year round for Anniversary, Birthday, Friendship and other cards, for sure!

I was inspired by the vintage style of the photo along with the light pink roses, hearts and gold bird cage for my Shabby and Vintage Mixed Media card! 

I have a personal goal to ink up stamps that have been in my stash in a while as well as use my massive stash of dies, lace, ribbon and other supplies. 

For those of you who follow my blog, you know that I do enjoy playing along with other online challenges and will be linking this card to Alphabet Challenge Blog “V is for Vintage” and the Just Us Girls #761 “Die Week- Hearts” Challenge.


I hope you have stopped by The Card Concept to see how the rest of the Design Team were inspired as well as check out the Alphabet Challenge and Just Us Girls galleries to see their fabulous creations!

To create this card:

Die cut the heart from a piece of cream cardstock. 

Die cut another heart from cream cardstock (to layer behind the initial heart die cut in the above set).  Adhere to the back of the original heart die cut (this will give your heart more strength and dimension).


Ink the Christ the Lord is Risen Today background stamp with Brushed Corduroy and Ground Espresso Distress Oxide ink , lay one of the pieces from the above steps onto the stamp image and randomly press the cardstock onto the stamp.

Trim the cream stamped background panel to approx. 3 ¾” x 5” and distress the edges with a distressing tool (or the side of scissors) and mount onto a piece of kraft cardstock (trim to approx. 4” x 5 ¼”) on a slight angle.

Adhere the heart die cut back into the opening that remained from the initial die cutting process.


Die cut several of the flower images from light pink cardstock and mount onto the heart.

Add a piece of ivory crochet lace to the front of the background panel and adhere a strip of chocolate grosgrain ribbon (wrapping the ends of the ribbon behind the panel).

Add a piece of pleated light pink ribbon onto the background panel.

Mount the entire background panel onto a piece of light pink cardstock.

Use a stencil brush with Brushed Corduroy and Ground Espresso Distress Oxide ink over the edges to distress both panels and mount the entire background panel to a kraft card base.

De-static a piece of cream cardstock with an embossing powder tool, ink the verse sentiment from God Verses 2 with Versamark ink, stamp onto the prepared paper, apply gold embossing powder and heat set with a heat tool.

Once the embossing has cooled, die cut the image with a stitched oval die (also die cut another oval from kraft cardstock to layer behind the sentiment oval).

Mount the sentiment onto the front of the card with dimensional foam.

Finish off the card by adhering pearls to the flower centers.  

Stamp Sets: Christ the Lord Is Risen Today, God Verses 2 (Divinity Designs, LLC)

Inks/Mediums: Versamark, Tim Holtz Distress Oxide- Brushed Corduroy, Ground Espresso

Cardstock/Paper: Cream and Kraft (Hobby Lobby- Paper Studio); Blushing Bride (Stampin’ Up!)

Accessories/Tools: Gemini, Jr., Bloomin’ Hearts Dies (retired Stampin’ Up!) MFT Stitched Oval STAX, Embossing Powder Tool, Gold Embossing Powder, Heat Tool, 3/8” Chocolate Grosgrain Ribbon (from my stash), 3/8” Pleated Blushing Bride Ribbon (retired SU!), .75” Venise Lace- Lucia- Ivory, Pearls

Thanks again for taking the time to stop by! I hope you are inspired to create a card and join us for our #214 Valentine Fun Challenge at The Card Concept!  The deadline to play along is Monday, March 10th at noon EDT.  

Wednesday, January 8, 2025

TCC213 Joy

 Hi Friends!

Happy New Year!  We are back with our challenges at The Card Concept with our #213 Winter Solace Challenge

I was inspired by the beautiful deer, the metallic colors and the textures for my Clean and Layered Mixed Media card.

I decided to ink up a few of my neglected stamps (I am still working on my goal of inking up stamps from my stash).  I was able to incorporate at least three different older stamp sets, an older embossing folder and die set into the design, yea!!

I am also participating with the Word Art Wednesday #681-#682 “Anything Goes” Challenge . 

If you have not had a chance to check out challenge blog to see how the rest of The Card Concept Design Team were inspired as well as check out the Word Art Wednesday challenge gallery to see their fabulous creations!

To create this card:

De-static a piece of white cardstock with an embossing powder tool, ink the stag image from the Yuletide Deer stamp set with Versamark ink, stamp onto the prepared paper, apply pewter embossing powder and heat set with a heat tool.

Repeat the above steps with the “Joy” sentiment from Endless Wishes.


Once the embossing has cooled, use a fine tip bronze water-based marker to color in some of the design elements on the stag image.

Die cut the image with the Hemstitch Square Die, mount onto a piece of silver mirror cardstock (trimmed to slightly smaller than the die cut square).

De-static the lower left-hand area near the stag, ink the sentiment from the retired Endless Wishes with Versamark ink, apply pewter embossing powder and heat set with the heat tool.

For the background panel, use a paintbrush to apply Champagne and Pewter Metallic Ink.  Use a heat tool to dry the ink.

De-static and stamp the Grunge Elements 2 image with Versamark ink over the metallic ink areas,  apply gold and pewter embossing powder, heat set with a heat tool (it is hard to see this part of the stamped images, but they are there).


Trim the background panel to 4” x 5 ¼”, mount onto a 4 ¼” x 5 ½” piece of silver mirror cardstock. 

Adhere the entire panel to a white card base.

Emboss a piece of the silver mirror cardstock with a diamond embossing folder.  Trim and adhere behind the stag image.

To finish off the card, mount the entire stag image onto the card front with dimensional foam.

Stamp Sets:  Yuletide Deer (STAMPlorations), Endless Wishes (retired Stampin’ Up!), Grunge Elements 2 (Sweet ‘n Sassy Stamps)

Inks/Mediums: Versamark, Tsukineko Champagne and Platinum Metallic Inks, Arteza Bronze Extra Fine Marker

Cardstock/Paper: White, Silver Mirror Cardstock (from my stash)

Accessories/Tools: Gemini, Jr., Spellbinders Hemstitch Square Dies, Sizzix Diamond Embossing Folder, Embossing Powder Tool, Gold and Pewter Embossing Powder, Heat Tool

Thanks again for taking the time to stop by! I hope you are inspired to create a card and join us for our #213 {Winter Solace} Challenge at The Card Concept!  The deadline to play along is Monday, February 10th at noon EDT.  

Related Posts Plugin for WordPress, Blogger...