Sunday, June 8, 2014

JUN14VSND- Every Day "Vacay"- Happy Retirement!!

Hi Again Stampers! 

Here is the final card created for the Splitcoaststampers’ Virtual Stamp Night (VSN) Friday Challenges- this one is for the JUN4VSND “Every Day Vacay” – create a Retirement card, Graduation or Congratulations card.   Since I used a background stamp, this card also qualifies for the SUO98 "Stamping in the Background" Challenge :-)

As my husband and I start to think about retirement, we dream of traveling (mainly to the US - we would love to travel cross country and visit all of the natural parks in the continental US) :-)    

With that dream of ours in mind, I decided to use World Map and a few other digital images to create this card.  The finished card seems a bit busy to me but that is what retirement is all about- being busy doing what you want- lol!!!

Again, the only main rule for VSN is that you have to create your card, start to finish (not including photographing and posting) within 60 minutes- this card took almost the entire hour but I did complete within the time frame- woohoo :-) !!


To create this card:

FYI- Most of the card uses My Digital Studio (MDS) images and since I looked at the challenges as a whole in the beginning,  I had designed the cards and printed the images in the beginning onto one piece of Whisper White cardstock.

Color the map using Stampin’ Blendabilities™- Skin Tone Collection, Old Olive, Coastal Cabana.  Once colored, distress the edges using the Distressing Tool and use a Sponge Dauber to apply Early Espresso Classic Ink to the edges.

Cut the map into thirds (you may not need to cut your map if you use the stamp instead- mine was a bit small so I hid the cut lines with other elements).  Uh, oh!!   Now you know all of my secrets- lol!!  (oh, we have a perfect stamp in the new catalog for that :-))

Layer the cut map onto Basic Black cardstock, trim and layer onto Sahara Sand cardstock trim and layer onto Basic Black and finally add to the Coastal Cabana card base.

Use a Sponge Dauber with Early Espresso Classic Ink to “age” the layers. 

Cut out the remaining images from World Tour (used the Big Shot™ with the Circle Collection Framelits™ to cut the All Abroad Image) and layer onto Basic Black cardstock.  

Color the images using Stampin’ Blendabilities™- Daffodil, Pumpkin Pie and Coastal Cabana Collections. 

Apply Crumb Cake Classic Ink with a brayer and Early Espresso Classic Ink using a Sponge Dauber to “age” the paper and age the sentiment from Teeny Tiny Wishes (enlarged before printing with MDS). 

The sentiment layer was created using scraps- Coastal Cabana, Basic Black and Sahara Sand.  Add the sentiment and a few pieces of knotted retired Hemp Twine, adhere to the card front.

Stamp the sentiment, “Congratulations” from the retired Express Yourself hostess set using Memento™ Tuxedo Black ink onto Whisper White cardstock.  Trim and use the Banner Punch to create the banner points, add to a Basic Black cardstock layer, trim and create banner points as well with the Banner Punch. 

Add the sentiment and international stamp images to the card using Stampin’ Dimensionals®. 

Use the retired Color Spritzer Tool with the Early Espresso Stampin’ Write marker to add additional distressing to the sentiments and add the So Saffron Candy Dots to finish off the card.

Stamp Sets:  World Map, World Tour, Teeny Tiny Wishes (all MDS versions), Express Yourself

Ink:  Printer Ink- Black, Crumb Cake, Early Espresso, Stampin’ Blendabilities™- Skin Tone, Daffodil Delight, Pumpkin Pie and Coastal Cabana Collections; Memento™ Tuxedo Black 

Paper: Whisper White, Basic Black, Coastal Cabana, Sahara Sand

Accessories:  Big Shot™, Circle Collection Framelits™, Banner Punch, Distressing Tool, Brayer, Sponge Dauber, 1 ¾” Circle Punch, retired Hemp Twine, Candy Dots


Thanks again for stopping by and I do hope you will have time to join in on the fun!  

Saturday, June 7, 2014

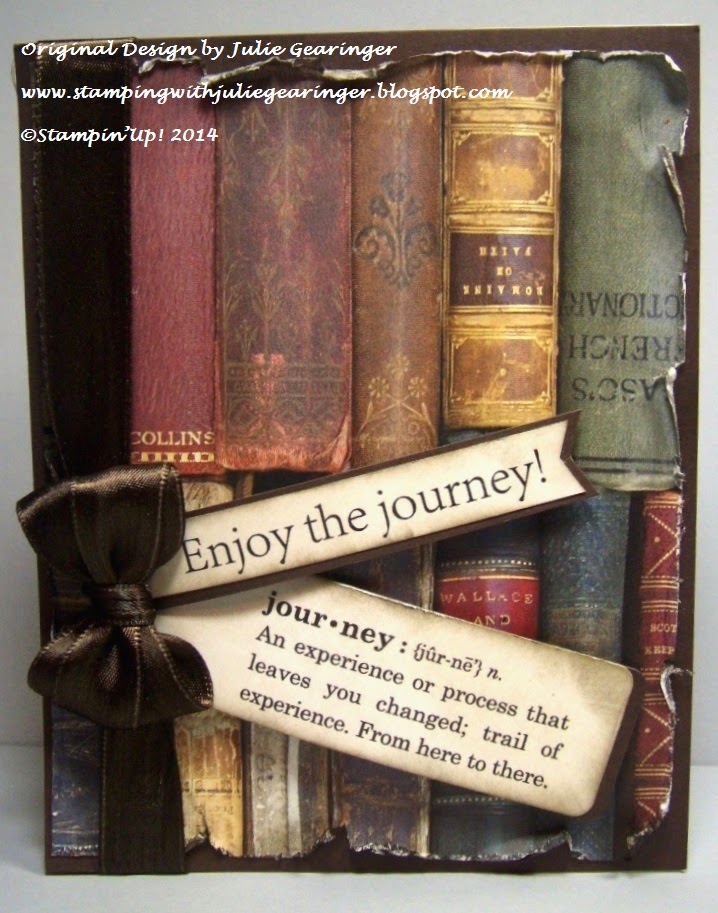
JUN14VSNC Enjoy The Journey with A Great Book!

Hi Again Stampers! 

Here is another card for the Splitcoaststampers’ Virtual Stamp Night (VSN) - the JUN14VSNC Challenge is  “A Good Book- Inspired by A Book”.  The challenge is to create a card inspired by a book, a book cover, text, characters, etc. :-)

When I was a child, we would visit my "Grandpa" in New York (the Hornell area) and he had a few bookcases full of old books around his lounge chair.  I loved to read and would look over those books each time we visited- they were old and not necessary rare at the time, but definitely "treasures" to me!!

Years ago, when Stampin’ Up! first came out with Designer Paper (I believe late 90's early 2000), this page was in a set that had images of rusty metal, etc. and I have been hoarding (oops, I mean saving) this paper ever since-lol!  When I saw this challenge and the memory of my Grandpa’s books came to me, I knew that it was time to finally cut this paper in his memory:-)

Remember, the main rule is that you have to create your card, start to finish (not including photographing and posting) within 60 minutes- this card was quick and easy!!

If you have a chance, check out the rest of the gallery at Splitcoaststampers for this challenge- so many unique designs :-)

This card was quick and easy since I had the My Digital Studio (MDS) images of the sentiments already printed, cut and ready to go!  I thought that the definition of “journey” is perfect for reading a good book- the "journey of the mind".
 
To create this card:

Use the Distressing Tool to distress the edges of the DSP, use a Sponge Dauber to apply Early Espresso Classic Ink over the distressed areas and mount onto a piece of Early Espresso cardstock.

Create the banner point for the sentiment “Enjoy the Journey” using the Banner Punch and mount onto a piece of Early Espresso cardstock (also using the Banner Punch to create the banner points- insert the sentiment from above into the point area to avoid cutting a small banner :-))

Use the Big Shot™ with the Chalk Talk Framelits™ to cut out the “Journey” definition and also a piece of Early Espresso cardstock from the same framelit™, layer the definition onto the Early Espresso leaving a bit showing on the edge.

Using a Brayer, apply Crumb Cake Classic Ink over both sentiments (to “age” the Whisper White cardstock) and apply Early Espresso Classic Ink lightly using a Sponge Dauber.

Add the sentiments to the card front using Stampin’ Dimensionals® and add the 5/8” Early Espresso Satin Ribbon bow. 

Adhere the entire card front to the card base to finish off the card.

Stamp Sets:  Define Your Life, Pedaling Past (sentiments only- both MDS versions)

Ink:  Printer Ink- Black, Crumb Cake, Early Espresso

Paper: Early Espresso, really old retired SU! Background Paper (Weathered? Cannot recall the name)

Accessories:  Big Shot™, Chalk Talk Framelits™, Banner Punch, Distressing Tool, 5/8” retired Early Espresso Satin Ribbon , Brayer, Sponge Dauber


Thanks again for stopping by and I hope you will have time to join in on the fun!  Also, I will be posting one more card from yesterday in a few minutes- have a great weekend!

JUN14VSNB Hot & Sticky Summer :-)

Hi Again Stampers! 

It is that time again for a Virtual Stamping Event at Splitcoaststampers – Summer Vacation, Friday andSaturday June 6th and 7th.     As mentioned in my last post, I had fun participating last year and decided to go for it again! 

The main rule is that you have to create your card, start to finish (not including photographing and posting) within 60 minutes, but even though this may seem to be difficult to accomplish, I found that that time limit was perfect!!   Allows me to focus more on the design and make quicker decisions-plus I was able to use up a few scraps as well as in this case, “stash” items that I have had for years!


The JUN14VSN14B Challenge is “Hot and Sticky Summer” and you need to use a sticker of some sort (homemade, one from your stash, etc.).   I also decided to incorporate the CC481 "So Smoky & Slushy" Splitcoaststampers Challenge- So Saffron, Strawberry Slush and Smoky Slate and I found  a very old sheet of square transparent Mosaic Tiles that I decided to use as the “sticker”….

Again, I turned to My Digital Studio (MDS) for the Postage Due image but you could easily use the stamp as well (I reduced the size of the image in MDS and printed out onto Whisper White cardstock :-)).   

Color the Postage Due image using Stampin’ Write Markers- just use the brush tip and color the entire image using continual swiping motions with the So Saffron marker, followed by the Strawberry Slush marker (only color the flower in the corner with Strawberry Slush and the stamens with the So Saffron).

Punch out the image using the 1” Square Punch and layer into a pattern onto a piece of Smoky Slate cardstock (I made a mistake and found it as I started to layer the punched images onto the Smoky Slate cardstock-  I had not lined up the punch in a sequential manner as I thought I had, so I matched up the printed image versus aligning in a perfect square).

Since I found the error above, I hand cut around the tiles (after I added the Mosaic Tile Stickers- would recommend you trim first before adding the Mosaic Tiles- oops!!)

I found a Smoky Slate card base ready from a previous crafting session (rejected from that project but perfect for this one :-)) so I decided to add a Basic Black layer (rounding the corners using the Envelope Punch Board).

Layer the sentiment (again, from MDS printed onto Whisper White cardstock) onto a few scrap strips of Smoky Slate and Basic Black cardstock – you cannot tell that they are scraps, can you?

Use the Big Shot™ with the Chevron Textured Impressions™ Embossing Folder to emboss a piece of retired So Saffron Designer Series Paper (DSP) and add the layered sentiment onto the embossed DSP.  Trim, add the 5/8” retired Basic Black Satin Ribbon double bow and adhere to the card front.

Add the focal image panel with the Mosaic Tile Stickers using Stampin’ Dimensionals™. 

Adhere a few Pearls to the upper left hand corner of the card as well as the lower right near the sentiment to finish off the card.

Stamp Sets:  Postage Due, Word Play (both MDS versions)

Ink:  Printer Ink- Black, Stampin’ Write Markers- So Saffron, Strawberry Slush

Paper: Whisper White, Basic Black, Smoky Slate, So Saffron DSP (retired)

Accessories:  Big Shot™, Chevron Textured Impressions™ Embossing Folder, Envelope Punch Board, 1” Square Punch, 5/8” Basic Black Satin Ribbon (retired), Pearls, 1” Square Transparent Mosaic Tile Stickers (from my stash)  


Thanks again for visiting and I will be posting a few more cards this evening- have a great weekend!

JUN14VSNA- One Touch of Nature (A Moth to the Flame) :-)

Hi Stampers! 

It is that time again for a  Splitcoaststampers Virtual Stamping Event - this year's theme is Summer Vacation and is being held on Friday and Saturday June 6th and 7th .   

I was able to participate last year and decided to go for it again!  One main rule is that you have to create your card, start to finish (not including photographing and posting) within 60 minutes, but I found that that time limit was perfect and I loved it!!   Allows me to focus on the design and work more efficiently- plus I was able to use up a few scraps in the process- yea!!

If you can find the time, here are the details- we would love to have you join in to play (deadline to upload to the Splitcoaststamper Gallery is 10Pm EST Saturday, June 14th).  

Here is my card for the first challenge- JUN14VSNA “Sittin’ by the Campfire”  and I decided to incorporate the colors of fire along with a moth (possibly butterfly).   

I recall the memories of camping as a kid and how the flames of the fire would draw some unique and beautiful moths.  

This image is from the My Digital Studio (MDS) Wonderful Wings stamp brush set (a currently available set, in fact, I was able to utilize MDS for all of my “hybrid” cards for these challenges and it truly saved time- some of the images I already had printed out and ready to go :-) ) .

Color the moth image using Stampin’ Blendabilities™ Collection-Daffodil Delight, Pumpkin Pie and Cherry Cobbler.  Increase the intensity of the black in the wings using a Stampin’ Write Basic Black marker, add the shadows with the Sahara Sand Stampin’ Write Marker and a few white highlights with the Chalk Marker.

Trim the panel, mount onto Basic Black cardstock, trim and mount onto Tangerine Tango cardstock, trim and mount onto Basic Black cardstock.
Mount the sentiment (from MDS Touch of Nature) in the same order as above.

Adhere a panel of retired Real Red Polka Dot Parade Designer Series Paper (DSP) onto the Basic Black card base and mount both the focal image and sentiment panels onto the card front using Stampin’ Dimensionals. 

Add the retired Antique Copper Hodgepodge Hardware embellishment to finish off the card.

Stamp Sets:  Wonderful Wings, Touch of Nature (both MDS versions)

Ink:  Printer Ink- Black, Stampin’ Write Markers- Basic Black, Sahara Sand; Stampin’ Blendabilities™ Collections- Daffodil, Pumpkin Pie and Cherry Cobbler; ™Chalk Marker

Paper: Whisper White, Basic Black, Tangerine Tango, retired Polka Dot Parade DSP

Accessories:  Retired Antique Copper Hodgepodge Hardware

Thanks again for stopping by!!   I hope you have enjoyed this card and come join in on the fun with us!!  

I will be posting the remaining three cards from the Friday evening challenges throughout this evening so come visit again soon- love and "virtual hugs" to all of you- God Bless!

Thinking of You- Life in the Forest :-)


Hi Stampers!

I love the combination of colors in this week’s ColourQ CQC244 Challenge and decided to combine it with the FMS139 Freshly Made SketchChallenge.   The colors are so fresh and summery, I decided to create a little scene with the new stamp set, Life in the Forest:-)

I hope you have had a chance to visit both of the challenge sites- again, great inspiration from all!

To create this card:

Use the Big Shot™ with the Arrows Textured Impressions™ Embossing Folder to emboss a piece of Whisper White cardstock, trim and add the banner strips per the sketch-created from retired Designer Series Paper (DSP) and mounted onto Night of Navy cardstock.

Mount the panel onto a piece of Night of Navy cardstock, trim and mount again onto Tangerine Tango cardstock and adhere to the Night of Navy card base.

Create a tag from Whisper White cardstock using the Scalloped Tag Topper Punch and layer onto another tag created from Night of Navy cardstock, rounding the corners using the Envelope Punch Board.

Punch a smaller piece of retired Bashful Blue DSP using the Scalloped Tag Topper Punch and adhere to the tag.
 
Create the "grassy" area using scraps of Old Olive cardstock (embossed using the Big Shot™ and the retired Square Lattice Textured Impressions™ Embossing Folder and hand torn), round the corners using the Envelope Punch Board and adhere to the lower part of the tag only applying adhesive to the bottom portion of the “grass” .

Stamp the fox and trees from Life in the Forest using Tuxedo Memento™ Black onto Whisper White cardstock and color using Stampin’ Write markers and Stampin’ Blendabilities™ (Stampin’ Write Tangerine Tango for the fox, followed by the Medium Pumpkin Pie Blendabilities™ and the Old Olive Blendabilities™ for the trees).  

“Fussy cut” out each image and arrange a few trees (tucking the trunks under the “grass”) using adhesive and mount the remaining trees and fox using Stampin’ Dimensionals®. 

Add a piece of retired 3/8” Tangerine Tango Dotted Scallop Ribbon to the tag and tie Natural Linen Thread around the ribbon with a bow.

Mount the tag to the card front using Stampin’ Dimensionals® and add the sentiment to finish off the card.

Stamp Sets: Life in the Forest, Wetlands (MDS version)

Ink: Printer Ink- Black, Stampin’ Blendabilities™- Old Olive and Pumpkin Pie Collections; Tangerine Tango Stampin’ Write Marker  
    
Paper: Whisper White, Night of Navy, Old Olive, Designer Series Paper- retired Old Olive DSP Stack, retired Bashful Blue from Hostess Level I Pack and retired Retro Fresh DSP

Accessories: Big Shot™,  Arrows and retired Square Lattice Textured Impressions™ Embossing Folders, Punches- Scalloped Tag Topper Punch, Hexagon, Large Oval Punch; Envelope Punch Board,  3/8” Tangerine Tango Dotted Scallop Ribbon, Natural Linen Thread


Thanks again for stopping by- now off to participate in Splitcoaststampers’ Summer Vacation Virtual Stamp Night (VSN)    Have a great weekend!

Tuesday, June 3, 2014

SUO98 Stamping in the Background- A CAS Floral Card :-)

Hi Stampers! 

It’s that time again- the new SUO98 Stamping in the BackgroundChallenge!!

For this challenge we would like to see your projects created with Stampin’ Up! Only products and to use stamps to create your background paper.   I decided to turn to My Digital Studio (MDS) again but this card could easily be made with the stamps as well (the flowers, leaves and sentiment would be smaller) but I think it would be fine :-)  I like using MDS for cards since it is quick and easy :-)

I hope you will have the time to visit and check out the rest of the fantastic Design Team projects-guess what?  We have a new designer joining our team this week (welcome Stacey Ailes!) !!

To create this project:
In My Digital Studio (MDS), open a blank 8.5 x 11 custom page and insert the Dictionary background stamp image, re-size to fit the A2 (approx. 3 ⅜”  x 5 ¼”).  Insert the scroll from Everything Eleanor over the Dictionary image and repeat/flip for the result that you desire
On the same page but lower on the sheet, insert the flowers from Everything Eleanor and a few leaves (I used French Foliage which is part of a digital kit).  Insert the sentiment from Wetlands and remember to leave plenty of space around the images so you can fussy cut out the flowers/leaves and create the banner for the sentiment.
Print out the sheet onto Whisper White cardstock, trim the background Dictionary panel and mount onto Basic Black cardstock and again onto Rich Razzleberry cardstock and mount onto the Basic Black card base.
Add the silver highlights to the scroll image using the Silver Marker.
Color the flowers with the Rich Razzleberry and Daffodil Delight Blendabilities™ Collection and the leaves with the Old Olive Blendabilities™ Collection.  Carefully cut out the images by hand.
Create the sentiment banner using the Hexagon Punch and layer onto a piece of Basic Black cardstock (cutting the banner points with the Hexagon Punch as well).
Layer the flowers, leaves and sentiment using Stampin’ Dimensionals and add a few Pearls to the corners to finish off the card.
Stamp Sets: Everything Eleanor, Dictionary, French Foliage (all MDS versions)
Ink: Printer Ink- Basic Black, Blendabilities™ Collections- Rich Razzleberry, Daffodil Delight and Old Olive; Silver Marker
Paper/Cardstock:  Whisper White, Basic Black, Rich Razzleberry
Accessories:  Hexagon Punch, Pearls

Thanks again for stopping by - I hope you have a chance to join in on our “Stamping in the Background”SU-Only Challenge!

Monday, June 2, 2014

By The Tide- An Experiment in Glue Art :-)


Hi Stampers!!

I wanted to try another new technique and decided to use this week’s Splitcoaststampers MIX70 Glue Art Challenge and SC490 Sketch along with the FabFri42 Color Challenge.

Again, I hope that you will find the time to visit each site and see all of the different designs and inspiration!

To create this card:

Spritz water onto a piece of Watercolor Paper and use an AquaPainter™ with Coastal Cabana and Pool Party Classic Ink to cover the entire piece- dry with the Heat Tool.

Once dried, apply Crisp Cantaloupe Classic Ink with the AquaPainter™ and spritz with water, dry with the Heat Tool.

Ink the coral stamp image from By The Tide using Crisp Cantaloupe Classic Ink and stamp over the Crisp Cantaloupe area of the card front.  Ink the script stamp using Summer Starfruit Classic Ink over the Pool Party/Coastal Cabana area of the card front.

 Apply Hot Glue over the Crisp Cantaloupe area to mimic additional coral, once dried, apply Gold Encore™ Ink over the glue to highlight the “coral”.

Ink the seahorse, fish and Nantucket images from By The Tide using Tuxedo Memento™ Black Ink onto Whisper White cardstock.  Use Sponge Daubers with Pool Party, Crisp Cantaloupe and Coastal Cabana Classic Ink to color the images.   Fussy cut the images out and set aside.

Cut out the central focal image using the Big Shot™ with the Window Frame Collection Framelits™ and also cut another window frame from Coastal Cabana and Basic Black cardstock.  

Cut the Coastal Cabana and Basic Black frames in half horizontally and layer behind the focal image. 

Use the Big Shot™ with a Square Lattice Textured Impressions™ Embossing Folder to emboss a piece of Crisp Cantaloupe cardstock and mount onto a piece of Coastal Cabana cardstock and again onto the Basic Black card base.

Another view of the glue art
Add the layer of Soho Subway Designer Series Paper (DSP) onto a piece of Coastal Cabana and Basic Black cardstock.   Also add another layer using the remaining piece of Watercolor Paper with the glue (cut from the focal image piece), mounted onto a piece of Coastal Cabana and Basic Black cardstock as well.

Sponge Pool Party Classic Ink onto one half of a White Tea Lace Paper Doily onto the side of the focal image and add to the side of the focal image mounting the entire focal image onto the card front using Stampin’  Dimensionals®. 

Add the layered Nantucket image, seahorse and set of fish to the card front. 

Stamp the sentiment from Wetlands using Tuxedo Memento™ Black Ink onto Whisper White and stamp the script stamp using Summer Starfruit over the sentiment as well as the Nantucket image using Pool Party. 

Use a Sponge Dauber with Crisp Cantaloupe Classic Ink and punch out with an XL Oval Punch, layer onto a piece of Coastal Cabana and Basic Black cardstock punched also with the XL Oval Punch.

Add the knotted piece of retired Hemp Twine and add the sentiment to the front of the card using Stampin’ Dimensionals®. 

 Stamp Sets:  By The Tide, Wetlands

Ink: Coastal Cabana, Crisp Cantaloupe, Pool Party, Summer Starfruit, Tuxedo Memento™ Black Ink

Paper: Watercolor Paper, Basic Black,  Coastal Cabana, Crisp Cantaloupe, Soho Subway DSP

Accessories: Big Shot™, Square Lattice Textured Impressions™ Embossing Folder, Windows Frame Collection Framelits™,  XL Oval and ¾” Circle Punch, White Tea Lace Paper Doily, Hot Glue, AquaPainter™, retired Hemp Twine


Thanks again for taking the time to visit- I hope you have a great Monday!!

Sunday, June 1, 2014

Happy 2014 Graduation!! A Proud Day for our Family :-)

Hi Stampers!!

This weekend, my husband and I had the privilege of celebrating the milestone of my twin niece’s Home School HS graduation! 

What wonderful, godly young ladies they have both become and we are so blessed to have them in our lives!  We still remember the days when they were young (seems like yesterday) and cannot believe how fast the time has flown by…  We love them so and are thankful that they were able to be taught by so many talented women- what a testimony!  Now they are off to a well known four year university and we are looking forward to seeing how the Lord will work in their lives!

Since they are twins, I decided to create the same basic card and used the Gelli Arts® Gel Printing Plate along with acrylic paints and a Parisian Embossing Folder :-)  The colors they chose were Silver, Black and Purple (I did not have any Purple Acrylic Paint so mixed Burgundy with Black :-))

Again, I had the Splitcoaststampers Mix-Ability MIX26 Stencils Challenge on my mind and will share a third card design with the same folder (different sentiment that could apply to graduation as well).

Again, I hope you will take the time to check out the Splitcoaststampers Mix-AbilityChallenge site to see the fantastic samples of the Design Teams and other entrants. 

The basic steps to the cards:

Use the Big Shot™ with the Sizzix™ Tim Holtz® Textured Fades™ Eiffel Tower Embossing Folder to emboss a piece of Whisper White cardstock and set aside (for use in a few minutes).

Apply a few drops of silver acrylic paint onto the Gelli Arts® Gel Printing Plate and use a Brayer to thinly spread the paint but make sure it is thick enough not to dry too quickly. 

Lay down a piece of Watercolor Paper over the printing plate (this card was created using a scrap piece of the Watercolor Paper), smooth with the brayer or your hand to cover the paper and carefully peel away from the plate.  Reapply the silver paint and continue with a few more prints.
As you can see, each card has different variations of color, so just like my twin nieces, they are not exactly the same :-)


Apply a few drops of Soft Black, Burgundy and Soft White Acrylic Paints and smooth with the brayer to mix the paint.  Lay the embossed piece of Whisper White cardstock over the paint, smooth with your hand or a brayer, lift up and set aside for use again.
Lay the silver side of the Watercolor Paper onto the printing plate, smooth with your hand or brayer and lift up (the raised areas of the embossing piece should show against the silver paint).

Once the initial panels were finished and dry (you can use a Heat Tool to speed up the drying process), re-insert the printed piece back into the same embossing folder that was used as the “stencil” and re-emboss using the Big Shot™.

Apply another thin layer of SilverPaint onto the printing plate and roll the paint from the Brayer onto the original Whisper White embossed panel (the one that was used as the “stencil” and is now covered with paint from the steps above) – this way you can use the original embossing panels as well as the print panels- nothing is wasted!!

After all of the panels are dry, if needed, add a bit of Blackberry Bliss Classic using the AquaPainter™ and dry with the Heat Tool.   Gently rub the Silver and Gold Encore™ Pigment ink pads across the top of the embossing to give the panel even more of a metallic look.  Trim the panel and apply to a layer of Blackberry Bliss cardstock and again onto a layer of Basic Gray cardstock.

Using My Digital Studio (MDS) insert the stamp brush sentiment from Go Graduate Plus, create a mask using a square punch (fill with Whisper White) to cover the words below the main sentiment and print out onto Whisper White cardstock.

Use the Big Shot™ with the Chalk Talk Framelits™ to cut out the sentiment and also cut another piece of Blackberry Bliss cardstock.  Layer the two and mount onto the card front using Stampin’ Dimensionals®.

Add the Basic Gray Satin Ribbon bow to the corner of the sentiment and mount the entire panel onto the Blackberry Bliss card base.

Use the Big Shot™ along with the Typeset Alphabet Bigz™ Die to cut out the numbers from Basic Gray and Blackberry Bliss cardstock. 

Offset layer onto one another and add to the card with Stampin’ Dimensionals®.  Add a few Rhinestones to finish off the card (a girl has to have a few diamonds, right?) :-)

Stamp Sets: Go Graduate Plus (MDS version)

Ink: Printer Ink- Black, Encore™ Pigment Ink- Silver, Gold, Acrylic Paints- Silver,  Soft Black, Burgundy, Soft White, Classic Ink- Blackberry Bliss

Paper: Whisper White, Blackberry Bliss, Basic Gray, Watercolor (card #3- Midnight Muse)

Accessories: Big Shot™, Chalk Talk Framelits™, Typeset Alphabet Bigz™, Sizzix™ Tim Holtz® Texture Fades™ Eiffel Tower Embossing Folder, Gelli Arts® Gel Printing Plate, Brayer, Basic Gray Satin Ribbon, Rhinestones
Third card created with same folder- used Midnight Blue Classic Ink and Paint as well as Blackberry Bliss and sentiment from Loving Thoughts, plus a bit of Blackberry Bliss Stitched Satin Ribbon and piece of retired Styled Silver Hodgepodge Hardware :-) 


Thanks again for visiting- I hope all of you have a fabulous Sunday!
Related Posts Plugin for WordPress, Blogger...