Showing posts with label Come to Bethlehem. Show all posts

Tuesday, December 23, 2014

PPA232 Come To Bethlehem- A Quick Card from Scraps :-)

Hi Stampers!

I have been working in the craft room preparing for Christmas and decided to take a quick break to create a card for this week’s Pals Paper Arts PPA232 Sketch Challenge

This sketch will be the last one from one of their designers, Margaret Moody- I will miss Margaret’s sketches- they are always so clean and intricate!  Thanks Margaret for all of your sketches in the past and your inspiration!!

If you have not had a chance to visit the Pals Paper Arts site yet, I would encourage you to do so- they have two fabulous design teams and wonderful galleries each week!

FYI- For this card, I pulled out my organized scraps (trust me, not all of my scraps are organized but I am working on it :-)).   I already had the sentiment and wise men image printed and ready to go from a previous digital hybrid card and the snowflake background panels were pieces left over from a "homemade designer paper" project years ago...this is why I keep my scraps around- it helps me create quick cards!!

To create this card:

Using a brayer, randomly and with quick strokes, apply Melon Mambo, Night of Navy and Rich Razzleberry Classic Ink to a piece of Whisper White cardstock (use light strokes since all of these colors are very dark- make sure that you allow some of the white to remain).  Do not worry if there are some streaks since the next step will hide them :-)

Using the Embossing Buddy®, de-static the brayered panel that you just created above and stamp the images from the retired set, Serene Snowflakes using Versamark™ ink.   Apply Stampin’ Emboss® Black Embossing Powder and heat with the Heat Tool.  

Trim the pieces per the sketch and mount onto a piece of Basic Black cardstock.

Using My Digital Studio (MDS), position the sentiment and the focal image from the Come to Bethlehem digital stamp set onto a blank 8.5 x 11 document.  Re-size the focal image and print onto Whisper White cardstock.

Trim the images and mount onto Basic Black cardstock.

Use the Big Shot™ with the Stylish Stripes Textured Impressions™ Embossing Folder to emboss a piece of Whisper White cardstock, trim and mount onto a piece of Basic Black cardstock, trim and mount onto the Rich Razzleberry card base.

Mount the embossed strips and sentiment onto the card front.

Add the focal image panel using Stampin’ Dimensionals®.

*** NOTE *** After assembling the card, I noticed a bit of “dirt” on my sentiment and focal image panels (most likely from storage since they were a few years old or from my work surface- lol!)  To salvage, I added some “stars” using the Silver Stampin’ Dazzle Pen.  Again, now you know all of my secrets :-)

Add the Rhinestone to the center of the star to finish off the card.

Stamp Sets: Come to Bethlehem (MDS version), Serene Snowflakes

Ink: Versamark™, Melon Mambo, Night of Navy, Rich Razzleberry Classic Ink; Printer Ink- Black; Stampin’ Dazzle Silver Pen

Paper/Cardstock:  Whisper White, Basic Black, Rich Razzleberry

Accessories:  Big Shot™, Stylish Stripes Textured Impressions™ Embossing Folder, Embossing Buddy®, Stampin’ Emboss® Black Embossing Powder, Heat Tool, Rhinestone


Thanks again for visiting- I hope all of you have a wonderful Christmas week!!

Thursday, May 29, 2014

Metallic Reindeer- Homemade Paper with A Printing Plate

Hi Stampers!!

It has been a busy week for me but I finally had a chance to play around with my new Gelli Arts® Gel Printing Plate (along with some old acrylic paints I had on hand and various embossing folders) to create some homemade DSP panels using plain Watercolor Paper :-).   

I heard about the Gelli Arts® Gel Printing Plate from the Mix-Ability Challenges at Splitcoaststampers and have found it very addicting!!  So far the only technique I have been experimenting with is using embossing folders but I cannot wait to try all of the other different techniques with stencils, found objects, etc.

I decided to create a few background panels for the CCC14 Christmas CardChallenge and tne Mix-Ability MIX26 Stencil Challenge (I used the embossing folders as stencils) at Splitcoaststampers and also incorporated the Festive Friday FFC32 Inspiration Photo along with the Seize the Sketch STS20 Challenge.   

Isn't this inspiration photo gorgeous??  I decided to focus on the silver reindeer on the table along with neutrals since I had an embossing folder that I have not used yet in my stash :-)

Again, if you have not stopped by any of the above listed challenge sites, I urge you to do so- great inspiration from all!

To create this card:

Use the Big Shot™ with the Anna Griffin™ Embossing Folder and emboss a piece of Whisper White cardstock and set aside (for use in a few minutes).

Apply a few drops of gold acrylic paint onto the Gelli Arts® Gel Printing Plate and use a Brayer to thinly spread the paint but make sure it is thick enough not to dry too quickly. 

Lay down a piece of Watercolor Paper over the printing plate, smooth with the brayer or your hand to cover the paper and carefully peel away from the plate.  Reapply the gold paint and continue with a few more prints.

 FYI- if you are interested in using the Gelli Arts® Gel Printing Plate, there are a few video links in the Splitcoaststampers forum as well you can find many searching YouTube®.

Apply a few drops of Pueblo Red and Midnight Blue Acrylic Paints and smooth with the brayer to mix the paint.  Lay the embossed piece of Whisper White cardstock over the paint, smooth with your hand or a brayer, lift up and set aside for use again.

Lay the gold side of the Watercolor Paper onto the printing plate, smooth with your hand or brayer and lift up (the raised areas of the embossing piece should show against the gold paint).

Continue to repeat the above steps on the additional Watercolor Paper gold panels (if you created more than one)- FY- I have found that I am creating approximately 10-12 background panels in one session with the printing plate as I experiment with different folders and paint colors (I will be sharing more of the experiments soon) :-).

Some of the panels will be darker than others (depending on the thickness of the paint at the time of laying down the embossing folder, etc.).   Again, this is a fun technique that it a bit of a collage-type appearance with random patterns- just remember there is no right or wrong :-)

Once the initial panels were finished and dry (you can use a Heat Tool to speed up the drying process), trim to 4 ¼” x 5 ½” , re-insert into the same embossing folder that was used as the “stencil” and re-emboss using the Big Shot™.

Apply another thin layer of Gold Paint onto the printing plate and roll the paint from the Brayer onto the original Whisper White embossed panel (the one that was used as the “stencil” and is now covered with blue/red paint) – this way you can use the original embossing panels as well as the print panels- nothing is wasted!!

You may find that you like the prints just as they are but I wanted to add a bit more texture and color.   On this panel, apply Blackberry Bliss and Midnight Muse Classic Ink using the Aqua Painter™, spritz the ink with water to allow it to spread and dry with the Heat Tool.

After this layer is dry, gently rub the Gold and Silver Encore™ Pigment ink pads across the top of the embossing to give the panel even more of a metallic look.  Trim the panel and apply to a layer of Blackberry Bliss cardstock. 

Use the Big Shot™ with the Woodgrain Textured Impressions™ Embossing Folder to emboss a piece of Crumb Cake cardstock and mount this piece onto the Blackberry Bliss card base.

Add the printed panel onto the card front using Stampin’ Dimensionals® and adhere the 3/8” Blackberry Bliss Stitched Satin Ribbon.

Mount the sentiment from Come to Bethlehem using Stampin’ Dimensionals® on the banner end and regular adhesive along the panel along with the retired Brushed Bronze button and Linen Thread.  

FYI- I used My Digital Studio (MDS) to print out the sentiment onto Whisper White cardstock and the Hexagon punch to create the banner points then mounted onto Blackberry Bliss cardstock, trimmed and created the banner points with the Hexagon Punch. 

Add the retired Brushed Bronze button with the Linen Thread to finish off the card.

Stamp Sets: Come to Bethlehem (MDS verison)

Ink: Printer Ink- Black, Classic Ink- Blackberry Bliss, Midnight Muse, Encore™ Pigment Ink- Gold and Silver, Acrylic Paints- Gold, Pueblo Red, Midnight Blue

Paper: Whisper White, Blackberry Bliss, Crumb Cake, Watercolor

Accessories: Big Shot™, Woodgrain Textured Impressions™ Embossing Folder, Anna Griffin™ Embossing Folder, Gelli Arts® Gel Printing Plate, Brayer, 3/8” Blackberry Bliss Stitched Satin Ribbon, retired Brushed Bronze Button, Linen Thread, Hexagon Punch

Thanks again for taking the time visit-  I hope all of you have a great week and stop by again soon- God Bless!

Wednesday, December 25, 2013

Merry Christmas 2013 !!

Merry Christmas!!!

I hope all of you have a wonderful Christmas with your family and friends celebrating the true reason for the season, the birth of our Lord and Savior, Jesus Christ.  

We have had such a blessed year and look forward to 2014!

I am working on finishing up a few last minute gift card holders and the house smells wonderful from the baking earlier (Magic Cookie Bars are my family’s favorite- could not arrive without them :-)).


I thought I would share a few of my favorite Christmas cards from this past year and will be posting new cards later this week- again, I hope you have a very Merry Christmas! 


The retired set, Come to Bethlehem with the new stamp O Holy Night - see the original post here 


Another version using O, Holy Night and the new Silver Foil Paper - details are here

A more vintage style with the new set, Joyful Christmas (here are the details)


Another Vintage Style (this one uses Masking Techniques- again here are more details)

This past year I have focused on creating Christmas cards each month and it has worked well for me- I will be doing this again in 2014 and hopefully will mail them on time next year!!  Still a big issue for me- I tend to hand deliver but still have several to mail :-)

This one was created with My Digital Studio, printed and distressed/colored- see details 

If interested, I have many more Christmas cards on my blog (68 different designs to be exact :-))  Here is the link to all of them and again, please feel free to CASE (Copy and Share Everything) but for personal use only :-)   

Thanks again for stopping by- Merry Christmas to all!! May the Lord richly bless you today and in the days ahead :-)


Wednesday, October 2, 2013

Peace on Earth- Wonderful Blessing for the HSSSC169 Sketch


Hi Again Stampers!

I wanted to create one more card this evening using the new single stamp, Wonderful Blessing along with the Hand Stamped Sentiments HSSSC169 Sketch Challenge …I love sketch challenges since they are such a great inspiration :-)   Again, if you have not visited the Hand Stamped Sentiments site yet, I highly recommend that you do so- great Design Team samples and entries as well!

To create this card:

Using the Embossing Buddy®, de-static a piece of Island Indigo cardstock and stamp the Wonderful Blessing image using Versamark™ ink.  Apply Stampin’ Emboss® White Embossing Powder and heat with the Heat Tool.     

Use the Big Shot™ with the Circles Collection Framelits™ to cut out the embossed image and cut another circle the same size from Island Indigo cardstock.  Cut the Island Indigo circle in half horizontally to layer behind the embossed image and adhere to a Tea Lace Paper Doily.

Emboss a piece of Winter Frost DSP using the Big Shot™ with the Pretty Print Textured Impressions™ Embossing Folder and a piece of Whisper White cardstock with the Argyle Textured Impressions™ Embossing Folder . 

Mount the Winter Frost DSP layer onto a piece of Island Indigo cardstock and lightly sand with the Sanding Block.  Add the embossed Whisper White layer and a piece of 1/8” Silver Ribbon.

Cut the banners from Winter Frost DSP  (add the banner points using the 1” Square Punch or cut by hand) and adhere to a layer of Island Indigo cardstock.

Mount onto the card per the sketch and add the focal image using Stampin’ Dimensionals®. 

Mount the banner sentiment (retired set, Come to Bethlehem stamped with Island Indigo Classic Ink onto Whisper White and mounted onto Island Indigo cardstock) and add the Rhinestone to the star to finish off the card. 

Stamp Sets: Wonderful Blessing (single stamp), Come to Bethlehem (retired)

Ink: Versamark™, Island Indigo

Paper/Cardstock:  Whisper White, Island Indigo, Winter Frost DSP

Accessories:  Big Shot™, Textured Impressions™ Embossing Folders- Pretty Print, Argyle;  Circle Collection Framelits™, Embossing Buddy®, Stampin’ Emboss® White Embossing Powder, Heat Tool,   Sanding Block, 1” Square Punch, 1/8” Silver Ribbon, Tea Lace Paper Doily, Rhinestone


Thanks again for taking the time to visit- have a wonderful Wednesday!!

Thursday, August 22, 2013

O Holy Night- Another Christmas in August Card

Hi Stampers!!

I wanted to create another quick Christmas card that I could easily multiply for one of my designs for the August CCC13 Splitcoaststampers Christmas Card Challenge (I had committed to 20-25 cards per month and figured it would be easier to make 5-6 of each design versus all one design since I tend to become easily bored :-))

Once I saw the terrific PPA169 sketch at this week’s Pals Paper Arts site , I knew it would work well for the new O Holy Night stamp (again, if you have not visited their site yet, I encourage you to do so- love their Design Team samples and they always have a large gallery of entries- so much inspiration!! )

To create this card:

Using the Embossing Buddy®, de-static a piece of Whisper White cardstock and stamp the Christmas scene from Come to Bethlehem using Versamark™ ink.  Apply Stampin’ Emboss® Silver Embossing Powder and heat with the Heat Tool.    

 Repeat the same steps using a piece of Vellum and the O Holy Night stamp (O Holy Night is one of my favorite hymns), embossing the image with Stampin’ Emboss® Black Embossing Powder.

Once the images are cooled, trim and adhere to Basic Black cardstock.  Add the 5/8” Basic Black Satin Ribbon bow to the top of the vertical panel. 

Mount a piece of Winter Frost DSP onto a piece of Basic Black cardstock and adhere to the Whisper White card base and attach the vertical and horizontal panels per the sketch (using Stampin’ Dimensionals® for the vertical panel). 

Add the Rhinestones to finish off the card. 

Stamp Sets:  O Holy Night, Come To Bethlehem (retired)

Ink: Versamark™

Paper: Whisper White, Basic Black, Vellum, Winter Frost DSP


Accessories: Embossing Buddy®, Heat Tool, Stampin’ Emboss Black and Silver Embossing Powder, Rhinestones, 5/8” Basic Black Satin Ribbon (retired)

Thanks again for taking the time to stop by- your visit is such an encouragement to me!! God Bless and have a wonderful Thursday !!

Thursday, February 28, 2013

Feb13 Christmas- Card #3- Clean and Simple "Hybrid"


Hi again, Stampers!!

Here is my third design for the February 2013 Splitcoaststampers CCC13 Christmas Card Challenge- I will complete the entire set later this evening but wanted to post before February was officially over but I had a bit of an issue with my computer so I am a few minutes late :-)  

As I mentioned in a previous post, this challenge is basically a commitment to yourself to complete your Christmas cards early (so you can mail them in November).  Last year, I did not have enough cards to mail, so I am re-committing myself in order to be able to start to mail in late November this year and I will need over 200 cards!

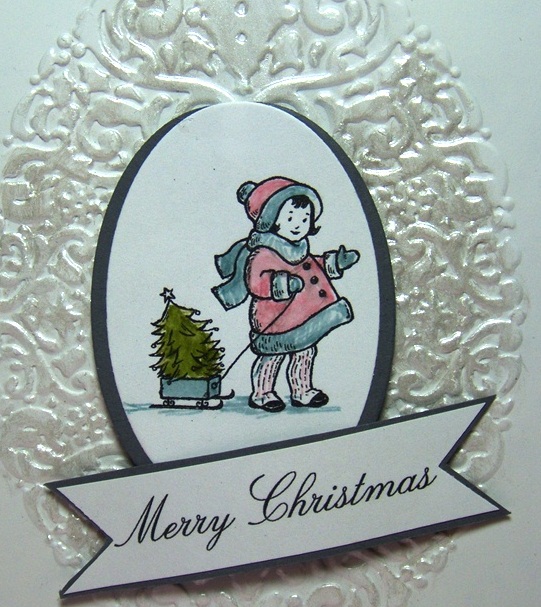
This is another Clean and Simple (CAS) card and although I have the stamp sets, I decided to utilize My Digital Studio (MDS) to print the images and create a “hybrid” card.

To create this card:

Using MDS, insert the stamp brush images and arrange the layout to fit onto one page and print onto a piece of 8.5” x 11” Whisper White cardstock. 

 Use Stampin’ Write Markers in Baja Breeze, Pretty In Pink and Lucky Limeade to color in the image and take an Aqua Painter to soften the colors.

Use the Big Shot™ with the Oval Framelits™ to cut out the images of the little girl and cut another oval the same size out of Basic Gray cardstock to layer behind the image (cut this oval in half to just peek out on the sides).

Close-up of Shimmer Paint
Also with the Big Shot™ and the Holiday Frame Textured Impressions™ Embossing Folder, emboss a piece of Whisper White cardstock for the background.  Use the Aqua Painter with a little bit of Frost White Shimmer Paint to brush over the raised image of the embossing.

Finished set of cards- yea!
Adhere the focal image along with the sentiment (also layered onto Basic Gray and using the 1” Square Punch to create the banner points) and layer the entire panel onto Basic Gray cardstock before mounting onto the Whisper White card base.

Another quick and easy card- I promise I will finish the other five cards :-)

Stamp Sets:  Greeting Card Kids, Come to Bethlehem (both MDS)

Ink: Stampin’ Write Markers- Baja Breeze, Pretty In Pink, Lucky Limeade  

Paper: Whisper White, Basic Gray


Accessories:  Big Shot™,  Holiday Frame Textured Impressions™ Embossing Folder, Oval Framelits™, Aqua Painter, Frost White Shimmer Paint

Thanks again for stopping by- I hope you enjoy the rest of your week!

Saturday, July 7, 2012

Christmas in July- Another One for the Birds :-)


Hi Stampers! 

I wanted to create another quick easy Christmas card using the July 2012 Creative Crew colors- Gumball Green, Very Vanilla and Cherry Cobbler and since I love birds, decided to play along with the “SUO48 For the BirdsChallenge” at Stampin’ Up Only Challenges  as well. 

This card was extremely simple- first cut out two Top Note Dies using the Big Shot – one from Very Vanilla and the other from Gumball Green (trim the Very Vanilla along the perforated edge). 

Stamp the chickadee from Beautiful Season using Basic Black Classic ink and color with the Aqua Painter and ink from the pads of Cherry Cobbler, Gumball Green and Basic Gray.

Add the 1/2” Very Vanilla Seam Binding Ribbon Bow with the Antique Brad and adhere to the embossed Very Vanilla panel.

Add the sentiment to finish off the card.  I would recommend hand delivery due to the brad but you could omit the brad for mailing purposes…

Stamp Sets:  Beautiful Season, Come to Bethlehem

 Ink: Cherry Cobbler, Gumball Green, Basic Gray, Basic Black

Paper:  Very Vanilla, Gumball Green

Accessories:  Big Shot™, Bitty Banners Framelits™, Northern Flurry Textured Impressions™ Embossing Folder,  Aqua Painter, Extra Large Oval Punch, ½” Very Vanilla Seam Binding, Antique Brad

Thanks again for stopping by and I hope you like this quick, easy card- I had fun making it!!   Have a great weekend and God Bless! 

Monday, January 2, 2012

CCC12- Twenty Six Christmas Cards- Yea!!


Hi Stampers!   

As I mentioned in an earlier post, I decided to start early this year creating my Christmas cards for 2012.  First, I signed up for the 2012 CCC12 Splitcoast Christmas Card Challenge again this year and have committed to making at least 20 cards per month!  I know it sounds ambitious, but for some reason, I was unable to follow thru with mailing my cards this year and barely had enough for hand distribution (last year I had created 110 cards). 

I did not want to fall short again this year, therefore the minimum of 20 per month should be enough for our church family and relatives.  I am going to make sure that I follow through on the multiples as well and try to create more CAS cards with fewer layers and embellishments (except for the hand delivery cards).  Thankfully, I have this blog and my friends that visit me to help keep me accountable :-)

This card was fairly quick and easy (once I decided on the background color- almost went with Crushed Curry since I had it out from the previous project- still need to use up the huge stockpile from the Clearance Rack :-))  I even  ended up making 26 total - not an easy task with my Angel "girl" helping me- isn't she cute? :-))

This card incorporates My Digital Studio for the main image  (what a time saver!) along with traditional stamping for the sentiment only.   I had to resize the main image a few times before deciding that eight images per 8.5 x 11" piece of Whisper White would be the best size (therefore there are two sizes of cards). 

Print the MDS image onto Whisper White cardstock using Black printer ink and layer the image onto Basic Black cardstock.  

Use the Decorative Label Punch to punch out labels from Whisper White and line up the sentiment on the upper and lower half of the label (cut the punched image in half so you will have the sentiment label for two separate cards).

Adhere the sentiment behind the main image and onto the Perfect Plum embossed panel (emboss using the Big Shot™ with the Snow Burst Textured Impressions™ Embossing Folder).  

Add the 5/8” Basic Black Satin Ribbon bow and a Rhinestone to the star to finish off the card!

Stamp Sets:  Come to Bethlehem (My Digital Studio and Clear Mount)
Ink: Printer Ink- Black and Basic Black
Cardstock:  Whisper White, Perfect Plum
Accessories:  Big Shot™, Snow BurstTextured Impressions™ Embossing Folder, 5/8” Basic Black Satin Ribbon, Rhinestone

Thanks again for visiting!  I hope you enjoy New Year’s Day and have a great week (possibly you are starting on your Christmas cards for 2012 as well?) If so, I would love to hear about them and possibly see a sample..if you leave a comment with your link, I will visit you as well .:-)

Sunday, December 18, 2011

Old Fashioned Christmas- Three in One!


Hi Stampers! 

I wanted to create a special Christmas card and decided to use the CCMC180 Create with Connie and Mary Sketch Challenge along with the Hand Stamped Sentiments HSSAOFC97 Old Fashioned Christmas theme.  This card also qualifies for the Stampin’ Up! Only SUO34 Holiday Challenge- if you have time, check out all of the challenge sites (the Design Teams and other entries provide so many fabulous ideas!)

To create this card:

Stamp the chickadee image from Beautiful Season using Versamark™ ink onto Whisper White cardstock, apply Stampin’ Emboss® Black Embossing Powder and heat emboss with the Heat Tool.  Once the image has cooled, emboss again with the Big Shot™ and the Designer Oval Frame Textured Impressions™ Embossing Folder. 

Color the image with Stampin’ Write markers in Old Olive, Cherry Cobbler and use a Blender Pen with Basic Gray for the bird.  Tear around the outside edges, distress by hand and use a Sponge Dauber to apply Crumb Cake ink to the edges and over the image to “antique” the paper.

With the Big Shot™ and the Square Lattice and Finial Press Textured Impressions™ Embossing Folders, emboss a piece of Designer Series paper for the background layer as well as the vertical layer behind the bird image (retired Deck the Halls ).  Carefully sand the background layer with the Sanding Block.

Stamp the Hello Doily background stamp using Versamark™ ink onto Always Artichoke cardstock, apply Stampin’ Emboss® Winter White Embossing Powder (retired) and heat emboss with the Heat Tool.  Once the image has cooled, carefully cut out around the outline and cut the doily in half. 

Layer the card as per the sketch, add the embossed/distressed sentiment, pearls and snowflake to finish off the card.

Stamp Sets: Beautiful Season, Hello Doily (background), Come to Bethlehem

Cardstock: Whisper White, Always Artichoke, Cherry Cobbler, retired SU! Designer Series Paper- Deck the Halls


Ink: Versamark™, Basic Gray, Crumb Cake, Stampin’ Write Markers- Old Olive, Cherry Cobbler

Accessories: Big Shot™, Textured Impressions™ Embossing Folders- Designer Frames (Oval), Finial Press, Square Lattice, Northern Frost Decorative Strip Die, Sanding Block, Heat Gun, Stampin’ Emboss® Black Embossing Powder , Sponge Dauber, Pearls

Thanks again for stopping by- I hope the recipient will enjoy this card and that all of you have a wonderful Christmas! 
Related Posts Plugin for WordPress, Blogger...