Showing posts with label Holiday Frame EF. Show all posts

Wednesday, December 3, 2014

Peace on Earth- Three Challenges in One!


Hi Stampers! 

I had a chance to relax and stamp last night and wanted to create a card using the PP224 Tic-Tac-Toe Challenge  (I chose Tree, Embossing and Glitter :-)) along with the CC507 Splitcoaststampers Color Challenge (dessert option of a Tree on your card)  and the SC92 Holiday Inspiration Photo Challenge
Again, if you have not visited the above sites, I hope you will do so- great inspiration from all!

To create this card:

Use a scrap piece of paper or a sticky note to mask the snow banks.  Use a Sponge Dauber with Baked Brown Sugar Classic Ink onto the sky area and ink the retired stamp, Evergreen using Early Espresso Classic Ink and repeatedly stamp the trees in the background.

Use a Stampin’ Write Early Espresso marker to darken the trees and add highlights with a Faber-Castell White Pitt Pen.

Add additional highlights with a paint brush and Soft White acrylic paint as well as applying highlights to the snow banks.

Use the Big Shot™ with the Ovals Collection Framelits™ to cut the image into an oval, cut another oval the same size from Early Espresso cardstock- split the Early Espresso oval in half and mount behind the masked image.

Use the Two-Way Glue Pen to apply glue onto the branches and add Dazzling Diamonds glitter.

Use the Big Shot™ with the retired Holiday Frame Textured Impressions™ Embossing Folder to emboss a piece of Whisper White cardstock (ink the interior of the folder before embossing with Baked Brown Sugar Classic Ink).  Carefully cut out the embossed panel.

Adhere a piece of Early Espresso cardstock to the end of a piece of Trim the Tree Designer Series Paper (DSP).  Mount onto a piece of Whisper White cardstock and adhere to the Early Espresso card base.

Add the embossed frame and oval image using Stampin Dimensionals® to the card front.

Stamp the sentiment from the retired Greetings of the Season stamp set using Early Espresso Classic Ink onto Whisper White cardstock.  Create the banner using the Hexagon Punch, mount onto Early Espresso cardstock (creating the banner with the Hexagon Punch as well). 

Add the sentiment to the front of the card using Stampin’ Dimensionals®.

Add the green Satin Ribbon bow to finish off the card.

Stamp Sets: Evergreen, Greetings of the Season

Ink: Baked Brown Sugar, Early Espresso; Faber-Castell White Pitt Pen, Soft White Acrylic Paint

Paper/Cardstock:  Whisper White, Early Espresso; Trim the Tree DSP

Accessories: Big Shot™, retired Holiday Frame Textured Impressions™ Embossing Folder, Oval Framelits™, Sponge Dauber, Dazzling Diamonds, Satin Ribbon (from my stash)


Thanks again for visiting- I hope you have a wonderful Wednesday!!

Saturday, February 15, 2014

True Friend- A Monochromatic Study in Pink for Two Challenges :-)


Hi Stampers!

Since I have a few friends that love pink, I wanted to create a card for the Card Concept #3 Color Challenge-Monochromatic Pinks and also the Stampin' Royalty SR213 Photo Inspiration Challenge (the pink flowers and china were the inspiration for this card :-)).   

I hope that you have had a chance to check out both sites- wonderful examples and inspiration from all!

Not sure what style this card would be described as- possibly elegant versus shabby, chic since I did not distress the edges- what do you think?  


To create this card:

In My Digital Studio (MDS), open a blank 8.5 x 11 custom page and insert the Elements of Style image along with the sentiment from Simple Friendship- again, I have this stamp set but had these images already previously printed (also, re-sized a bit smaller than the stamp set) and ready to go…

Print out onto Whisper White cardstock and color the flowers using various Stampin’ Write markers in Blushing Bride, Melon Mambo, Pear Pizzazz and Pink Pirouette. 

Use the Big Shot™ with the Ovals Framelits™ to cut out the image and another oval cut from Melon Mambo cardstock.  Cut the Melon Mambo oval in half and adhere behind the focal image.

Use the Big Shot™ with the retired Holiday Frame Textured Impressions™ Embossing Folder to emboss a piece of Pink Pirouette cardstock, trim and adhere to a piece of Melon Mambo cardstock.

Add the horizontal strip of embossed Melon Mambo cardstock (from my scraps- previously embossed with the Square Lattice Textured Impressions™ Embossing Folder.  Layer a piece of ½” Pink Satin Ribbon (from my stash) over the embossed layer and mount the entire panel onto the Pink Pirouette card base.

Add the focal image oval and sentiment to the card front using Stampin’ Dimensionals®.
 
Create the rolled flowers from Melon Mambo and Pink Pirouette cardstock using the 1 ¼” and 1 ½” Scallop Circle Punches (punch out, cut a spiral towards the center, crimp with the retired Crimper Tool, roll up and adhere)  and the leaves from Pear Pizzazz cardstock with the Bird Builder Punch.  Add to the front of the card using Mini Glue Dots or a Hot Glue Gun. 

Add a few Pearls to the upper left corner and sentiment layer to finish off the card.

Stamp Sets:  Elements of Style, Simple Friendship (both MDS versions)

Ink: Printer Ink- Black, Stampin’ Write markers- Blushing Bride, Melon Mambo, Pear Pizzazz and Pink Pirouette

Paper: Whisper White, Melon Mambo, Pink Pirouette, Pear Pizzazz

Accessories: Big Shot™,  Ovals Framelits™, Square Lattice and retired Holiday Frame Textured Impressions™ Embossing Folders, Punches- Large Oval, Bird Builder, 1 ¼” and 1 ½” Scallop Circle, Pearls, ½” Pink Satin Ribbon (from my stash)


Thanks again for visiting!  I hope all of you have a wonderful weekend and have fun stamping!

Monday, April 15, 2013

Pumpkin Pie for Christmas?


Hi Stampers! 

How about a Christmas card in April?  I know that it may seem a bit early but I have committed to actually making cards this year and I will need approx. 250 Christmas cards (I do not want to start in November :-)) .   

This card will be one of my April designs for the Splitcoaststampers’ CCC13 Christmas Card Challenge and I decided to use a very non-traditional color scheme from the Dynamic Duos DD48 Color Challenge and the FMS81 Sketch from Freshly Made Sketches (if you have the time, check both sites out- the Design Team and samples are terrific!).

This is a quick, easy CAS card:
                                                                                               
Ink the tree image using Pumpkin Pie Classic Ink and stamp onto Whisper White cardstock (stamp three images – one main tree image and two partials for the flower portion only).

Use the Big Shot™ with the Ovals Collection Framelits™ to cut out the main tree image and also cut another oval from Pumpkin Pie cardstock (you can cut both layers at the same time using the same size framelit).  

Also using the Big Shot™, emboss a piece of Bashful Blue Designer Series Paper (DSP) with the Holiday Frame Textured Impressions™ Embossing Folder (I also used a Sponge to lightly apply Whisper White Craft ink over the embossed area).

Mount the tree image onto the Pumpkin Pie layer (cut the Pumpkin Pie oval in half vertically so just a bit of the layer shows behind the focal image). 

Cut out the flower image only from the two extra stamped images and mount one onto the tree using Stampin’ Dimensionals®.  

Stamp the sentiment with Pumpkin Pie Classic Ink onto Whisper White cardstock and cut the banner with the Paper Trimmer and use the 1” Square Punch for the banner "points".  

Per the sketch, layer the Pumpkin Pie DSP over the Bashful Blue layer, adhere the sentiment and remaining floral image using Mini Glue Dots™ and add the Pearls to finish off the card.


Stamp Sets: Scandinavian Season, Christmas Greetings (sorry, both retired)

Ink: Pumpkin Pie, Craft Whisper White

Paper/Cardstock:  Whisper White, Pumpkin Pie, Bashful Blue and Pumpkin Pie DSP

Accessories:  Big Shot™,  Holiday Frame Textured Impressions™ Folder, Ovals Collection Framelits™, 1 “ Square Punch, Pearls, Sponge, Stampin’ Dimensionals®

OK, now I need your opinion- as much as I love pumpkin pie for dessert, do you think this color combo is OK for Christmas, or is it a bit too non-traditional?  If you have the time, please let me know (I have to make six more of this design and if needed, can change the color scheme :)).

Thanks again for stopping by- I will be posting another CAS card today – if you have time, check back again!   Hope you have a fabulous Monday!!

Thursday, February 28, 2013

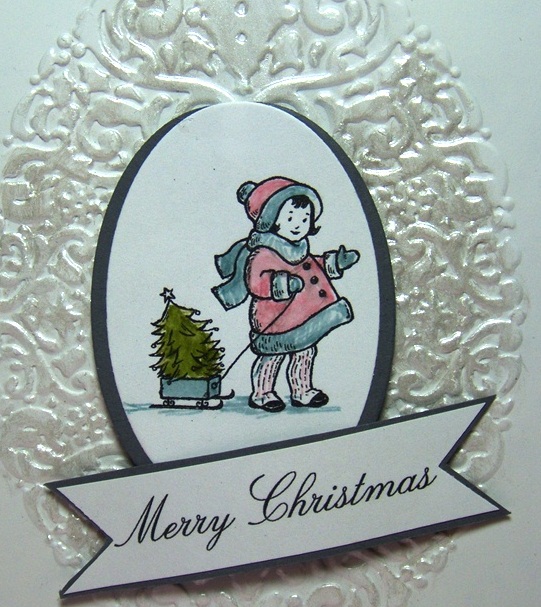
Feb13 Christmas- Card #3- Clean and Simple "Hybrid"


Hi again, Stampers!!

Here is my third design for the February 2013 Splitcoaststampers CCC13 Christmas Card Challenge- I will complete the entire set later this evening but wanted to post before February was officially over but I had a bit of an issue with my computer so I am a few minutes late :-)  

As I mentioned in a previous post, this challenge is basically a commitment to yourself to complete your Christmas cards early (so you can mail them in November).  Last year, I did not have enough cards to mail, so I am re-committing myself in order to be able to start to mail in late November this year and I will need over 200 cards!

This is another Clean and Simple (CAS) card and although I have the stamp sets, I decided to utilize My Digital Studio (MDS) to print the images and create a “hybrid” card.

To create this card:

Using MDS, insert the stamp brush images and arrange the layout to fit onto one page and print onto a piece of 8.5” x 11” Whisper White cardstock. 

 Use Stampin’ Write Markers in Baja Breeze, Pretty In Pink and Lucky Limeade to color in the image and take an Aqua Painter to soften the colors.

Use the Big Shot™ with the Oval Framelits™ to cut out the images of the little girl and cut another oval the same size out of Basic Gray cardstock to layer behind the image (cut this oval in half to just peek out on the sides).

Close-up of Shimmer Paint
Also with the Big Shot™ and the Holiday Frame Textured Impressions™ Embossing Folder, emboss a piece of Whisper White cardstock for the background.  Use the Aqua Painter with a little bit of Frost White Shimmer Paint to brush over the raised image of the embossing.

Finished set of cards- yea!
Adhere the focal image along with the sentiment (also layered onto Basic Gray and using the 1” Square Punch to create the banner points) and layer the entire panel onto Basic Gray cardstock before mounting onto the Whisper White card base.

Another quick and easy card- I promise I will finish the other five cards :-)

Stamp Sets:  Greeting Card Kids, Come to Bethlehem (both MDS)

Ink: Stampin’ Write Markers- Baja Breeze, Pretty In Pink, Lucky Limeade  

Paper: Whisper White, Basic Gray


Accessories:  Big Shot™,  Holiday Frame Textured Impressions™ Embossing Folder, Oval Framelits™, Aqua Painter, Frost White Shimmer Paint

Thanks again for stopping by- I hope you enjoy the rest of your week!

Thursday, November 22, 2012

PP122- Thanksgiving and Christmas- Two Cards for One Challenge!


Hi Stampers!  
                                                                                                             
Happy Thanksgiving to all of my U.S. friends!!   I hope all of you are having a blessed Thanksgiving holiday!

This week the PP122 Challenge is a Clean and Simple (CAS) Challenge using Silver or Gold so while I had the supplies out, I decided to create two cards- one for Thanksgiving and another for Christmas.

If you have not had a chance to check out The Paper Players site yet, I would recommend that you take a moment to do so.  Again, the Design Team has outdone themselves and the rest of the entries are gorgeous!! 

To create the Thanksgiving card:

With the Big Shot™ and the Holiday Frame Textured Impressions™ Embossing Folder emboss a piece of Early Espresso Core’dinations cardstock (lightly sand the embossed image to show the lighter core of the paper).

De-static a piece of Naturals White cardstock with the Embossing Buddy® and stamp the images from Full of Blessings and French Foliage using Versamark™ ink.  Apply Stampin’ Emboss® Gold Embossing Powder and heat emboss with the Heat Tool.

Once cool, cut out the oval using the Big Shot™ with an Oval Framelits™ Die and fussy cut the leaves and create a banner with the sentiment (use the corner of the 1” Square Punch to create the banner points).  Mount the oval to the embossed panel using Stampin’ Dimensionals and arrange the leaves and banner sentiment attaching to the card with Mini Glue Dots.

Adhere the entire panel to the Naturals White card base to finish off the card.

Stamp Sets:  Full of Blessings, French Foliage

 Ink: Versamark™

Paper:  Early Espresso Core’dinations, Naturals White

Accessories:  Big Shot™, Holiday Frame Textured Impressions™ Embossing Folder, Sanding Block, Embossing Buddy®, Heat Tool, Stampin’ Emboss® Gold Embossing Powder, 1” Square Punch

To create the Christmas Blessings Card:

With the Big Shot™ and the Lacy Brocade Textured Impressions™ Embossing Folder emboss a piece of Whisper White cardstock.  Use the narrow ornament from the Holiday Ornaments Framelit™ Die to cut a piece of More Mustard cardstock.  Adhere the white embossed background to a piece of More Mustard cardstock.

De-static a piece of Whisper White cardstock and the More Mustard ornament with the Embossing Buddy®.  Ink the stamp image from Bells & Boughs , the sentiment from More Merry Messages and the Snowflake Party Builder Wheel using Versamark™ ink (I took the wheel apart and use it as a regular stamp).  Stamp the poinsettia image and the sentiment onto the Whisper White cardstock.  Stamp the Snowflake Party wheel across the ornament a few times.  Apply Stampin’ Emboss® Gold Embossing Powder to all images and heat emboss with the Heat Tool.

Cut the poinsettia image out using the Big Shot™ and the round pointed ornament from the Holiday Ornament Framelits™ Die set.  Mount the More Mustard ornament first, then the white ornament to the Lacy Brocade embossed background.

Create the banner using the corners of the 1” Square Punch and adhere to the bottom of the card.

Add the Satin Ribbon Bow and pearls to finish off the card. 

Stamp Sets:  Bells & Boughs, More Merry Messages, Snowflake Party Builder Wheel

 Ink: Versamark™

Paper:  More Mustard, Whisper White

Accessories:  Big Shot™, Lacy Brocade Textured Impressions™ Embossing Folder, Embossing Buddy®, Heat Tool, Stampin’ Emboss® Gold Embossing Powder, 1” Square Punch. Pearls, 1 ¼” Gold Satin Ribbon (from my stash)

Again, Clean and Simple (CAS) style does not come easy to me and I so admire those who can create the CAS masterpieces that I see everywhere but this is my version of CAS.

Thanks again for stopping by and I hope all of you have a blessed Thanksgiving and weekend!

Sunday, August 12, 2012

081112 Swap Card- Joyful Hearts Meeting

Hi Stampers!

I have been busy stamping and finally can share at least one of the projects with you :-).

This card was created for the swap that we held at our SU! Quarterly Meeting- a great time with my upline, Cindy Fodor (she is fantastic) and my fellow demonstrators!  I love getting together and sharing ideas- if you have ever thought of joining Stampin’ Up! now is as great time!  

For $ 99.00 you can chose the Starter Kit (pick $125.00 worth of product- your choice of stamps, etc.).  Join and work it as a business or just join to receive the discount- you can do it "your way".   If interested in joining my team, check out the details on my SU! website !  Click on the upper right hand tab (Join Now) for all of the details or the small tab at the top Contact Me and I can contact you regarding more information:-)

This card front was easy to duplicate to create the 26 needed for the swap today:-)

To create this card:

Use a sponge dauber to apply Crumb Cake Classic Ink onto the raised portion of the Holiday Frame Textured Impressions™ Embossing Folder.  Insert a piece of Whisper White cardstock and emboss with the Big Shot™. 

Use the Big Shot™ with the Adorning Accents Framelits™ to cut the piece of Wisteria Wonder cardstock. 

Ink the interior of the Lacy Brocade Textured Impressions™ Embossing Folder and emboss the Wisteria Wonder Framelit™ cut in the above step. 

Use the Decorative Label Punch to punch out a piece of Early Espresso cardstock and emboss with the Lacy Brocade Textured Impressions™ Embossing Folder.  Cut the punched piece in half horizontally and adhere to the back of the Wisteria Wonder Framelit™.  Adhere the Framelit™ assembly to the embossed Whisper White background with SU! Dimensionals. 

Stamp the sentiment from Petite Pairs using Early Espresso Classic Ink onto Whisper White and use a Sponge Dauber with Crumb Cake ink along the edges.  Punch out with the 1 ¼” Circle Punch and layer onto a circle punched from Early Espresso using the 1 3/8” Circle Punch.  Mount to the Framelit™ assembly with SU! Dimensionals.

Stamp the butterflies from Papillon Potpourri using Early Espresso Classic Ink onto Crumb Cake cardstock.  Punch out with the Elegant Butterfly Punch.  Use the Aqua Painter to apply a thin coat of Frost White Shimmer Paint to the butterflies.  

Tie the small ribbon bow using ½” Crumb Cake Seam Binding and adhere the bow along with the butterflies to the Framelit™ assembly using Mini Glue Dots.  

Stamp Sets: Papillon Potpourri, Petite Pairs

Cardstock: Whisper White, Crumb Cake, Early Espresso, Wisteria Wonder

Ink: Crumb Cake, Early Espresso

Accessories: Big Shot™, Textured Impressions™ Embossing Folders- Holiday Frame, Lacy Brocade, Adorning Accents Framelit™, Punches- Decorative Label, Elegant Butterfly  Punch, 1 ¼” and 1 3/8” Circle, Sponge Dauber, ½” Crumb Cake Seam Binding, Pearls

Thanks again for stopping by!  Have a wonderful weekend- God Bless! 

Related Posts Plugin for WordPress, Blogger...