Showing posts with label Brayer Designer Paper. Show all posts

Tuesday, December 23, 2014

PPA232 Come To Bethlehem- A Quick Card from Scraps :-)

Hi Stampers!

I have been working in the craft room preparing for Christmas and decided to take a quick break to create a card for this week’s Pals Paper Arts PPA232 Sketch Challenge

This sketch will be the last one from one of their designers, Margaret Moody- I will miss Margaret’s sketches- they are always so clean and intricate!  Thanks Margaret for all of your sketches in the past and your inspiration!!

If you have not had a chance to visit the Pals Paper Arts site yet, I would encourage you to do so- they have two fabulous design teams and wonderful galleries each week!

FYI- For this card, I pulled out my organized scraps (trust me, not all of my scraps are organized but I am working on it :-)).   I already had the sentiment and wise men image printed and ready to go from a previous digital hybrid card and the snowflake background panels were pieces left over from a "homemade designer paper" project years ago...this is why I keep my scraps around- it helps me create quick cards!!

To create this card:

Using a brayer, randomly and with quick strokes, apply Melon Mambo, Night of Navy and Rich Razzleberry Classic Ink to a piece of Whisper White cardstock (use light strokes since all of these colors are very dark- make sure that you allow some of the white to remain).  Do not worry if there are some streaks since the next step will hide them :-)

Using the Embossing Buddy®, de-static the brayered panel that you just created above and stamp the images from the retired set, Serene Snowflakes using Versamark™ ink.   Apply Stampin’ Emboss® Black Embossing Powder and heat with the Heat Tool.  

Trim the pieces per the sketch and mount onto a piece of Basic Black cardstock.

Using My Digital Studio (MDS), position the sentiment and the focal image from the Come to Bethlehem digital stamp set onto a blank 8.5 x 11 document.  Re-size the focal image and print onto Whisper White cardstock.

Trim the images and mount onto Basic Black cardstock.

Use the Big Shot™ with the Stylish Stripes Textured Impressions™ Embossing Folder to emboss a piece of Whisper White cardstock, trim and mount onto a piece of Basic Black cardstock, trim and mount onto the Rich Razzleberry card base.

Mount the embossed strips and sentiment onto the card front.

Add the focal image panel using Stampin’ Dimensionals®.

*** NOTE *** After assembling the card, I noticed a bit of “dirt” on my sentiment and focal image panels (most likely from storage since they were a few years old or from my work surface- lol!)  To salvage, I added some “stars” using the Silver Stampin’ Dazzle Pen.  Again, now you know all of my secrets :-)

Add the Rhinestone to the center of the star to finish off the card.

Stamp Sets: Come to Bethlehem (MDS version), Serene Snowflakes

Ink: Versamark™, Melon Mambo, Night of Navy, Rich Razzleberry Classic Ink; Printer Ink- Black; Stampin’ Dazzle Silver Pen

Paper/Cardstock:  Whisper White, Basic Black, Rich Razzleberry

Accessories:  Big Shot™, Stylish Stripes Textured Impressions™ Embossing Folder, Embossing Buddy®, Stampin’ Emboss® Black Embossing Powder, Heat Tool, Rhinestone


Thanks again for visiting- I hope all of you have a wonderful Christmas week!!

Thursday, October 17, 2013

Birthday Wishes- Fall Florals for Three Challenges :-)

Hi Stampers! 

I wanted to take to take a break from creating Christmas cards and share this card created using the colors from this week’s DD74 Dynamic Duos Challenge along with the AtlanticHearts Sketch Challenge #25 and the monthly theme at the Stampin' Celebration SCIC71 Inspiration Challenge.

If you have not had the chance to visit any of these sites yet, I hope you will take the time to do so – again, great inspiration!

To create this card:

Using So Saffron Classic Ink, ink up your brayer roller and roll the ink a bit sporadically onto a piece of Vary Vanilla cardstock.

Stamp the larger flower (dotted line) image from Stippled Blossoms using Calypso Coral Classic Ink, stamping off for some of the images to create your own Designer Series Paper (DSP).  Trim this panel to 4” x 5 ¼”.

Add the Crochet Lace and Satin Ribbon (both from my stash) per the sketch.  Adhere the entire panel to the Calypso Coral card base.

Create the rolled flowers using Scallop Circle Punches (2 3/8”, 1 ¾” and 1 ¼”) from So Saffron and Calypso Coral cardstock.  Spiral cut from the outside using a wavy pattern toward the middle, roll up starting from the outside toward the center and use Mono Multi Adhesive to adhere the layers together.

Punch out a few leaves using the Bird Builder Punch from Pistachio Pudding cardstock and punch out the sentiment using the XL Oval Punch (this sentiment is from the retired set, Watercolor Trio and was printed from My Digital Studio onto Very Vanilla cardstock). 

Also punch out two additional XL Ovals from Calypso Coral cardstock for the frame behind the sentiment, attach the two Calypso Coral ovals together (spread apart a bit) to create a frame for the sentiment and adhere the sentiment to the center.

Mount the sentiment onto the background layer (per the sketch) and add the rolled flowers and leaves.  Add a few Pearls to the sentiment to finish off the card.

Stamp Sets: Stippled Blossoms, Watercolor Trio (MDS)

Ink: Calypso Coral, So Saffron, Printer Ink- Black

Paper/Cardstock:  Very Vanilla, Calypso Coral, So Saffron, Pistachio Pudding

Accessories: Brayer, Punches- Scallop Circle- 2 3/8”, 1 ¾”, 1 ¼”, Bird Builder, XL Oval;  Pearls, Crochet Lace and Satin Ribbon (from my stash)


Thanks again for visiting- I hope you have a terrific Thursday!!

Tuesday, April 30, 2013

Fun, Brayered, Mosaic Background- Another New Technique for Me :-)


Hi Again Stampers! 

I had so much fun with the Just Add Ink's "Just Add A New Technique" the other week, that I knew I wanted to create a card for this week’s Just Add Ink JAI163 "Just Add A Fun Background” Challenge.  

I decided to incorporate Ann’s lovely PP143 Sketch Challenge at The PaperPlayer’s and since I used Sizzix products, it also is another example for the SU-Only Challenges SUO69 Anything Sizzix Challenge.    Again, if you have the time, check out all of these sites for wonderful ideas and inspiration!

To create this card:

Using your brayer (I use three separate brayers for this technique), lightly brayer a random pattern of Bashful Blue Classic Ink onto a piece of Glossy White cardstock.  Add another random layer of Baja Breeze followed by a light random layer of  Marina Mist Classic Ink.
 
Spritz the inked background with Champagne Mist Shimmer Paint (mixed with 70% alcohol) and let it dry a bit.  Ink the ledger stamp from The Open Sea using Midnight Muse Classic Ink and randomly stamp over the entire panel (it will run a bit since it is still slightly wet but this is OK- part of the distressed look).   

Now here’s where it becomes interesting…tear the panel into various size pieces and use a Sponge Dauber to heavily ink the edges with Midnight Muse Classic Ink (distressing some of the edges by hand- fair warning, your fingers will get inky in this process :-)).

Re-layer the torn edges in an overlapping mosaic pattern onto a piece of lightweight paper (I made the mistake of using Whisper White cardstock and ended up having to tear them off again for the final card since it was too thick).  

Use the Big Shot™ with the Square Lattice Textured Embossing Folder to emboss the entire panel and then, tear again in thirds.  Ink the edges again to hide the white core (again, this is where I made my mistake and had to disassemble the entire mosaic and re-apply to my Whisper White card base). 

While you are working with the Big Shot™,  emboss a piece of Designer Series Paper for the central layer of the sketch along with a few strips for the horizontal banners with the Square Lattice EF (I used the retired DSP, Nautical).

Stamp the globe image, compass, anchor and sentiment onto Glossy or Whisper White cardstock using Midnight Muse Classic Ink.  Punch or cut out the globe image and compass (along with a corresponding layer of Midnight Muse cardstock for each) and use the Big Shot™ with the Bitty Banners Framelits to cut out the sentiment.  Carefully hand cut around the anchor.

Add the anchor to the globe layer with a Pewter Brad as well as adding a brad to the center of the compass.   Layer per the sketch and add the ½” Cherry Cobbler Seam Binding Ribbon bow to finish off the card.

Stamp Sets: The Open Sea, Itty Bitty Banners

Ink: Bashful Blue, Baja Breeze, Marina Mist, Midnight Muse

Paper/Cardstock:  Whisper White, Cherry Cobbler, Midnight Muse, retired Nautical DSP, Glossy White

Accessories: Big Shot™,  Square Lattice Textured Impressions™ Embossing Folder, Bitty Banners Framelits™, Punches- 1 ¼”, 1 3/8” and 2 ½” Circle, 1” Square (for banner points on strips), Pewter Brads, Brayer, Sponge Dauber, Champagne Mist Shimmer Paint, ½” Cherry Cobbler Seam Binding Ribbon

Thanks again for visiting!  So what do you think of this fun background created using the Mosaic Brayer Technique (not sure if this is a formal technique or not:-))?  Too busy, too vintage or just right?  If you have the time, let me know- your comments mean so much to me :-)

Stop by again soon- have a fabulous Tuesday!!

Sunday, December 30, 2012

True Blue Sympathy for Men of Honor


Hi Stampers!!

This month has been one of joyous occasions as well as one of saying goodbye to loved ones.  I found out that one of my uncles passed away (he lives far away from me and I have not seen him in approx. 15 years or more) plus there were two other funerals I attended within the last week for men who were influential in my life as well as others. 

With the flurry of work and Christmas, I had not had the chance to create special sympathy cards for any of the families who lost loved ones, so this weekend I finally had a chance to spend time in my craft room...

I wanted to create masculine sympathy cards and chose to incorporate the SU- Only SUO61 True Blue Color Challenge into the theme of the cards.  I also wanted to use one of the new sets from the 2013 Spring Mini catalog and  I was not aware at the time of designing these cards that the one gentleman who has passed into the arms of Jesus loved the beach and spent vacations there with his family every year –plus the verse in the sentiment was mentioned as one of his favorites at the funeral.   It is truly amazing how the Lord leads you without you even knowing it at the time :-) 

Panel Close-Up 
To create the basic elements for these cards:

The basic panel design was created by brayering ink onto four pieces of Whisper White cardstock- first Bashful Blue, then Marina Mist and finally Tempting Turquoise.  You do not have to be perfect with this step, in fact, the brayered colors on the cardstock will appear a bit contemporary with some of the hard edges showing but do not despair- you will not notice this once the card is finished :-)

Stamp the images using Midnight Muse Classic Ink and punch out the images with the 1 ¼” Square Punch (use the ¾” Circle Punch to punch out the Nantucket anchor image).  You will not be able to fit the entire images into the punched area, so chose the areas that appeal to you:-)

Card #1
With the Color Spritzer Tool and a Midnight Muse Stampin’ Write marker, spritz the images to add a bit if distressing.  Layer onto squares punched from Midnight Muse cardstock with the 1 3/8” Square Punch.   

Card #1- Distress the edges of the Midnight Muse with the Distressing Tool.  Layer onto Whisper White cardstock and again onto Tempting Turquoise.  Add the sentiment layer at the bottom and knotted Hemp Twine with the circular image in the middle.

Use the Big Shot™ with the Woodgrain Textured Impressions™ Embossing Folder to emboss a piece of Whisper White and Midnight Muse cardstock.  Layer onto Tempting Turquoise and adhere the focal image to finish off the card.

Card #2
Card #2- Use the same steps as in Card #1, except use a piece of Whisper White embossed with the Herringbone Textured Impressions™ Embossing Folder (this was already embossed in my scraps).  

Layer a piece of Tempting Turquoise behind the sentiment layer (cut with the Big Shot™ and the Labels Collection Framelits™ ).

A few more punched elements behind the Nantucket image adds additional interest.


Card #3
Card #3- Again the same steps but the Woodgrain folder with Whisper White panel is mounted onto Tempting Turquoise and again onto Whisper White- the sentiment is directly stamped on this Whisper White layer.

Once distressed a bit with Sponge Daubers, the Color Spritzer Tool and the Nantucket stamp, layer the entire card onto Midnight Muse cardstock before adding the Whisper White card base.

Card #4

Card #4- I used the fish and coral images only and added the Nantucket stamp onto those panels.

The sentiment banner was created with the 1' Square Punch for the banner points and the Hemp Twine was noted and wrapped around the edges.

 Add the Woodgrain and Square Lattice embossed panels along with the Circle Brad in the center to finish off the card. 


Stamp Sets: By the Tide, Blessings from Heaven

Ink:  Bashful Blue, Marina Mist, Midnight Muse, Tempting Turquoise

Paper: Whisper White,  Midnight Muse, Tempting Turquoise

Accessories:  Big Shot™, Labels Collection Framelits™, Textured Impressions™ Embossing  Folders- Woodgrain, Herringbone, Square Lattice,  1” Square Punch (for  sentiment banner), 1 ¼” and 1 3/8” Square Punch,  Color Spritzer Tool, Sponge Daubers,  Hemp Twine (retired), Circle Brads (retired)

I hope you like these cards- I am not sure which one I like the best.  My husband likes card#1 - if you have the time, let me know which one you prefer (if any :-))  

Thanks again for stopping by and I hope all of you have a great (safe) week celebrating our New Year! 

If you have a chance, stop by again soon - I will be sharing a Christmas card for 2013 in my next post!

Saturday, October 29, 2011

Thanks for All You Do- Two in One!


Hi Stampers! 

I created this card using this week’s CQC108 ColourQ Challenge Colors along with the FMS8 sketch from this week's Freshly Made Sketches.   Again, the Design Teams at both sites have created gorgeous projects and the entries for each challenge are wonderful!
 
I decided to create my own "Designer Paper" with a brayer and four of the challenge colors for the center panel and also used Heat Embossing for the flowers. 

To create this card:

On two pieces of Whisper White cardstock, brayer So Saffron, Daffodil Delight and Peach Parfait Classic ink.  Once one piece, stamp the flourish in Basic Black and mount onto Basic Black and Whisper White cardstock.

On the other piece, de-static with the Embossing Buddy®, stamp the floral images with Versamark® ink, apply Stampin’ Emboss®  Black Embossing Powder and heat with the Heat Tool.   Carefully cut out each flower and set aside.

Use the Big Shot™ and emboss a piece of Peach Parfait and Whisper White cardstock with the Square Lattice Textured Impressions™ Embossing Folder.  Assemble the layers, add the flowers and sentiment.

Finish off the card with the pearls and 5/8” Black Satin Ribbon bow.

Stamp Sets:  Creative Elements, Absolutely Fabulous (retired)

Ink:  Versamark™, Basic Black, Daffofil Delight, Peach Parfait, So Saffron

Cardstock: Whisper White, Basic Black, Peach Parfait

Accessories:  Big Shot™, Square Lattice Textured Impressions™ Embossing Folder, Embossing Buddy®, Heat Tool, Stampin’ Emboss® Black Embossing Powder, Brayer, Pearls, 5/8” Black Satin Ribbon, Decorative Label Punch

Thanks again for visiting today- I hope you like this card!  I had a great time making it and since these colors are not ones I would normally put together, it was truly a challenge for me!  Have fun stamping and creating and stop by again soon! 

Wednesday, August 25, 2010

CQC47 & SSC165 Gratitude- Two Challenges in One!

Hi Stampers! It is that time of the week again- new challenges!


This card incorporates two challenges- CQC #47 see http://colourq.blogspot.com/ for more details (and the other wonderful samples submitted by some very talented artists).

I decided to incorporate the colors along with the sketch challenge #SSC165 from Stamping 411 - see http://www.stamping411.blogspot.com/ for more details.   


To create this card: Use the brayer technique described in an earlier post (see CCMC112 instructions)- brayer Whisper White cardstock with More Mustard and Poppy Parade. After applying the colors, use an Embossing Buddy to “de-static” the cardstock. Ink the medallion image with Versamark ink and then directly onto Basic Gray Classic Ink (Craft ink could be used instead of the Versamark/Classic combination). Apply Clear Embossing Powder and heat with the Heat Gun until melted. Carefully cut the image around the outside edges and mount onto a scallop die cut (Big Shot, Scallop #2 Die, Vintage Wallpaper Embossing Folder).

Using the leaf image from the same stamp set, stamp in Basic Gray and stamp off the page first, then stamp onto Whisper White and stamp again (see faint image to the right). Ink the sentiment in Poppy Parade and stamp over the leaf images, layer onto More Mustard and Basic Gray.

Emboss a piece of Whisper White with the Vintage Embossing Folder and spray with Frost White Shimmer Paint mixed with 70% alcohol. Attach the straight piece of ribbon (I used 5/8” satin ribbon from my stash and it is only a shade darker than the Bermuda Bay although in the photo it appears more teal than it is in real life) . Adhere the medallion and sentiment layer to the Whisper White. Layer the embossed Whisper White onto More Mustard and attach the bow portion of the ribbon. Adhere pearl in the center of the medallion and layer all onto Poppy Parade.

I hope you like this card- the color combination was a bit out of my normal "comfort zone" but that's why I enjoy the challenges!  Thanks again for visiting and I hope you have a blessed day!

Monday, August 23, 2010

CCMC112 Medallion

Hi Stampers!  

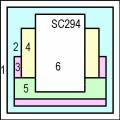
I love the sketch layout for this week's challenge on Splitcoast Stampers (#SC294- see http://www.splitcoaststampers.com/gallery/showgallery.php?page=5&si=sc294 for the entire gallery of ideas). 

I also loved the inspiration photo for this week's Create with Connie and Mary color challenge #CCMC112 - see http://www.createwithconnieandmary.com/- colors to be used are Daffodil Delight, Wild Wasabi, Pacific Point, Bashful Blue, White and Black.  I found the contemporary "fluid" feeling of the inspiration fabric to be my inspiration and decided to create my own designer paper by using several brayers and Whisper White cardstock.  
UPDATE- I was honored to have this card chosen as one of the Top Three Picks! 

To create the background paper:  I used three separate brayers- if you only have one brayer, clean before loading each color.  Load the brayer with Daffodil Delight ink and apply to two separate pieces of Whisper White cardstock (it does not have to be perfectly applied and leave some white).  Next load the brayer with Bashful Blue ink and roll the ink over the Daffodil Delight but do not cover all of the yellow.  Next do the same thing with Pacific Point ink and apply the ink over the Bashful Blue (again leaving some of the Daffodil Delight, White and Bashful Blue showing).  The ink will appear to have hard edges from the side of the brayer but do not be concerned, they will seem to disappear with the next few steps.  After brayering the ink onto the cardstock, spray the cardstock with alcohol to intensify the color (or you can lightly mist with water for a watercolor look).  Use a heat gun to dry the paper. On one piece, stamp the En Francais background stamp in Basic Black and on the other brayered piece, again using Basic Black ink, stamp with the scroll stamp from Elements of Style. 


On a third piece of Whisper White,  brayer only Daffodil Delight and Bashful Blue. Using the Embossing Buddy and Versamark ink, heat emboss the medallion from Day of Gratitude (available Sept.1 from the Holiday Mini) with Black EP.  After the EP has cooled,  trim the cardstock, mount onto Whisper White and Basic Black (add pearl to the center).  Using the Big Shot, emboss a piece of Wild Wasabi with the Square Lattice Embossing and mounted this layer onto Basic Black.  Finish the card with 5/8" Black Satin ribbon and I decided to intentionally leave off a sentiment for the moment.

I hope you like this card.   Thanks for visiting- God Bless!
Related Posts Plugin for WordPress, Blogger...