Showing posts with label ColourQ. Show all posts

Friday, November 18, 2016

By The Seeds You Plant


Hi Friends! 

Today I am sharing a Mixed Media card that I designed using Artistic Outpost (AO)  stamp sets Harvest, Seed Packets Background and Grunge Elements (all available at Our Daily Bread Designs) and I will be sharing this card on the Artistic Outpost Blog as well tomorrow :-)
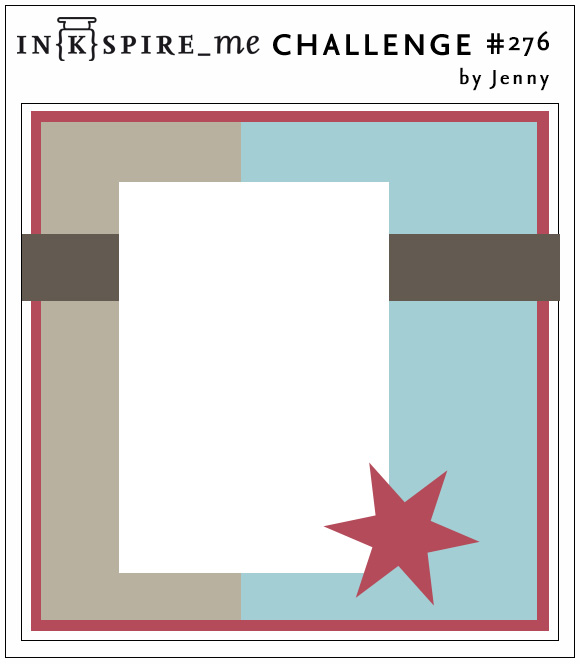
I incorporated the IN{K}-Spire Me #276 Sketch Challenge along with the ColourQ CQC368 Challenge and the Mixed Media Card #29 Thanksgiving Card Challenge into the design (while I do not have a Thanksgiving sentiment per se, I always think of harvest time as a time of Thanksgiving and thought of the AO Seed Packets Background image when I saw this photo inspiration at the Mixed Media Card Challenge :-)).

If you have not had a chance to visit The Artistic Outpost Blog or the challenge sites yet, I encourage you to do so- gorgeous inspiration from my AO Design Team Sisters as well as from the challenge galleriesl!

To create this card:

Using the grid and splatter images from AO Grunge Elements stamp set, repeatedly stamp onto honey and olive cardstock with gathered twigs and crushed olive distress ink.

Once you are satisfied with the background, trim the panels per the sketch, distress the edges and use a sewing machine with a zig zag stitch to add the layers to a piece of chocolate cardstock (distressing the edges as well).

Stamp the grid image with gathered twigs distress ink onto a piece of chocolate cardstock, distress the edges and sew onto the panel.

Add the knotted twine (wrapping the ends around the back of the card front) before mounting onto the white card base.

De-static two pieces of white cardstock with an embossing tool, ink the AO Seed Packets Background and the sentiment from the AO Harvest stamp set with embossing ink, stamp each onto one of the prepared white cardstock panels, apply dark brown embossing powder and heat set with a heat tool.

Once the powder has cooled, use a water brush with distress inks to color the AO Seed Packets Background image (I used crushed olive, peeled paint, carved pumpkin, gathered twigs and wild honey) and use a water brush with peeled paint distress ink to add a bit of color to the sentiment.

Trim the sentiment panel, distress the edges and use a stencil with crackle texture paste to apply texture before mounting onto the chocolate cardstock.

Ink the large splatter stamp from the AO Grunge Elements stamp set with gathered twigs, stamp onto the sentiment, distress the edges of the sentiment and mount onto chocolate cardstock.

Add the focal image and the sentiment to the card front with dimensional foam.

Add a bit of the crackle texture paste to the card front using the honeycomb stencil to finish off the card.


Thanks again for taking the time to stop by- hugs to all of you and I hope you have a wonderful weekend!

Friday, January 8, 2016

Sale-A-Bration- What I Love :-)


Hello Friends!

I hope you are having a terrific week so far!  I had a chance to play around with some of the new 2016 Sale-A-Bration sets today and created a card using the “What I Love” stamp set.

I wanted to participate in a few of my favorite online challenges, so I decided to use the CQC323 ColourQ Challenge, the SC119 Sketch from Stampin’ Celebration and the theme of the Inkspirational #99 “Thank You with SomethingNew” Challenge.

If you have not had a chance to visit the above challenge site galleries yet, again, I would encourage you to do so- wonderful inspiration from all!

To create this card:

De-static a piece of Whisper White cardstock with the Embossing Buddy®, ink the outline flower image from What I Love using Versamark™ Ink, stamp onto the prepared cardstock, apply Stampin’ Emboss® White Embossing Powder and heat set with the Heat Tool.

Color the image with the Blushing Bride and Melon Mambo Stampin’ Write Markers, spritzing with water to blend the colors, re-color as needed and fussy-cut out the flowers.

Ink the Definitely Dahlia background stamp with Blushing Bride Classic Ink, stamp onto a piece of Whisper White cardstock, trim the panel, add the distressing with the large Gorgeous Grunge splatter stamp using Melon Mambo and Pool Party Classic Ink , stamp the sentiment with Melon Mambo Classic Ink as well as a few of the leaves.

Add the banner elements  using the Banner Triple Punch to create the banners (I had the woodgrain piece of Crumb Cake and the retired Pool Party DSP already I my stash and mounted both on scrap pieces of Melon Mambo cardstock).

Trim the background panel and mount onto Melon Mambo cardstock, trim again and mount onto the Pool Party card base.

Punch the leaves from Crumb Cake cardstock, sponge Melon Mambo Classic Ink over the edges and add to the card front along with the Gold Thread loops.

Add the embossed flowers using Stampin’ Dimensionals® to finish off the card.

Stamp Sets:  What I Love (2016 SAB), Definitely Dahlia, Gorgeous Grunge

Ink: Versamark™, Blushing Bride, Melon Mambo, Pool Party; Stampin’ Write Markers- Blushing Bride, Melon Mambo

Paper/Cardstock: Whisper White, Crumb Cake, Melon Mambo, Pool Party; retired Sweet Shoppe DSP

Accessories:  Big Shot™, Woodgrain Textured Impressions™ Embossing  Folder, Embossing Buddy®, Stampin’ Emboss® White Embossing Powder, Heat Tool, Banner Triple Punch, Leaf Punch (MS), Gold Thread, Water Spritzer Bottle

You can never have too many “thank you” cards in your stash and I can see that I will be using the What I Love stamp set for many different occasions for sure!


Thanks again for taking the time to visit- I hope all of you have a fabulous evening!

Wednesday, October 20, 2010

CQC55 with SSC173 Sketch Challenge


Hi Again, Stampers!

I wanted to create a card using Part I of this week’s ColourQ’s CQC55 Challenge Colors- (see http://colourq.blogspot.com/) along with the Sketch Challenge from Stamping 411 with the Operators (see http://www.stamping411.blogspot.com/). 


I had not had a chance to ink up my new set, Artistic Etchings yet so decided to use this set along with the fall colors in the challenge.  I utilized a few pieces of previously embossed cardstock along with a collage technique to create this quick and easy card.


Stamp Sets:  Artistic Etchings, French Foliage, Teeny Tiny Wishes
Cardstock:  Basic Black, River Rock, Very Vanilla
Ink: Basic Black, Poppy Parade, River Rock, Tangerine Tango
Accessories: Big Shot, Vintage Wallpaper and Finial Press EF, Distressing Tool, Sponge Dauber, 1 ¼” Black Grosgrain Ribbon, Modern Label and Word Window Punch, Champagne Mist Shimmer Paint, Pearls, Dimensionals

Thanks again for looking- have a blessed week!   

Wednesday, October 13, 2010

CQC54 Two Cards for One Challenge!

Hi Again, Stampers!

I wanted to create a couple of cards using the ColourQ’s CQC54 Challenge Colors- see http://colourq.blogspot.com/ for more details and the lovely samples from the Design Team and entries. 


The first card uses Elements of Style along with the Vintage Wallpaper EF. 

 I embossed the Old Olive layer with the EF and sponged Concord Crush to distress the cardstock. 

I used the main floral image from Elements of Style with Basic Black Classic Ink and watercolored the image using a Blender Pen with Concord Crush, Pumpkin Pie and Old Olive Classic Ink. 

Using the Distressing Tool I distressed the edges, spritzed the card and sponged the edges with Concord Crush.  Layered this onto Concord Crush and sprayed this image along with the embossed background with Frost White Shimmer Paint mixed with 70% alcohol.

Angled the 5/8” Olive Satin Ribbon, added the sentiment and pearls.

Stamp Sets:  Elements of Style, Teeny Tiny Wishes
Cardstock:  Old Olive, Concord Crush, Whisper White
Ink: Basic Black, Concord Crush, Old Olive, Pumpkin Pie    
Accessories: Big Shot, Vintage Wallpaper EF, 5/8” Old Olive Satin Ribbon, Modern Label and Word Window Punch, Color Spritzer Tool, SU! Concord Crush Marker, Blender Pen, Distressing Tool, Sponge Dauber, Frost White Shimmer Paint, Pearls


The second card uses the Masking Technique with Pumpkin Pie, Concord Crush and Old Olive Classic Ink along with Sponge Daubers to create the background scene. 

I stamped the Just Believe floral image with Basic Black, trimmed and added the Concord Crush layer.   Using the Big Shot, I embossed the Pumpkin Pie with the Square Lattice EF, layered this onto Concord Crush, added the 5/8” Black Satin Ribbon, Rhinestones and the sentiment from Peace Within.

Stamp Sets:  Just Believe, Peace Within
Cardstock:  Concord Crush, Pumpkin Pie, Whisper White
Ink: Basic Black, Concord Crush, Old Olive, Pumpkin Pie    
Accessories: Big Shot, Square Lattice EF, 5/8” Basic Black Satin Ribbon, Medium Oval Punch, Sponge Daubers, Rhinestones

 Thanks again for taking the time to visit- I love reading your comments and you are such an encouragement for me!    Have a blessed week!   

Saturday, October 9, 2010

CQC53 Just Believe

Hi Stampers!

I know it’s late and I should be packing up for my workshop tomorrow morning (11 am and it is now past midnight) but I felt that I wanted to create a few more cards to show the versatility of the Just Believe stamp set using the colors from this week’s ColourQ #53 (see http://colourq.blogspot.com/). 


The first card uses the small floral image from Just Believe stamped in Pacific Point and colored using SU! Markers.

Stamp Sets:  Just Believe, Herb Expressions
Cardstock:  Whisper White, Baja Breeze, Pacific Point, Pear Pizzazz, Pumpkin Pie
Ink: Pacific Point, Baja Breeze          
Accessories: Big Shot, Finial Press EF, Backgrounds I Texturz Plate, Crimper Tool, SU! Markers- Pear Pizzazz, Pumpkin Pie, 5/8” Pumpkin Pie Satin Ribbon, SU! Punches- Fancy Flower XL, 2 ½” Circle XL, 1 3/8” Circle, Scallop Trim; Pearls


The second card is another quick and easy card using the large floral image from Just Believe and SU! Markers along with the Color Spritzer Tool. 

Stamp Sets:  Just Believe, Teeny Tiny Wishes
Cardstock:  Whisper White, Pacific Point, Pear Pizzazz
Ink: Pumpkin Pie                               
Accessories: Big Shot, Finial Press EF, SU! Markers- Baja Breeze, Pacific Point, Pear Pizzazz, Pumpkin Pie, 5/8” Pumpkin Pie Satin Ribbon, The Tearing Edge, SU! Punches- 1 3/8” Circle, Word Window, Modern Label; Pearls


Thanks again for visiting- have a blessed weekend!

Thursday, October 7, 2010

CQC53 Wish Big

Hi Stampers!  

I know I should be preparing for my workshop on Saturday, but I just had to create a card using the colors from this week’s ColourQ #53 - check out http://colourq.blogspot.com/ for lovely samples from the Design Team (as well as all of the other entries).    I decided to use the Stamping411 with the Operators sketch SSC171 again (see http://www.stamping411.blogspot.com/ - such a great sketch!).


This card was quick and easy- I stamped the floral image from Just Believe with Pacific Point and used SU! Markers in Pear Pizzazz and Pumpkin Pie to color in the flowers.  I used a  the Color Spritzer Tool and a SU! Baja Breeze Marker to add a little interest in the background.

After layering the panels, I used a previously embossed piece of Whisper White and mounted this onto the Pacific Point and Pear Pizzazz layer.  I originally had a simple stamped sentiment with three pearls to the left, but I did not like the way that turned out so I decided to layer behind the sentiment with the Decorative XL Punch.

Stamp Sets:  Just Believe, Short & Sweet
Cardstock:  Whisper White, Baja Breeze, Pacific Point, Pear Pizzazz, Pumpkin Pie
Ink: Pacific Point                              
Accessories: Big Shot, Finial Press EF, Color Spritzer Tool, SU! Markers- Baja Breeze, Pear Pizzazz, Pumpkin Pie, 5/8” Pumpkin Pie Satin Ribbon, Decorative Label XL Punch, Pearls

Thanks again for taking the time to visit and I hope you enjoy the rest of your week!

Saturday, October 2, 2010

Happy Birthday ColourQ!


Hi Stampers! 

This week ColourQ is celebrating their very 1st Birthday- Congratulations ColourQ! 

They have been providing 52 weeks of great color inspiration and this week they have decided to combine a sketch challenge with your choice of a previous week’s ColourQ combination from their first year (see (http://colourq.blogspot.com/ for more details).
I needed to make two cards for my twin nieces who just turned 15 this week, so what better way to celebrate than to use the sketch/color combination from the ColourQ's birthday week:-) 

I love their color combinations and chose CQC26 since lime green and purple are the favorite colors of both of my nieces.  Of course, they are also “horse crazy” so I used a SU! retired favorite set of mine- Bareback for the focal image.  I changed the colors on each one to try to make them a bit different:-)


A bit of sponging, the Big Shot with a few SU! embossing folders, pearls and ribbon were all it took to make both cards in a jiffy!

Stamp Sets:  Bareback (retired), Short & Sweet
Cardstock:  Certainly Celery, Lovely Lilac, Lavender Lace, Bermuda Bay and Whisper White
Ink: Lovely Lilac and Bermuda Bay


Accessories: Big Shot, Finial Press, Square Lattice and Vintage Wallpaper EF, Word Window and Modern Label Punches, Pearls and 5/8” White Satin Ribbon

Thanks again for visiting and all of your encouragement:-)  I hope you enjoy the weekend- we are expecting lovely weather tomorrow- God Bless!

Wednesday, September 22, 2010

CQC51 Friends 24-7 Thank You

Check out the color choices this week for the ColourQ Challenge #51 (visit their blog at http://colourq.blogspot.com/ for more details).    


Stamp Sets:  En Francais, Friends 24-7, Short & Sweet
Cardstock: Old Olive, Poppy Parade, Whisper White
Ink: Old Olive, Peach Parfait, Poppy Parade
Accessories:  Big Shot, Vintage Wallpaper EF, Brayer, Sponge Daubers, Pearls, Word Window , Modern Label Punch, 2 ½ Circle Punch, Frost White Shimmer Paint Mist, 5/8” Old Olive Satin Ribbon

I used the same technique listed in an earlier blog to create the background paper along with masking for the bird image.  This was a fairly quick and easy card once I determined the design.   

I hope you like this card- thanks again for stopping by!  Have a great week!

Sunday, September 19, 2010

CQC50 Possibility of a Miracle

I decided to make one more card today since I will not be able to stamp tomorrow.

The color choices this week for the ColourQ Challenge #50 are so gorgeous!  Check out their website at  http://colourq.blogspot.com/ for more details and to see all of the lovely samples.    

Stamp Sets:  Friends Never Fade, Fine Flourish, Peace Within
Cardstock:  Cherry Cobbler, Early Espresso, Pear Pizzazz, Peach Parfait, Versamark and Whisper White
Ink: Pear Pizzazz, Cherry Cobbler
Accessories:  Big Shot, Finial Press EF, Heat Gun, Clear EP, Brayer, Sponge Daubers, Pinking Hearts Border Punch, 5/8” satin ribbon from my stash

Thanks again for looking- have a great Sunday! 

Wednesday, September 8, 2010

CQC49 Razzle Dazzle

I decided to make another card this evening since I most likely will not have time to stamp tomorrow evening.

I absolutely love the color choices this week's ColourQ Challenge #49- see http://colourq.blogspot.com for more details.

I will most likely make another card for this challenge but my first card is using a stamp set that has been somewhat neglected- Razzle Dazzle. I like the main image but at times find it difficult to think of ways to use it – it reminds me of Pennsylvania Dutch artwork so I thought that these colors may work well together with this main image in this set.


I inked the entire floral image with Marina Mist and then using sponge daubers, “pounced” Soft Suede, Night of Navy and Pacific Point around the image in various areas. I stamped this main image onto Whisper White- I love to see the blended colors with this technique.


I punched the main image out with the XL 2 ½” circle punch and used a circle cutter to cut the Pacific Point and Marina Mist circles. I feel that I always need to use an Embossing Folder (what did we ever do without our Big Shot?) and I used the Finial Press EF folder on the Whisper White and Soft Suede background layers.


Finished off with 5/8” Night of Navy Satin Ribbon and the sentiment from Watercolor Trio stamped in Night of Navy and layered on a Marina Mist Scallop Oval. The first photo is without pearls and since it seems that I can not make a card without pearls anymore, I added them and took another photo.


Here's the one without the pearls-
Which one do you like better?

UPDATE- What an honor- this card was chosen as one of the Courtiers!  Thank you for all of your kind comments and encouragement!

Thanks again for looking- enjoy your Wednesday!

Thursday, September 2, 2010

CQC48 I'm Here for You


This card was created for this week’s ColourQ Challenge #48- see http://colourq.blogspot.com/ for more details.   The colors for this week’s inspiration photo were definitely a "challenge" for me but I decided to give it a try.  I used the rock and roll  technique for the large flowers along with emboss resist (using sponge daubers).


Stamp Sets: Vintage Vogue, Occasional Quotes (Hostess Level III)
Cardstock: Tangerine Tango, Bermuda Bay, Cherry Cobbler, Daffodil Delight, Very Vanilla, Crumb Cake
Ink: Tangerine Tango, Bermuda Bay, Cherry Cobbler, Daffodil Delight, Crumb Cake, Versamark
Accessories: Big Shot, Square Lattice and Finial Press EF, 1 3/8” and 1 ¼” Square and Scallop Trim Border Punch, Sponge Dauber, Embossing Buddy, Clear EP, Heat Gun, Satin Ribbon from my stash, Dimensionals

Thanks for looking- I hope you like it- have a blessed day!

Wednesday, August 25, 2010

CQC47 & SSC165 Gratitude- Two Challenges in One!

Hi Stampers! It is that time of the week again- new challenges!


This card incorporates two challenges- CQC #47 see http://colourq.blogspot.com/ for more details (and the other wonderful samples submitted by some very talented artists).

I decided to incorporate the colors along with the sketch challenge #SSC165 from Stamping 411 - see http://www.stamping411.blogspot.com/ for more details.   


To create this card: Use the brayer technique described in an earlier post (see CCMC112 instructions)- brayer Whisper White cardstock with More Mustard and Poppy Parade. After applying the colors, use an Embossing Buddy to “de-static” the cardstock. Ink the medallion image with Versamark ink and then directly onto Basic Gray Classic Ink (Craft ink could be used instead of the Versamark/Classic combination). Apply Clear Embossing Powder and heat with the Heat Gun until melted. Carefully cut the image around the outside edges and mount onto a scallop die cut (Big Shot, Scallop #2 Die, Vintage Wallpaper Embossing Folder).

Using the leaf image from the same stamp set, stamp in Basic Gray and stamp off the page first, then stamp onto Whisper White and stamp again (see faint image to the right). Ink the sentiment in Poppy Parade and stamp over the leaf images, layer onto More Mustard and Basic Gray.

Emboss a piece of Whisper White with the Vintage Embossing Folder and spray with Frost White Shimmer Paint mixed with 70% alcohol. Attach the straight piece of ribbon (I used 5/8” satin ribbon from my stash and it is only a shade darker than the Bermuda Bay although in the photo it appears more teal than it is in real life) . Adhere the medallion and sentiment layer to the Whisper White. Layer the embossed Whisper White onto More Mustard and attach the bow portion of the ribbon. Adhere pearl in the center of the medallion and layer all onto Poppy Parade.

I hope you like this card- the color combination was a bit out of my normal "comfort zone" but that's why I enjoy the challenges!  Thanks again for visiting and I hope you have a blessed day!

Saturday, August 21, 2010

CQC46 Kindness from the Heart

I love weekly challenges to keep you stamping!  I generally participate in several each week and some of my favorites are:  Always Playing with Paper (The Paper Players) http://www.thepaperplayers.blogspot.com/  Create with Connie and Mary http://www.createwithconnieandmary.com/   ColourQ  http://colourq.blogspot.com/  and Pals Paper Arts http://www.palspaperarts.com/  and the many challenges at Splitcoast Stampers http://www.splitcoaststampers.com/.  
  

This week for the ColourQ #46 challenge, I decided to make two cards-see http://colourq.blogspot.com for more details and the many other artist's submissions for this week's challenge. 


The first card submitted was what is called Clean and Simple (CAS).  This card has minimal stamping and utilizes several punches- 
5 Petal, Boho Blossom, Large and Medium Oval, Modern Label, XL Designer Label and the Big Shot with the Square Lattice Embossing Folder.  

To create the floral embellishment:   
Using the 5 Petal Punch, punch enough flower layers from Cherry Cobbler, Baja Breeze and Very Vanilla.    For the center of the flowers, punch a piece for each flower with the Boho Blossom punch. Here I used a previously embossed piece of Daffodil Delight (aligned the cardstock to punch only the medium floral image).  Using either a piercing tool (I used a 1/16" handheld punch) create an opening in all of the layers to insert the gold brad.

To assemble the card: Using the Big Shot, emboss a layer of Very Vanilla with the Square Lattice Embossing Folder (I just love this folder- it gives the look of fabric and adds so much texture!).   Adhere the ribbon (retired Wild Wasabi stitched grosgrain) to the lower part of the Very Vanilla piece and attach this entire layer onto a piece of Cherry Cobbler.   Adhere a strip of Wild Wasabi DP to Cherry Cobbler  (I used a piece of retired DP from a previous Hostess Level 1 pack).  Adhere this strip to the Very Vanilla and attach the flower embellishments with Dimensionals or Pop Dots.  The sentiment is from the Hostess Level 3 set Occasional Quotes and was stamped with Cherry Cobbler ink on Very Vanilla cardstock.  Using the Medium Oval Punch, Modern Label Punch with Baja Breeze, Large Oval Punch with the retired Wild Wasabi DP and the new XL Designer Label Punch (from the upcoming Holiday mini) in Cherry Cobbler. 

The first card did not have enough stamping for me:-) so I had to make a second card for the same challenge.   

The second card utilizes one of my favorite techniques- Emboss Resist
To create the main image:  Use an Embossing Buddy to prepare a piece of Very Vanilla for Heat Embossing.   Stamp the large medallion from the new set Day of Gratitude (upcoming Holiday Mini) first in Versamark, then in Daffodil Delight onto prepared Very Vanilla cardstock.  Apply Clear Embossing Powder and set with the Heat Gun.  Once this has dried, use sponge daubers with Baja Breeze (center), Wild Wasabi(middle) and Cherry Cobbler(outside edges) and in a circular motion. apply the ink over the embossed image.  Once the ink has reached the desired intensity, use a very lightly moistened paper towel and gently rub the ink off the embossed images.  Cut the image out carefully around the outer edges. 

Using a Circle Cutter Plus, detemine the size of your circles to encase the medallion and cut a three circles:  smallest from Daffodil Delight, middle from Baja Breeze and largest from Wild Wasbi.  Adhere all three together and mount the medallion with Dimensionals.  Attach a pearl to the center of the medallion and set aside. 

To assemble the card: Adhere a Cherry Cobbler layer onto Wild Wasabi.  Emboss the Very Vanilla piece with the Big Shot and the Square Lattice Embossing Folder, adhere the ribbon (used retired Wild Wasabi stitched grosgrain ribbon) and adhere to the Cherry Cobbler layer.  Adhere the circle focal piece to the Very Vanilla layer and attach the bow. 

Stamp the sentiment from Heard from the Heart on Very Vanilla with Cherry Cobbler ink.  Layer over bottom area of card. 

Thanks for looking-  Have a blessed day!
Related Posts Plugin for WordPress, Blogger...