Showing posts with label Cross. Show all posts

Saturday, February 18, 2023

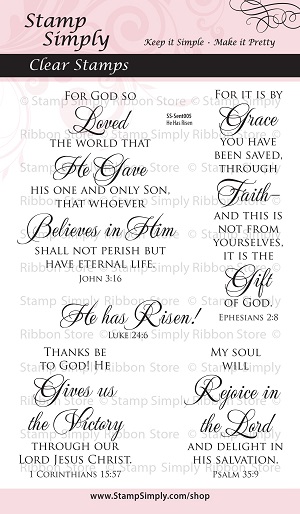
He Has Risen


Hi Friends!

This week the Design Team at Stamp Simply are sharing Easter, Spring and floral cards.

With Easter fast approaching, I decided to use the new Craft Consortium InkDrops- Sunset 6x6 paper for the background and paired it with two different stamp sets, dies and other accessories all from Stamp Simply!

I hope you have time to check out the rest of the inspiration from the Design Team- gorgeous projects by all!


This card was created by heat embossing the daffodil image from
He Lives with white embossing powder onto the orange patterned ink drops paper.  I love the patterns on the ink drop papers- wonderful for backgrounds as well as stand-alone cards.


The
cross was die cut and embossed from white cardstock before being layered onto two additional crosses die cut from black cardstock.

The rolled flower was created by hand- I cut a rough circle from a scrap piece of the background paper, spiral cut from the outside in and crimped with a crimper tool. Once crimped, I rolled the flower from the outside in, and adhered with adhesive. 
The flower was layered with die cut leaves from the Two Sprigs Die set.

The orange jewels on a string are part of the new May Arts Vintage Sampler- On Fire with Orange and Yellow. They fit perfect in the cross (I added a bit of adhesive behind the cross to hold the jewel strand in place).

The sentiment from He Has Risen was heat embossed with black ink and clear embossing powder and the card was finished off with a few pearls.

Stamp Sets: He Has Risen, He Lives (Stamp Simply supplies)

Inks/Mediums: Versamark, Versafine Onyx Black

Cardstock/Paper: Black, Craft Consortium Ink Drops- Sunset 6x6

Accessories/Tools: Gemini, Jr., Stamp Simply Steel Dies- Crosses, Two Sprigs; .75” Lucia Lace- White, Embossing Powder Tool, Clear and White Embossing Powder, Heat Tool, Kaisercraft Round Self-Adhesive Pearls- Pearl, May Arts Vintage Sampler- On Fire with Orange and Yellow

As many of you who follow my blog know, I enjoy participating with online challenges and will be linking to the  Word Art Wednesday #583-#584 “Anything Goes” Challenge.

Also, don’t forget to check out the wonderful array of Easter/Spring sets at Stamp Simply! 


Wednesday, April 1, 2020

TCC132 Happy Easter


Hi Friends!


I love the shabby chic details in this vintage vignette and was inspired by the frame around the cross, the cross itself, the colors as well as the little blue bird and black birdcage to create a Shabby and Vintage Mixed Media Easter card.

In an ongoing effort to use my existing supplies, I finally created a card using the Cross embossing folder that I have had in my stash for a few years and also used a partial sentiment from a Stampin’ Up! stamp set that is from 2002 (God Bless II).


To create this card:

De-static a piece of white cardstock with an embossing powder tool.  Ink the sentiment from God Bless II with Versafine™ Onyx Black ink (I inked just the lower part of the sentiment only), stamp onto white cardstock, apply clear embossing powder and heat emboss with a heat tool.

Trim and create the banner points by hand, mount onto black cardstock and trim close to the edge.

For the background- emboss a piece of gray designer paper with the cross embossing folder and lightly sand the embossing.  

Using a putty knife, apply textured embossing powder onto the background around the cross.  Lightly dry with a heat tool.

Use a clear glitter pen to add shimmer to the cross area, distress the edges of the panel, mount onto a white card base.

Die cut two of the floral clusters from white cardstock, adhere both together to create  a layered die cut.  Die cut two of the single flowers from light blue designer paper, layer together and adhere over the floral area of the cluster die.

Mount the layered die cut directly to the card front and add the layered sentiment with dimensional foam.

Finish off the card with black rhinestones.

Stamp Sets:  God Bless II (retired Stampin’ Up!)

Ink/Mediums: Versafine™ Onyx Black, Studio 490 Crackled Texture Paste (Wendy Vecchi)

Cardstock/Paper: Whisper White, Basic Black; misc. gray and light blue patterned paper from my stash

Tools/Accessories: Gemini, Jr™, Spellbinders™ August Die of the Month Set, Embossing Buddy®, Clear Embossing Powder, Cross Embossing Folder (Darice™),  Heat Tool, utty Knife, Sanding Block, Black Rhinestones

Thanks again for taking the time to visit!  I hope I have inspired you to create your own card based on our {Easter Blessings } photo and link up to our gallery at The Card Concept- we would love to see what inspired you! The challenge is open until April 13th  at noon EDT.

Tuesday, March 1, 2016

SUO143 Happy Easter


Hi Friends!   

It’s time for the SUO143 “Easter Fun” Challenge- I used several stamp sets for this card design and also incorporated the Create with Connie and Mary CCMC395 Sketch Challenge along with the Splitcoaststampers’  Alphabet Challenge (“C” for Cross).

I hope you will have a chance to check out my sister DesignTeam member samples at the SU-Only Challenge site as well as the fantastic Design Team samples and gallery at the other galleries- wonderful inspiration from all!

To create this card:

Ink the cross image from Blessed by God using Stāz-On® Jet Black Ink and stamp two images onto Whisper White cardstock.

Fussy cut both crosses and cut off the lower portion of one of the crosses to use as the bottom half to lengthen the cross.

Ink the lined image from Timeless Textures using Melon Mambo Classic Ink, stamp off on scrap paper, stamp onto a piece of Whisper White cardstock for the center horizontal panel of the sketch, repeat the steps to create a line the entire way across the panel.

Using the Simply Scored™ Tool, flip the panel over and score two lines above the Melon Mambo stamped area and score two lines below (for the other layers of the sketch).

Ink the scroll image from Timeless Textures with Smoky Slate Classic Ink and stamp onto the panel as well as a few splatters.

Trim the panel, mount onto Melon Mambo cardstock, trim and mount onto the Basic Black card base.

Ink the flowers from Everything Eleanor using Stāz-On® Jet Black Ink and stamp three of the flowers onto Whisper White cardstock.

Color the flowers with Stampin’ Write Markers- Blushing Bride and Melon Mambo, spritz with water to soften the ink and fussy cut the flowers.

Stamp the sentiment from Teeny Tiny Wishes onto Whisper White cardstock using Stāz-On® Jet Black Ink, “huff” onto the Timeless Textures stamp images and stamp over the sentiment, trim and create the banner points using the Hexagon Punch.

Layer the sentiment onto Basic Black cardstock, create the banner points using the Hexagon Punch.

Add the Silver Thread and layer the flowers, cross, sentiment with Stampin’ Dimensionals® to finish off the card.

Stamp Sets:  Blessed by God, Everything Eleanor, Timeless Textures, Teeny Tiny Wishes

Ink:  Stāz-On® Jet Black, Melon Mambo, Smoky Slate; Stampin’ Write Markers- Blushing Bride, Melon Mambo, Smoky Slate
Paper/Cardstock: Whisper White, Melon Mambo, Basic Black
Accessories: Simply Scored™ Tool, Hexagon Punch, Silver Thread
Thanks again for stopping by and we hope to see your Stampin’ Up! Only project in our “Easter Fun” Challenge gallery!


Sunday, March 31, 2013

Hallelujah, He Is Risen- Card #2 !!


Happy Easter (again)!! 

I needed one more card for Easter so I decided to use the Freshly Made Sketches FMS79 Sketch along with the colors from the CQC182 ColourQ Challenge (since I had those colors still out and embossed parts from the previous post).


Again, if you have not had the time, check out both sites for wonderful examples and inspiration!! 

To create this card:

Using the Embossing Buddy®, de-static a piece of Whisper White cardstock and stamp the image from Crosses of Hope using Versamark™ ink.  Apply Stampin’ Emboss® Early Espresso Embossing Powder and heat with the Heat Tool.   Once cooled, color with the Stampin’ Write markers in Pool Party, Wisteria Wonder, Lucky Limeade and Always Artichoke and carefully cut out. 

Use the Big Shot™ to emboss a piece of Whisper White cardstock with the Lacy Brocade Textured Impressions™ Embossing Folder (difficult to see in the photo).  Cut the Whisper White embossed cardstock with the 2 ½” Circle Punch and layer onto another 2 ½” Circle punched from Early Espresso cardstock.  

Adhere the cross with Mini Glue Dots and add the rolled flower with the leaves (flower was created with the 1 ¼” Scallop Circle Punch and the leaves are from the Bird Builder Punch). 

Add the Wisteria Wonder and Lucky Limeade DSP layers (previously embossed from the last post and lightly sanded to expose the white core).  Layer the ribbon and embossed Vellum per the sketch, add the ribbon bow, sentiment and Pearl to finish off the card. 

Stamp Sets: Crosses of Hope, Teeny Tiny Wishes

Ink: Versamark™, Stampin’ Write Markers- Pool Party, Wisteria Wonder, Lucky Limeade, Always Artichoke, Early Espresso

Paper/Cardstock:  Whisper White, Early Espresso, Wisteria Wonder and Lucky Limeade DSP, Vellum

Accessories:  Big Shot™,  Lacy Brocade, Vintage Wallpaper and Delicate Designs (Lace)Textured Impressions™ Embossing Folders, Large Scallop Edgelit™, Punches- 2 ½” Circle, 1” Square (for banner points), Word Window (for sentiment), 1 ¼” Scallop Circle, Bird Builder; Embossing Buddy®, Stampin’ Write® Early Espresso Embossing Powder, Heat Tool, Pearls, 5/8” Satin Ribbon (from my stash)

Thanks again for visiting- I hope all of you have a wonderful Easter celebrating our Risen Savior!!

Hallelujah - He is Risen!!


Hi Stampers! 

Happy Easter!!  I hope all of you have a wonderful Easter celebrating our Risen Savior!!

I needed to create a few more Easter cards and decided to use the colors from this week’s CQC182ColourQ Challenge along with the Nacho Average NAC39 Sketch Challenge.  If you have not visited these sites yet, stop by- they have great samples from their Design Teams as well as the other entries.

To make this quick and easy “hybrid” card:

Print an image from the Crosses of Hope Brush Set from My Digital Studio (MDS)- I enlarged the image form the original stamp size :-)  Color the flowers and leaves using Stampin’ Write markers in Pool Party, Wisteria Wonder, Lucky Limeade and Always Artichoke.  Carefully cut out the cross and adhere the sentiment banner.

Use the Big Shot™ with the Vintage Wallpaper Textured Impressions™ Embossing Folder to emboss a piece of Wisteria Wonder Designer Series Paper (DSP) and a piece of Lucky Limeade DSP using the Lacy Brocade Textured Impressions™ Embossing Folder.  Lightly sand the DSP to reveal the white core.

Layer the DSP onto Basic Black cardstock, add the embossed Vellum lace edge and the satin ribbon band.   Add the cross image using Stampin’ Dimensionals and the satin ribbon bow to finish off the card.

Stamp Sets:  Crosses of Hope (MDS), Teeny Tiny Wishes

Ink: Printer Ink- Black, Stampin’ Write markers- Pool Party, Wisteria Wonder, Lucky Limeade, Always Artichoke, Basic Black

Cardstock/Paper: Whisper White, Basic Black, Wisteria Wonder DSP, Lucky Limeade DSP, Vellum

Accessories:  Big Shot™, Vintage Wallpaper, Lacy Brocade and Delicate Designs (Lace)Textured Impressions™ Embossing Folders,  Large Scallop Framelit™, Punches- 1” Square (for banner points), 5/8” Satin Ribbon (from my stash)

Thanks again for stopping by- I hope you have a glorious Easter!
Related Posts Plugin for WordPress, Blogger...
