Showing posts with label Pretty Potted Florals. Show all posts

Wednesday, March 11, 2026

TCC225 She Shall Be Praised


Hi Friends!

Welcome to the #225 {Spring Flowers} Challenge at The Card Concept!  

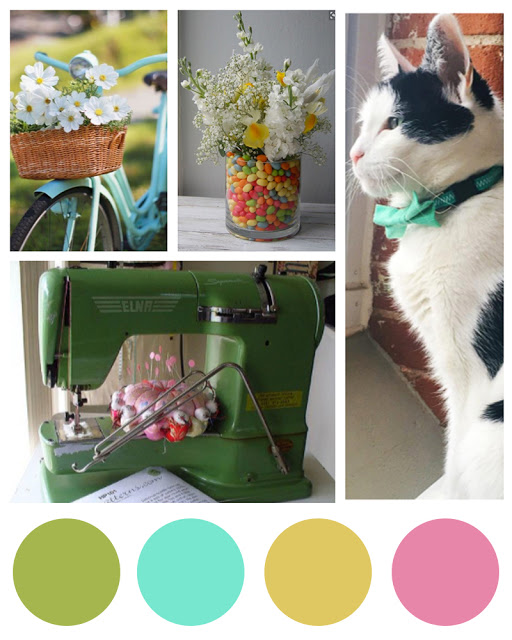
Look at our fun spring inspiration photo!  I loved the bright colors and spring flowers and decided to pull out a few of my neglected stamps from Creative Worship (formerly Sweet ‘n Sassy Stamps) to create a Clean and Layered Mixed Media card.

We hope that you will take a moment to stop by our challenge blog and check out how the rest of our wonderful Design Team was inspired as well!  Our challenge is for the entire month, so we are hoping that you will have time to create a card and join us.

I enjoy playing along with other online challenges and am also playing along with the Craft Rocket #134 No Designer Paper Challenge and the Word Art Wednesday #742-#743 Anything Goes Challenge. If you have not had a chance to check out their sites, I hope you will do so- gorgeous inspiration from all! 

To create this card:

Ink the floral potted image from Pretty Potted Florals with Versafine Onyx Black ink, stamp onto white cardstock, apply clear embossing powder and heat set with a heat tool.


Once the embossing has cooled, watercolor the image using water-based markers, once dry add frost white shimmer paint to the petals (hard to see in the photo).

Add white accents to the floral center with an extra fine white paint pen.

Fussy cut the image and set aside.

Using Peacock Feathers Distress Oxide Ink with a stencil brush, stencil the ink onto a piece of 3 ¾” x 5” piece of white cardstock (I used a retired Memory Box Heartwood stencil).

De-static the lower right-hand area of the stenciled panel, ink the verse sentiment from Precious Poppies with Versafine Onyx Black ink, apply clear embossing powder and heat set with a heat tool.

Mount the stenciled panel onto blue cardstock, trim mount onto orange cardstock, trim and mount onto a white card base.

Adhere the floral image onto the card front with dimensional foam.

Add a few orange rhinestones to finish off the card.

Stamp Sets: Pretty Potted Florals, Precious Poppies (Creative Worship Stamps)

Inks/Mediums: Versafine Black Onyx, Peacock Feathers Distress Oxide; Stampin’ Write Markers- Melon Mambo, Gumball Green, Hello Honey, YoYo Yellow, Early Espresso; Frost White Shimmer Paint, Extra Fine White Paint Pen

Cardstock/Paper: White, Bermuda Bay, Tangerine Tango

Accessories/Tools: retired Heartwood stencil (Memory Box), Stencil Brush, Embossing Powder Tool, Clear Embossing Powder, Heat Tool, AquaPainter™, Orange Rhinestones

I hope you have had a chance to stop by The Card Concept to see how the rest of the Design Team were inspired as well as check out the other challenge gallery entries- gorgeous inspiration from all!

We hope you are inspired to create a card and join us for our #225 {Spring Flowers} at The Card Concept. The deadline to play along is Monday, April 6th  at noon EDT.   


Wednesday, August 23, 2017

Pretty Potted Floral Birthday


Hi Friends!

While I had the colors out for the Splitcoaststampers CC649 Color Challenge for my previous post, I decided to create another quick Clean and Simple (CAS) card for a few more online challenges.

This card uses the Pretty Potted Florals Clear Stamp Set (designed by NinaB Designs) along with Long Stem Silhouettes (designed by Korin Sutherland) – both available at Sweet ‘n Sassy Stamps.


If you have not had a chance to visit the above challenge sites or SNSS Blog/FB Page yet, I encourage you to do so- wonderful inspiration from all!

To create this card:

1). Ink the Pretty Potted Florals image using Versafine™ Onyx Black Ink, stamp onto white cardstock, apply clear embossing powder and heat set with a heat tool. Once the embossing powder has cooled, use a water brush with ink from the Lemon Lime Twist, Bermuda Bay and Basic Gray Stampin’ Write Markers to watercolor the image.  Fussy-cut and set aside.

2). To create the background, slit open an acetate envelope (I use the clear envelope packaging from the SNSS stamp sets:-)), scribble ink from the Bermuda Bay and Lemon Lime Twist markers onto one half of the envelope, lightly spritz with water, close the envelope and “smoosh” the ink around, re-open the envelope and press a piece of white cardstock into the ink.

3). Trim the background, stamp the sentiment from Long Stem Silhouettes using Versafine™ Onyx Black Ink and mount onto a piece of gray cardstock.  Adhere the entire panel onto the white card base and add the fussy-cut flower with dimensional foam.

4). To finish off the card, use a clear glitter pen to add shimmer to the flower petals and the Extra Fine White Sharpie® Paint Pen to add white highlights to the flower center.

Stamp Sets:  Pretty Potted Florals, Long Stem Silhouettes (Sweet ‘n Sassy Stamps)

Ink/Mediums: Versafine™ Onyx Black, Stampin’ Write Markers- Bermuda Bay, Basic Gray, Lemon Lime Twist; Spectrum Noir™ Clear Glitter Pen, Sharpie® Extra Fine White PaintPen

Paper/Cardstock: Whisper White, Basic Gray

Accessories/Tools: Embossing Buddy®, Clear Embossing Powder, Heat Tool, Clear Acetate Envelope, Water Spritzer, AquaPainter™ 

Thanks again for taking the time to stop by- hugs and I hope all of you have a fabulous week!  

Friday, May 12, 2017

Pretty Potted Florals


Hi Friends!

I have another quick CAS Mixed Media card to share using the Pretty Potted Florals Clear Stamp Set (designed by NinaB Designs) and the Long Stemmed Silhouettes Clear Stamp Set (designed by Korin Sutherland)- both available from Sweet ‘n Sassy Stamps.  


Again, if you have not had a chance to visit the challenge sites or SNSS Blog/FB Page yet, I encourage you to do so- gorgeous inspiration from all!

To create this card:

1). Ink the floral image from Pretty Potted Florals using archival black ink and stamp onto white cardstock.  Watercolor the image with water-based markers and die cut with a stitched rectangle die.  Mount onto black cardstock and trim close to the edge.

2). Trim a piece of white cardstock to 4” x 5 ¼” for the background, use sponge daubers with dijon ink along with a flourish stencil to lightly stencil the background panel and around the floral image.

3). Mask off the vertical element of the sketch and apply picket fence distress stain over the stenciling on the background (to tone down the color and create a muted background).  Score along the masked edge before trimming the panel.

4). Layer the horizontal scored strip onto black cardstock, mount the split background panel onto the black card front and adhere the layered horizontal strip.

5). Ink the sentiment from Long Stemmed Silhouettes with embossing ink onto black cardstock and heat emboss with white embossing powder.  Once cooled, create the banner points and mount onto the floral image panel. 

6). Adhere the floral image layered panel onto the card with dimensional foam and use a clear glitter pen to add shimmer to the petals as well as the background (difficult to see in the photo).

7). Finish off the card with a pearl in the center of the flower.

Thanks again for stopping by- I hope I have inspired you to pull out your supplies and create something this weekend.  Hugs and have a great week, sweet friends!


Friday, April 14, 2017

Proverbs 17:17- A Friend Loveth At All Times


Hi Friends!

I hope all of you having a great day so far! I had a chance to design a few cards this week using the Sweet ‘n Sassy Stamps Pretty Potted Florals and Peaceful Peonies Clear Stamp Sets.


If you have not had a chance to visit the challenge sites or SNSS Blog/FB Page, I encourage you to do so- fabulous inspiration from all!

To create this card:

1). Ink the Pretty Potted Florals images using archival black ink and stamp onto white cardstock (I inked just the floral part to save paper).

2). Color each flower with alcohol and water based markers, add clear shimmer with a clear glitter pen.

3). Fussy cut each of the flower images and set aside.

4). Trim a piece of white cardstock to approx.. 4” x 5 ¼”, stamp the verse sentiment from Peaceful Peonies using archival black ink onto the panel, mount onto the black card front and adhere the entire panel onto the white card base.

 5). Die cut a piece of designer paper with a stitched rectangle die and mount onto a piece of black cardstock, trim close to the die cut.

6). Add the die cut panel onto the card front with dimensional foam, add the fussy cut flowers and add the pearls to the centers to finish off the card.

“Moreover, brethren, I declare to you the gospel which I preached to you, which also you received and in which you stand, For I delivered to you first of all that which I also received: that Christ died for our sins according to the Scriptures, and that He was buried, and that He rose again the third day according to the Scriptures.” 

“So they said, “Believe on the Lord Jesus Christ”” Acts 16:31a NKJV
The verse on today’s card also reflects what Christ did for us-

A friend loveth at all times” Prov 17:17 NKJV

Today as we remember Christ’s sacrifice on the cross for all of our sins, my hope and prayer is that you have accepted Christ as your personal Savior.  I am so thankful that the Lord Jesus came to earth, lived as a perfect man, died on the cross for our sins and rose again on the third day. What a wonderful Savior is Jesus my Lord!! 

Hugs and have a blessed Easter, sweet friends!

Monday, March 20, 2017

Pretty Potted Florals Birthday


Hi Friends!


This card was so much fun to design and create! I will be linking this card to the Seize the Birthday Challenge as well as the Flower Challenge #6 "Anything Goes" Challenge

 If you have not had a chance to visit the challenge sites yet, I hope you will find time to do so- gorgeous inspiration from all!


To create this card:

1). Ink the Pretty Potted Florals image using archival black ink, stamp onto a piece of white cardstock, heat set with a heat tool before coloring with alcohol and water based markers.  Die cut the panel with a stitched die and mount onto black cardstock.

2). Use a stencil brush to apply tumbled glass distress ink with a flourish stencil to a piece of white cardstock, layer onto black cardstock and add the designer paper layer.

3). Heat emboss the sentiment from Long Stem Silhouettes with white embossing powder onto black cardstock, layer the floral image along with the sentiment using dimensional foam.

4). Use a Sharpie Extra Fine White Paint Pen to add highlights to the flower center and finish off the card by adding shimmer to the petals with a clear glitter pen.


Thanks again for taking the time to visit, I hope I have inspired you and that you will stop by again soon- hugs and have a blessed week, sweet friends!


Related Posts Plugin for WordPress, Blogger...