Showing posts with label Scripture Collection 4 (ODBD). Show all posts

Tuesday, March 10, 2020

RRCB130 Come To Me


Hi Friends!!

I am so thrilled to be a Guest Designer for The Retro Rubber Challenge Blog #130 Sketch Challenge!

As many of you know, I have a personal goal to ink up some of my "unloved" sets as well as older favs,  so since one of the requirements for The Retro Rubber Blog Challenge Blog is to use stamps that are at least one year old,  I love playing along with their challenge!  

They have a very versatile sketch for the #130 Challenge- I think that this sketch would work for a CAS card as well as an elaborate layered card (I was inspired to create a fairly simple Mixed Media card). 
.

For this challenge, I pulled out one of my favorite retired Stampin’ Up! sets, By the Tide (circa 2013) and combined it with a current Divinity Designs, LLC (formerly Our Daily Bread Designs) stamp set, Scripture Collection 4 (circa 2010). 


To create this card:

De-static a piece of white cardstock with an embossing powder tool, ink the By the Tide images with Versafine™ Onyx Black Ink and stamp onto the panel.  Apply clear embossing powder and heat set with a heat tool. 

Once the embossing has cooled, water color with Distress Oxide inks as well as water-based markers (see below for colors).  Fussy cut each image and set aside.

For the background panel and center squares,  tap Distress Oxide inks onto a silicone mat (I used a combination ofTumbled Glass, Salty Ocean, Twisted Citron and Peacock Feathers), spritz lightly with water, mix the inks together a bit, press the panels into the ink and lift up to move the ink around the panels.

Repeat the steps above using a heat tool between layers until you are satisfied with the results.

Randomly stamp the script image from By The Tide using Black Soot Distress ink onto the larger background panel and the coral image with Peacock Feathers towards the bottom of the panel.

Trim the smaller panel for the three rectangles for the sketch, mount each rectangle onto black cardstock and trim close to the edge.

De-static the background panel with an embossing powder tool, ink the sentiment from Scripture Collection 4 with Versafine™ Onyx Black ink, stamp onto the panel, apply clear embossing powder and heat set with a heat tool.

Trim the panel, mount onto black cardstock, trim close to the edge and mount onto a white card base.

Mount the outside rectangles (per the sketch) directly to the card front and use dimensional foam to mount the center rectangle.

Add the fussy cut images directly to the card front and use dimensional foam to “pop” up the main fish in the center as well as the shell/seahorse in the lower left hand corner.

Use a clear glitter pen to add shimmer to the images as well as an extra fine white paint pen to add highlights to the eye of the center fish.

Finish off the card with a few clear Nuvo™ jewel drops.

Stamp Sets: By the Tide (retired Stampin’ Up!), Scripture Collection 4 (Divinity Designs, LLC)

Ink/Mediums: Versafine™ Onyx Black; Stampin’ Write Markers- Pool Party, Coastal Cabana, Gumball Green; Tim Holtz™ Distress Oxide Inks- Tumbled Glass, Salty Ocean, Peacock Feathers, Twisted Citron, Black Soot; Spectrum Noir™ Clear Glitter Pen, Sharpie™ Extra Fine White Paint Pen, Nuvo™ Morning Dew Jewel Drops

Cardstock/Paper:  Whisper White, Basic Black

Accessories: MISTI™, Embossing Buddy®, Clear EP, Heat Tool, AquaPainter™, Silicone Mat

I hope I have inspired you to create something this week and if you have the time, I know that we would love to your creation using the #130 Sketch at The Retro Rubber Challenge Blog!  

Thanks again for taking the time to visit- I hope all of you have a fabulous week!

Wednesday, September 7, 2016

TCC57 A Woman Who Fears the Lord


Hi Friends!!

Woohoo- we are back with The Card Concept Challenges!!  We have a beautiful photo inspiration challenge to inspire you – Challenge #57 “The Rainbow Connection”.   I was inspired by the colors and texture of the woodgrain door for my Mixed Media card :-)

I also incorporated the Splitcoaststampers SC609 Sketch Challenge into the design as well as the Word Art Wednesday #246-#247 “Anything Goes” Challenge and the Inkspirational #116 Primary Color Challenge.  

Just a reminder that The Card Concept Challenge  is a bi-weekly challenge site that has an inspiration photo along with a number of design styles that you can choose from to create your card- Clean and Simple, Clean and Graphic, Clean and Layered, Shabby Chic, Freestyle Collage, Classy and Elegant and Mixed Media.

I hope you will find the time to visit each of the above challenge sites- wonderful inspiration from all!

To create this card:

Die cut a piece of white cardstock with the largest die from the Our Daily Bread Designs (ODBD) Pierced Rectangle Dies.

Ink the ODBD Chalkboard Vine Background stamp with distress ink, stamp onto the die cut rectangle and mount onto a piece of black cardstock (trimming close to the die cut edge).

Add the white crochet lace and black satin ribbon to the panel (wrapping the ends of the ribbon behind the card front) and mount the card front onto the gray card base.

Create the main woodgrain panel by applying several neutral colors of distress ink and stain to a piece of white cardstock, spritz with water and re-apply until you receive the desired gray shade.

Die cut the panel with the ODBD Pierced Rectangles Dies and emboss with a woodgrain embossing folder.

Swipe the weathered wood distress ink pad over the embossing and use a stencil to add the gesso.

Mount onto a piece of black cardstock die cut with the ODBD Double Stitched Rectangle Dies and add to the card front with dimensional foam.

Ink the sentiment from the ODBD Scripture Collection 4 with archival black ink, stamp onto white cardstock and die cut with the ODBD Layered Lacey Ovals Die.

Mount the sentiment to the card front with dimensional foam.

Die cut pieces of red, soft yellow and blue cardstock with the ODBD Bitty Blossoms Dies and ODBD Pretty Posies Dies, assemble the flowers and add pearls to the centers.

Die cut the leaves with the ODBD Lovely Leaves Dies from wasabi cardstock, add the leaves and flowers to the card front to finish off the card (I used hot glue and dimensional foam under a few for height).

Thanks again for visiting- I hope you have a chance to come play along with us at The Card Concept!!

Monday, April 18, 2016

CAS A Woman Who Fears the Lord


Hi Friends!

This card was designed using the CAS Colours and Sketches #169 Sketch Challenge (I flipped the sketch :-)) along with Kath's #63 Color Challenge at the Watercooler Wednesday Challenge and the Splitcoaststampers' CAS373 "It's About Birthdays" Challenge (this card is for one of the ladies in our Bible Study group).  


I hope you will take the time to visit the above linked sites- so much inspiration!

To create this card:

Ink the butterflies from Papillon Potpourri, flower and branches from Choose Happiness using Versamark™ ink and stamp onto Whisper White cardstock, apply Stampin’ Emboss® Black Embossing Powder and heat set with the Heat Tool.

Color the butterflies with the Stampin’ Write So Saffron marker and punch out using the Elegant Butterfly Punch.

Color the branches with the Pear Pizzazz Stampin’ Write marker and the flowers with the Blushing Bride and Watermelon Wonder Stampin’ Write markersm fussy-cut the images and add white to the center with the Faber-Castell® Pitt Pen White Marker.

Using the Smakin’ Acetate technique, press the Blushing Bride Classic Ink pad against the acetate, spritz with water, lay a piece of Whisper White cardstock down into the ink and lift up the cardstock (pressing in the ink to remove from the acetate).

Ink the sentiment from the Our Daily Bread Designs (ODBD)  Scripture Collection 4 with Watermelon Wonder Classic Ink, stamp onto the background panel and add a few splatters with Watermelon Wonder Classic Ink using the splatter stamp from Timeless Textures. 

Trim the panel, mount onto Watermelon Wonder cardstock, trim and mount onto Pear Pizzazz cardstock, trim and mount onto the Whisper White card base.

Using the dot image from Timeless Textures, stamp with Watermelon Wonder onto the pieces of Watermelon Wonder cardstock, trim and mount onto Pear Pizzazz cardstock.

Adhere the layered Watermelon Wonder pieces to the card front per the sketch and mount the branches, flowers and butterflies.

Add the Pearls to the butterfly centers to finish off the card.

I know this does not appear as a “normal” birthday card but since the sentiment is not the traditional "Happy Birthday" that the recipient could display this throughout the year versus just for a few days :-)

Stamp Sets: Choose Happiness, Papillon Potpourri, Timeless Textures (Stampin’ Up!), Scripture Collection 4 (ODBD)

Ink: Versamark™, Watermelon Wonder; Stampin’ Write Markers- Blushing Bride, Pear Pizzazz, So Saffron, Watermelon Wonder; Faber-Castell® White Pitt Pen Marker

Paper: Whisper White, Pear Pizzazz, Watermelon Wonder

Accessories: Acetate, Water Spritzer Bottle, Embossing Buddy®, Stampin’ Emboss® Black Embossing Powder, Heat Tool, Pearls


Thanks again for taking the time to stop by- I hope you have a wonderful week, my friends!

Wednesday, March 30, 2016

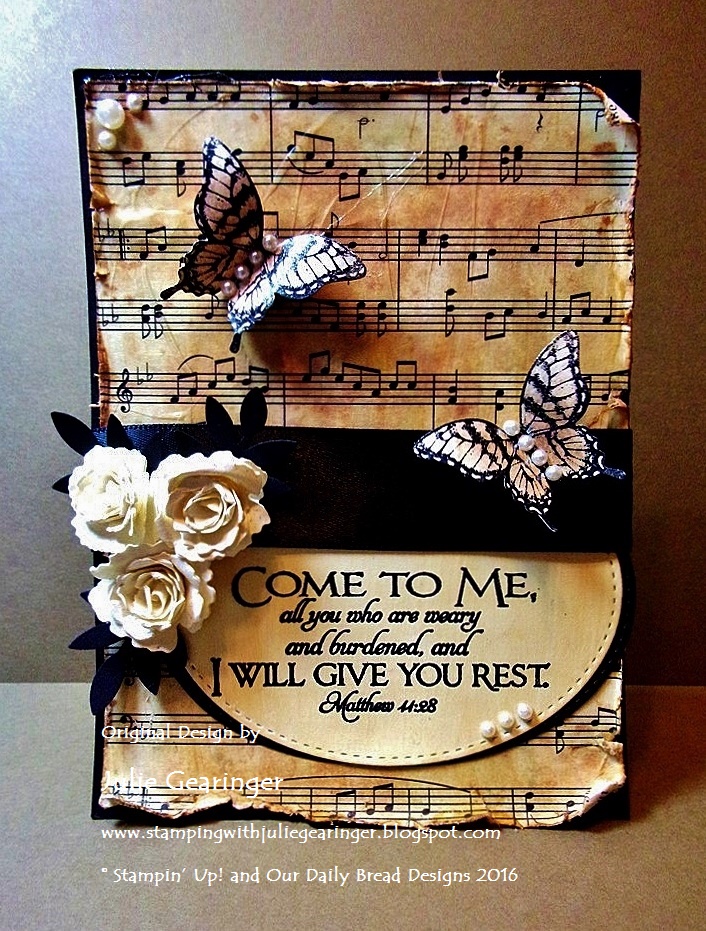
TCC52 I Will Give You Rest


Hi Friends!!


I took inspiration from the gorgeous script and neutral colors along with the flowers and black satin for my Mixed Media card.

Just a reminder that the Card Concept is a bi-weekly challenge that has an inspiration photo along with a number of design styles that you can choose from to create your card- Clean and Simple, Clean and Graphic, Clean and Layered, Shabby Chic, Freestyle Collage, Classy and Elegant and Mixed Media.  


I hope you have a chance to visit us at The Card Concept and check out the rest of our Design Team samples as well as the Alphabet and Splitcoaststampers challenge sites- wonderful inspiration from all!!

To create this card:

Ink the verse from the Scripture Collection 4 from Our Daily Bread Designs (ODBD) using Stāz-On® Jet Black Ink and stamp onto Very Vanilla cardstock.

Use the Big Shot™ with the ODBD Stitched Ovals Dies to cut out the stamped verse and also cut out a piece of Basic Black cardstock.
Split the Basic Black oval in half and adhere behind the die cut verse, apply Tim Holtz® Vintage Distress Medium over the surface and allow to air dry.

 Distress the edges of the Modern Medley Designer Series Paper (DSP) with a Distressing Tool, apply Ranger® Tim Holtz® Old Paper and Tea Dye Distress Stains, heat with the Heat Tool to dry the DSP, apply Tim Holtz® Vintage Distress Collage Medium and once dry apply Tim Holtz® Crazing Distress Medium.

Mount the panel to a piece of Basic Black cardstock, add the Scripture layered die cut to the background panel, adhere a piece of 1” Black Satin Ribbon over the panel (wrapping the edges behind the background panel) and mount the entire panel to the Whisper White card base).

Create the rolled roses with the
It is hard to see the shimmer on the roses and butterflies
but it is there :-)
Big Shot™ with My Favorite Things (MFT) Large Royal  Rose Dies and Royal Rose Dies, roll up the flowers and adhere with Hot Glue in the centers to hold the roses together.

Spritz the flowers with Champagne Mist Shimmer Paint spray, punch out the leaves with the Martha Stewart (MS) Leaf Punch from Basic Black cardstock and add the roses with the leaves to the card front (again, I used Hot Glue).

Stamp the butterflies from Stampin’ Up! Papillon Potpourri using Stāz-On® Jet Black Ink onto Very Vanilla cardstock, color with an AquaPainter™ and Ranger® Tim Holtz® Tea Dye Distress Stain, punch out with the Elegant Butterfly Punch and spritz with Champagne Mist Shimmer Paint spray.

Mount the butterflies onto the card front and add the Pearls to the centers of the butterflies, the corners of the card base and along the sentiment to finish off the card.

Stamp Sets: Papillon Potpourri (Stampin’ Up!), Scripture Collection 4 (ODBD)

Ink: Stāz-On® Jet Black; Ranger® Tim Holtz® Old Paper and Tea Dye Distress Stains, Ranger® Tim Holtz® Vintage and Crazing Medium, Champagne Mist Shimmer Paint Spray

Paper: Very Vanilla, Basic Black, Modern Medley DSP (retired)

Accessories: Big Shot™, MFT Large Royal Rose and Royal Rose Dies, Distressing Tool, AquaPainter™, Elegant Butterfly Punch, MS Leaf Punch, 1” Black Satin Ribbon, Pearls


Thanks again for taking the time to stop by- I hope you can gather your supplies and pick a style to create your own card for our gallery at The Card Concept!  Plus you could have a chance to be in the drawing to win a prize :-) 
Related Posts Plugin for WordPress, Blogger...