Showing posts with label Simply Scored. Show all posts

Friday, October 23, 2015

CAS Leaves for Three Challenges


Partial view from our favorite overlook- Jewell Hollow
Hi Friends!!

My husband and I visited Skyline Drive in Shenandoah National Park today and it was absolutely gorgeous!! 

Look at that tall spindly tree he is in :-)
We saw a Bald Eagle flying across a field before we even left our own county (in an area we never expected to see an eagle) plus in addition to the wonderful fall leaves, we had the thrill of seeing a black bear up in a tree approx. 50 feet high!

We could not believe this branch would hold him :-)
He was quite the acrobat :-)
We were not the first to spot this bear so we are not sure if he climbed the tree in front of the spectators, or if he was already at the top of the tree when they spotted him, but we had the pleasure of watching him for a few minutes.   It is amazing how agile these bears are and the tree trunk was very small compared to the other trees around him but he have loved the nuts  and/or leaves on that particular tree (since he did not even seem to notice that we were congregating on the drive snapping pictures of him)!

All in all, a wonderful fall day marveling at God’s amazing creation!!  Just glorious!


I was so inspired by all of the fall colors, I decided to create a quick card for Nance’s PP267 “CAS Leaves” Challenge at The Paper Players along with the Stampin’ Royalty SR#300 Photo Inspiration Challenge and the FMS209 Sketch atFreshly Made Sketches.

I hope you have a chance to visit the above galleries- wonderful inspiration from all!

To create this card:

Stamp the leaf image from the retired Best of Autumn stamp set using Stāz-On® Jet Black Ink onto a piece of watercolor paper.

Use an AquaPainter™ to add water to the image and color with the Hello Honey, Tangerine Tango, Cajun Craze and Cherry Cobbler Classic Ink pads (“spritzing” and adding more color to create the watercolor wash).

Dry with the Heat Tool and add additional detail with the Stampin’ Write Markers of the same colors.

Use the Big Shot™ with the My Favorite Things™ Stitched Rectangle Dies to cut out the image (I actually shortened the die cut image by overlapping the sides).

Stamp the sentiment from the retired Short & Sweet stamp set using Stāz-On® Jet Black Ink onto a piece of Very Vanilla cardstock, flip the cardstock over and use the Simply Scored™ Tool to score along the sides and top.

Add the scored panel to the Very Vanilla card base, adhere the Gold Twine loops and finish off the card by mounting the leaf focal image using dimensional foam.

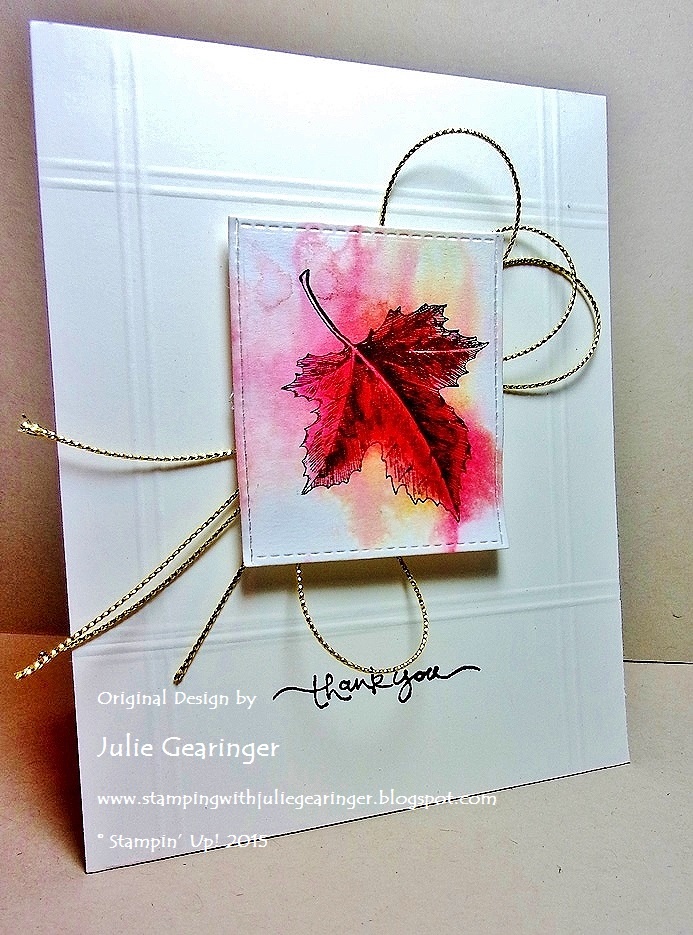
Another view- of course, my card can
never compare to the splendor of the real thing!


Stamp Sets:  Best of Autumn, Short & Sweet(retired Stampin’ Up!)

Ink: Stāz-On® Jet Black, Hello Honey, Cajun Craze, Cherry Cobbler, Tangerine Tango Classic Ink; Stampin’ Write Markers- Cajun Craze, Cherry Cobbler

Paper: Watercolor, Very Vanilla

Accessories: Simply Scored™ Scoring Tool, AquaPainter™, Water Spritzer Bottle, Gold Twine


While I had these colors out, I did create one more fall card with leaves and will share a bit later today.  Thanks again for stopping by- hugs to you, my friends!

Tuesday, October 13, 2015

SUO133 Timeless Elegance Double Diagonal Pocket Card


Hello Friends!   

It’s time for the new SUO133 “Pocket Card” Challenge and I decided to use a tutorial from Splitcoaststampers for the Diagonal Double Pocket Card as my “starting” point.

I hope you will have a chance to check out my sister Design Team member samples and create your own Stampin’ Up! Only project for our gallery. 

To create this card:

Using the basic instructions from the tutorial, trim the Timeless Elegance Designer Series Paper (DSP) to 8.5 x 11” and score at 4.25” and 5.5” to create four “panels”. 
Trim the 5.5” score line on the left (I incorrectly trimmed mine) and follow the instructions in the tutorial to finish off the pocket card.

Since I had “goofed” on my initial trimming, I was able to cut off one of the diagonal folds and use that as the front lighter panel on the card creating a third diagonal pocket.

I also added a small trim piece at the bottom with the 5/8” Gold Satin Ribbon bow attached for a 4th pocket on the front and attached another panel of DSP in the back (to hide the ends of the ribbon) for a 5th pocket.

I decided to create two tags from Very Vanilla cardstock, punched each with the Scallop Tag Topper Punch, added 5/8” Gold Satin Ribbon  with Natural Linen Thread bows and stamped with sentiments from Blessed by God using Stāz-On® Jet Black Ink.

Back view- pocket at the bottom
These additional pockets could be filled with gift cards, tags, photos, etc. and you could decorate this pocket card in so many ways- I just quickly wrapped a cocoa packet with a piece of the Wonderland Vellum in the upper pocket.
Stamp Sets:  Blessed by God
Ink: Stāz-On® Jet Black
Paper/Cardstock: Very Vanilla, Timeless Elegance DSP, Woodland Vellum Stack
Accessories: Simply Scored™ Scoring Tool, Scallop Tag Topper Punch, 5/8” Gold Satin Ribbon, Natural Linen Thread

Thanks again for stopping by and we hope to see your Stampin’ Up! Only project in our “Pocket Card” Challenge gallery!


Built for Free Using: My Stampin Blog

HYCCT1512 Keep Your Faith In Beautiful Things

Hi Again Friends!!

I decided to create a quick card for the Splitcoaststampers' Hope You Can Cling To  HYCCT1512 Kathleen’s “Make It Tasty” Challenge using the Pals Paper Arts PPA271 ColorChallenge and the CAS-ual Fridays CFC144 Tic-Tac-Toe Challenge (Scoring, Spritzing and Sparkling) for inspiration.

I hope you have a chance to visit the above galleries and possibly take time to join in on the fun!!

To create this card:

Stamp the sentiment and pear image from the retired Faith In Nature (retired hostess set from Stampin’ Up!) using Stāz-On® Jet Black Ink onto a piece of watercolor paper.

Use  an AquaPainter™ to add water to the image and color with the Old Olive, Hello Honey and Soft Suede Classic Ink pads (“spritzing” and adding more color to create the watercolor wash).

Dry with the Heat Tool and add additional detail with the Stampin’ Write Markers of the same colors.

Flip the panel over and use the Simply Scored™ Scoring Tool to add the “score” lines, trim the panel, mount onto a piece of Hello Honey cardstock, trim and mount onto Old Olive cardstock, trim once more and mount onto the Soft Suede card base.

Add two Rhinestones (for the “sparkling” part of the Tic-Tac-Toe) to finish off the card.

There you have it- a quick, CAS card with Scoring, Spritzing and Sparking :-)


Stamp Sets:  Faith In Nature (retired Stampin’ Up!)

Ink: Stāz-On® Jet Black, Hello Honey, Old Olive and Soft Suede Classic Ink; Stampin’ Write Markers- Hello Honey, Old Olive, Soft Suede

Paper: Watercolor, Hello Honey, Old Olive, Soft Suede

Accessories: Simply Scored™ Scoring Tool, AquaPainter™, Rhinestones


Thanks again for stopping by- I hope you can drop by again soon! Hugs to you and have a terrific day, my friends!

Sunday, August 2, 2015

Sheltering Tree- Thinking of You :-)

Hi Again Stampers!!

This Clean and Simple (CAS) card was created using the Splitcoaststampers’ SC551 Sketch Challenge (see gallery here) and Free For All F4A263 “Sheltering Friends” Challenge (see details here and gallery here) along with the CQC301 ColourQ Challenge, Just Us Girls #304 Autumn Challenge and Simon Wednesday “Anything Goes” Challenge. 

 If you have not done so, I hope you will have a chance to visit the above sites to check out the wonderful Design Team samples as well as their fantastic galleries!

This card was very simple to create- the stamp set does the work for you (I just love that! :-)):

Use a Sponge Dauber to apply Apricot Appeal, More Mustard and Calypso Coral Classic Ink to the foliage of the Sheltering Tree set, stamp onto Whisper White cardstock, ink the tree trunk using Night of Navy Classic Ink and stamp onto the panel, re-ink the foliage with the same colors and stamp again over the tree trunk.

Sponge the foliage colors onto the watercolor effect strip stamp and stamp twice to create the ground area, trim the panel and mount onto Night of Navy cardstock.

Use the Simply Scored™ Scoring Tool to score the diagonal lines onto the Whisper White background panel (per the sketch) and mount onto the Night of Navy card base.

Add the focal image panel using Stampin’ Dimensionals® along with the stamped sentiment layer to finish off the card.

Quick and easy for sure!!

Stamp Sets: Sheltering Tree

Ink: Calypso Coral, Night of Navy, retired Apricot Appeal and More Mustard

Paper: Whisper White, Night of Navy

Accessories: Sponge Daubers, Hexagon Punch, Simply Scored™ Scoring Tool


Thanks again for stopping by- I hope all of you have a wonderful week!!

Sunday, April 19, 2015

CAS Crazy About You- A Color, Sketch and Stencil Challenge :-)


Hi Stampers!!

Here is the second Clean and Simple (CAS) card that I created using the Hand StampedSentiments HSSCC209 Color Challenge along with the Splitcoaststampers’ SC536 Sketch (see details here and gallery here) and the CAS320 Stencil It! Challenge (see details here and gallery here).

Again, if you have not already done so, I hope you will find the time to visit the above challenge sites!  They have fantastic Design Team samples as well as wonderful inspiration from their galleries :-)

To create this card:

Using Calypso Coral Classic Ink, stamp the flower from Crazy About You and stamp twice onto Whisper White cardstock.

Stamp the leaf stem twice as well using Mossy Meadow Classic Ink onto Whisper White cardstock.

“Fussy-cut” the leaf stems, one of the flowers full size and the other flower without the outer petals.

Use a Sponge Dauber with Bermuda Bay Classic Ink to stencil the honeycomb portion of the Balzer Designs® Mini Punchenella Stencil onto Whisper White cardstock (avoiding the center of the card).

Use the Simply Scored™ Scoring Tool to create the scored lines down the center.

Trim the stenciled Whisper White panel and mount onto a piece of Bermuda Bay cardstock, trim again and mount onto the Whisper White card base.

Stamp the sentiment from Sheltering Tree with Mossy Meadow Classic Ink.

Mount the leaves and large flower to the card front using Tombow™ Multi Mono Liquid Glue and add the second flower to the center of the large flower (lining up the petals) using Stampin’ Dimensionals®.

Adhere the Pearl to the center of the flower to finish off the card.

Stamp Sets:  Crazy About You, Sheltering Tree

Ink:  Calypso Coral, Mossy Meadow

Paper: Whisper White, Bermuda Bay, Calypso Coral

Accessories: Simply Scored™ Tool, Pearl, Mini Punchenella Stencil by Balzar Designs®


Thanks again for stopping by- have a wonderful Sunday, my friends!

Saturday, August 30, 2014

Comfort and Hope Bloom in Your Heart- Clean and Layered (CAL)


Hi Stampers! 

I had a fabulous day crafting with one of my best friends and this evening decided to create a card using the Card Concept#17 "Be Inspired" Challenge along with the final STS#27 Seize The Sketch Challenge to create a Clean and Layer (CAL) card. 

I hope you will find the time to visit both sites to see the gorgeous Design Team cards as well as a terrific gallery of entries!  

So sad that this is the final challenge for Seize The Sketch – I will miss their sketch challenges and wish them all the best!

To create this CAL card:

Ink the large blossom stamp from the retired set, Betsy’s Blossoms using Summer Starfruit Classic Ink and stamp onto Whisper White cardstock. 

Cut into squares and mount onto Basic Gray cardstock.

Score a piece of Whisper White cardstock at the top and bottom, trim and stamp the sentiment using Basic Gray Classic Ink.

Mount a second panel of Whisper White cardstock onto the Basic Gray card base and adhere the scored panel using Stampin’ Dimensionals®.

Mount the stamped image squares using Stampin’ Dimensionals® and add the die cut bird to the card front.

Add a few Pearls to finish off the card.

Stamp Sets: Bloom with Hope, Betsy’s Blossoms (retired)

Ink: Basic Gray, Summer Starfruit (retired)

Paper: Whisper White, Basic Gray

Accessories: Big Shot™, Simply Scored™, Birds and Feather Die Cut (Sweet -n-Sassy), Pearls


Thanks again for visiting- I hope you have a wonderful weekend!!

Tuesday, July 29, 2014

Birthday Wishes For LeAnne- A Color, Technique and Sketch Challenge :-)


Hi Stampers! 

I wanted to create another card using one of my favorite stamp sets, An Open Heart and decided to incorporate the C489 Splitcoaststampers' Color Challenge (Bermuda Bay, Pool Party and Calypso Coral) along with the FM170 Friday Mashup! DelftTile Background and Sketch (modified the sketch a bit) and also a birthday cardfor the #119 blog hop at Merry Monday for LeAnne  (Happy Birthday LeAnne!!).   

If you have not had a chance to do, I hope that you will take a moment to visit all of the challenge sites- so many wonderful Design Teams samples and entries!

To create this card:

Use the Simply Scoring Tool™ to score lines on a piece of Whisper White cardstock at 1” increments to create the tile background.

Using Memento™ Tuxedo Black Ink stamp the stem image onto Whisper White cardstock, mask and repeatedly stamp the image again, mask and stamp once more.

Color the floral stem image using the Stampin’ Write markers- Pool Party and Bermuda Bay for the leaves and Calypso Coral for the berries and blossoms.

Use the medium Calyso Coral Blendabilities™ marker to add shadows on the blossoms and the Crumb Cake Stampin’ Write marker to add shadows to the image.

Use a Sponge Dauber with Crumb Cake Classic Ink to sponge over the entire image and allow the “grout” lines to show :-)   Add additional shadows with Soft Suede Classic Ink  and use the Color Spritzer Tool with the Early Espresso Stampin’ Write marker to add more distressing.

Trim the panel and adhere to a piece of Pool Party cardstock, trim again and add to the Calypso Coral cardstock layer.

Add the embossed lace panel- I had this piece in my scraps :-)   It had been previously cut with the Big Shot™ along with the Large Scallop Edgelit™ and embossed with the Delicate Designs Textured Impressions™ Embossing Folder (that had been inked with Crumb Cake Classic Ink prior to embossing the Whisper White cardstock). 

Sponge additional Crumb Cake Classic Ink onto the Calypso Coral cardstock at the bottom of the card and use the Color Spritzer Tool with the Early Espresso Stampin’ Write marker. 

Add the 5/8” Satin Ribbon bow (from my stash)  to cover the seam of the lace embossed piece. 

I also had a pre-printed sentiment in my stash (using My Digital Studio onto Whisper White cardstock)- sponge with Crumb Cake Classic Ink , punch out using the Large Scallop Punch and layered onto a Pool Party cardstock oval punched with the Large Oval Punch as well. 

Layer the panel onto a piece of Bermuda Bay cardstock , trim and mount onto a Whisper White card base.   Sponge Crumb Cake Classic Ink to “antique” the edges of the card and age the Whisper White card base.

Stamp the Carolina Wren image onto Whisper White cardstock using Memento™ Tuxedo Black Ink and color using the Sahara Sand, Crumb Cake and Baked Brown Sugar Stampin’ Write markers and carefully cut out by hand.

Cut a 2” Circle from Whisper White cardstock and create a horizon line using the Basic Black Stampin’ Write marker.  Mask the line and repeatedly stamp the leaf image from World of Dreams using Pool Party Classic Ink, ink the same image using Bermuda Bay Classic Ink and stamp a few leaves with the Bermuda Bay. 

Color the “ground” area with the Crumb Cake and Baked Brown Sugar Stampin’ Write marker and Light Crumb Cake Blendabilities™ marker. 

 Use a Sponge Dauber with Crumb Cake Classic Ink to distress the paper and add the spritzing using the Early Espresso Stampin’ Write marker along with the Color Spritzer Tool.

Punch out a 2” Circle from Pool Party and Calypso Coral cardstock, split the circles in half horizontally and adhere behind the stamped landscape image.

Add the fussy cut wren to the circle using Stampin’ Dimensionals® and adhere to the layered circle.  

Stamp Sets: An Open Heart, World of Dreams, Hugs and Wishes (MDS version)

Ink: Memento™ Tuxedo Black, Crumb Cake, Soft Suede, Stampin’ Write Markers- Basic Black, Baked Brown Sugar, Crumb Cake, Calypso Coral, Bermuda Bay, Pool Party, Sahara Sand; Stampin’ Blendabilities™- Calypso Coral, Crumb Cake Collections

Paper/Cardstock:  Whisper White, Bermuda Bay, Calypso Coral, Pool Party

Accessories: Big Shot™, Large Scallop Edgelit™, Delicate Designs Textured Impressions™ Embossing Folder, Sponge Dauber, Color Spritzer Tool,  Punches- Large Oval, 2” Circle; Simply Scored™ Tool,  5/8” Satin Ribbon (from our stash)


Thanks again for stopping by- I hope you all of you have a wonderful Tuesday and again, Happy Birthday, LeAnne!!  Hugs to you, my friend :-)

Sunday, August 18, 2013

Two Cards, One Layer and a bit of Scoring!!

Hi Stampers! 

I hope all of you are having a wonderful Sunday!  When I checked out this week’s  PP159 Challenge at The Paper Players, I was surprised to see that it was “Ann’s CAS One Layer Challenge”  :-)  Ann and I both struggle with one layer cards and since she made a fabulous one, I knew I would have to take the challenge as well- thanks for the inspiration Ann!!

Again, if you have not taken the time to visit their site, check it out!!  So many lovely Design Team samples and entries!

Originally I was going to create a masked background but I struggle with creating a "clean" one layer card (I always seem to smudge something or stamp the sentiment crooked) so I decided to take the My Digital Studio (MDS) route again!  For those of you who love the real rubber stamps (I do as well) and are tired of the MDS cards, I promise, they will be coming out to "play" this week :-)

To create the first card:

Open a blank 8.5 x 11 custom page and insert the stamp brush set Swallowtail.  Re-size and position onto the far right hand side of the page (so when you print and score down the center, the image will be on the front of the card).  

Click on the image to allow the “handles” to appear and position your mouse over one of the corner handles until you see the curved arrow (this is the symbol for rotating).  Hold the mouse button down and click on the handle to drag the image into a slight curve.

Insert a Square Punch and enlarge to place over the wing area on the right- change the color of the punch to Whisper White (so it will disappear). 

Position the sentiment from Watercolor Trio under the butterfly (retired set as a rubber stamp set but still "current" in MDS- love it!!).


For the second card:

Follow the same steps above with the Sunflower background stamp brush set, the Square Punches for the sides and angle one of the punches for the bottom right and insert the sentiment from Lovely Romance.

Print the cards onto Whisper White cardstock, fold in half and with the Simply Scored Scoring Tool, add Score Lines along the top, sides and bottom of the card.

Clean and simple (CAS) and only one layer- woohoo, I did it!!

Stamp Sets:  Swallowtail, Watercolor Trio, Sunflower, Lovely Romance  (all MDS)

Ink: Printer Ink- Black

Cardstock: Whisper White

Accessories:  Simply Scored Scoring Tool


I think I will make a few more for a set for quick mailings :-)

Thanks again for taking the time to stop by- your visit is such an encouragement to me!! 

Have a wonderful Monday!!

Monday, April 15, 2013

CAS Wish Big- Two Challenges in One!


Hi Again, Stampers! 

I decided to create another CAS Card for the CAS(E) This Sketch! Challenge #23 and the Hand StampedSentiments HSSCC157 Color Challenge.  

Again, if you have the time, check out both sites for wonderful inspiration!!
                                                                                    To create this very quick, easy CAS card:

Use the Simply Scored Scoring Tool with the Diagonal Score Plate to score four lines onto Whisper White cardstock (for the diagonal lines on the sketch).

Using Island Indigo Classic Ink, stamp the sentiment at the same angle as the scoring.     Trim the scored, stamped  piece to 4” x 5 ¼” and layer onto the Whisper White card base.

Use the Blossom Punch to punch out a flower from Island Indigo cardstock-  emboss the flower using the Big Shot™ with the Lacy Brocade Textured Impressions™ Embossing Folder. 

Also, with the Big Shot™ and the Little Leaves Sizzlelits™ Die, cut two sets of leaves from Lucky Limeade cardstock.

Stamp the medallion image from Lacy and Lovely using Island Indigo Classic Ink onto Daffodil Delight cardstock.  Punch the image out with the 1” Circle punch and layer onto a 1 ¼” circle punched from Whisper White cardstock. 

Add the punched medallion center to the embossed flower,  mount the leaves and flower onto the card front to finish this quick, easy card!  

Stamp Sets: Lacy & Lovely, Short & Sweet (retired)

Ink:  Island Indigo

Paper: Whisper White, Daffodil Delight, Island Indigo, Lucky Limeade

Accessories:  Big Shot™,  Lacy BrocadeTextured Impressions™ Embossing  Folder, Little Leaves Sizzlit™ Die, Simply Scored™ Scoring Tool™. Diagonal Score Plate, Blossom, 1” Circle and 1 ¼” Circle Punches

Thanks again for stopping by and if you have the time, let me know if you like this card (I struggle with the CAS style).      I hope you have a wonderful week!

Sunday, March 24, 2013

Oh Happy Day#2- Another Three Challenges in One!


Hi again Stampers!!


Here is the second card created this evening using the colors from this week’s CQC181 ColourQ Challenge and the FM78 sketch from Freshly Made Sketches plus this card uses the same musical sentiment so it qualifies as the second card also for the CASology #36 Song Challenge :-).  If you have a chance, check out the challenge sites to see how many different designs can be created with one color challenge and a sketch/topic :-). 

To create this card:

Using Basic Black Classic Ink, stamp the daisy image onto Daffodil Delight cardstock and the flower center onto Whisper White.  

Use the 1” Circle Punch to punch out the flower center- color the flower center using Stampin’ Write Brilliant Blue and Brocade Blue marker.  

Carefully cut out the daisy along the edges and adhere the flower center.

Mount the decorative paper to a piece of Basic Black cardstock and add the strips along the center. 

Stamp the sentiment onto Whisper White cardstock using Basic Black Classic Ink and punch out with the 1 3/8” Circle Punch.  Adhere under the Decorative Paper edge  and add the flower using Stampin’ Dimensionals®.   Add a Pearl to the middle of the flower center.  

Use the Simply Scored™ scoring tool to score lines along the top and bottom of the Whisper White card base and the Simply Scored™ Borders Scoring Plate to add the curved edge along the top of the card base.

Adhere the main focal panel to finish off the card- quick and easy!!

Stamp Sets:  Decorate A Daisy, Bloomin’ Marvelous (SAB 2013)

Ink: Basic Black, Craft White, Stampin’ Write Markers- Brilliant Blue and Brocade Blue (both retired)

Paper: Whisper White, Basic Black, Daffodil Delight, Brilliant Blue DSP (retired Hostess Level I Pack), Neutrals Decorative Paper (SU! first Designer Paper introduced and retired over 10 years ago :-))   

Accessories:  1" Circle and 1 3/8” Circle Punch, Pearl

Thanks again for stopping by- I hope all of you have a fabulous Sunday!!

Related Posts Plugin for WordPress, Blogger...