Showing posts with label Best of Autumn. Show all posts

Wednesday, November 6, 2019

TCC123 Give Thanks


Hi Friends!

Welcome to the #123 {Thanksgiving Table} Challenge at The Card Concept!  I was inspired by the colors of the flowers, the blue glass and the black/white checked pillow in the background to create a Clean and Layered Mixed Media card!

As I have mentioned in previous posts, I am making a concentrated effort to ink up the stamps I already own that have not been used in a while. 

For this card, I decided to pull out two retired Stampin’ Up! sets, French Foliage and Best of Autumn.

I decided to use the emboss resist technique to create a panel with the leaves and I was able to create two cards from one panel ( I will post the second card later this week).  It was difficult to capture the shimmer on the leaf panel but it does have a glittery shimmer in the background :-)


If you have not had a chance to visit us at The Card Concept or the other challenge sites yet, I hope you will find time to do so- gorgeous inspiration from all!


To create this card:

After creating the emboss resist panel with the French Foliage stamp set, die cut a circle.  Stamp the script stamp and cancelled stamp image repeatedly with Versafine™ Onyx Black onto the circle, apply clear embossing powder and heat set with a heat tool.

Mount the circle onto a die cut circle from black cardstock.  Use a clear glitter pen to add shimmer to the entire panel (carefully, so you do not mix the inks and dilute the background). Set aside to dry.

Die cut a piece of white cardstock with a stitched rectangle die .  De-static the bottom corner with an embossing powder tool, stamp the sentiment with Versafine™ Onyx Black  ink, apply clear embossing powder and heat set with a heat tool.  Mount onto a piece of black cardstock, trim and mount onto a white card base.

Die cut the blue panel from designer paper with a stitched rectangle die, mount onto black cardstock and trim close to the edge.  Adhere directly to the card front.

This is the view prior to using the clear glitter pen and adding the jewel drops 
Die cut the banners from designer paper, die cut another banner using the same die from black cardstock, split and mount behind the banner.  Add the strip of black satin ribbon with the ribbon slide and mount the banners onto the card front.

Add the die cut focal image circle with dimensional foam (or chipboard). 

Add a few Nuvo™ Morning Dew Jewel Drops to the leaves and three black gems to finish off the card.

Stamp Sets:  French Foliage, Best of Autumn (both retired Stampin’ Up!)

Ink/Mediums: Versafine™ Onyx Black, Versamark™, Tim Holtz™ Distress Oxide- Mustard Seed, Ripe Persimmon, Candied Apple, Peacock Feathers, Picked Raspberry; Spectrum Noir™ Clear Glitter Pen, Nuvo™ Morning Dew Jewel Drops

Cardstock/Paper: Whisper White, Basic Black, Calyspo Coral;  retired Autumn Meadows and Autumn Traditions Designer Series Paper (all Stampin’ Up!)

Tools/Accessories: Big Shot™, Dies- My Favorite Things™ Stitched Rectangle A2 STAX Set 1,  retired Fishtail Banner STAX, Stitched Circle STAX; Sizzix™ Circles, retired Banner Dies (Stampin’ Up!); Sponge Daubers, Embossing Buddy®, Clear Embossing Powder, Heat Tool, ¼” Black Satin Ribbon (Offray), retired Stampin’ Up! Silver Hodgepodge Hardware Ribbon Slide, Black Hexagon Gems

Thanks again for taking the time to visit!  I hope I have inspired you to create your own card based on our {Thanksgiving Table}  photo and link up to our gallery at The Card Concept- we would love to see your interpretation!! The challenge is open until Monday, November 18th at noon, EST.


Monday, November 23, 2015

Acorny "Give Thanks"


Hi Again Friends!!

I wanted to share another card that I created this weekend using the Splitcoaststampers’ SC567 Sketch along with the Colour Me..Subtle! #98 Challenge and the Paper Craft Crew #171 “Give Thanks” Theme Challenge.

 Again, if you have not already visited the above sites, I hope you will take a moment to do so- great inspiration from all!

To create this card:

Trim a piece of Very Vanilla cardstock on an angle for the sketch, mount onto a ppiece of Soft Suede cardstock and mount onto the Very Vanilla card base.

Stamp the acorns from Acorny Thanks using Soft Suede Classic Ink onto Very Vanilla cardstock and punch out the acorns using the Acorn Builder Punch.

Ink one of the acorn tops using Crushed Curry Classic Ink and stamp onto Very Vanilla cardstock.

Ink two acorn tops using Crushed Curry Classic Ink, roll into Cherry Cobbler Classic Ink and daub the ink with a Sponge Dauber to blend the edges.

Punch all of the acorn tops using the Acorn Builder Punch and adhere to the acorns.

Ink the oak leaves from Vintage Leaves using Cherry Cobbler Classic Ink and stamp onto Crushed Curry cardstock and use the Big Shot™ with the Leaves Framelits™ and cut out the leaves.

Use a Sponge Dauber with Soft Suede Classic Ink onto the leaves and acorns.

Add a glue dot to adhere the Gold Metallic Thread, mount the two leaves (looping the thread within the leaves) with Stampin’ Dimensionals®, mount the acorns with Stampin’ Dimensionals™ as well.

Ink the sentiment with Early Espresso Classic Ink, roll into Cherry Cobbler Classic Ink and stamp onto the card front.

Ink the large splatter stamp with Soft Suede Classic Ink and repeatedly stamp the splatter stamp over the card front to finish off the card.

Stamps: Acorny Thanks, Vintage Leaves, Gorgeous Grunge, Best of Autumn (retired)

Ink:  Cherry Cobbler, Crushed Curry, Soft Subtle

Paper: Very Vanilla, Soft Suede, Crushed Curry

Accessories: Big Shot™, Leaves Framelits™, Acorn Builder Punch, Gold Metallic Thread, Sponge Daubers


Thanks again for stopping by- have a great week, my friends!

Friday, October 23, 2015

CAS Leaves for Three Challenges


Partial view from our favorite overlook- Jewell Hollow
Hi Friends!!

My husband and I visited Skyline Drive in Shenandoah National Park today and it was absolutely gorgeous!! 

Look at that tall spindly tree he is in :-)
We saw a Bald Eagle flying across a field before we even left our own county (in an area we never expected to see an eagle) plus in addition to the wonderful fall leaves, we had the thrill of seeing a black bear up in a tree approx. 50 feet high!

We could not believe this branch would hold him :-)
He was quite the acrobat :-)
We were not the first to spot this bear so we are not sure if he climbed the tree in front of the spectators, or if he was already at the top of the tree when they spotted him, but we had the pleasure of watching him for a few minutes.   It is amazing how agile these bears are and the tree trunk was very small compared to the other trees around him but he have loved the nuts  and/or leaves on that particular tree (since he did not even seem to notice that we were congregating on the drive snapping pictures of him)!

All in all, a wonderful fall day marveling at God’s amazing creation!!  Just glorious!


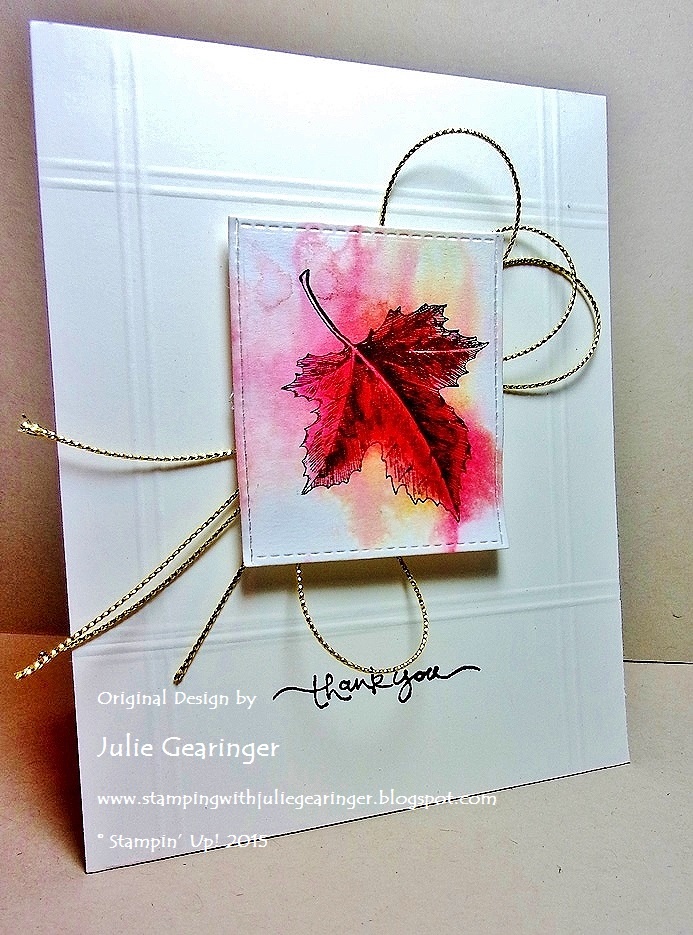
I was so inspired by all of the fall colors, I decided to create a quick card for Nance’s PP267 “CAS Leaves” Challenge at The Paper Players along with the Stampin’ Royalty SR#300 Photo Inspiration Challenge and the FMS209 Sketch atFreshly Made Sketches.

I hope you have a chance to visit the above galleries- wonderful inspiration from all!

To create this card:

Stamp the leaf image from the retired Best of Autumn stamp set using Stāz-On® Jet Black Ink onto a piece of watercolor paper.

Use an AquaPainter™ to add water to the image and color with the Hello Honey, Tangerine Tango, Cajun Craze and Cherry Cobbler Classic Ink pads (“spritzing” and adding more color to create the watercolor wash).

Dry with the Heat Tool and add additional detail with the Stampin’ Write Markers of the same colors.

Use the Big Shot™ with the My Favorite Things™ Stitched Rectangle Dies to cut out the image (I actually shortened the die cut image by overlapping the sides).

Stamp the sentiment from the retired Short & Sweet stamp set using Stāz-On® Jet Black Ink onto a piece of Very Vanilla cardstock, flip the cardstock over and use the Simply Scored™ Tool to score along the sides and top.

Add the scored panel to the Very Vanilla card base, adhere the Gold Twine loops and finish off the card by mounting the leaf focal image using dimensional foam.

Another view- of course, my card can
never compare to the splendor of the real thing!


Stamp Sets:  Best of Autumn, Short & Sweet(retired Stampin’ Up!)

Ink: Stāz-On® Jet Black, Hello Honey, Cajun Craze, Cherry Cobbler, Tangerine Tango Classic Ink; Stampin’ Write Markers- Cajun Craze, Cherry Cobbler

Paper: Watercolor, Very Vanilla

Accessories: Simply Scored™ Scoring Tool, AquaPainter™, Water Spritzer Bottle, Gold Twine


While I had these colors out, I did create one more fall card with leaves and will share a bit later today.  Thanks again for stopping by- hugs to you, my friends!

Friday, July 25, 2014

FMS146 Give Thanks

Hi Stampers! 
 
I wanted to create a card for this week’s Freshly Made Sketches FMS146 Challenge and decided to incorporate My Digital Studio (MDS) with traditional card making techniques and our new Stampin’ Blendabilities™ :-)

I hope you will find the time to visit the Freshly Made Sketches Challenge site- gorgeous Design Team cards as well as a fabulous gallery of entries!


To create this card:

Open a blank document in My Digital Studio (MDS), position the oak leaf image from Lovely As A Tree and print out onto Whisper White cardstock.  

Color the image using Stampin’ Blendabilities™ - Daffodil Delight, Pumpkin Pie, Cherry Cobbler and Crumb Cake Collections (layering the colors).  

Carefully “fussy-cut” around the image and mount using Stampin’ Dimensionals® onto a 2 ½” circle of cardstock (previously embossed with the Woodgrain Textured Impressions™ Embossing Folder).

Layer a 2 ½” circle of Cherry Cobbler cardstock behind the embossed Crumb Cake. 

Layer a piece of the retired Parker’s Patterns and Venetian Romance Designer Series Paper (DSP) onto Cherry Cobbler cardstock, creating the banner points using the Hexagon Punch. 

Use the splatter stamp from Gorgeous Grunge along with Soft Suede Classic Ink onto a piece of Very Vanilla cardstock.  Stamp the sentiment from the retired set, Best of Autumn using Cherry Cobbler Classic Ink at the bottom of the card front.

Trim the panel and mount onto a piece of Cherry Cobbler cardstock, trim and mount onto the Very Vanilla card base.

Adhere the two banners to the card front and add the focal image using Stampin’ Dimensionals® to finish off the card.

Stamp Sets: Lovely As A Tree (MDS version), Gorgeous Grunge, Best of Autumn (retired)

Ink: Cherry Cobbler, Soft Suede, Stampin’ Blendabilities™ - Daffodil Delight, Pumpkin Pie, Cherry Cobbler and Crumb Cake Collections

Paper: Whisper White, Very Vanilla, Crumb Cake, Cherry Cobbler, retired Parkers Patterns, Venetian Romance DSP

Accessories: Big Shot™, Woodgrain Textured Impressions™ Embossing Folder, 2 ½” Circle Punch, Hexagon Punch


Thanks again for stopping by- I hope you have a fabulous Friday!
Related Posts Plugin for WordPress, Blogger...