Showing posts with label Scoring. Show all posts

Thursday, August 1, 2024

TTTC253 In All Your Ways


Hi Friends!

Woohoo!  I have the honor of being the Guest Designer for the Tic-Tac-Toe #253 Challenge!  I love this challenge plus the winner has the opportunity to be a future Guest Designer, what fun!

This challenge board has so many great opportunites! I decided to pull out a few of my retired stamp sets (one of my goals is to create cards at times with my older stamps) and used the middle row across on the board- Flowers- Scoring and Die Cuts, plus I also added twine for this Vintage style floral card.

To create this card: 

Score a few diagonal lines on a piece of kraft cardstock (FYI- I scored four lines at the top left to lower right hand side and six lines in the same direction from the middle left to lower right hand corner- it is a bit difficult to see the scoring in the photo).

Trim the scored panel to 4” x 5 ¼”.  

Ink the sentiment with Versafine Onyx Black ink, stamp onto the lower left hand area of the panel, heat set the ink with a heat tool.


Add a knotted piece of twine between the scored lines (I knotted the twine on the ends but not under the focal image area).  Wrap the ends behind the cardstock, then layer onto a piece of black cardstock (trimming close to the edge – approx. 4 ⅛” x 5 ⅜”).

Mount the entire panel onto an A2 vanilla card base (4 ¼” x 5 ½” tent fold).

Ink the floral image with Versamark Onyx Black ink (I used the retired Butterfly Basics stamp set from Stampin’ Up!), stamp onto vanilla cardstock and heat set the ink with a heat tool.

Color the floral image using water-based markers, and once satisfied with the coloring, die cut with a pierced oval circle die.

Die cut another oval from black cardstock to layer behind the die cut floral image, then die cut a scalloped oval from vanilla cardstock to layer behind the black oval (to complete the floral focal image).

Adhere the layered floral image onto the card front with dimensional foam.

Using black cardstock, create the “photo corners” using scissors- cut a small square from scraps, then cut the angles (I do have a photo corner punch but I wanted smaller corners).

Mount the two photo corners to the opposite corners and  add a pearl to the center to finish off the card.

This completes the “original” card card that I submitted to the Tic-Tac-Toe challenge coordinator.  

I tend to design with more of a Shabby Chic style and decided that I wanted to add more to the background around the flower, so I masked the floral image, inked the honeycomb background stamp (from Butterfly Basics) with Versafine Onyx Black, stamped off a bit before stamping around the floral image. 


After stamping the honeycomb background, I added the postscript image (also from the retired Butterfly Basics set) stamped with Broken China Distress Oxide ink.

I am also joining in with the Double D Challenge “Basket Full of Posies”- I was inspired by the flowers and colors of the basket. 

Stamp Sets: Butterfly Basics (retired Stampin’ Up!). Scripture Medley 2 (retired Verve Stamps)

Ink/Mediums: Versafine™ Onyx Black; Stampin’ Write Markers-Cajun Craze, Calypso Coral, Mossy Meadow, Wild Wasabi; Tim Holtz Broken China Distress Oxide

Cardstock/Paper: Vanilla, Black, Kraft; retired Park Lane Designer Paper (Stampin’ Up!)

Accessories: Scoring Tool, Heat Tool, Gemini, Jr.™, Divinity Designs Pierced Oval Dies, MFT Die-namics Oval Open Scallop Doily, Oval Dies (retired SU!), Natural Twine, Pearls

So which one is your favorite?  The first one with the "clean" background, or the second card with a "distressed" backgrpund?  Curious minds need to know, lol!

Thanks again for taking the time to visit- I hope you will be able to join us at Tic-Tac-Toe#253 Challenge!  Have a blessed week/weekend, sweet friends!

Wednesday, November 30, 2016

Merry Christmas Star


Hi Friends!

I hope all of you are having a wonderful week so far!  It’s time for the new Splitcoaststampers’ SC621Sketch Challenge and I just love the sketch that Diane designed for us this week!

I decided to create a Clean and Simple (CAS) Christmas card with the retired Stampin’ Up! Christmas Star (Holiday Single) stamp along with a sentiment from the retired Contempo stamp set.

I am also linking this card to the Hand Stamped Sentiments HSS252 Inspiration Challenge (I was inspired by the reds and greens as well as the white) along with the Time Out #71 “Christmas with an Optional Twist of Glitter/Shimmer” Challenge.

If you have not already visited the above challenge sites yet, I hope you will have a chance to do so- fabulous inspiration from my DT Sisters at the SCS Sketch Gallery as well as the other challenge sites!

To create this card:

Using Stampin’ Write Markers (Cherry Cobbler and Always Artichoke), color the retired Stampin’ Up! Christmas Star image, “huff” onto the ink to re-moisten and stamp onto a piece of Whisper White cardstock.

Fussy-cut the image and use the Simply Scored™ Tool to score all of the lines.  Fold the score lines to create the dimension and use a foam brush to apply ModPodge® to the image (be careful not to press too hard since the ink will start to run together and set it aside to dry).  FYI- I like to apply ModPodge® at times to images to give them more stability and it does have shimmer :-).

Use the Simply Scored™ Tool to add scoring to create the “side panel” elements of the sketch, trim the panel, mount onto Always Artichoke cardstock, trim again and mount onto Cherry Cobbler Cardstock.

Use Clear Wink of Stella® to add shimmer to the scored areas (difficult to see in the photo).

Use the Cherry Cobbler Stampin’ Write Marker Ink to ink the sentiment from the retired Contempo Christmas stamp set and stamp onto the card front.

Mount the entire card front onto the white card base, add the looped retired Silver Cord and mount the Christmas Star image with dimensional foam.

Stamp Sets:  Christmas Star,  Contempo Christmas (retired Stampin’ Up!)

Ink/Medium: Stampin’ Write Markers- Always Artichoke, Cherry Cobbler; Clear Wink of Stella®; ModPodge®

Cardstock/Designer Paper:  Whisper White, Always Artichoke, Cherry Cobbler

Accessories/Tools:  Simply Scored Tool™, retired Silver Cord


Thanks again for taking the time to visit- I hope you can gather your supplies and join us for the SC621 Sketch Challenge at Splitcoaststampers this week!

Monday, June 6, 2016

Proverbs 31:30- She Shall Be Praised


Hi Again Friends!

I had a great weekend stamping and wanted to share a Mixed Media Clean and Simple card I designed with Majestic Monarchs and Precious Poppies Clear Stamp sets from Sweet ‘n Sassy Stamps.


If you have not had a chance to visit the above challenge galleries yet, I encourage you to do so- it always amazes me how many different cards can be designed with one color, sketch or theme challenge!

To create this card:

Ink the PreciousPoppies Clear Stamp set using Blushing Bride Classic Ink and stamp onto Whisper White cardstock (I cut the clear stamp images apart and used the large flower image along with one from the smaller flower images).


Use an AquaPainter™ to soften the edges and blend the color a bit.

Add the double score lines with the  Simply Scored ™ Scoring Tool (instead of layers for the sketch layout), stamp the sentiment from Precious Poppies using Stampin’ Archival™ Basic Black Ink and heat set with Heat Tool.

Trim the panel, mount onto a piece of Basic Black cardstock and adhere to the Extra Thick Whisper White card base.

De-static a piece of Whisper White cardstock with an Embossing Buddy®, stamp the butterfly image from Majestic Monarchs Clear Stamp Set using Versamark™ Ink, apply Stampin’ Emboss® Black Embossing Powder and heat set with the Heat Tool.

Color the butterfly with Stampin’ Write So Saffron, Blushing Bride and Rose Red markers, softening the edges with an AquaPainter™.

Fussy-cut the butterfly and adhere to the card front (per the sketch- I used hot glue).

Add Clear Wink of Stella® to the flower petals to finish off the card.

Majestic Monarchs 
Stamp Sets: Majestic Monarchs, Precious Poppies (Sweet ‘n Sassy Stamps)

Ink: Versamark™, Stampin’ Archival™ Basic Black, Blushing Bride; Stampin’ Write Markers- Blushing Bride, Rose Red, So Saffron; Clear Wink of Stella®
Paper: Whisper White, Extra Thick Whisper White, Basic Black

Accessories: AquaPainter™, Simply Scored™ Scoring Tool, Embossing Buddy®, Stampin’ Emboss® Black Embossing Powder, Heat Tool


Thanks again for stopping by!!  I hope you have a fabulous week, my friends!

Friday, October 23, 2015

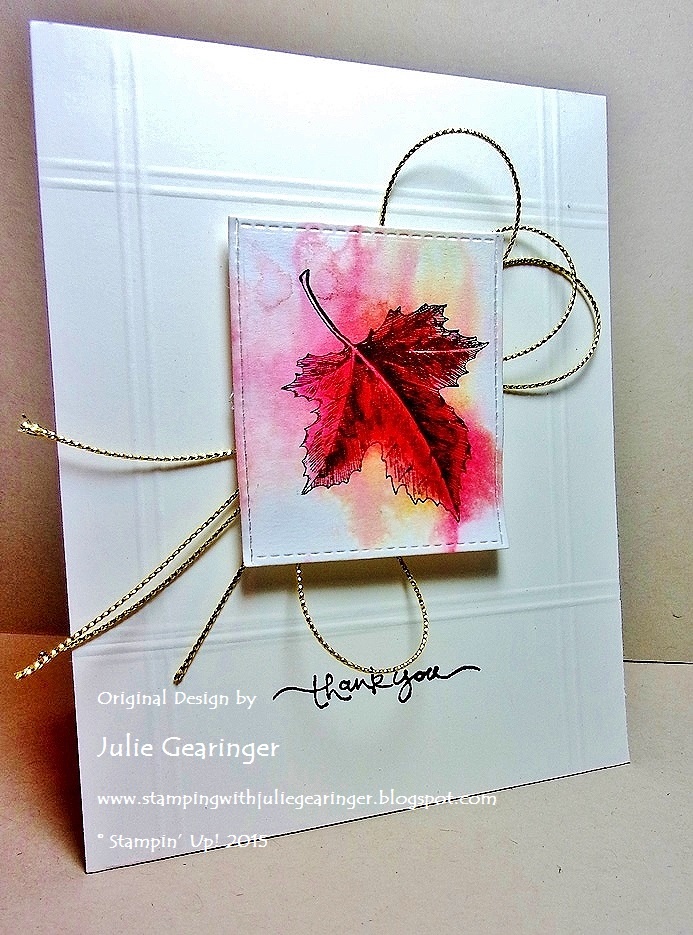
CAS Leaves for Three Challenges


Partial view from our favorite overlook- Jewell Hollow
Hi Friends!!

My husband and I visited Skyline Drive in Shenandoah National Park today and it was absolutely gorgeous!! 

Look at that tall spindly tree he is in :-)
We saw a Bald Eagle flying across a field before we even left our own county (in an area we never expected to see an eagle) plus in addition to the wonderful fall leaves, we had the thrill of seeing a black bear up in a tree approx. 50 feet high!

We could not believe this branch would hold him :-)
He was quite the acrobat :-)
We were not the first to spot this bear so we are not sure if he climbed the tree in front of the spectators, or if he was already at the top of the tree when they spotted him, but we had the pleasure of watching him for a few minutes.   It is amazing how agile these bears are and the tree trunk was very small compared to the other trees around him but he have loved the nuts  and/or leaves on that particular tree (since he did not even seem to notice that we were congregating on the drive snapping pictures of him)!

All in all, a wonderful fall day marveling at God’s amazing creation!!  Just glorious!


I was so inspired by all of the fall colors, I decided to create a quick card for Nance’s PP267 “CAS Leaves” Challenge at The Paper Players along with the Stampin’ Royalty SR#300 Photo Inspiration Challenge and the FMS209 Sketch atFreshly Made Sketches.

I hope you have a chance to visit the above galleries- wonderful inspiration from all!

To create this card:

Stamp the leaf image from the retired Best of Autumn stamp set using Stāz-On® Jet Black Ink onto a piece of watercolor paper.

Use an AquaPainter™ to add water to the image and color with the Hello Honey, Tangerine Tango, Cajun Craze and Cherry Cobbler Classic Ink pads (“spritzing” and adding more color to create the watercolor wash).

Dry with the Heat Tool and add additional detail with the Stampin’ Write Markers of the same colors.

Use the Big Shot™ with the My Favorite Things™ Stitched Rectangle Dies to cut out the image (I actually shortened the die cut image by overlapping the sides).

Stamp the sentiment from the retired Short & Sweet stamp set using Stāz-On® Jet Black Ink onto a piece of Very Vanilla cardstock, flip the cardstock over and use the Simply Scored™ Tool to score along the sides and top.

Add the scored panel to the Very Vanilla card base, adhere the Gold Twine loops and finish off the card by mounting the leaf focal image using dimensional foam.

Another view- of course, my card can
never compare to the splendor of the real thing!


Stamp Sets:  Best of Autumn, Short & Sweet(retired Stampin’ Up!)

Ink: Stāz-On® Jet Black, Hello Honey, Cajun Craze, Cherry Cobbler, Tangerine Tango Classic Ink; Stampin’ Write Markers- Cajun Craze, Cherry Cobbler

Paper: Watercolor, Very Vanilla

Accessories: Simply Scored™ Scoring Tool, AquaPainter™, Water Spritzer Bottle, Gold Twine


While I had these colors out, I did create one more fall card with leaves and will share a bit later today.  Thanks again for stopping by- hugs to you, my friends!

Tuesday, October 13, 2015

HYCCT1512 Keep Your Faith In Beautiful Things

Hi Again Friends!!

I decided to create a quick card for the Splitcoaststampers' Hope You Can Cling To  HYCCT1512 Kathleen’s “Make It Tasty” Challenge using the Pals Paper Arts PPA271 ColorChallenge and the CAS-ual Fridays CFC144 Tic-Tac-Toe Challenge (Scoring, Spritzing and Sparkling) for inspiration.

I hope you have a chance to visit the above galleries and possibly take time to join in on the fun!!

To create this card:

Stamp the sentiment and pear image from the retired Faith In Nature (retired hostess set from Stampin’ Up!) using Stāz-On® Jet Black Ink onto a piece of watercolor paper.

Use  an AquaPainter™ to add water to the image and color with the Old Olive, Hello Honey and Soft Suede Classic Ink pads (“spritzing” and adding more color to create the watercolor wash).

Dry with the Heat Tool and add additional detail with the Stampin’ Write Markers of the same colors.

Flip the panel over and use the Simply Scored™ Scoring Tool to add the “score” lines, trim the panel, mount onto a piece of Hello Honey cardstock, trim and mount onto Old Olive cardstock, trim once more and mount onto the Soft Suede card base.

Add two Rhinestones (for the “sparkling” part of the Tic-Tac-Toe) to finish off the card.

There you have it- a quick, CAS card with Scoring, Spritzing and Sparking :-)


Stamp Sets:  Faith In Nature (retired Stampin’ Up!)

Ink: Stāz-On® Jet Black, Hello Honey, Old Olive and Soft Suede Classic Ink; Stampin’ Write Markers- Hello Honey, Old Olive, Soft Suede

Paper: Watercolor, Hello Honey, Old Olive, Soft Suede

Accessories: Simply Scored™ Scoring Tool, AquaPainter™, Rhinestones


Thanks again for stopping by- I hope you can drop by again soon! Hugs to you and have a terrific day, my friends!

Sunday, April 19, 2015

CAS Crazy About You- A Color, Sketch and Stencil Challenge :-)


Hi Stampers!!

Here is the second Clean and Simple (CAS) card that I created using the Hand StampedSentiments HSSCC209 Color Challenge along with the Splitcoaststampers’ SC536 Sketch (see details here and gallery here) and the CAS320 Stencil It! Challenge (see details here and gallery here).

Again, if you have not already done so, I hope you will find the time to visit the above challenge sites!  They have fantastic Design Team samples as well as wonderful inspiration from their galleries :-)

To create this card:

Using Calypso Coral Classic Ink, stamp the flower from Crazy About You and stamp twice onto Whisper White cardstock.

Stamp the leaf stem twice as well using Mossy Meadow Classic Ink onto Whisper White cardstock.

“Fussy-cut” the leaf stems, one of the flowers full size and the other flower without the outer petals.

Use a Sponge Dauber with Bermuda Bay Classic Ink to stencil the honeycomb portion of the Balzer Designs® Mini Punchenella Stencil onto Whisper White cardstock (avoiding the center of the card).

Use the Simply Scored™ Scoring Tool to create the scored lines down the center.

Trim the stenciled Whisper White panel and mount onto a piece of Bermuda Bay cardstock, trim again and mount onto the Whisper White card base.

Stamp the sentiment from Sheltering Tree with Mossy Meadow Classic Ink.

Mount the leaves and large flower to the card front using Tombow™ Multi Mono Liquid Glue and add the second flower to the center of the large flower (lining up the petals) using Stampin’ Dimensionals®.

Adhere the Pearl to the center of the flower to finish off the card.

Stamp Sets:  Crazy About You, Sheltering Tree

Ink:  Calypso Coral, Mossy Meadow

Paper: Whisper White, Bermuda Bay, Calypso Coral

Accessories: Simply Scored™ Tool, Pearl, Mini Punchenella Stencil by Balzar Designs®


Thanks again for stopping by- have a wonderful Sunday, my friends!

Tuesday, July 29, 2014

Birthday Wishes For LeAnne- A Color, Technique and Sketch Challenge :-)


Hi Stampers! 

I wanted to create another card using one of my favorite stamp sets, An Open Heart and decided to incorporate the C489 Splitcoaststampers' Color Challenge (Bermuda Bay, Pool Party and Calypso Coral) along with the FM170 Friday Mashup! DelftTile Background and Sketch (modified the sketch a bit) and also a birthday cardfor the #119 blog hop at Merry Monday for LeAnne  (Happy Birthday LeAnne!!).   

If you have not had a chance to do, I hope that you will take a moment to visit all of the challenge sites- so many wonderful Design Teams samples and entries!

To create this card:

Use the Simply Scoring Tool™ to score lines on a piece of Whisper White cardstock at 1” increments to create the tile background.

Using Memento™ Tuxedo Black Ink stamp the stem image onto Whisper White cardstock, mask and repeatedly stamp the image again, mask and stamp once more.

Color the floral stem image using the Stampin’ Write markers- Pool Party and Bermuda Bay for the leaves and Calypso Coral for the berries and blossoms.

Use the medium Calyso Coral Blendabilities™ marker to add shadows on the blossoms and the Crumb Cake Stampin’ Write marker to add shadows to the image.

Use a Sponge Dauber with Crumb Cake Classic Ink to sponge over the entire image and allow the “grout” lines to show :-)   Add additional shadows with Soft Suede Classic Ink  and use the Color Spritzer Tool with the Early Espresso Stampin’ Write marker to add more distressing.

Trim the panel and adhere to a piece of Pool Party cardstock, trim again and add to the Calypso Coral cardstock layer.

Add the embossed lace panel- I had this piece in my scraps :-)   It had been previously cut with the Big Shot™ along with the Large Scallop Edgelit™ and embossed with the Delicate Designs Textured Impressions™ Embossing Folder (that had been inked with Crumb Cake Classic Ink prior to embossing the Whisper White cardstock). 

Sponge additional Crumb Cake Classic Ink onto the Calypso Coral cardstock at the bottom of the card and use the Color Spritzer Tool with the Early Espresso Stampin’ Write marker. 

Add the 5/8” Satin Ribbon bow (from my stash)  to cover the seam of the lace embossed piece. 

I also had a pre-printed sentiment in my stash (using My Digital Studio onto Whisper White cardstock)- sponge with Crumb Cake Classic Ink , punch out using the Large Scallop Punch and layered onto a Pool Party cardstock oval punched with the Large Oval Punch as well. 

Layer the panel onto a piece of Bermuda Bay cardstock , trim and mount onto a Whisper White card base.   Sponge Crumb Cake Classic Ink to “antique” the edges of the card and age the Whisper White card base.

Stamp the Carolina Wren image onto Whisper White cardstock using Memento™ Tuxedo Black Ink and color using the Sahara Sand, Crumb Cake and Baked Brown Sugar Stampin’ Write markers and carefully cut out by hand.

Cut a 2” Circle from Whisper White cardstock and create a horizon line using the Basic Black Stampin’ Write marker.  Mask the line and repeatedly stamp the leaf image from World of Dreams using Pool Party Classic Ink, ink the same image using Bermuda Bay Classic Ink and stamp a few leaves with the Bermuda Bay. 

Color the “ground” area with the Crumb Cake and Baked Brown Sugar Stampin’ Write marker and Light Crumb Cake Blendabilities™ marker. 

 Use a Sponge Dauber with Crumb Cake Classic Ink to distress the paper and add the spritzing using the Early Espresso Stampin’ Write marker along with the Color Spritzer Tool.

Punch out a 2” Circle from Pool Party and Calypso Coral cardstock, split the circles in half horizontally and adhere behind the stamped landscape image.

Add the fussy cut wren to the circle using Stampin’ Dimensionals® and adhere to the layered circle.  

Stamp Sets: An Open Heart, World of Dreams, Hugs and Wishes (MDS version)

Ink: Memento™ Tuxedo Black, Crumb Cake, Soft Suede, Stampin’ Write Markers- Basic Black, Baked Brown Sugar, Crumb Cake, Calypso Coral, Bermuda Bay, Pool Party, Sahara Sand; Stampin’ Blendabilities™- Calypso Coral, Crumb Cake Collections

Paper/Cardstock:  Whisper White, Bermuda Bay, Calypso Coral, Pool Party

Accessories: Big Shot™, Large Scallop Edgelit™, Delicate Designs Textured Impressions™ Embossing Folder, Sponge Dauber, Color Spritzer Tool,  Punches- Large Oval, 2” Circle; Simply Scored™ Tool,  5/8” Satin Ribbon (from our stash)


Thanks again for stopping by- I hope you all of you have a wonderful Tuesday and again, Happy Birthday, LeAnne!!  Hugs to you, my friend :-)
Related Posts Plugin for WordPress, Blogger...