Showing posts with label Sincere Salutations. Show all posts

Tuesday, July 5, 2016

Noble Deer- Thinking of You

Hi Again Friends!

Woohoo!  I am excited to announce that I am the Guest Designer for the Retro Rubber Challenge Blog for the new #42 Challenge to use brads or eyelets! 

One of the perks of playing along with the Retro Rubber Challenge Blog is that if you are chosen as the challenge favorite, you have the opportunity to guest design for one of their future challenges. 

This was a new challenge site for me so I first played along with the #rrbc40 Challenge and I am honored that they chose this  card as their favorite and now I have a chance to be their Guest Designer for Challenge #42:-)

To me brads or eyelets seem to be  perfect for masculine cards, so I pulled out retired Stampin’ Up! sets, retired Stampin' Up! paper and retired Stampin' Up! brads for a truly retro card!  

I have been a Stampin' Up! Demo  since 1999 (primarily a hobby/discount demo) and have kept all of my retired stamps.  I love that the Retro Rubber Challenge Blog promotes using your older stamps (at least one year old).

I know that I personally am guilty of buying stamps that either retire shortly after purchase, or I have so many new purchases that I have not had a chance to ink them up before they retire- I bought both of these sets because I loved the art work,  sentiment fonts, plus my dad was always an avid hunter and sportsman :-)

I was able to even incorporate a retro sketch from June 2011  at Splitcoaststampers #SC36 (I flipped the sketch and the SCS challenges never expire) plus I will also be linking to the current Simon Says Wednesday “Anything Goes” Challenge along with The Daily Marker 30 Day Coloring Challenge- Day #1 

If you have not already done so, I hope you will visit the Retro Rubber Challenge Blog as well as the other challenge sites to check out the wonderful inspiration from all of the Design Teams as well as their gallery entries!

To create this card:

Using ink from the Basic Black Stampin’ Archival Pad™, stamp the Noble Deer (retired Stampin’ Up circa 2004) image onto Whisper White cardstock.  

Don't you just love this deer image- I would never hunt them (but fully understand the need to hunt, as I noted, I was raised in a hunting family :-)) but I do love admiring deer in the fields and woods...such beautiful examples of God's creation!

Use an AquaPainter™ along with ink from Ranger® Tim Holtz® Distress Ink Pads- Stormy Sky, Crushed Olive, Mowed Lawn, Iced Spruce, Gathered Twigs and Tea Dye to color the image.

Add additional horizon lines with a Faber-Castell® Black XS Pitt Pen marker and heat with the Heat Tool to dry the watercolor.

Use the Big Shot™ with the My Favorite Things™ (MFT) Stitched Rectangle STAX Dies to cut out the image, mount onto Soft Suede cardstock and add the photo corners (created from the retired Photo Corner Punch-SU!).

Add the retired Brushed Brass brads to the photo corners and set the image aside.
For the background, use the Simply Scored™ Scoring Tool to score the diagonal lines on the Apple Cider Designer Paper (I just scored along the lines on the paper to mimic a quilting effect), trim and mount onto a piece of Tip Top Taupe cardstock, trim again and mount onto a piece of Soft Suede cardstock.

Add the 5/8” Rust Satin Ribbon and layer a piece of retired 3/8” Soft Suede Taffeta Ribbon over the Rust Satin Ribbon (wrap the ends behind the panel).

Mount the entire card front onto the Extra Thick Whisper White card base.

Mount the focal image onto the card front with dimensional foam and add the 5/8” Rust Triple Satin Ribbon bow along with the Antique Brad in the center (I used Hot Glue to add this bow so it will be securely attached).

Ink the sentiment from Sincere Salutations (retired Stampin’ Up circa 2005) with ink from the Basic Black Stampin’ Archival Pad™, stamp onto Whisper White cardstock, heat set with the heat tool.

Use an AquaPainter™ with ink from Ranger® Tim Holtz® Crushed Olive, Mowed Lawn and Iced Spruce- just brush across the sentiment, die cut with the MFT Stitched Rectangle STAX Dies and mount onto Soft Suede cardstock.

Cut the tiny photo corners by hand and add to the corners, mount the sentiment to the card front with dimensional foam to finish off the card.

Stamp Sets:  Noble Deer (2004), Sincere Salutations (2005)- both retired Stampin’ Up!

Ink: Basic Black Stampin’ Archival Pad™, Ranger® Tim Holtz® Distress Ink Pads- Stormy Sky, Crushed Olive, Mowed Lawn, Iced Spruce, Gathered Twigs and Tea Dye, Faber-Castell® Black XS Pitt Pen marker

Paper:  Whisper White, Soft Suede, Tip Top Taupe; retired Apple Cider Designer Paper (2007 Stampin’ Up!)

Accessories: Big Shot™, MFT Stitched Rectangle STAX Dies, AquaPainter™, retired Stampin’ Up! items- Photo Corner Punch, Antique Brad, Brass Brads, 3/8” Soft Suede Taffeta Ribbon; 5/8” Rust Satin Ribbon (from my stash)


Thanks again for visiting- I hope I have inspired you to pull out some of your older stamps and come play along with us at the Retro Rubber Challenge Blog ! 

Thursday, January 26, 2012

CAS for Simply Stampin' Sketch#43


Hi Stampers! 
I wanted to create another Clean and Simple (CAS) card and chose the wonderful Sketch#43 at Simply Stampin’ for my inspiration. 
This is my first time participating with their challenge blog and I love all of the Design Team ideas as well as the individual entries- great job ladies! 
This sketch has so many possibilities but I decided to let the beautiful Mocha Morning Designer Series Paper "take the stage" on this card:-)  

To create this card:

With the Big Shot™, emboss a piece of the Very Vanilla with the Finial Press Textured Impressions™ Embossing Folder and mount onto a piece of Basic Black cardstock.
Use the 1 1/” Square Punch to punch out five squares from the Mocha Morning DSP and mount onto Basic Black squares punched with the 1 3/8” Square Punch.

Stamp the sentiment with Basic Black Classic Ink onto Very Vanilla cardstock, punch out with the Large Oval Punch and layer onto a piece of Basic Black cardstock (punched with the Decorative Label Punch).

Add the 5/8” Basic Black Satin Ribbon bow and Pearls to finish off the card.

Stamp Sets:  Sincere Salutations

InkBasic Black

Paper: Very Vanilla, Basic Black, Crumb Cake, Mocha Morning DSP

Accessories:  Big Shot™, Finial Press Textured Impressions™ Embossing Folders , Punches- 1 ¼” and 1 3/8” Square, Large Oval and Decorative Label, 5/8” Basic Black Satin Ribbon,  Pearls  

Thanks again for visiting- it is such an encouragement to me! I hope all of you have a wonderful week! 

Tuesday, October 18, 2011

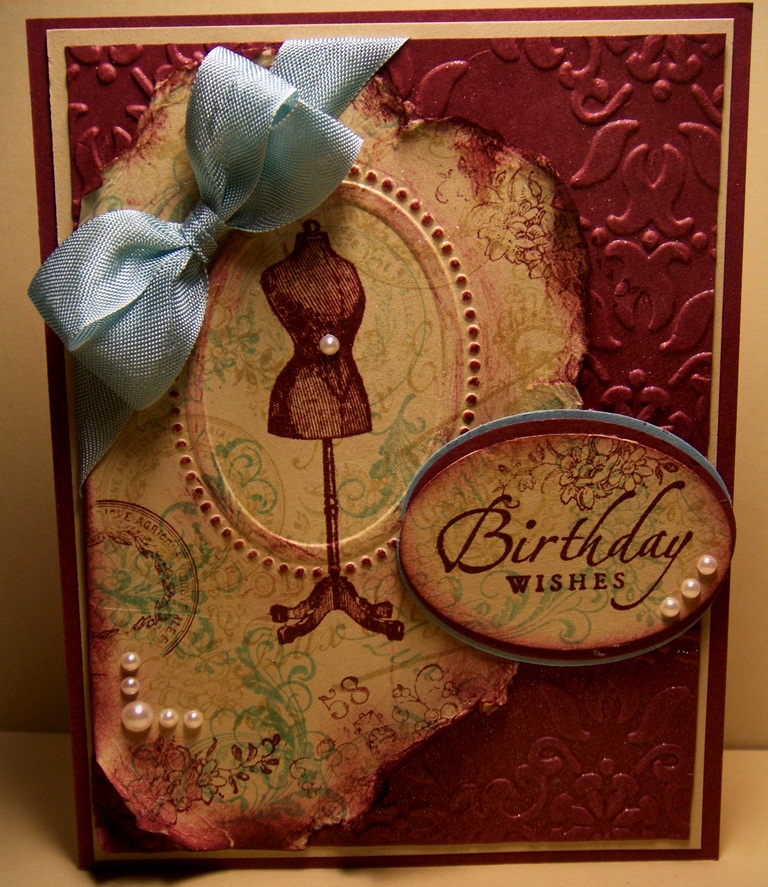
CCMC171 Vintage Birthday


Hi Stampers! 

I created this card using this week’s  CCMC171 Color Challenge at Create with Connieand Mary- at first this color challenge seemed to be a difficult one, but the Design Team samples were so inspirational and once I started "playing", the colors seemed to go great together!  If you have not stopped by their site this week, check them out!

To create this card:

On a piece of River Rock cardstock, create the collage background using River Rock, Baja Breeze and Bravo Burgundy (stamping off for the Bravo Burgundy). Once the collage is finished, stamp the dress form in Bravo Burgundy ("full strength" ink:-)).

Use the Big Shot™ with the Oval Decorative Label Textured Impressions™ Embossing Folder and line up the dress form image prior to embossing the collage panel.  Tear the edges and reserve a piece for the sentiment. 

Stamp the sentiment using Bravo Burgundy and punch out with the Large Oval Punch.  Layer with Bravo Burgundy and Baja Breeze (also punched with the Large Oval Punch). Using a Sponge Dauber, sponge the edges of the collage panel and sentiment with Bravo Burgundy to distress. 

Spray both the collage and sentiment with Champagne Mist Shimmer Paint (mixed with 70% alcohol).   Layer onto an embossed panel of Bravo Burgundy, add the Baja Breeze Seam Binding bow and pearls to finish off the card.

Stamp Sets: Established Elegance, Sincere Salutations

Cardstock: Baja Breeze, Bravo Burgundy, River Rock

Ink: Baja Breeze, Bravo Burgundy, River Rock

Accessories: Big Shot™, Vintage Wallpaper and Oval Decorative Frame Textured Impressions™ Embossing Folders, Large Oval Punch, Baja Breeze Seam Binding, Champagne Mist Shimmer Paint, Sponge Dauber,  Pearls

Thanks again for stopping by- have a great week creating!  

Saturday, October 15, 2011

PP67 Holiday Greetings- with or without?


Hi Stampers!   

Just in the "nick of time"!  I wanted to create a card for this week’s PaperPlayers PP67 Color Challenge and hopefully will have time to load before the deadline:-)

I decided to use a new set, Creative Elements and thought that this card could be either for Christmas or Thanksgiving- also at first I did not have the pearls and then added them, which do you prefer?

To create this card:

Use the Embossing Buddy® to de-static a piece of More Mustard cardstock and stamp the floral image with Versamark®ink and then again into Bravo Burgundy and heat emboss with Stampin’ Emboss® Clear Embossing Powder. 

Use the Big Shot™ and emboss a piece of Very Vanilla cardstock with the Snowburst Textured Impressions™ Embossing Folder, a small piece of More Mustard with the Square Lattice EF  and a piece of Very Vanilla with the Oval Decorative Frames EF.

Stamp the sentiment with Bravo Burgundy in the oval frame and the scroll image with Cajun Craze (stamp off first).  Use a Sponge Dauber with Bravo Burgundy to sponge around the edges and bring out some of the texture.

Better without Pearls or with?
Spray the Very Vanilla embossed background as well as the oval frame with Champagne Mist Shimmer Paint spray (also, I used the reverse side of the Snowburst EF and it looks a bit different- must say, I like it:-)).

Layer the panels, add the 5/8” Satin Ribbon (from my stash) and pearls to finish off the card. 

Stamp Sets:  Creative Elements, Sincere Salutations

 Ink: Versmark™, Bravo Burgundy, Cajun Craze

Cardstock:  Very Vanilla, More Mustard, Cajun Craze Designer Series Paper

Accessories:  Big Shot™, Snowburst, Finial Press and Oval Decorative FrameTextured Impressions™ Embossing Folders, Embossing Buddy®, Stampin’ Emboss® Clear Embossing Powder, Heat Tool, Pearls, 5/8” Satin Ribbon (from my stash)

Thanks again for stopping by!   I hope all of you have a great weekend- try to find some time to “play”! 

Saturday, October 8, 2011

Embedded Embossing- Birthday Wishes


Hi Stampers! 

I created this card for a special friend of mine using the CCMC170Sketch at Create with Connie and Mary and the colors from this week’s HSSCT87Hand Stamped Sentiments Challenge.  Both sites have wonderful inspiration- if you have a moment, check them out! 


I decided to use the Emboss Resist and Embedded Embossing for this card (not sure if Embedded Embossing is the correct name but it seems to describe the technique :-))

To create this card:

Use the Embossing Buddy® to de-static a piece of Pumpkin Pie Designer Series Paper and stamp the Sweet Floral background stamp with Versamark®ink.  Apply Stampin’ Emboss® Clear Embossing Powder and heat with the Heat Tool.  Once the image has cooled, use Sponge Daubers to apply Cherry Cobbler and Night of Navy Classic Ink over the image using circular motions to push the ink into the detail of the embossing.  Gently wipe the excess ink off with a damp paper towel and carefully cut around the image.

Adhere the image to Night of Navy cardstock, trim and use the Big Shot™ with the Square Lattice Textured Impressions™ Embossing Folder to emboss.  Mount onto Cherry Cobbler cardstock and add the 5/8” Night of Navy Satin Ribbon and mount the entire panel onto Pumpkin Pie cardstock.

Create the rolled flowers from Cherry Cobbler and Pumpkin Pie using the 1 3/8”  and 1 ½” Circle Punches (cut a spiral and roll up- quick and easy) and insert a pearl into the center of each flower.

Stamp the sentiment onto Pumpkin Pie, punch out with the Large Oval Punch and layer with two Large Oval pieces of Cherry Cobbler.

Add the sentiment and flowers to the card and finish off with the 5/8” Night of Navy Satin bow.


Modified version:  Add the Whisper White carstock layer- punched border at the bottom (punched with the Eylet Border Punch and crimped with the Crimper). 


So which one do you like better?  With the white layer at the bottom or without ( am leaning to the one with the white..)?


Stamp Sets: Sweet Floral (background), Sincere Salutations
Cardstock: Cherry Cobbler, Night of Navy, Pumpkin Pie
Ink: Versamark®, Cherry Cobbler, Night of Navy
Accessories: Big Shot™, Square Lattice Textured Impressions™ Embossing Folder, Embossing Buddy® , Stampin’ Emboss® Clear Embossing Powder , Heat Tool, 5/8” Night of Navy Satin Ribbon, Large Oval Punch, 1/38” and 1 ½’ Circle Punches,  Sponge Daubers, Pearls

Thanks again for stopping by! I hope you like this card- I had a great time creating it!   Have a wonderful Sunday and God Bless! 

Thursday, October 6, 2011

SSC223 Get Well Soon


Hi Stampers! 
It has been a stressful week at my accounting job, so after Awana this evening, I decided that I need a “de-stress” with my card making and what better way than with the Operators at Stamping411 :-).   
I wanted to create a fairly quick, easy card and I love the SSC223 sketch this week, so I chose to keep it simple by using Designer Paper for the background. 
This sketch has so many possibilities, and again, the Stamping411 Design Team has done a fabulous job! If you have a chance to visit, check them out along with all of the other gorgeous entries!

To create this card:

With the Big Shot™, emboss a piece of the Beau Château Designer Series Paper with the Square Lattice Textured Impressions™ Embossing Folder and a piece of Pink Pirouette with the Oval Designer Frame Textured Impressions™ Folder (I stamped the sentiment first in Soft Suede before embossing) .   

Trim around the oval frame, cut off one end of the Designer Series Paper (to flip over and use the reverse side) and tear the upper right hand corner.  Use a Sponge Dauber with Soft Suede ink to distress the layers a bit and adhere the DSP onto Soft Suede.

Use the Crimper to crimp the exposed corner of the Soft Suede background and a piece of Marina Mist cardstock.  Punch the edge of the Marina Mist with the Scallop Trim Border Punch and adhere over the cut edge of the DSP. 

Create the rolled flowers using the 1 3/8” Circle Punch (cut a spiral and roll up- quick and easy) and insert a pearl into the center of each flower (sometimes this can be the trickiest part of the card).  

Attach the ribbon and bow, oval with sentiment and the rolled flowers (I used mini glue dots to adhere the flowers to the card). 

Stamp Sets:  Sincere Sentiments

InkSoft Suede

Cardstock: Marina Mist, Pink Pirouette, Soft Suede, Beau Château DSP

Accessories:  Big Shot™, Square Lattice and Oval Designer Frames Textured Impressions™ Embossing Folders , Scallop Trim Border and 1 3/8” Circle Punches, Sponge Dauber, Crimper, 3/8” Soft Suede Taffeta Ribbon, Pearls  

Thanks again for stopping by and blessing my life with you! I hope all of you have a great week stamping and take some time to "de-stress" :-)! 

Sunday, October 2, 2011

Equestrian Dream and to be 16 Again!


Hi Stampers! 


This week my twin nieces celebrated their 16th birthday!  In some ways it just seems like they were born yesterday and yet all of those memories of their childhood seem so distant.  To see them grow up into the young, beautiful girls that they have become is amazing!  

Of course, they love horses and are volunteers at a local ministry called Horses for Hearts and they love it!  In honor of their birthday, I created their cards using one of my favorite retired SU! sets, Equestrian Dream along with Heat Embossing and Spiced Cake Designer Series Paper (DSP). 

These cards were quick and easy to make as well- use the Big Shot™ along with the Top Note™ Die to cut the panels from Very Vanilla and Early Espresso.  Trim along the perforated edge from the Very Vanilla and sand the edges with the Sanding Block. 

De-static the Very Vanilla piece using the Embossing Buddy®, stamp the images in Versamark™ ink and heat emboss with Stampin’ Emboss® Gold Embossing Powder.  Mount the Very Vanilla onto the Early Espresso and attach the 5/8” Satin Ribbon .

Repeat the above steps to emboss the sentiment and punch out using the Large Oval Punch (layer onto two pieces of Early Espresso also punched out with the Large Oval Punch).

Layer the focal image onto the Spice Cake DSP (embossed with the Square Lattice Textured Impressions™ Embossing Folder) and mount onto Early Espresso. 

Stamp Sets:  Equestrian Dream (retired), Sincere Salutations
Ink:  Versamark™
Cardstock: Very Vanilla, Early Espresso, Spice Cake DSP
Accessories:  Big Shot™, Square Lattice Textured Impressions™ Embossing Folder, Sanding Block, Embossing Buddy®, Heat Tool, Stampin’ Emboss® Gold Embossing Powder, Large Oval Punch, Satin Ribbon (from my stash)

Thanks again for visiting- the girls seemed to enjoy these cards and I know it gave me great pleasure to create them for someone as special as they are! 

Monday, September 26, 2011

Another Fall Birthday with Day of Gratitude!


Hi Stampers! 

I created this card using the CCMC168Sketch at Create with Connie and Mary and for a second submission to the SUO28 Fall Challenge.  Again, I cannot emphasis enough, how great the other entries and Design Team samples are at both sites- check them out! :-)

To create this card:

Use the Big Shot™ with the Square Lattice Textured Impressions™ Embossing Folder to  emboss a piece of the Spice Cake Designer Series paper and with the Vintage Wallpaper Textured Impressions™ Embossing Folder to emboss a piece of Pool Party cardstock. 

This picture shows the texture of the background Spice Cake DSP
Use a Sponge Dauber with Soft Suede ink to distress the Pool Party pieces and cut for the horizontal layers on the sketch.

Ink the large medallion from Day of Gratitude with Pool Party Classic Ink and pounce Soft Suede Classic Ink onto the stamp (over the Pool Party) with a Sponge Dauber.   Stamp the image onto Very Vanilla cardstock and carefully cut around the edges of the medallion.  Sponge more Soft Suede around the edges of the medallion and also sponge the edges of the Pool Party card front.

Spray the background DSP, medallion image and sentiment with Champagne Mist Shimmer Paint spray (mixed with 70% alcohol).  Once the paint spray dries, adhere the layers to the DSP, mount the medallion (with SU! Dimensionals), the Soft Suede Taffeta Ribbon, sentiment and add the pearls to finish off the card.  

You can see the Shimmer Paint a bit better in this one :-)


Stamp Sets: Day of Gratitude, Sincere Salutations
Cardstock: Pool Party, Very Vanilla
Ink: Pool Party, Soft Suede
Accessories: Big Shot™, Vintage Wallpaper and Square Lattice Textured Impressions™ Embossing Folders, 3/8” Soft Suede Taffeta Ribbon, Large Oval Punch, Sponge Daubers, Champagne Mist Shimmer Paint,  Pearls

Thanks again for stopping by- have fun stamping and God Bless!

Tuesday, September 20, 2011

Another Fall Birthday Card (and a New Challenge)


Hi Stampers! 

I needed to create some more Fall Birthday cards and decided to use the FM24 Friday MashUp Challenge along with the CS48TCreative Sketch Challenge (a new challenge site for me:-).  Again, both sites have wonderful inspiration for all- if you have the time, check them out!

The Friday MashUp Challenge is to create a Fall Card or create a card using Orange and Yellow, or "Mash It Up" and do both in one card. Although, Orange and Yellow are not normally the first colors that I gravitate towards, after working with them this past week, I will have to make an effort to use them more often:-).

Even though this card has flowers versus leaves, I believe that the fall colors remind me of a late summer/fall day in the garden and all of the items are Stampin' Up! with the exception of a piece of lace that I had in stock (from my sewing stash :-)).  


To create this card:

Use the Big Shot™ and emboss a piece of More Mustard  with the Vintage Wallpaper Textured Impressions™ Embossing Folder ( I used a brayer and applied Tangerine Tango ink to the smooth side of the interior of the folder prior to embossing).  With a Sponge Dauber, apply Soft Suede ink on the edges and over the embossed images to “antique” the paper. 

On Very Vanilla cardstock, use Early Espresso Classic Ink to stamp the En Francais background stamp and the main floral image from Elements of Style.  Also, stamp the sentiment from Sincere Salutations with Early Espresso ink and a few flowers from the floral image onto another piece of Very Vanilla.  Emboss this piece with the Big Shot™ and the Designer Frames Textured Impressions™ Embossing Folder. 

Use Stampin’ Write Markers in More Mustard, Pumpkin Pie, Old Olive and Cajun Craze (for the centers) to color the flowers.  Sponge the edges of all with Soft Suede ink and spritz using the Color Spritzer Tool and the Soft Suede Stampin’ Write Marker. 

Mount the focal image layers onto Pumpkin Pie cardstock (carefully trim around the Designer Frame prior to mounting to the cardstock and trim the Pumpkin Pie to "frame"the die cut).  Sponge more Soft Suede ink to distress and tone down the brightness of the Pumpkin Pie. 

Spray each layer with Champagne Mist Shimmer Paint (mixed with 70% alcohol- this does not show up in photo very well but the card looks "dazzling" in the light :-)).  

Layer the lace, focal images. ribbon, bow and add the pearls to finish off the card. 

Stamp Sets:  Elements of Style, Sincere Salutations, En Francais
 Ink: Early Espresso, Tangerine Tango, Soft Suede, Stampin’ Write Markers- More Mustard, Pumpkin Pie, Old Olive, Cajun Craze, Soft Suede
Cardstock:  Very Vanilla, More Mustard, Pumpkin Pie
Accessories:  Big Shot™, Vintage Wallpaper and Designer Frames Textured Impressions™ Embossing Folder, Sponge Dauber, Color Spritzer Tool, Brayer, Pearls, 5/8” Pumpkin Pie Satin Ribbon (retired),  Lace (from my sewing stash)

Thanks again for stopping by- I hope all of you have a wonderful week stamping and creating!  

Sunday, September 18, 2011

Fall Themed Birthday- Three in One!


Hi Stampers! 

I decided to create another card this evening (well, now morning) and decided to use the colors from the CC339 Always So Crazed Splitcoast Challenge and incorporate the SFF091611 Sketch Friday Frenzy Sketch and the HSSFTC584 Fall Theme (since the colors remind me of fall). 

I have a few friends that have birthdays in the fall and thought these colors would be perfect  for a fall themed card (I know, a bit non-traditional since it does not focus on leaves, but I hope you think it qualifies as well :-)). 

If you have a chance to check out the site links above, you will find so much inspiration- it never ceases to amaze me on how many different interpretations can be created from one sketch or one color challenge! 

To create this card:

Use the Big Shot™  with the Ovals Die and cut large ovals from Very Vanilla, So Saffron and Always Artichoke cardstock.  Stamp the bee image from Nature’s Pace with Cajun Craze ink and color with Stampin’s Write Markers in Always Artichoke, So Saffron and Cajun Craze.

Use the Color Spritzer Tool with the Always Artichoke and Cajun Craze marker and spritz the image, Sponge both colors around the edge of the oval as well.

Layer onto the So Saffron and Always Artichoke oval die cuts ( I cut the ovals in half so you could create a layer).  Adhere a piece of Cajun Craze punched with the Decorative Label Punch  and embossed with the Vintage Wallpaper Textured Impressions™ Embossing Folder (actually from my scraps and also cut in half) to both ends (bonus- this will hide the split on the oval layers:-)).

Emboss a piece of So Saffon with the Vintage Wallpaper Textured Impressions™ Embossing Folder (I used a brayer to ink the folder first with So Saffron ink on the smooth interior side of the folder).  Attach the focal image with Stampin’ Dimensions, layer the satin ribbon bow and adhere the panel to the Always Artichoke card base. 

Stamp the sentiment with Cajun Craze, "huff" onto the bee image to re-moisten the Cajun Craze ink and stamp the leaf areas over the sentiment.  Punch the sentiment out with the Large Oval Punch, spritz and sponge as noted above and layer onto a Modern Label Punch and Decorative Label Punch to create the embellishment.

Add pearls to finish off the card.

Stamp Sets:   Nature’s Pace, Sincere Salutations 

Ink:  Cajun Craze, So Saffron

Cardstock:  Very Vanilla, Always Artichoke, So Saffron, Cajun Craze

Accessories:  Big Shot™, Vintage Wallpaper Textured Impressions™ Embossing Folder, Ovals Die,, Punches-  Large Oval Punch, Modern Label, Decorative Label , Color Sprtizer Tool, Sponge Daubers, Pearls, 5/8” Satin Ribbon (from my stash)

Thanks again for stopping by- I hope all of you have a great week creating for the ones you love! 

Sunday, August 7, 2011

Sweet Floral- Final Swap Card Attempt

Hi Stampers!  

Well, originally after several attempts and an extremely hectic week, I had thought that I was going to forgo creating a swap card for the quarterly Joyful Hearts Demonstrator Meeting on August 6th, but on Friday evening at 9 pm, I decided to give it one more try and use the new background stamp, Sweet Floral. 

In my first attempt for a swap card (see previous post) I had incorporated one of my favorite techniques, Emboss Resist with Dry Embossing, but that card was a bit too involved to recreate multiples in time for the swap.  Since I seem to gravitate to the Emboss Resist technique, I decided to use it again for this card :-)


To create this card:
Ink the En Francais background stamp with Early Espresso ink and stamp onto a piece of Very Vanilla cardstock.    

De-static the stamped piece of Very Vanilla with the Embossing Buddy and stamp the Sweet Floral background stamp using Veramark ink.  Apply Clear EP and heat emboss with the Heat Gun.  Using Sponge Daubers, apply Island Indigo and Early Espresso ink, sponge over the entire image.  Remove the excess ink over the embossed images with a moistened paper towel.  Tear the upper and lower corner by hand and sponge more Early Espresso ink to create the faux burned edges.

Stamp the sentiment with Island Indigo and punch out with the Decorative Label Punch, sponge the edges with Early Espresso.  Punch another piece of Early Espresso with the Decorative Label Punch to layer behind the sentiment label.  

Attach the 5/8” Very Vanilla Satin Ribbon bow and adhere the sentiment under the ribbon. 

Use the Crimper Tool and crimp the upper right and lower left corner of the Crumb Cake background piece.  Lightly sponge Early Espresso over the crimping and along the edges. 

Layer the focal image onto the Crumb Cake layer to finish off the card.

Stamp Sets:  Sweet Floral, Sincere Salutations
Ink: Island Indigo, Early Espresso, Versamark
Cardstock:  Very Vanilla, Crumb Cake
Accessories:  Heat Gun, Clear Embossing Powder, Sponge Daubers, XL Decorative Label Punch, 5/8” Very Vanilla Satin Ribbon, Crimper Tool
Once I created this card, I decided that this finally be the one for the swap and proceeded to create the additional 25 cards (six hours later finished the 25 cards and finally in bed by 5 am- meeting was at 8:45 am, but who needs sleep?) 

Are we addicted or what? :-)).

Thanks again for visiting- I will be working on another project and will post again soon!

Sunday, June 12, 2011

CQC88 Emerging Color Birthday Card

Hi Stampers! 

I wanted to create a card using the luscious colors from this week’s ColourQ Challenge- they are so rich and elegant!  

I was so excited to receive my sneak peek items from the 2011-2012 SU! Catalog and wanted to play with some of the new sets, so I decided to use Delicate Doilies along with one of my favorite background stamps, Medallion.  I also decided to use one of my favorite techniques, Emboss Resist along with another technique called Emerging Color (see the Splitcoast Stampers tutorial for this technique).     

Also, please forgive the image of this card- I find it very difficult to obtain a good picture of a card with any type of red ink.  This card looks much better in real life :-)

To create this card:

Ink the doily stamps with Crumb Cake, Soft Suede, Early Espresso and Cherry Cobbler and stamp repeatedly on a piece of Very Vanilla to create your own designer paper- here I used a 4 ¼” x 5 ½” piece of Very Vanilla (A2) size, but you could use stamp an entire piece of 8 ½” x 11”, trim to the A2 size and use the remainder to create many other cards with the One Sheet Wonder (OSW) technique.  

De-static the stamped images with the Embossing Buddy and ink the Medallion background stamp with Versamark and stamp the Medallion image towards the edge of the paper (right over the doilies).  Apply Clear Embossing Powder (EP) and heat emboss with the Heat Gun. 

Allow the embossing to cool and use a Sponge Dauber with Cherry Cobbler and apply ink over the embossed image and remaining cardstock.  Use another Sponge Dauber with Early Espresso and apply over the Cherry Cobbler.  With a slightly damp paper towel, gently rub off the ink on the embossed area.

Spray the entire focal panel with Champagne Mist Shimmer Paint (mixed with 70% alcohol) and trim to fit the front of the card (allowing for additional layers). 

Mount onto a piece of Early Espresso (bottom half embossed using the Big Shot with the Vintage Wallpaper EF).  Punch a piece of Very Vanilla with the new Lace Ribbon Border Punch and lightly sponge Crumb Cake ink over the border to soften the Very Vanilla.

Attach the border below the focal panel and adhere a piece of Early Espresso 5/8” Stain Ribbon over the gap on the card front.  Create  a tailored bow and attach with Mini Glue Dots.  

Stamp the sentiment with Cherry Cobbler ink onto Very Vanilla cardstock and punch out with the Large Oval Punch.  Ink the Medallion background stamp (center only) first using the Crumb Cake Sponge Dauber (pounce the ink onto the stamp), then Cherry Cobbler and followed by Early Espresso.  Lightly stamp off using a piece of scrap and then stamp over the sentiment.  Sponge the edges of the oval with Crumb Cake, spray with Champagne Mist Shimmer Paint and attach to the front of the card.

Mount onto a Cherry Cobbler layer, then onto the Very Vanilla card front.

Stamp Sets:   Medallion, Delicate Doilies, Sincere Salutations
Ink:  Crumb Cake, Cherry Cobbler, Early Espresso, Soft Suede, Versamark
Cardstock:  Very Vanilla, Cherry Cobbler, Early Espresso
Accessories:  Big Shot, Vintage Wallpaper EF, Embossing Buddy, Clear EP, Heat Gun, Large Oval Punch, Lace Ribbon Border Punch, Sponge Daubers, 5/8” Early Espresso Satin Ribbon, Champagne Mist Shimmer Paint 

Thanks again for visiting- I hope all of you have a blessed week!

Wednesday, April 20, 2011

Birthday Wishes- PP43 & CCMC146

Hi Stampers!
I decided to create a card with the colors from this week’s The Paper Players PP43 Clean and Simple Sketch  Challenge (see http://thepaperplayers.blogspot.com/ ) and the CCMC146 Color Challenge from Create with Connie and Mary (see http://www.createwithconnieandmary.com/ ). 

All of the Design Team projects at both sites along with the other entries are so wonderful, if you have time to visit, you won’t be disappointed!
To create this card:
Use the 2 ½” XL Circle Punch along with the 1 3/4" Scallop Circle and 2 ¼” XL Scallop Punch to create the flowers using the rolled flower technique.
Use the Big Shot to emboss a piece of Whisper White and Pacific Point with the Square Lattice Embossing Folder.    
Punch the edge of the Whisper White band with the Scallop Eyelet Punch and crimp with the Crimper Tool. 
Attach the Pumpkin Pie DSP and the Whisper White Scrap across the center. Stamp the sentiment with Pacific Point and punch out with the Large Oval Punch.  Punch additional pieces layers of Real Red and Pacific Point with the XL Decorative Label Punch. 
Attach the flowers with glue dots to finish off the card. 
Stamp Sets:  Sincere Sentiments
Ink: Pacific Point
Cardstock: Whisper White, Pacific Point, Pumpkin Pie, Real Red  

Accessories:  Big Shot, Square Lattice EF, Punches- Eyelet Border, 2 ½” XL Circle, 1 3/4" Scallop, 2 3/8" Scallop, Scallop Oval XL and XL Decorative

Thank you for stopping by- I hope all of you are having a blessed Easter week! 

Sunday, March 27, 2011

Birthday Wishes- Four Challenges

This week’s Just Add Ink JAI61 Challenge
is to create a card with just stamps and cardstock- no punches, dies, designer paper, embellishments or ribbon!  Since I am so used to using all of my “tools” (the Big Shot, embossing folders, ribbon, punches, brads, etc.) this was a definitely a challenge!  
I decided to combine the JAI61 challenge with three others- the colors from this week’s  ColourQ CQC77 Challenge (see http://colourq.blogspot .com ),
the sketch from Sketch  Frenzy Friday #SFF032511 (see http://www.sketchfrenzyfriday.blogspot.com/ ) and the
theme from the HSSTC60 Challenge from Hand Stamped Sentiments (http://handstampedsentiments.blogspot.com/ ).

To create this card:
Use a brayer and apply Bashful Blue onto Whisper White followed by Kiwi Kiss and Bermuda Bay in a random pattern.  Next, stamp the background stamp, En Francais with Bashful Blue over the brayered background. 
Next, stamp the floral image from Elements of Style with Concord Crush and sponge the edges with Concord Crush and Bermuda Bay. Mount onto Concord Crush and Kiwi Kiss.
Stamp En Francais with Bashful Blue onto Whisper White, tear the bottom edge by hand and
stamp the sentiment from Sincere Salutations in Concord Crush.  Using Sponge Daubers, apply ink to the edges and over the center area with Bermuda Bay and Kiwi Kiss to tone down the Whisper White, sponge the edges with Concord Crush and Bermuda Bay.

Stamp Sets: En Francais, Elements of Style, Sincere Salutations
Ink: Bashful Blue, Concord Crush, Bermuda Bay and Kiwi Kiss
Cardstock: Whisper White, Concord Crush, Kiwi Kiss
Accessories: Sponge Daubers, Brayer

I hope you like this card- I did have fun getting back to basics but I am not ready to give up my ribbon and Big Shot yet.

Thanks again for visiting- have a blessed week!
Related Posts Plugin for WordPress, Blogger...