Sunday, April 8, 2012

CQC131- Two Cards- One Color Challenge!


Happy Easter!! 

This morning, we had a wonderful celebration of the Resurrection of our Lord and Savior!   Alleluia, He is Risen, He is Risen Indeed!

I decided to relax this afternoon and finish up a few cards that I started yesterday.  Two of the cards were for this week’s CQC131 ColourQ Challenge – the soft spring-like colors Blushing Bride, Peach Parfait, Pear Pizzazz, So Saffron and Whisper White.  I love these colors but they did pose a bit of a challenge for me (I struggle with pink and yellow together).

For the first card, I used the Sunflower background stamp.  Ink with the background stamp with Versamark™ , stamp onto So Saffron cardstock and heat emboss with Stampin’ Emboss® Clear Embossing Powder.  Once cooled, overstamp with the En Francais background stamp (inked with Peach Parfait) and using Sponge Daubers, apply Blushing Bride, Peach Parfait and Pear Pizzazz.  Wipe off the excess ink from the embossed image and reapply ink as needed (I ended up adding a bit of Early Espresso to the center to bring out some more of the details).

Layer the panel onto Whisper White, Peach Parfait and Blushing Bride.  Add the Pear Pizzazz Seam Binding Bow, Hemp Twine with the Tiny Tag sentiments and the Antique Brad flower, mount into one more layer of Pear Pizzazz to finish off the card.

Stamp Sets:  Sunflower and En Francais (background), Nature’s Pace

Ink: Versamark™, Blushing Bride, Pear Pizzazz, Peach Parfait, Early Espresso

Paper: Whisper White, Blushing Bride, Pear Pizzazz, Peach Parfait, So Saffron

Accessories:  Heat Tool, Sponge Daubers, ½” Pear Pizzazz Seam Binding, Hemp Twine, Punches- Jewelry Tag and Boho Blossom, Antique Brad


The second card has the same color scheme but utilizes more texture with just a bit of stamping.

Ink the En Francais background stamp with Peach Parfait and stamp onto a piece of glossy Designer Series Paper (I used a piece from the retired Bridal Specialty DSP- see below if you do not have glossy DSP).

Use a Sponge Dauber with Blushing Bride and Peach Parfait to tone down the stamped white glossy DSP.  Before the next step of embossing with the Big Shot, punch out the large flower using the Blossom Punch and set aside.
Emboss the remainder of the DSP (from the step above)  with the Big Shot™ and the Vintage Wallpaper Textured Impressions™ Embossing Folder (I inked the interior smooth side of the folder with Pear Pizzazz ink before inserting the paper and embossing).

If you do not have a glossy Designer Series Paper, you could do the same steps above on Whisper White. After punching out the flower and embossing the background, lightly spray with Frost White Shimmer Paint (mixed with 70% alcohol :-)).
Punch out one more large flower using the Blossom Punch from Peach Parfait cardstock and with your paper snips, cut the petals apart (I generally cut across towards the center for each petal and end up with six petals that have a point on the end). 

Take each of these little petals and adhere behind the blossoms of the stamped flower (punched in step 1 above).  

 Punch the center of the flower out of a piece of Peach Parfait using the Boho Blossom punch (large flower from the Boho Blossom Punch).  Align the center in the middle of the large flower, punch a hole for the brad using the 1/16" Hand Held Punch or Piercing Tool and add the Antique Brad.

Layer with the 5/8” White Satin Ribbon bow, Whisper White border (this was a scrap that I had previously embossed with Snow Burst EF- I punched along the edge with the Eyelet Border Punch and then ran thru the Crimper Tool to soften the fibers and it almost looks like fabric :-)). 

Add the little tags, leaves and layer to finish off the card.

Stamp Sets:  En Francais, Tiny Tags

Ink:  Blushing Bride, Pear Pizzazz, Peach Parfait

Paper: Whisper White, Blushing Bride, Pear Pizzazz, Peach Parfait, So Saffron, Bride Specialty Designer Series Paper 

Accessories:  Big Shot™, Vintage Wallpaper and Snow Burst Textured Impressions™ Embossing Folder, Punches- Boho Blossom, Blossom, Eyelet Border, Jewelry Tag, 5-Petal Flower, 1/16” Handheld, Sponge Daubers, 5/8”  White Satin Ribbon, Metallic Brad, Crimper Tool

Thanks again for stopping by- I hope all of you had a wonderful Easter- may the Lord richly bless you this week! 

Wednesday, April 4, 2012

Congratulations- "Love" for Homegrown


Hi Stampers!! 

I have not had a chance to participate with the Stamping411 Sketches lately, so I wanted tocreate a card using this week’s SSC249 Sketch along with the “Congratulations”  SUO42 theme challenge from the SUO Challengesite.  I also chose to highlight all of the 2010-2012 retiring “In-Colors” with the exception of Blushing Bride- only another month or so before these beautiful colors will be retired!

In keeping with the idea to use “sets that you had to have but have not inked as much as you thought you would”, I decided to ink up my “neglected” Homegrown set.  I love the artwork in this set, but for some reason, have not used it as much as I thought I would.

I modified the sketch a bit to add the sentiment at the bottom.  The   “Congratulations” theme seemed an appropriate sentiment- I know that I would like to have more time to possibly garden or stamp :-) 

Plus I was able to ink up one of my retired sets (again, one that had not been used as much as I would have liked before it retired)- hmmn…there seems to be a theme here- I must have too many stamp sets :-) !!
To create this card:

Close-Up of detail in the corners
Ink the images with Versamark® and stamp onto Whisper White cardstock.  Heat emboss with the Heat Tool and once the embossing has cooled, color the images using the Aqua Painter with the ink pads (I used Concord Crush, Poppy Parade, Peach Parfait and Pear Pizzazz).  Carefully cut out around the embossed images and set aside.

Using the Big Shot™ with the Finial Press Textured Impressions™ Embossing Folder, emboss a piece of Peach Parfait DSP (prior to embossing, I inked the smooth interior side of the folder first with Peach Parfait).  Lightly sand this layer with the Sanding Block and adhere onto Concord Crush. 

Wrap the Pear Pizzazz Seam Binding around the outside corners, add the knotted Hemp Twine and the embossed images. Use the 1/16” Handheld Punch and attach two brads in the corner of the Homegrown sentiment and mount the entire panel onto Pear Pizzazz cardstock.  

Add the sentiment layers and you are finished! 

Stamp Sets:  Homegrown, Congrats (retired)

Ink: Versamark™, Concord Crush, Peach Parfait, Pear Pizzazz, Poppy Parade
Paper: Whisper White, Concord Crush, Pear Pizzazz, Peach Parfait DSP (retired Hostess pack)

Accessories:  Big Shot™, Finial Press Textured Impressions™ Embossing Folder, Framelits™ Label Collection Die, Heat Tool, Stampin’ Emboss® Black Embossing Powder, Modern Label and 1” Circle Punch, Pear Pizzazz Seam Binding, Hemp Twine, Metallic Brads

Thanks again for stopping by- I hope all of you have a wonderful Easter week! 

Sunday, April 1, 2012

Notably Ornate- Needing Some Love :-)

Hi Again Stampers!

There was an unofficial challenge posed on Splitcoast Stampers for us to use a stamp set that we just “had to have” but have essentially neglected after purchase.  I have quite a list of stamp sets that I had to have from the catalog and one of those is Notably Ornate. 

I love the style of this set, but for some reason, have not taken the time to create with it.  I decided to use the frame and oval image for this card and combined it with Artistic Etching and a few other challenges- the FMS28 Freshly Made Sketch along with the CCMC195 colors from Create with Connieand Mary.  


To create this card:

Ink the frame image using Versamark™ ink onto So Saffron cardstock, apply Stampin’ Emboss® Silver Embossing Powder and heat emboss with the Heat Tool.  Once the image has cooled, carefully cut around the edges of the frame.    

Use a Versamark™ Marker to ink the edges of the oval stamp from Notably Ornate and repeat the embossing steps above.

Using Poppy Parade ink, stamp the ornate circle from Artistic Etchings onto another piece of So Saffron and the crown image in the center of the oval.

Heat emboss the Eiffel Tower from Artistic Etchings, allow to cool and emboss with the Designer Oval Frame Textured Impressions™ Embossing Folder. Carefully cut around the edges of the embossing folder and the Eiffel Tower. 

With the Big Shot™ emboss a piece of Poppy Parade cardstock with the Vintage Wallpaper Textured Impressions™ Embossing Folder (I inked the smooth interior with Poppy Parade ink prior to embossing) and emboss a piece of Poppy Parade Designer Series Paper (retired Hostess Level I Paper Patterns Pack In Color).

Assemble the layers, add the 5/8” Basic Gray Satin Ribbon bows and Rhinestone to finish off the card. 

Stamp Sets: Notably Ornate, Artistic Etchings, Short and Sweet

Cardstock:  Basic Gray, So Saffron, Poppy Parade

Ink: Versamark™, Poppy Parade

Accessories: Big Shot™, Textured Impressions™ Embossing Folder- Vintage Wallpaper, Designer Frame (Oval), Vintage Wallpaper,  Heat Tool, Stampin’ Emboss® Silver Embossing Powder, 5/8” Basic Gray Satin Ribbon, Rhinestone

Thanks again for visiting and all of your encouragement!  I hope all of you have a wonderful Easter week and try to find time to stamp! 

He Is Risen! Two Challenges and Triple Embossing?


Hi Stampers!! 

Boy, do the weeks fly by!  Here it is, another week and time for a card for the CQC130 ColourQ Challenge  and the HSSIC111 Easter Theme Challenge at Hand Stamped Sentiments!  

I chose to create a quick, CAS card using one of my favorite retired Easter sets, Easter Morn.  A bit of heat embossing, marker coloring, die cutting, dry embossing and you are finished!

To create this card:

Heat emboss the image with Stampin’ Emboss® Gold Embossing Powder (used Versamark® ink on Whisper White- this is the first embossing layer).  Color the image using Stampin’ Write markers in Daffodil Delight, Certainly Celery, Tempting Turquoise and Melon Mambo.  

Emboss a piece of Whisper White with the Square Lattice Textured Impressions™ Embossing Folder (I used a piece of Whisper White cardstock that had been previously embossed) and emboss it again the second time with the Framed Tulips Textured Impressions™ Embossing Folder  (this is the third embossing layer :-)). 

Frame the image with the Framelits™ Lables Collection and cut two other frames the same size from Melon Mambo (to layer behind the image).

Layer the entire card panel and add the Turquoise Satin Ribbon Bow (from my stash-it is definitely Turquoise IRL- photo appears a bit darker).  This ribbon was one of many that I found at a local outlet store- very pretty and since I love Satin Ribbon, of course, I had to have it:-))

Stamp Sets:  Easter Morn

Ink: Versamark™, Stampin’ Write Markers- Certainly Celery, Daffodil Delight, Melon Mambo, Tempting Turquoise

Paper: Whisper White, Certainly Celery, Daffodil Delight, Melon Mambo, Tempting Turquoise

Accessories:  Big Shot™, Square Lattice and Framed Tulips Textured Impressions™ Embossing Folders, Framelits™ Label Collection Dies, Heat Tool,  Stampin’ Emboss® Gold Embossing PowderTurquoise Satin Ribbon (from my stash)

Thanks again for stopping by- I hope all of you have a wonderful week! Easter is coming- I am so thankful that my Savior Is Risen, He Is Risen indeed! 

Tuesday, March 27, 2012

Hand Stamped Sentiments Design Team Try-Out!


Hi Stampers! 

One of my favorite challenge blogs, Hand Stamped Sentiments  is having a Design Team "Try-Out " and I wanted to create a card to throw my name “into the ring”! 

As most of you who regularly visit my blog know, I started my blog approximately 1 1/2 years ago and love to participate in weekly challenges!    I have been a Guest Designer on several of my favorite challenge blogs- The Paper Players, Friday Mash Up, A La Card Monkey, Sunny Challenges and Creations and recently have been named to the May-August Creative Crew on Splitcoast Stampers, but I would like to be a regular member of a weekly Design Team :-)

I love the variety of challenges that Hand Stamped Sentiments provides each week- I have some tough competition, wish me luck! :-)

I decided to create a Vintage Style card with Distressing (since this style comes very easy to me) and I had not had a chance to ink up my bird stamp, Young Vermillion yet.  I love to watch birds and most likely will not have an opportunity to see a Vermillion in real life (since it appears as though their normal habitat is in South America and Southern Mexico) so I researched online to check their coloring.

This stamp appears to be a young female Vermillion but I decided to use the colors of a male. 

To create this card:

Stamp the bird image with Versamark™ ink onto Very Vanilla cardstock, apply Stampin’ Emboss® Black Embossing Powder and heat with the Heat Tool.  Once cooled, color the image with Stampin’ Up! Watercolor Pencils then apply a bit of water with the Aqua Painter. 

Use the Big Shot™ with the Designer Oval Frame Textured Impressions™ Embossing Folder to create the embossed frame around the bird image.  Stamp the background stamp from French Foliage using Crumb Cake ink, tear around the edges and distress by hand.  Apply Crumb Cake ink with a Sponge Dauber to “antique”. 

Ink the smooth interior of the Vintage Textured Impressions™Embossing Folder with Soft Suede Classic Ink and emboss a piece of Crumb Cake cardstock.  Also emboss a piece of Everyday Enchantment DSP and lightly sand with the Sanding Block. 

Layer the pieces, add the Victoria Lace Trim, add the 5/8” Early Espresso Satin Ribbon bow, sentiment and pearls to finish off the card. 

Stamp Sets: Young Vermillion, Blessings from Heaven, French Foliage

Ink: Versamark™, Basic Black, Crumb Cake

Paper: Very Vanilla, Crumb Cake, Everyday Enchantment DSP

Accessories:  Big Shot™, Vintage Wallpaper and Designer Oval Frame Textured Impressions™ Embossing Folders, Watercolor Pencils, Aqua Painter, XL Oval Punch, Pearls, 5/8” Early Espresso Satin Ribbon (retired), Sponge Dauber, Sanding Block, Victoria Lace Trim, Distressing Tool  

Thanks again for stopping by!  I hope you like this card – I had a great time creating it! 

Sunday, March 25, 2012

Nature Walk- Two Challenges in One!


Hi Stampers! 

I wanted to create one more card this weekend and the HSSTC110 Watercolor Technique Challenge has been on my mind all week and I decided to combine this technique with the FMS27 Freshly Made Sketch.

Again, both sites provide so much inspiration between their wonderful Design Teams and the entries each week- if you have a chance, stop by and see for yourselves! 

To create this card:

De-static a piece of Watercolor Paper and stamp the images from Nature Walk with Versamark™ ink.  Apply Stampin’ Emboss® Black Embossing Powder, heat with the Heat Tool.  Once the embossing powder has cooled, color the images with Watercolor Pencils and the Aqua Painter.   

Punch the egg image with the 1 ¼” and 1 3/8” Circle Punches, use the 1 ¼” Punch for the bee and “fussy cut” the bird image. 

Close-Up of Embossing and Background Stamp
Ink the background stamp, En Français with Bashful Blue Classic Ink and stamp onto Bashful Blue cardstock.   Direct apply Bashful Blue Classic Ink onto the smooth interior side of the Vintage Wallpaper Textured Impressions™ Embossing Folder and emboss with the Big Shot™. 

Huff onto the ink on the background stamp and stamp the punched pieces.  Mount the circles onto Basic Black cardstock. 

Crimp a strip of Basic Black cardstock using the Crimper Tool.  Apply the 5/8” Black Satin Ribbon bow over the embossed background layer, add the crimped layer of Basic Black cardstock, adhere the strip of blue Satin Ribbon, mount the circle images with Stampin’ Dimensionals and the sentiment to finish off the card. 

Stamp Sets: Nature Walk, En Français (background stamp), Petite Pairs

Ink: Versamark™, Basic Black

Paper: Watercolor, Naturals White, Bashful Blue, Basic Black

 Accessories:  Big Shot™, Vintage Wallpaper and Square LatticeTextured Impressions™ Embossing Folders, Watercolor Pencils, Crimper Tool, Punches- 1 ¼”, 1 3/8” and 1 ½” Circle, 5/8” Basic Black Satin Ribbon, Blue Satin Ribbon from my stash

Thanks again for stopping by- have a wonderful week stamping and creating!  

Saturday, March 24, 2012

CQC129- Fresh Vintage Easter


Hi Stampers!! 

Another week and time for another CoulourQ Challenge!  This week’s CQC129 colors are beautiful and remind me of Easter eggs so I had to create an Easter card.


This card was quick and easy- a bit of embossing, coloring with markers and you are finished!


To create this card:

Color the main floral image from Fresh Vintage with Stampin’ Write markers- Wisteria Wonder, Rich Razzleberry and Turquoise onto Whisper White cardstock.  Use the Blossom Punch to punch out the image and also punch a flower from Rich Razzleberry. 
Cut towards the center along each petal of the Rich Razzleberry punched flower- this will give you six petal pieces to adhere to the back of the focal image and create a layered look.

Use the Brayer to apply Rich Razzleberry ink to the smooth side of the interior of the Finial Press Textured Impressions™ Embossing Folder and emboss a piece of Cool Caribbean (retired) as well as a piece of Rich Razzleberry.

Create the layers, add the 5/8” Rich Razzleberry Satin Ribbon (retired), sentiment and Pearls to finish off the card. 

Stamp Sets:  Fresh Vintage, Teeny Tiny Wishes

Ink: Rich Razzleberry, Stampin’ Write Markers- Rich Razzleberry, Tempting Turquoise, Wisteria Wonder

Paper: Whisper White, Rich Razzleberry, Cool Caribbean (retired)

Accessories:  Big Shot™, Finial Press Textured Impressions™ Embossing Folder, Punches- Blossom, 5-Petal Flower, 2 ½” Circle, 1 1/4” Circle , Brayer, Pearls, 5/8” Rich Razzleberry Satin Ribbon (retired)

Thanks again for stopping by- I hope all of you have a fabulous week!  

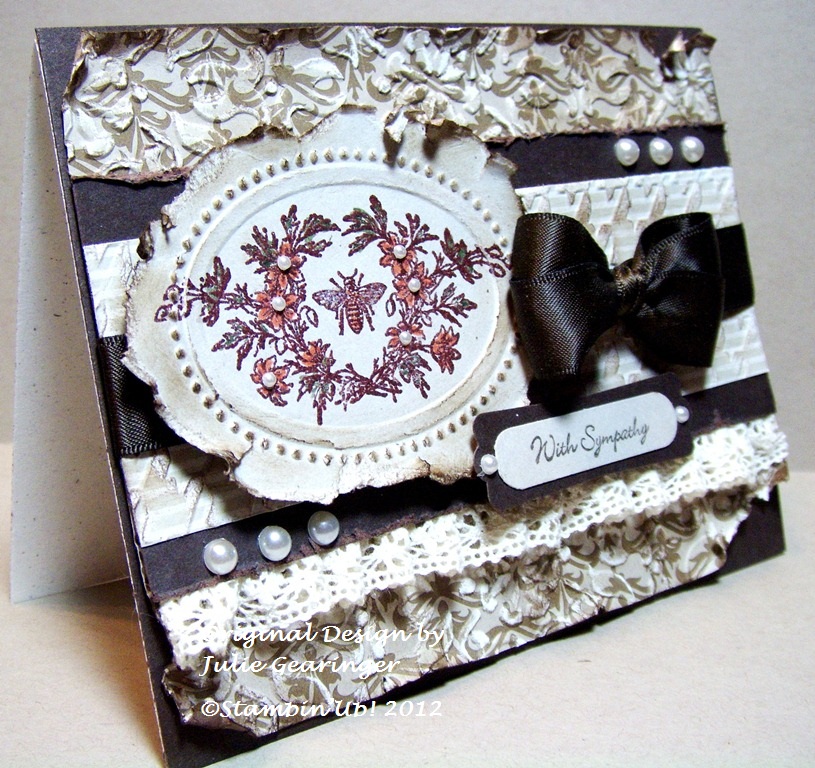
Guest Designer- Sunny Challenge 33/12


Hi Stampers! 

I have been invited to be a Guest Designer for this week’s SC33/12 Challenge at Sunny Challenges and Creations!  If you have the time, stop by their blog and check out the inspiration from the Design Team as well as the other Guest Designers (and while you’re at it, why not join us for this challenge)?

To create this card:

De-static a piece of Sahara Sand cardstock with  Versamark™ ink and apply Stampin’ Emboss®  Brown Embossing Powder (retired).  Heat with the Heat Tool, let the image cool and color with Stampin’ Write Markers in Tangerine Tango and Always Artichoke.

Use the Big Shot™ with the Oval Designer Frame Textured Impressions™ Embossing Folder and emboss over the image.  Tear around the outside, distressing with your finger and sponge Soft Suede to gently “antique” the image.

Emboss a piece of the Mocha Morning Specialty DSP with the Vintage Wallpaper Textured Impressions™ Embossing Folder and a piece of Sahara Sand DSP with the Herringbone Textured Impressions™ Embossing Folder.  Lightly sand both layers with the Sanding Block and lightly sponge Soft Suede ink over the layers to bring out the texture.

Distress the edges of the Mocha Morning layer and mount onto Early Espresso cardstock.

Mount the Sahara Sand layer onto Early Espresso, distress the edges of the Early Espresso with the Distressing Tool, add Sticky Strip along the bottom edge and attach the Victoria Lace Trim (ruffling as you attach it to the Sticky Strip). 

Layer onto the Mocha Morning panel, add the 5/8” Early Espresso Satin Ribbon (retired) and sentiment.  Apply 2-Way Glue and Dazzling Diamonds to the wings of the bee, add a few pearls and the card is finished!

Stamp Sets:  Nature’s Pace, Teeny Tiny Wishes

Paper: Early Espresso, Sahara Sand, Morning Morning DSP, Sahara Sand DSP

Ink: Versamark™, Early Espresso, Stampin’ Write Markers- Tangerint Tango, Always Artichoke

Accessories:  Big Shot™, Textured Impressions™ Embossing Folders- Oval Designer Frame, Vintage Wallpaper and Herringbone, Embossing Buddy®, Heat Tool, Stampin’ Emboss® Brown Embossing Powder (retired), Punches- Word Window, Modern Label; Victoria Lace Trim, Pearls, Dazzling Diamonds, Sponge Dauber, Sanding Block, Distressing Tool

Thanks again for visiting and if you have the time, join us for this sketch/technique challenge- it helps relieve your stress with "distressing" (trust me, it is a lot of fun)! 
Related Posts Plugin for WordPress, Blogger...