Tuesday, March 27, 2012

Hand Stamped Sentiments Design Team Try-Out!


Hi Stampers! 

One of my favorite challenge blogs, Hand Stamped Sentiments  is having a Design Team "Try-Out " and I wanted to create a card to throw my name “into the ring”! 

As most of you who regularly visit my blog know, I started my blog approximately 1 1/2 years ago and love to participate in weekly challenges!    I have been a Guest Designer on several of my favorite challenge blogs- The Paper Players, Friday Mash Up, A La Card Monkey, Sunny Challenges and Creations and recently have been named to the May-August Creative Crew on Splitcoast Stampers, but I would like to be a regular member of a weekly Design Team :-)

I love the variety of challenges that Hand Stamped Sentiments provides each week- I have some tough competition, wish me luck! :-)

I decided to create a Vintage Style card with Distressing (since this style comes very easy to me) and I had not had a chance to ink up my bird stamp, Young Vermillion yet.  I love to watch birds and most likely will not have an opportunity to see a Vermillion in real life (since it appears as though their normal habitat is in South America and Southern Mexico) so I researched online to check their coloring.

This stamp appears to be a young female Vermillion but I decided to use the colors of a male. 

To create this card:

Stamp the bird image with Versamark™ ink onto Very Vanilla cardstock, apply Stampin’ Emboss® Black Embossing Powder and heat with the Heat Tool.  Once cooled, color the image with Stampin’ Up! Watercolor Pencils then apply a bit of water with the Aqua Painter. 

Use the Big Shot™ with the Designer Oval Frame Textured Impressions™ Embossing Folder to create the embossed frame around the bird image.  Stamp the background stamp from French Foliage using Crumb Cake ink, tear around the edges and distress by hand.  Apply Crumb Cake ink with a Sponge Dauber to “antique”. 

Ink the smooth interior of the Vintage Textured Impressions™Embossing Folder with Soft Suede Classic Ink and emboss a piece of Crumb Cake cardstock.  Also emboss a piece of Everyday Enchantment DSP and lightly sand with the Sanding Block. 

Layer the pieces, add the Victoria Lace Trim, add the 5/8” Early Espresso Satin Ribbon bow, sentiment and pearls to finish off the card. 

Stamp Sets: Young Vermillion, Blessings from Heaven, French Foliage

Ink: Versamark™, Basic Black, Crumb Cake

Paper: Very Vanilla, Crumb Cake, Everyday Enchantment DSP

Accessories:  Big Shot™, Vintage Wallpaper and Designer Oval Frame Textured Impressions™ Embossing Folders, Watercolor Pencils, Aqua Painter, XL Oval Punch, Pearls, 5/8” Early Espresso Satin Ribbon (retired), Sponge Dauber, Sanding Block, Victoria Lace Trim, Distressing Tool  

Thanks again for stopping by!  I hope you like this card – I had a great time creating it! 

Sunday, March 25, 2012

Nature Walk- Two Challenges in One!


Hi Stampers! 

I wanted to create one more card this weekend and the HSSTC110 Watercolor Technique Challenge has been on my mind all week and I decided to combine this technique with the FMS27 Freshly Made Sketch.

Again, both sites provide so much inspiration between their wonderful Design Teams and the entries each week- if you have a chance, stop by and see for yourselves! 

To create this card:

De-static a piece of Watercolor Paper and stamp the images from Nature Walk with Versamark™ ink.  Apply Stampin’ Emboss® Black Embossing Powder, heat with the Heat Tool.  Once the embossing powder has cooled, color the images with Watercolor Pencils and the Aqua Painter.   

Punch the egg image with the 1 ¼” and 1 3/8” Circle Punches, use the 1 ¼” Punch for the bee and “fussy cut” the bird image. 

Close-Up of Embossing and Background Stamp
Ink the background stamp, En Français with Bashful Blue Classic Ink and stamp onto Bashful Blue cardstock.   Direct apply Bashful Blue Classic Ink onto the smooth interior side of the Vintage Wallpaper Textured Impressions™ Embossing Folder and emboss with the Big Shot™. 

Huff onto the ink on the background stamp and stamp the punched pieces.  Mount the circles onto Basic Black cardstock. 

Crimp a strip of Basic Black cardstock using the Crimper Tool.  Apply the 5/8” Black Satin Ribbon bow over the embossed background layer, add the crimped layer of Basic Black cardstock, adhere the strip of blue Satin Ribbon, mount the circle images with Stampin’ Dimensionals and the sentiment to finish off the card. 

Stamp Sets: Nature Walk, En Français (background stamp), Petite Pairs

Ink: Versamark™, Basic Black

Paper: Watercolor, Naturals White, Bashful Blue, Basic Black

 Accessories:  Big Shot™, Vintage Wallpaper and Square LatticeTextured Impressions™ Embossing Folders, Watercolor Pencils, Crimper Tool, Punches- 1 ¼”, 1 3/8” and 1 ½” Circle, 5/8” Basic Black Satin Ribbon, Blue Satin Ribbon from my stash

Thanks again for stopping by- have a wonderful week stamping and creating!  

Saturday, March 24, 2012

CQC129- Fresh Vintage Easter


Hi Stampers!! 

Another week and time for another CoulourQ Challenge!  This week’s CQC129 colors are beautiful and remind me of Easter eggs so I had to create an Easter card.


This card was quick and easy- a bit of embossing, coloring with markers and you are finished!


To create this card:

Color the main floral image from Fresh Vintage with Stampin’ Write markers- Wisteria Wonder, Rich Razzleberry and Turquoise onto Whisper White cardstock.  Use the Blossom Punch to punch out the image and also punch a flower from Rich Razzleberry. 
Cut towards the center along each petal of the Rich Razzleberry punched flower- this will give you six petal pieces to adhere to the back of the focal image and create a layered look.

Use the Brayer to apply Rich Razzleberry ink to the smooth side of the interior of the Finial Press Textured Impressions™ Embossing Folder and emboss a piece of Cool Caribbean (retired) as well as a piece of Rich Razzleberry.

Create the layers, add the 5/8” Rich Razzleberry Satin Ribbon (retired), sentiment and Pearls to finish off the card. 

Stamp Sets:  Fresh Vintage, Teeny Tiny Wishes

Ink: Rich Razzleberry, Stampin’ Write Markers- Rich Razzleberry, Tempting Turquoise, Wisteria Wonder

Paper: Whisper White, Rich Razzleberry, Cool Caribbean (retired)

Accessories:  Big Shot™, Finial Press Textured Impressions™ Embossing Folder, Punches- Blossom, 5-Petal Flower, 2 ½” Circle, 1 1/4” Circle , Brayer, Pearls, 5/8” Rich Razzleberry Satin Ribbon (retired)

Thanks again for stopping by- I hope all of you have a fabulous week!  

Guest Designer- Sunny Challenge 33/12


Hi Stampers! 

I have been invited to be a Guest Designer for this week’s SC33/12 Challenge at Sunny Challenges and Creations!  If you have the time, stop by their blog and check out the inspiration from the Design Team as well as the other Guest Designers (and while you’re at it, why not join us for this challenge)?

To create this card:

De-static a piece of Sahara Sand cardstock with  Versamark™ ink and apply Stampin’ Emboss®  Brown Embossing Powder (retired).  Heat with the Heat Tool, let the image cool and color with Stampin’ Write Markers in Tangerine Tango and Always Artichoke.

Use the Big Shot™ with the Oval Designer Frame Textured Impressions™ Embossing Folder and emboss over the image.  Tear around the outside, distressing with your finger and sponge Soft Suede to gently “antique” the image.

Emboss a piece of the Mocha Morning Specialty DSP with the Vintage Wallpaper Textured Impressions™ Embossing Folder and a piece of Sahara Sand DSP with the Herringbone Textured Impressions™ Embossing Folder.  Lightly sand both layers with the Sanding Block and lightly sponge Soft Suede ink over the layers to bring out the texture.

Distress the edges of the Mocha Morning layer and mount onto Early Espresso cardstock.

Mount the Sahara Sand layer onto Early Espresso, distress the edges of the Early Espresso with the Distressing Tool, add Sticky Strip along the bottom edge and attach the Victoria Lace Trim (ruffling as you attach it to the Sticky Strip). 

Layer onto the Mocha Morning panel, add the 5/8” Early Espresso Satin Ribbon (retired) and sentiment.  Apply 2-Way Glue and Dazzling Diamonds to the wings of the bee, add a few pearls and the card is finished!

Stamp Sets:  Nature’s Pace, Teeny Tiny Wishes

Paper: Early Espresso, Sahara Sand, Morning Morning DSP, Sahara Sand DSP

Ink: Versamark™, Early Espresso, Stampin’ Write Markers- Tangerint Tango, Always Artichoke

Accessories:  Big Shot™, Textured Impressions™ Embossing Folders- Oval Designer Frame, Vintage Wallpaper and Herringbone, Embossing Buddy®, Heat Tool, Stampin’ Emboss® Brown Embossing Powder (retired), Punches- Word Window, Modern Label; Victoria Lace Trim, Pearls, Dazzling Diamonds, Sponge Dauber, Sanding Block, Distressing Tool

Thanks again for visiting and if you have the time, join us for this sketch/technique challenge- it helps relieve your stress with "distressing" (trust me, it is a lot of fun)! 

Sunflower Love- March Creative Crew Color Focus


Hi Stampers! 

Another warm week here on the East Coast!  I hope this is not an indication of a "searing" hot summer but it has been nice to have a bit warmer weather:-)

I wanted to create a card for the Splitcoast Stampers Stampin’ Up! Creative Crew March DSP/Color Focus Challenge #CCREW0312DF.  This month in honor of the March flower of the month, Daffodils and Jonquils, they are highlighting using the colors  Daffodil Delight, So Saffron and Blushing Bride along with a Neutral of your choice in either cardstock or Designer Series Paper (DSP). 

This card also would have qualified for The Paper Players CAS#87 Challenge but I am not able to stamp until Friday evening (and their challenge closes Friday at noon now).
Just wanted to give them a "shout out"- the Design Team has fabulous projects not to mention all of the other wonderful submissions.  Maybe I can get a chance to create in time for next week! :-)

Many of the artists in the gallery created Daffodils from punch art along so many other creative ideas.  If you have the time, check them out thru the link above and while you are at it, give this challenge a try yourself!  Even though there is not a deadline for submission and the galleries should remain open indefinitely, Blushing Bride is one of the In-Colors that will be retiring this year (along with Poppy Parade, Peach Parfait, Pear Pizzazz, Concord Crush).  

Don't forget- the new Stampin' Up! catalog will be out soon and if you need any replenishment on the retiring In-Colors or would like to obtain these colors for future use, now is the time!  If you do not already have a demonstrator, you can order directly from my SU! Website.  If you place order before the end of March, you can earn a free Sale-A-Bration item for each sales increment of $ 50.00 (before tax and s/h).  Now is the time to order your In-Colors and take advantage of this great Sale-A-Bration!  

To create this card:

De-static a piece of Whisper White cardstock with the Embossing Buddy® (yes, I know that  “The Buddy” is unavailable to order right now and SU! is looking for another supplier but many of you have one in stock and I cannot emboss with it :-)).  

Ink the background stamp, Sunflower with Versamark™ and stamp onto the prepared Whisper White cardstock.  Apply Stampin’ Emboss Brown Embossing Powder(retired), heat with the Heat Tool, let the image cool and color with Stampin’ Write Markers in So Saffron , Daffodil Delight and Chocolate Chip.  Highlight with the Blushing Bride Marker and carefully cut out the image.

Use a Brayer and apply Daffodil Delight Classic Ink to the smooth interior of the Finial Press Textured Impressions™ Embossing Folder.   Emboss a piece of Blushing Bride cardstock and mount this onto a piece of Chocolate Chip cardstock. 

Emboss a piece of So Saffon DSP (from the Designer Series Paper Pack) with the Square Lattice Textured Impressions™ Embossing Folder and adhere to the Blushing Bride layer. 

Adhere the flower image, attach the Tiny Tag sentiment and the Chocolate Chip button (also retired) and layer onto So Saffron to finish off the card. 

Stamp Sets:  Sunflower (background), Tiny Tags

Paper: Whisper White, Blushing Bride, So Saffron, Chocolate Chip

Ink: Versamark™, Daffodil Delight, Stampin’ Write markers- So Saffron, Daffodil Delight, Chocolate Chip, Blushing Bride

Accessories:  Big Shot™, Textured Impressions™ Embossing Folders- Finial Press and Square Lattice, Embossing Buddy®, Heat Tool, Stampin’ Emboss® Brown Embossing Powder (retired), Jewelry Tag Punch, Hemp Twine, Chocolate Chip Button (retired), Metallic Brad (behind the button holding the tags)

I hope you have fun creating this weekend and don’t forget to join us on the Creative Crew Challenges!  I have just found out this week that I will be on the May-August Design Team and will be able to announce the May challenges on May 1st.  

If you are a SU! Demo and have access to the Demo Forum on SCS, come join us!  If you are not a Demo, now is the best time to sign up- the kit is only $125.00 (vs. $175.00 until the end of March) and not only will you receive the discount, an additional gift each month with your Demonstrator order, you also have so many other “perks” of being a Demo!  Interested in joining my team?  Just let me know, if you would like more information…. 

Thanks again for visiting and all of your encouragement!  Have a blessed week! 

Monday, March 19, 2012

A Rainbow Bouquet for Blessing My Life!


Hi Stampers! 

Another weekend is almost over and back to work tomorrow:-))  I so enjoy my free time on the weekends and yesterday had the privilege of spending time with my new recruit, Susan (yea!) and her two oldest daughters.  We had a great day learning new techniques and some of the "tricks of the trade" - I am looking forward to spending time with these lovely ladies again real soon :-))

This evening, I wanted to create one more card and thought the cheerful HSSTC109 Rainbow Theme at Hand Stamped Sentiments was the perfect way to end the weekend!If you have not had the time to visit their site yet, check out all of the great samples of the rainbow colors- such creativity!  

The most time consuming part of this card was creating the rolled flowers.  Many of you have inquired on how they were created and they are quite simple.  Below is a brief tutorial and there is a wonderful tutorial on Splitcoast Stampers describing a similar method.  

This is how I create the Rolled Flowers:

Using a circle punch, punch out the number of circles needed for your card (one per flower).  FYI- For this card I used the 1 3/8” Circle Punch but you can use any size circle punch- the larger the circle the larger the flower.

Using the Crimper Tool, crimp the cardstock circles (I run the circles thru the Crimper twice, angling the circle for the second pass). 

Starting on the outside of the circle, use scissors to cut a wavy line following the outline of the circle (creating a spiral until you reach the middle and leave a piece of cardstock available as a little base).  Place a small amount of liquid glue (I used Tombow Multi Adhesive) and press the cardstock flower edges into the glue holding until gently set.

Manipulate the petals and using the tip of your scissors, press the very beginning of the rolled flower edge into the center (to create a flat spot for the pearl- this is the very middle of the flower and were the spiral started).  Add the pearl and adhere the flower to your card using Mini Glue Dots.

I hope this brief written tutorial helps you- the flowers are easy to make but do take a bit of patience and time- have fun giving it a try!


As mentioned above, this card incorporates the rolled flowers along with embossed panels, satin ribbon and of course, pearls:-) .  Once the flowers were made,  the card was quick and easy to assemble. 

Stamp Sets: Blessings from Heaven

Ink: Concord Crush

Paper: Whisper White, Cherry Cobbler, Concord Crush, Marina Mist, Peach Parfait, Pear Pizzazz, So Saffron

 Accessories:  Big Shot™,  Herringbone and Perfect Polka Dots Textured Impressions™ Embossing Folders, Punches- 1 3/8” Circle, XL Oval , Pearls, 5/8” White Satin Ribbon

Thanks again for stopping by and blessing my life with you!  I hope all of you have a wonderful week stamping and creating- God Bless! 

Sunday, March 18, 2012

The Luck of the Irish- Two Challenges in One!


Hi Stampers!! 

Another busy week but what beautiful weather here on the East Coast!  We have had such a mild winter this year and this week’s weather has reminded us that spring has arrived!  

Even though I an half Irish, I do not normally create St. Patrick;'s Day cards but wanted to create a card using the CQC128 ColourQ Challenge colors (just a "wee bit late" for St. Patrick’s Day :-)).  I also decided to combine the colors with the Splitcoast Stampers SC374 Sketch Challenge- but left the sentiment off to add later (could be used as a Get Well, Thinking of You and possibly Sympathy card).  

Again, I hope you will take the time to visit both sites- the ColourQ Design Team has so many inspirational designs and of course, Splitcoast is a stamper's dream! 

To create the focal image, de-static a piece of Certainly Celery and Glorious Green  (retired) cardstock  with the Embossing Buddy®.  Stamp the floral image from Mixed Bunch using Versamark® ink , apply Stampin’ Emboss® Silver Embossing Powder and heat with the Heat Tool.  Once cooled, punch the flower from the Certainly Celery using the Blossom Punch and use the 5-Petal Punch on the Glorious Green image (for the leaves) and the 1" Circle Punch for the center.

Use the Big Shot™ with the Framleits™ Labels Collection and cut a piece of Wild Wasabi and Very Vanilla.  Run the Wild Wasabi layer through the Big Shot™ and the Finial Press Textured Impressions™ Embossing Folder and the Very Vanilla with the Snowburst Textured Impressions™ EF.   Punch out a circle of Going Gray with the 2 ½” Circle Punch and emboss as well with the Finial Press EF.


Mount onto a piece of Certainly Celery (embossed with the Finial Press folder – brayer Wild Wasabi onto the smooth side of the folder before embossing).


Layer per the sketch and add the Gray Satin Ribbon (from my stash) and Pearl to finish off the card. 

Stamp Sets:  Mixed Bunch

Ink: Versamark™, Wild Wasabi

Paper: Very Vanilla, Certainly Celery, Going Gray, Wild Wasabi, Glorious Green (retired)

Accessories:  Big Shot™, Finial Press and Snowburst Textured Impressions™ Embossing Folder, Framelits™ Label Collection,  HeatTool, Stampin’ Emboss ® Silver Embossing Powder, Punches- Blossom, 5-Petal Flower, 2 ½” Circle, 1" Circle, Gray Satin Ribbon (from my stash), Pearl

Thanks again for stopping by- I hope all of you have a fabulous week!  

Thursday, March 15, 2012

Springtime Vintage- Two in One!


Hi Stampers! 

Spring is definitely here this week on the East Coast and the gorgeous PP86 Spring Color Challenge from The Paper Players is perfect for this time of year!  

 
I decided to use the color combination along with the SSC246 sketch from Stamping411.   As always, the gals at both sites have created such beautiful projects- such inspiration!  Hopefully you will have the time to visit each of their sites:-)

Actually this card has very little stamping, four embossing folders and six punches- fairly quick to create once the rolled flowers were made.

To create this card:

Use the Big Shot™ with the Square Lattice Textured Impressions™ Embossing Folder to emboss a piece of Crumb Cake cardstock and a piece of Everyday Enchantment DSP.  On the embossed Crumb Cake layer, emboss again using the Decorative Oval Frame.  Carefully cut out the Oval Frame (use the part of the background layer that will not show on the card). 

Emboss a piece of Very Vanilla with the Elegant Lines Textured Impressions™ Embossing Folder- punch out a piece with the  XL Oval Punch  and trim another piece for the central panel.  Add the Victoria Lace border with Sticky Strip at the bottom (ruffling the lace as you adhere it to the back).   Layer entire panel onto a piece of Lucky Limeade, add the ½” Crumb Cake Seam Binding and the rows of Pearls. 

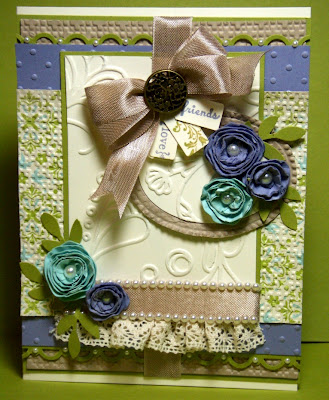
Emboss a piece of Wisteria Wonder with the Perfect Polka Dots Textured Impressions™ Embossing Folder.  Create the background layers, add the additional ½” Crumb Cake Seam Binding Ribbon with Antique Brad, Tiny Tags and Rolled Flowers. 

Stamp Sets:  Tiny Tags

 Ink: Lucky Limeade and Wisteria Wonder

Cardstock:  Crumb Cake, Lucky Limeade, Pool Party, Wisteria Wonder, Everyday Enchantment DSP, Very Vanilla

Accessories:  Big Shot™, Textured Impressions™ Embossing Folders- Elegant Lines, Perfect Polka Dots, Square Lattice and Decorative Frame- Oval, Punches- 1 3/8” Circle, 1 ½” Circle, Scallop Trim, XL Oval, Jewelry Tag, Bird Builder, ½” Crumb Cake Seam Binding, Antique Brad, Pearls

Thanks again for visiting- all of you are such an encouragement to me! 

Sunday, March 11, 2012

Two Cards- One Color Challenge!


Hi Stampers! 

I had a great day yesterday with my loving husband:-)  He works very long hours through the week and only has a Saturday off once every three to four weeks but this past Saturday we were able to escape for the day to Skyline Drive at Shenandoah National Park in Virginia :-)  We love the nature, serenity and all of the gorgeous vistas- truly a place that we feel closer to God and His Creation- a peaceful place that helps to to restore our souls!

Stamping is another way that I relieve stress so I wanted to create at least one card before my hectic week at work started.  I decided to try this week's HSSCC108 Color Challenge and had so much fun that I ended up making two cards:-)  

The first card uses the color challenge colors only and the second card combines the HSSCC108 Color Challenge along with the RS2 Retro Sketch Challenge.  

Once reason I like participating in color challenges is that they "challenge" me to use color combinations that I normally would not put together and this one was no exception.  Real Red and Daffodil Delight are wonderful colors but a bit brighter than I normally tend to gravitate towards and to combine them with Soft Suede and Crumb Cake, I originally was not so sure:-)

I seemed to recall that these colors may be in my neglected Attic Boutique Designer Series paper and lo and behold, several of the pages focused on these colors!   

The first card is a quick,  Clean and Simple (CAS) card and has very little stamping- the Attic Boutique DSP took center stage! 

Just emboss the DSP panel with the Big Shot™ and the Framed Tulips Textured Impressions™ Embossing Folder. Lightly sand the embossed areas with the Sanding Block.  

 Add the Real Red Satin Ribbon bow with the rolled flower/pearl center.  To create the flower- punch  the Daffodil Delight cardstock with the 1 3/8" Circle Punch, run through the Crimper Tool, cut a wavy spiral to the center, roll up from the outside edge, glue and place a pearl in the center. 

Add the sentiment layered onto the XL Large Oval punched shapes and you are finished!


The second card uses the same colors with the RS2 Retro Sketch Challenge

Stamp the bee/floral image from Nature’s Pace onto Crumb Cake with Soft Suede ink.  Color the flowers and leaves with Stampin’ Write markers in Daffodil Delight,  Real Red and Crumb Cake.  Distress the edges with the Distressing Tool and your finger (tearing a bit along the way).  Sponge Soft Suede along the edges and use the Color Spritzer Tool with the Stampin’ Write Soft Suede marker to add more details.

Use the Big Shot™ with the Vintage Wallpaper Textured Impressions™ Embossing Folder to emboss a piece of Antique Boutique DSP and Soft Suede cardstock., 

Layer all together per the sketch, add the sentiment along with a few more flowers from the Boho Blossom Punch and of course, pearls.  

Stamp Sets:  Nature’s Pace, Herb Expressions

 Ink: Soft Suede, Stampin’ Write Markers- Crumb Cake, Daffodil Delight, Real Red

Paper: Crumb Cake, Daffodil Delight, Real Red, Whisper White, Attic Boutique Designer Series Paper

Accessories:  Big Shot™,  Vintage Wallpaper Textured Impressions™ Embossing Folder,  Framed Tulips Textured Impressions™ Embossing Folder , Sanding Block, Sponge Dauber, 5/8” Real Red Satin Ribbon, Distressing Tool, Crimper Tool,  Punches- 1 3/8” Circle, XL Oval Punch, Boho Blossoms; Sponge Dauber, Pearls

Thanks again for dropping by- your visits mean so much to me!  I hope all of you find a time to de-stress and have fun stamping! 

Thursday, March 8, 2012

Spring Has Sprung- Three in One!


Hi Stampers! 

The weather here has been so spring-like this month that The Paper Players PP85 “Spring Has Sprung” Challenge seemed perfect!

 I decided to create a card using the “Spring” theme along with the FMS25 FreshlyMade Sketch and the CQC127 ColourQ colors.  All of the Design Teams and entries at both of these sites are wonderfully inspiring- if you have time, check them out!

To create this card:

Color the floral image with Stampin’ Write markers in Certainly Celery, Calypso Coral and Blushing Bride- “huff” and stamp the image onto Whisper White cardstock. 

Mount the focal image onto a layer of Chocolate Chip (punched on the edge with the Scallop Trim Border Punch). Add the 5/16” Chocolate Chip Satin Ribbon bow and pearls.
The sentiment was created using the same floral image (“huff” on the stamp to re-moisten the ink), layering the Chocolate Chip and Blushing Bride cardstock (punched with the XL Oval Punch). 

Create the rolled flowers using the 1 3/8” Circle Punch- run each circle through the Crimper Tool, cut a spiral and roll up into a flower.  Add the pearl centers to finish off the card.

Stamp Sets:  Just Believe, Love and Sympathy

Paper: Whisper White, Blushing Bride, Chocolate Chip, Certainly Celery DSP, Everyday Enchantment DSP

Ink: Stampin’ Write markers- Blushing Bride, Calypso Coral, Certainly Celery
Accessories: Punches- 1 3/8” Circle, XL Oval, Scallop Trim; Crimper Tool, Pearls, 5/16” Chocolate Chip Satin Ribbon

Thanks again for stopping by- I hope all of you have a wonderful week stamping :-)

Sunday, March 4, 2012

Retro Colors with a Retro Sketch!


Hi Stampers!! 

Even though this week was extremely busy, I wanted to create a card using the retro CQC126ColourQ Challenge colors and I  noticed that the ColourQ was highlighting a new challenge blog from Arielle- Retro Sketches so I decided to use the RS1 sketch.     

A brand new challenge with a wonderful idea-  each week, a different Design Team member will choose an old "retro" sketch from one of their previous cards and create a new card with the "retro" sketch :-).   If you had not had a chance to visit yet, check out both sites for quite a bit of inspiration and join us for some fun! 


To create this card:

To create the focal image, de-static a piece of Whisper White with the Embossing Buddy®, stamp the Sunflower background stamp with Versamark® ink, apply Stampin’ Emboss® Brown Embossing Powder (retired)  and heat with the Heat Tool.  Once cooled, color the petals with a Stampin’ Write Daffodil Delight marker.

Carefully cut around the petals and mount the image onto a piece of Whisper White that has been embossed with the Big Shot™ and the Square Lattice Textured Impressions™ Embossing Folder.  Mount this onto Pumpkin Pie.

Use the Crimper Tool (had to use a retro tool for this one) and crimp the corners of a piece of Pumpkin Pie cardstock to create the diamond pattern as well as three strips of Early Espresso.

Assemble the layers, add the sentiment and finish off with Metallic Brads. 

Stamp Sets:  Sunflower, Short & Sweet

Ink: Versamark™, Early Espresso , Stampin’ Write marker- Daffodil Delight

Paper: Whisper White, Early Espresso, Lucky Limeade, Pumpkin Pie

Accessories:  Big Shot™, Square Lattice and Snowburst Textured Impressions™ Embossing Folder, Crimper Tool, HeatTool, Stampin’ Emboss ® Brown Embossing Powder, Punches- Modern Label, Word Window, 5/16” Handheld; Metallic Brads
Thanks again for stopping by- I hope you have a blessed week! 

Saturday, March 3, 2012

Leap Year Awana Birthday Celebration!


Hi Stampers! 

I have not had a chance to post this week since I have been taking a break from my normal weekly challenges to create birthday cards and notebooks for our 5th and 6th grade girls in Awana. 

My fellow leaders and I decided to have our first annual “combined” birthday party for the girls (celebrate one big birthday for all so we would not forget anyone) and since this year was a Leap Year, it was the perfect Wed. eve to hold the party.

We chose a “chocolate” theme and it seemed that all of the girls had a great time with the games, food and gifts. 

One of the leaders, Michelle (my good friend and technically co-Director :-)), found the perfect little chocolate heart shaped charm and inserted them into a brown chiffon bag that also included a magnet, chocolate and a few other goodies.  We used a brown lunch bag tied with ribbon for the rest of the gifts-  a covered notebook/journal, handmade card and of course, more chocolate:-).

To create the notebooks, emboss a piece of Certainly Celery cardstock using the Big Shot™ along with the Perfect Polka Dot Textured Impressions™ Embossing Folder.  

Add the Satin Ribbon Bow and adhere this panel to the front of the notebook.

Use the Owl Builder Punch to punch out the owl (I used retired Designer Series paper for the little vests) along with Early Espresso cardstock for the body, Whisper White and Basic Black cardstock for the eyes, Pretty in Pink for the little heart.

Use the Scallop Punch to punch out the scallops from Early Espresso cardstock, hand cut the scallop in half and then again in quarters for the wings.  Adhere to the side of the body.  

The Cupcake Builder Punch was used for the black part of the eye (the small part of the eye on the Owl Punch was too small for me to glue for 24 notebooks :-)). 

Adhere the owl to the Certainly Celery panel,  a
dd the Pretty in Pink heart to the ear along with the Rhinestone to finish off the notebook.  Even though some of the owls appear to be cross-eyed, even my husband thought that the notebooks turned out cute!

Now for the birthday card- I decided to stay with a CAS card (since we needed 24) so I used the Big Shot™ again with  the Perfect Polka Dot Textured Impressions™ Embossing Folder to emboss another Certainly Celery cardstock layer.

Punch out the flower from Perfect Plum cardstock using the Blossom Punch and emboss with the Petals-A-Plenty Textured Impressions™ Embossing Folder.  Punch a hole in the center of the flower using the 5/16” Handheld Punch and insert the Chocolate Chip Corduroy Button brad (retired). 

Use the 5-Petal Flower Punch with Wild Wasabi for the leaves.  Cut the flower with two petals on one side and three on the other.  Fold each flower in half and adhere to the Certainly Celery panel. 

Mount the flower on top of the leaves, stamp the sentiment from Happiest Birthday Wishes (Hostess set) with Elegant Eggplant Classic Ink, add the ribbon bow and adhere to the Whisper White card base.

I thought that the owl may be too "cutesy" for the leaders, so I
 decided to create a different journal for them (I used the same technique to create the background cardstock layer and ribbon).  The focal panel is a modified version of a recent card that I created - see post under Lovely As A Tree.  

Stamp Sets: Happiest Birthday Wishes , Lovely As A Tree 

Paper:  Early Espresso, Pretty in Pink, Whisper White, Basic Black, Certainly Celery, Perfect Plum, Wild Wasabi, retired DSP, Going Gray (retired)

Ink: Elegant Eggplant, Versamark

Accessories:  Big Shot™, Textured Impressions™ Embossing Folders- Perfect Polka Dots, Petals-A-Plenty, Punches- Owl Builder, Cupcake Builder, Scallop Circle, Blossom, 5-Petal Flower, Corduroy Buttons (retired), Rhinestone, Heat Gun, Stampin' Emboss Basic Black Embossing Powder, Sponge Daubers, Satin Pearls, 5/8" Basic Black Satin Ribbon, additional Satin Ribbon  from my stash 

Such easy projects- I will have to make more (but start sooner next time- story of my life- severe procrastination)!  It seems to take me a while to decide on a design :-)

I hope all of you have a wonderful weekend and have fun stamping! 
Related Posts Plugin for WordPress, Blogger...