Monday, January 14, 2013

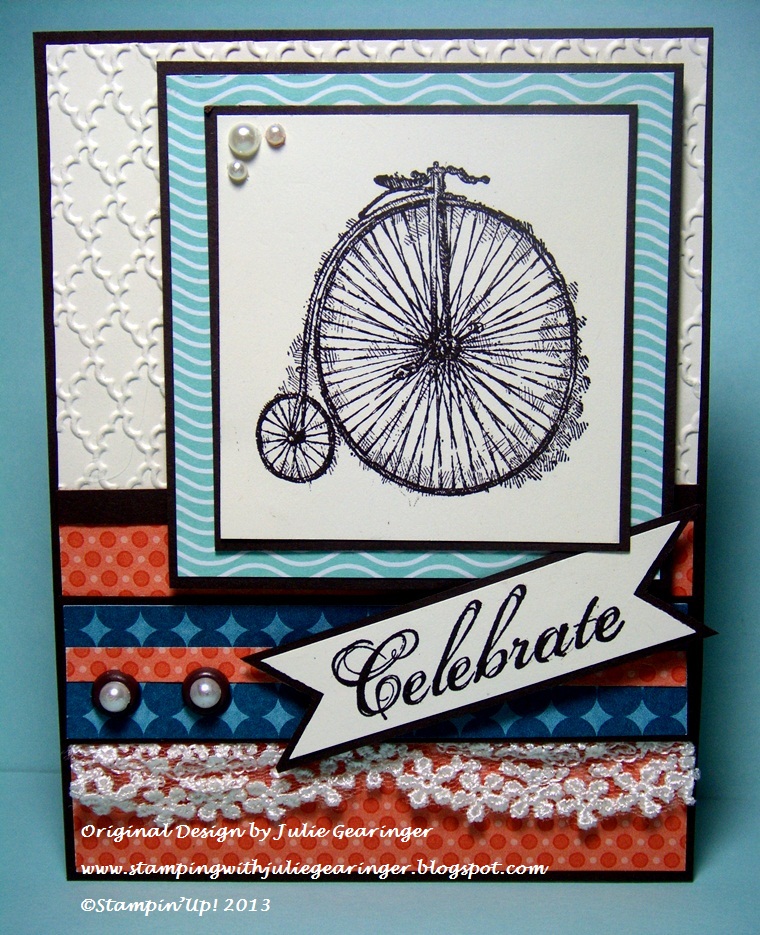
Celebrate!! Three in One!


Hi Stampers! 

I hope all of you had a wonderful week!  I decided to create a card featuring some of the 2013 Spring/Summer Mini Catalog items along with a new stamp set from the upcoming 2013 Sale-A-Bration (SAB). Plus, I am so thankful that I was able to use scraps for all of the layers- love going "green"!!  


If you have the time, check out each site for wonderful inspiration and see how creative all of the Design Team members were this week!

To create this card:

Use the Big Shot™ with the Fancy Fan Textured Impressions™ Embossing Folder to emboss a piece of the Very Vanilla cardstock.  Mount this onto a piece of Early Espresso cardstock, add the Tangerine Tango DSP and s strip of Early Espresso cardstock to cover the cut edge.

Stamp the bicycle image from the new SAB Feeling Sentimental stamp set using Early Espresso Classic Ink onto Very Vanilla cardstock. Adhere to Early Espresso cardstock and again onto a “frame” created with Pool Party DSP (from retired Just Eat Cake) and Early Espresso cardstock.

Create the lower strip at the bottom of the card using another strip of DSP from Summer Smooches (featuring Island Indigo), scrap strip of the DSP from the lower half of the card, mount onto Early Espresso cardstock and add the 18” Scalloped Lace Trim from the new Spring/Summer Mini Artisan Embellishment kit (I cut the lace in half so I can use the other half for another card).

Add the banner sentiment (points created with the 1 3/8" Square Punch), the 5/16” Neutral Brads  along with Pearls to finish off the card.

Stamp Sets:  Feeling Sentimental

Cardstock: Very Vanilla, Early Espresso, DSP from Summer Smooches and Just Eat Cake (retired)

Ink:  Early Espresso

Accessories:  Big Shot™, Fancy Fan Textured Impressions™ Embossing Folder, 1 3/8” Square Punch, 18” Scalloped Lace Trim Lace , Pearls, 5/16” Neutrals Brads (retired)

Thanks again for stopping by- I hope all of you find a chance to stamp and have fun this week- go ahead and celebrate in your craft room (I know I will)!! 

Tuesday, January 8, 2013

Happy Anniversary- 30 Years Together!


Hi Stampers! 

This week , my husband and I will be celebrating our 30th Anniversary!!  It seems just like yesterday that we met, but then again, it seems like I have known him forever!  I am so thankful that we have the opportunity to be husband and wife here on earth and that we will spend eternity together in Heaven with the Lord!!  He is the best husband ever and very supportive of my stamping :-)

I decided to create another “bird” card in honor of one of our favorite hobbies, watching birds :-)  We have been blessed to see over 140 species of birds from our own sunroom and love to scan the tops of the trees with our binoculars in search of a new species or for the chance to see some of our favorites return each year. 

I decided to use the beautiful set, Nature Walk along with the CCCMC233 Sketch and the colors of this week’s Stampin’ Royalty SR157 Color Challenge (I completed the card too late to join in the SR157 Challenge but love the color palette).  If you have the time, check out their sites to see all of the amazing entries!

To create this card:

Using Soft Suede and Crumb Cake Classic Ink, stamp the images onto Very Vanilla cardstock and cut into panels.  

Sponge the edges and lightly in the center with Crumb Cake and Soft Suede to “distress” the images and add more distressing with the Color Spritzer Tool and a Soft Suede marker.  

Mount all of the panels onto Crumb Cake and Soft Suede cardstock and watercolor the egg images using an Aqua Painter with Not Quite Navy (NQN) Classic Ink.

Use the Big Shot™ with the Lacy Brocade Textured Impressions™ Embossing Folder (ink the interior of the folder first with Crumb Cake Classic Ink) to emboss a piece of Very Vanilla cardstock.  Adhere this background onto NQN and Crumb Cake cardstock and then onto the Very Vanilla cardbase. 

Add the banner created from NQN Designer Series Pack (do not look too close- I accidentally created the banner with the words upside down- oops! :-)) Add the panels using Stampin' Dimensionals.  

Add the ½” Very Vanilla Seam Binding Ribbon Bow accented with an Antique Brad and the sentiment to finish off the card.

I hope my darling husband does not mind the bow- "real" men like bows, right?

Stamp Sets:  Nature Walk, Teeny Tiny Wishes

Ink: Crumb Cake, Not Quite Navy, Soft Suede, Stampin’ Write markers- Crumb Cake and Soft Suede

Cardstock: Very Vanilla, Crumb Cake, Not Quite Navy, Soft Suede, Not Quite Navy Designer Series Pack

Accessories:  Big Shot™, Lacy Brocade Textured Impressions™ Embossing Folder, Sponge Daubers, Color Spritzer Tool, Punches- 1 3/8” Square Punch (for banner points), Word Window and Modern Label;  ½” Very Vanilla Seam Binding Ribbon, Antique Brad

Thanks again for stopping by- have a blessed week!

Monday, January 7, 2013

Oh, Happy Day!! 2013 Sale-A-Bration is Near!


Hi Stampers!!

I wanted to share with you a card that I designed using the bright colors from this week’s DD34Dynamic Duos and the FM91 Sketch from the Friday Mashup! 

 Again, if you have not had the time to visit their sites yet, you are in for a treat!  The Design Team's ideas are wonderful as well as all of the other entries - so much talent!!

This card incorporates one of the new Sale-A-Bration (SAB) sets that will be available after January 22nd along with some of the new SAB Designer Paper and Ribbon- stay tuned for more details in January regarding how you can earn these items free!

To create this card:

Use Stampin’ Write markers in Island Indigo and Melon Mambo to color the leaves and flowers from Bloomin’ Marvelous and stamp onto Whisper White cardstock to create your focal image.  

"Stamp off" a few of the images to leave a lighter impression and ink the sentiment stamp the Stampin' Write Island Indigo marker as well :-)  

When you have the desired effect with the flowers and leaves, use a Sponge Dauber to lightly sponge Island Indigo around the edges.

Mount the focal image onto Island Indigo and again onto Melon Mambo (leaving a bit of Melon Mambo at the bottom for the Finishing Touches Edgelit™ border  and the new 1/4" Island Indigo Satin Ribbon). 

Emboss a piece of Whisper White cardstock using the Big Shot™ with the Lacy Brocade Textured Impressions™ Embossing Folder and adhere this background to a layer of Island Indigo and Melon Mambo.

Create the banner using DSP mounted onto Melon Mambo cardstock - use a 1” Square Punch to create the banner “points” . 

Assemble the card per the sketch- add the banner, mount the focal image using Stampin’ Dimensionals, adhere the butterflies, leaves and rolled flowers (tutorial here) with Mini Glue Dots and finally the pearls to finish off the card. 

Stamp Sets: Bloomin’ Marvelous

Ink:  Stampin’ Write Markers- Island Indigo, Melon Mambo

Paper: Whisper White, Island Indigo, Melon Mambo, Sycamore Street DSP (2013 SAB), Melon Mambo (Brights Designer Series Pack)

Accessories:  Big Shot™, Lacy BrocadeTextured Impressions™ Embossing Folder, Finishing Touches Edgelit™ Die, Punches- 1" Square Punch, 1 3/8” and 1 ¼” Circle (for the rolled flowers), Bird Builder, Elegant Butterfly; Pearls, Sponge Dauber, ¼” Island Indigo Satin Ribbon (2013 SAB Bundle)

Thanks again for stopping by - I hope you have  a great time this week creating something fun with paper!! 

2013 January Christmas- Three Challenges in One!


Hi Stampers!!

I have been busy at work again this week and wanted to take time this weekend to create the remaining six cards for my January “commitment” for the SplitcoaststampersCCC13 Christmas Card Challenge ( I have committed to 20 per month:-)).
  
After I had already created my first two Christmas cards for the Splitcoaststampers CCC13 Challenge, I realized that the theme for January is to use non-traditional colors.  With that in mind for my last set for January, I decided to use the colors from this week’s Pals Paper Arts PPA150 Color Challenge long with the Freshly Made FMS67 Sketch Challenge.  I love both of these challenge sites and the Design Team Samples along with all of the other submissions show how many interpretations can be made with a specified challenge
.
To create this card:

Print the images from Beautiful Season and More Merry Messages using My Digital Studio (MDS) onto Whisper White cardstock (I mirrored the image to reverse the chickadee).  I love using MDS to create "hybrid" cards :-)

Color the berries using a Stampin’ Write Melon Mambo marker and the chickadee and leaves using the Gray Watercolor Pencil.

Use the Big Shot™ with the Oval Framelits™ to cut out the chickadee image and also cut an oval from Basic Black and Melon Mambo cardstock (cutting these two in half lengthwise to layer behind the focal image).

Use the Big Shot™ with the Fancy Fan Textured Impressions™  Embossing Folder to emboss a piece of Basic Gray cardstock .  Also with the Big Shot™, cut pieces of Whisper White cardstock with the Large Scallop Edgelit™  and Northern Frost Decorative Strip.   Emboss the scalloped pieces with the Delicate Designs Textured Impressions™ Embossing Folder (2 pieces per card) and “pop” out two snowflakes per card.

Added a third snowflake to cover up the sentiment "error" :-)
Layer the embossed Basic Gray with a strip of Melon Mambo Designer Series Paper (from the DSP Stack) along with the two lace borders onto Basic Black cardstock. 
** HINT** I cut the ovals from the Basic Black background layer and covered it with Basic Gray, Melon Mambo and embossed lace panels (no one will be the wiser plus it helps eliminate some of the weight of the card).
Add the two strips of 5/8” Basic Black Satin Ribbon.  Adhere the Oval focal image and sentiment using Stampin’ Dimensionals. 

Stamp Sets:  None- MDS Beautiful Season, MDS More Merry Messages

Ink: Printer Ink-Black, Stampin’ Write Markers- Melon Mambo,  Watercolor Pencil- Gray

Paper: Whisper White, Basic Gray, Melon Mambo DSP from the Brights Designer Series Pack

Accessories:  Big Shot™,  Fancy Fan and Delicate Designs (Lace)Textured Impressions™ Embossing Folders,  Oval  Framelits™, Northern Frost Decorative Trim, Large Scallop Edgelit™, 1” Square Punch (for banner points), Pearls, 5/8” Basic Black Satin Ribbon (retired)

Thanks again for stopping by- I hope you like this non-traditional color Christmas card! 

Have a wonderful Monday and stop back soon- I will be posting another card using an upcoming Sale-A-Bration set!

Tuesday, January 1, 2013

2013 Christmas- Card #2


Hi Stampers!

Happy New Year!!  I hope all of you had a wonderful, safe New Year!!

 I had a chance to create a few more Christmas Cards for the CCC13Splitcoaststampers Christmas Card Challenge using the colors from this week’s The Friday Mashup FM90 Challenge.  I was able to create eight of these cards and now with my previous post,  am off to a good start towards my goal of twenty per month :-)  The first card, I distressed a bit and sponged to "age" the paper and the other seven were "clean"- I decided with the time that it took to distress , I preferred the "clean" look  :-)

This card is another “hybrid” card- the images are digital but the coloring and other elements are “traditional” :-)

To create this card:

Using My Digital Studio (MDS), print out the skater image from Winter Post and the sentiment from Wishes and Greetings using Black Printer Ink onto Whisper White cardstock.

Color the images with a Stampin’ Write marker in Pool Party and Midnight Muse.  Punch the image out using a 2 ½” XL Circle Punch.  Punch out another circle using Midnight Muse cardstock and cut in half to layer behind the focal image.

Adhere the focal image onto a Whisper White Tea Lace Doily and attach the ½” Midnight Muse Stitched Satin Ribbon bow.

Use the Big Shot™ with the Lacy Brocade Textured Impressions™ Folder to emboss a piece of Pool Party and Midnight Muse Cardstock.  Cut both pieces in half and adhere to a piece of Whisper White cardstock.   Add a piece of the ½” Midnight Muse Stitched Satin Ribbon to hide the seam and adhere the doily focal image to the front of the card.

With the Big Shot™ and the Northern Frost Decorative Strip die cut out the snowflakes from Whisper White cardstock.

Punch out the sentiment using the XL Oval Punch and also punch two pieces from Midnight Muse cardstock to layer behind the sentiment.  Mount to the card front along with the snowflakes using Mini Glue Dots.  Add the Rhinestones to the center of the snowflakes to finish off the card.

First card- created with distressing, sponging 
Stamp Sets:  None- My Digital Studio- Winter Post, Wishes and Greetings  

 Ink: None- Printer Ink, Stampin’ Write Markers- Midnight Muse, Pool Party

Cardstock: Whisper White, Basic Black, Pool Party, Midnight Muse

Accessories:  Big Shot™, Lacy Brocade Textured Impressions™ Folder, Northern Frost Decorative Strip, Whisper White Tea Lace Doily, ½” Midnight Muse Stitched Satin Ribbon, XL Oval Punch, 2 ½” Circle Punch, Rhinestones

Thanks again for stopping by and I hope you have a wonderful week!

Monday, December 31, 2012

Christmas 2013- Cards for the New Year


Hi Again Stampers!!

I am ashamed to say that I did not create enough Christmas cards in 2012 to mail any at all (only hand delivery) so I am going to be more dedicated in 2013!! 

This card was created for the Splitcoaststampers Christmas Card CCC13 Challenge using the colors from this week’s CQC169 ColourQ Challenge.  I was able to create six cards (I decided that my goal of twenty cards per month will be easier to attain if I create smaller batches of different designs) so I will be sharing Christmas cards every week or so throughout the year to be able to make my goal :-)
  
To create this  “hybrid card”- part digital using traditional elements as well:

Print the skate image using the My Digital Studio (MDS) Winter Memories download (six to a page with black printer ink) along with the MDS sentiment from More Merry Messages (in red printer ink). 

Color the skate image using Stampin’ Write markers in Real Red, Pear Pizzazz and Bermuda Bay (both retired In-Colors).  Use a Watercolor Pencil in Gray to highlight the skate laces, heal and blades.

Use the Big Shot™ to emboss a piece of Basic Gray DSP (I used a retired Hostess Pack) and Pear Pizzazz cardstock with the Lacy Brocade Textured Impressions™ Embossing Folder.  Lightly sand the Basic Gray DSP layer to expose the white core.

Emboss a piece of Whisper White cardstock using the Delicate Designs (Lace)Textured Impressions™ Embossing Folder .  Layer the Pear Pizzazz onto the Lace Embossed border and a strip of Whisper White at the top.  Adhere to the embossed Basic Gray layer and mount onto the Whisper White card base. 

Cut the skate images out using the Big Shot™ with Oval Framelits™ and cut a second oval image out of Basic Gray (cut this oval in half and layer behind the skate image).  Adhere the layered oval onto a White Tea Lace Paper Doily and add to the card front.

Add the 5/8” Real Red Satin Ribbon bow along with the sentiment banner to finish off the card.

Stamp Sets:  None- MDS Winter Memories, MDS More Merry Messages

Ink: Printer Ink-Black, Red; Stampin’ Write Markers- Real Red, Pear Pizzazz, Bermuda Bay, Watercolor Pencil- Gray

Paper: Whisper White, Pear Pizzazz, Basic Gray DSP (retired Hostess Level I Pack)

Accessories:  Big Shot™, Lacy Brocade and Delicate Designs (Lace)Textured Impressions™ Embossing Folders,  Oval Framelits™, White Tea Lace Paper Doily, Sanding Block, 1” Square Punch (for banner points), 5/8” Real Red Satin Ribbon (retired)

Thanks again for stopping by- have a wonderful New Year!

Sunday, December 30, 2012

True Blue Sympathy for Men of Honor


Hi Stampers!!

This month has been one of joyous occasions as well as one of saying goodbye to loved ones.  I found out that one of my uncles passed away (he lives far away from me and I have not seen him in approx. 15 years or more) plus there were two other funerals I attended within the last week for men who were influential in my life as well as others. 

With the flurry of work and Christmas, I had not had the chance to create special sympathy cards for any of the families who lost loved ones, so this weekend I finally had a chance to spend time in my craft room...

I wanted to create masculine sympathy cards and chose to incorporate the SU- Only SUO61 True Blue Color Challenge into the theme of the cards.  I also wanted to use one of the new sets from the 2013 Spring Mini catalog and  I was not aware at the time of designing these cards that the one gentleman who has passed into the arms of Jesus loved the beach and spent vacations there with his family every year –plus the verse in the sentiment was mentioned as one of his favorites at the funeral.   It is truly amazing how the Lord leads you without you even knowing it at the time :-) 

Panel Close-Up 
To create the basic elements for these cards:

The basic panel design was created by brayering ink onto four pieces of Whisper White cardstock- first Bashful Blue, then Marina Mist and finally Tempting Turquoise.  You do not have to be perfect with this step, in fact, the brayered colors on the cardstock will appear a bit contemporary with some of the hard edges showing but do not despair- you will not notice this once the card is finished :-)

Stamp the images using Midnight Muse Classic Ink and punch out the images with the 1 ¼” Square Punch (use the ¾” Circle Punch to punch out the Nantucket anchor image).  You will not be able to fit the entire images into the punched area, so chose the areas that appeal to you:-)

Card #1
With the Color Spritzer Tool and a Midnight Muse Stampin’ Write marker, spritz the images to add a bit if distressing.  Layer onto squares punched from Midnight Muse cardstock with the 1 3/8” Square Punch.   

Card #1- Distress the edges of the Midnight Muse with the Distressing Tool.  Layer onto Whisper White cardstock and again onto Tempting Turquoise.  Add the sentiment layer at the bottom and knotted Hemp Twine with the circular image in the middle.

Use the Big Shot™ with the Woodgrain Textured Impressions™ Embossing Folder to emboss a piece of Whisper White and Midnight Muse cardstock.  Layer onto Tempting Turquoise and adhere the focal image to finish off the card.

Card #2
Card #2- Use the same steps as in Card #1, except use a piece of Whisper White embossed with the Herringbone Textured Impressions™ Embossing Folder (this was already embossed in my scraps).  

Layer a piece of Tempting Turquoise behind the sentiment layer (cut with the Big Shot™ and the Labels Collection Framelits™ ).

A few more punched elements behind the Nantucket image adds additional interest.


Card #3
Card #3- Again the same steps but the Woodgrain folder with Whisper White panel is mounted onto Tempting Turquoise and again onto Whisper White- the sentiment is directly stamped on this Whisper White layer.

Once distressed a bit with Sponge Daubers, the Color Spritzer Tool and the Nantucket stamp, layer the entire card onto Midnight Muse cardstock before adding the Whisper White card base.

Card #4

Card #4- I used the fish and coral images only and added the Nantucket stamp onto those panels.

The sentiment banner was created with the 1' Square Punch for the banner points and the Hemp Twine was noted and wrapped around the edges.

 Add the Woodgrain and Square Lattice embossed panels along with the Circle Brad in the center to finish off the card. 


Stamp Sets: By the Tide, Blessings from Heaven

Ink:  Bashful Blue, Marina Mist, Midnight Muse, Tempting Turquoise

Paper: Whisper White,  Midnight Muse, Tempting Turquoise

Accessories:  Big Shot™, Labels Collection Framelits™, Textured Impressions™ Embossing  Folders- Woodgrain, Herringbone, Square Lattice,  1” Square Punch (for  sentiment banner), 1 ¼” and 1 3/8” Square Punch,  Color Spritzer Tool, Sponge Daubers,  Hemp Twine (retired), Circle Brads (retired)

I hope you like these cards- I am not sure which one I like the best.  My husband likes card#1 - if you have the time, let me know which one you prefer (if any :-))  

Thanks again for stopping by and I hope all of you have a great (safe) week celebrating our New Year! 

If you have a chance, stop by again soon - I will be sharing a Christmas card for 2013 in my next post!

Friday, December 28, 2012

Happy Birthday Darling!!


Hi Stampers!!

I wanted to share the birthday card that I created for my wonderful husband using the Splitcoaststampers’ SC416 Sketch Challenge.  

I love him so much and not only is he the best husband in the world, he is also my best friend !!  We have a lot to celebrate this year since our 30th Anniversary is approaching in a little over a week! 

We love to watch birds so I chose one of my favorite stamp sets, Nature Walk and included a few sneak peeks of items in the upcoming Spring Mini catalog and Sale-A-Bration catalog.   

To create this card:

De-static a piece of Whisper White cardstock with the Embossing Buddy®.  Stamp the bird image and sentiment using Versamark™ink, apply Early Espresso Stampin’ Emboss® Embossing Powder and heat with the Heat Tool.

Once cooled, carefully color the bird image  with Watercolor Pencils (take care not to rub off the embossing powder with the point of the pencil) and cut towards the tail.   Use the 2 ½” XL Circle Punch to punch out the bird (fold the tail back a bit to not punch off the tail).

Lightly sponge the edges around the circle with Crumb Cake, Soft Suede and Early Espresso Classic Ink.  Use the Color Spritzer Tool with the Early Espresso Stampin’ Write Marker to add a bit of distressing.

Punch another circle from Early Espresso cardstock to cut in half and layer behind the bird image.

Use the Big Shot™ to emboss a piece of Not Quite Navy Designer Series Stack Paper (DSP)  with the Lacy Brocade Textured Impressions™ Embossing Folder and a piece of Soft Suede DSP with the new Honeycomb Textured Impressions™ Embossing Folder (sneak peak- available with the new Spring Mini Catalog).  Lightly sand both embossed panels to expose the white core of the DSP.

Adhere the Not Quite Navy panel to Early Espresso cardstock and the Soft Suede strip.  Add the 5/8” Early Espresso Satin Ribbon to the edges of the Soft Suede layer.

Use the Big Shot™ with the Adorning Accents Edgelits™ to cut the edge of a piece of Cajun Craze DSP and emboss with the matching Adorning Accents Textured Impressions™ Embossing Folder.  Cut the edges off to layer behind the main piece on the sides and adhere to the card with Stampin’ Dimensionals®.   A bit difficult to see this layer but it is a bit staggered behind the bird image :-)

Add the bird image, the 5/8” Early Espresso Satin bow and the embossed sentiment (sneak peek at a SAB set) to finish off the card.

Stamp Sets: Nature Walk, Feeling Sentimental (upcoming SAB set)

Ink: Versamark™, Classic Ink- Crumb Cake, Early Espresso, Soft Suede , Stampin’ Write Marker- Early Espresso

Paper: Whisper White, Designer Series Stack Paper – Cajun Craze, Not Quite Navy and Soft Suede


Accessories:  Big Shot™, Adorning Accents Edgelit™, Textured Impressions™ Embossing Folders- Lacy Brocade, Adorning Accents and Honeycomb, Heat Tool, Embossing Buddy®, Stampin’ Emboss® Early Espresso Embossing Powder, Watercolor Pencils,  1” Square Punch (for  sentiment banner), 2 ½” XL Circle Punch,  Color Spritzer Tool, Sponge Daubers, 5/8” Early Espresso Satin Ribbon (retired)

Praying that this card is masculine enough for my hubby - he knows that I love stain ribbon and hopefully the bow will not be too “girly” for him :-) 

Thanks again for stopping by- have a great weekend and I should be able to share a few more cards with you this weekend!
Related Posts Plugin for WordPress, Blogger...