Monday, October 13, 2014

ODBDSLC215 Gratitude Can Transform Common Days

Hi Stampers!


 If you have not had a chance to visit the ODBD site yet, I hope you will find the time to do so- as always, wonderful Design Team samples as well as tremendous inspiration from the gallery of submissions!!

To create this card:

Stamp the Cornucopia image from Our Daily Bread Designs using Memento™ Tuxedo Black Ink onto Whisper White cardstock.  Color the image using Stampin’ Blendabilities™ Collections (Cherry Cobbler, Daffodil Delight, Old Olive, Pumpkin Pie, Wisteria Wonder and Neutrals) and carefully cut out the image.  

Use the Big Shot™ with the Vintage Flourish Pattern Die (ODBD) and cut the frame out of Very Vanilla cardstock. 

Ink the sentiment from Day of Gratitude using Chocolate Chip Classic Ink and stamp onto the frame.   Distress a bit using Ranger© Tim Holtz® Old Paper Distress Ink and the Color Spritzer Tool with a Stampin’ Write Chocolate Chip marker to add a bit of splatter.

Mount the frame onto a piece of retired Apple Cider Designer Series Paper (DSP).  Add the 1” Chocolate Chip Satin Ribbon strip and mount the frame onto the Chocolate Chip card base.

Repeatedly stamp the leaf image from Day of Gratitude using Memento™ Tuxedo Black Ink onto Whisper White cardstock and color using the Light and Medium Old Olive Stampin’ Blendabilities™ markers.  Carefully cut out the images and mount onto the card front. 

Add the Cornucopia image using Stampin’ Dimensionals® and add the retired Bronze button along with Hemp Twine to finish off the card.

Stamp Sets:  Day of Gratitude, Cornucopia (ODBD)

Ink:  Memento™ Tuxedo Black Ink, Stampin’ Blendabilties™- Cherry Cobbler, Daffodil Delight, Old Olive, Pumpkin Pie, Wisteria Wonder; Stampin’ Write Marker- Chocolate Chip, Ranger© Tim Holtz® Old Paper Distress Ink

Paper: Very Vanilla, Chocolate Chip, retired Apple Cider DSP

Accessories: Big Shot™, Vintage Flourish Pattern Die (ODBD), Color Spritzer Tool, 1” Chocolate Chip Satin Ribbon, Bronze Button, Hemp Twine


 Thanks again for visiting- have a wonderful evening!

Thursday, October 9, 2014

C is for Cat- A Color and Sketch Challenge :-)

Hi Stampers!   

Last night I had a chance to play in my craft room and decided to create a card using the CC499 Splitcoaststampers’ Color Challenge- "Saffron Pumpkins in the Meadow" with the dessert option of using something gold and do not make a Halloween card along with the MoJo366 Sketch Challenge.

I could not add Gold to this card without distracting from the image (but it is not Halloween) :-)

If you have not visited either challenge site yet, I encourage you to do so- marvelous inspiration from all!

To create this card:

The main focal panel is from Graphic 45’s Raining Cats and Dogs series (I love animals especially cats and just had to have this paper- lol!) - I decided to use a Mossy Meadow Stampin’ Write marker too darken the leaves a bit on her dress but all of the other colors matched perfectly.

Once the coloring was finished, apply Ranger© Tim Holtz® Old Paper Distress Stain to “antique” the paper.

Mount the panel onto a piece of Mossy Meadow cardstock, trim and mount onto Basic Black cardstock.

Use the Big Shot™ along with the Alpabet Press Textured Impressions™ Embossing Folder to emboss a piece of retired Pumpkin Pie Designer Series Paper (DSP).  Lightly sand the embossed panel using a Sanding Block, trim and mount onto a piece of Basic Black cardstock.

Also mount a piece of retired I Am Me DSP to a piece of Basic Black cardstock for the additional vertical part of the sketch challenge.

Mount a piece of Mossy Meadow cardstock to a piece of Basic Black cardstock.

Add the I Am Me DSP panel first, then add the strip of ¾” Black Satin Ribbon over the panel, securing the ends behind the panel.  Add the distressed Pumpkin Pie layer and mount the focal image using Stampin’ Dimensionals®.

Stamp the sentiment tags using the retired Tiny Tag stamp set onto Very Vanilla cardstock and punch out using the retired Jewelry Tag Punch.  Antique the paper using Ranger© Tim Holtz® Old Paper Distress Stain.  Insert a Mini Black Brad at the top of the two tags and mount onto the card panel.

Use the Big Shot™ to cut out the cat (Impression Obsession die?) from Basic Black cardstock and mount onto the front of the focal image panel.

Mount the entire focal image panel onto the So Saffron card front, add the triple ¾” Black Satin Ribbon bow along with Pearls to finish off the card.
Stamp Sets: Tiny Tags
Ink:  Memento™ Tuxedo Black Ink, Stampin’ Write Mossy Meadow marker, Ranger© Tim Holtz® Old Paper Distress Stain
Paper/Cardstock:  Basic Black, Mossy Meadow, So Saffron, Very Vanilla; retired Pumpkin Pie DSP, retired I Am Me DSP; Raining Cats and Dogs (Graphic 45)
Accessories:  Big Shot™, Alphabet Press Textured Impressions™ Embossing Folder, Cat Die (non-SU!), retired Jewelry Tag Punch, ¾” Black Satin Ribbon (from my stash), Pearls

Thanks again for stopping by- I hope all of you have a great Thursday!

Tuesday, October 7, 2014

SUO107 Truly Grateful to be "Out in the Woods"

Hi Stampers! 


I hope that you will visit us at SUO-Challenges to check out the rest of the Design Team projects and join in on in on the fun with your Stampin’ Up! Only creations as well as visit the CCMC site and check out all of their fantastic designs and gallery!

To create this project:
Ink the moose image from Walk in the Wild using Memento™ Tuxedo Black Ink and stamp onto a piece of Whisper White cardstock. 
Create a mask for the moose using a sticky note and also create a mask for the moon with the 1 ¼” Circle Punch.
Mask the moose and moon image and using a Sponge Dauber with Marina Mist Classic Ink, sponge the ink onto the sky in a horizontal pattern to mimic woodgrain.
Color the moose using Stampin’ Blendabilities- Light and Medium Crumb Cake and the grassy area with the Light and Medium Old Olive markers.
Cut the image out using the Big Shot™ with the Ovals Collection Framelits™ (also cut an oval of the same size from Early Espresso cardstock).  Hand-cut the Early Espresso oval in half horizontally and mount behind the focal image.
Use a Sponge Dauber to apply Baked Brown Sugar Classic Ink to the edges and use the retired Color Spritzer Tool with the Early Espresso Stampin’ Write marker to add a bit more distressing..
Use the Big Shot™ with the Woodgrain Textured Impressions™ Embossing Folder to emboss a piece of Crumb Cake cardstock.  Trim and mount onto a panel of Early Espresso cardstock, trim again and mount onto another panel of Crumb Cake cardstock, trim once more and mount onto the Early Espresso card base.
Cut the angled piece of Designer Series Paper (DSP) from the Trim the Tree DSP Paper Stack, mount onto a piece of Early Espresso cardstock and adhere this panel to the card front per the card sketch.
Ink the woodgrain background stamp from Truly Grateful using Baked Brown Sugar Classic Ink and stamp onto a piece of Crumb Cake cardstock.   Trim a piece to use as one of the vertical banners, cut the banner points by hand using the image as a guide, use the Distressing Tool to distress the edges and use a Sponge Dauber with Early Espresso Classic Ink to add a bit more distressing and definition along the edges.
Trim a piece of Early Espresso cardstock (I had a piece already embossed with the Woodgrain Textured Impressions™ Embossing Folder in my stash)- cut the banner points with the Hexagon Punch and distress the edges using the Distressing Tool. 
Adhere both banners to the card front, add the strands of Burlap Ribbon and mount the moose oval using Stampin’ Dimensionals®.
Stamp the sentiment using Early Espresso Classic Ink onto another portion of the previously stamped woodgrain background (in the step above) and hand cut the banner points on both ends using the image as a guide.  Mount onto a piece of Early Espresso cardstock (cutting the banner points by hand as well).
Adhere to the card front using Stampin’ Dimensionals® and add the retired Bronze Button with the Burlap Ribbon tied in the center to finish off the card.
Stamp Sets: Walk in the Wild, Truly Grateful
Ink: Memento™ Tuxedo Black Ink, Baked Brown Sugar, Early Espresso, Marina Mist;  Stampin’ Blendabilities™- Light and Medium Crumb Cake, Light and Medium Old Olive; Stampin’ Write Markers- Early Espresso
Paper/Cardstock:  Whisper White, Early Espresso, Crumb Cake, Trim the Tree DSP Stack
Accessories:  Big Shot™, Woodgrain Textured Impressions™ Embossing Folder, Ovals Collection Framelits™, Sponge Daubers, Distressing Tool, Burlap Ribbon, Hexagon Punch, retired Color Spritzer Tool, retired Bronze Button, paper for masking

Thanks again for taking the time to stop by – you are such an encouragement to me!  I hope you have a chance to join in on our “Outin the Woods” Challenge- have a wonderful week!!

Monday, October 6, 2014

Hope- A Color Challenge with a Technique "Twist"


Hi Stampers!

I wanted to create a card using the CQC261 ColourQ Challenge and decided to incorporate a version of the Alcohol Marker Marbling Technique (hence, the "Technique Twist", using Stampin’ Write Markers versus the alcohol markers).  

Also, you would normally use glossy cardstock for this technique, but since the challenge needed Very Vanilla cardstock, I decided to go ahead and give it a try :-)   One thing I noticed is that the regular cardstock soaks up most of the ink so you do not have the ability to allow the ink to spread (nor the chance for a second print) as you do with the glossy cardstock.  

If you have not had a chance to visit the ColourQ Challenge site yet, I hope you will find the time to do so- as always, great Design Team samples as well as tremendous inspiration from the gallery of submissions!!

To create this card:

Using the same steps as the technique for alcohol markers (see tutorial here), apply the Stampin’ Write markers directly onto the plastic bag- Island Indigo and retired Dusty Durango and use a Sponge Dauber to apply retired Kiwi Kiss Classic Ink.

Mist the ink on the plastic bag with Rubbing Alcohol and lay the piece of Very Vanilla cardstock over the moistened ink.

Repeatedly stamp the sentiment image using Chocolate Chip Classic Ink over the newly created background (re-inking after each stamping) and using Island Indigo Classic Ink, add a bit of additional distressing using the splatter stamp from Gorgeous Grunge.

Carefully cut the sections apart, use a Sponge Dauber with Chocolate Chip Classic Ink to apply ink over the edges and adhere to a piece of Chocolate Chip cardstock. 

Mount a piece of Island Indigo cardstock to the Chocolate Chip card base.

Ink the Gorgeous Grunge stamps using retired Dusty Durango , Kiwi Kiss and Island Indigo Classic Ink. 

Mount the two sentiment panels flush with the card front and add the third panel using Stampin’ Dimensionals®.   
Create the rolled roses from Island Indigo and Dusty Durango cardstock (use the 2 ⅜” , 1 ¾” and 1 ¼” Scallop Circle Punches- punch the scallop circles, hand cut a wavy spiral from the outside of the scallop circle toward the center, use the Bone Folder to curl the edges of the petals a bit, roll up from the outside edge and adhere using Tombow Multi-Purpose Adhesive or a Hot Glue Gun).
Add the rolled flowers to the card front along with the Chocolate Chip leaves to finish off the card.

Stamp Sets:  Gorgeous  Grunge, Natural Beauty (retired)

Ink:  Chocolate Chip, Island Indigo, retired Dusty Durango and Kiwi Kiss; Stampin’ Write Markers- Island Indigo, retired Dusty Durango

Paper: Very Vanilla, Chocolate Chip, Island Indigo , retired Dusty Durango

Accessories: Sponge Daubers, Punches- 2 ⅜”, 1 ¾” and 1 ¼” Scallop Circle, Bird Builder; Plastic Bag, Rubbing Alcohol  

Thanks again for visiting- have a terrific Tuesday, my friends!

Sunflower Prayers- A Calypso Coral Monochromatic Card


Hi Again Stampers! 

I wanted to create a card using the CMCC40 Monochromatic ColorChallenge along with the FMS156 Sketch Challenge and the Fusion 09/25Inspiration Photo.

I had a few sunflower images filed away from My Digital Studio (MDS) and decided to incorporate one of the images into this card. 

I hope you will have time to check out the challenge sites- so much inspiration!!

To create this card:

Open a blank document in My Digital Studio (MDS), position the sunflower image and print out onto Whisper White cardstock.  

Color the petals using the Calypso Coral Slate Stampin’ Blendabilities™ Collection, the center of the Sunflower with the Light Crumb Cake Stampin’ Blendabilities™ marker and carefully “fussy-cut” the sunflower image separating a few of the petals.

Layer a piece of Very Vanilla cardstock onto the Early Espresso card base. 

Using retired DSP, create the horizontal layers for the card and adhere to the card front.   Add the sentiment and Pearls.

Mount the Sunflower image onto the card front using Stampin’ Dimensionals® to finish off the card. 

Stamp Sets:  Sunflower, Petite Pairs

Ink: Printer Ink- Black, Early Espresso, Stampin’ Blendabilities™- Calypso Coral Collection, Light Crumb Cake

Paper: Whisper White, Very Vanilla, retired Etcetera Designer Series Paper

Accessories: Pearls, 1 ¼” Circle Punch


Thanks again for stopping by- I hope you have a marvelous Monday!!

Sunday, October 5, 2014

So Very Thankful- A CAS Card for Three Challenges :-)


Hi Stampers!

This card was created for the Pals Paper Arts PPA222 Color Challenge along with the CAS(E) This Sketch CTS95 Challenge and the Our Daily Bread Designs ODBDSLC214 Fall Inspired Challenge (although I am too late to link to the ODBD Challenge, I still want to give them credit for the inspiration :-))

If you have not already visited the challenge sites, I hope you will find the time to do so- there are so many wonderful examples from the Design Teams and the galleries!

To create this card:

On a piece of Very Vanilla cardstock, stamp the Gorgeous Grunge splatter and line images in Early Espresso, So Saffron and Calypso Coral Classic Ink. 

Using Early Espresso Classic Ink 
stamp the sentiment from Pretty Patches: Apple, trim the panel and mount onto the Very Vanilla card base using Stampin’ Dimensionals®.

Ink the background stamps using Calypso Coral, Early Espresso and So Saffron Classic Ink and stamp onto Very Vanilla cardstock. 

Use the Big Shot™ with the Maple Leaf Framelit™ to cut out the images from the background stamped panels.  

Use a Sponge Dauber with So Saffron Classic Ink to add a bit of So Saffron to the Calypso Coral leaf as well as the So Saffron leaf and sponge Early Espresso Classic Ink around the edges of all three leaves (adding a bit more Early Espresso to the central leaf toning down the Very Vanilla cardstock).

Mount each of the leaves onto the card front using Stampin’ Dimensionals™ to finish off the card.

Stamp Sets: Stampin’ Up!- Gorgeous Grunge; Our Daily Bread Designs- Chalkboard Fan Background, Chalkboard Word Collage, Chalkboard Vine Background;  Wplus9 Design Studio, LLC- Pretty Patches: Apple

Ink:  Calypso Coral, Early Espresso, So Saffron

Paper: Very Vanilla    
                              
Accessories: Big Shot™, Maple Leaf Framelit™ (non SU!)


Thanks again for stopping by- I am so very thankful for all of you- have a great Monday!!

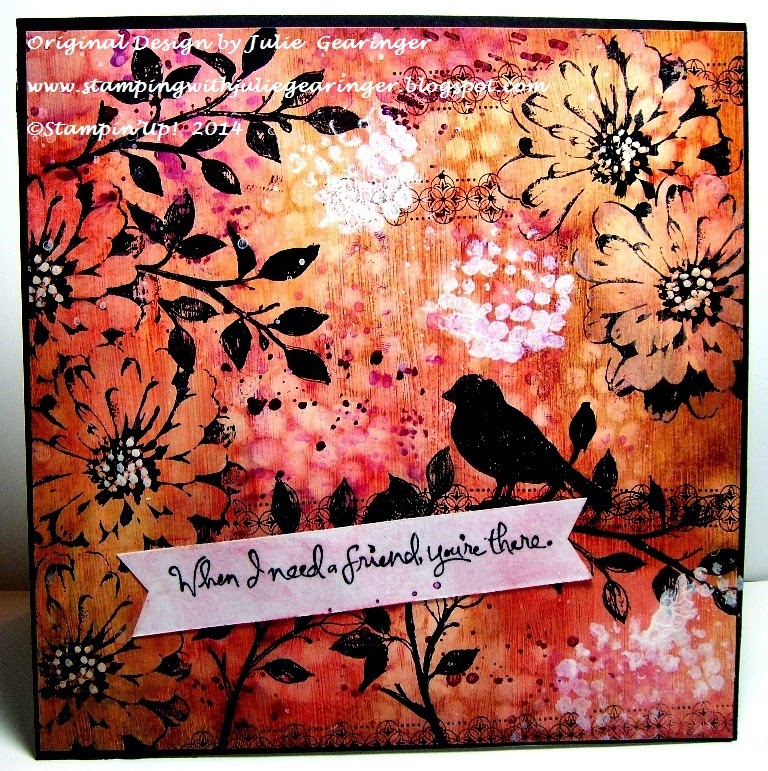
When I Need A Friend- A Mixed Media Card for Three Challenges :-)

 Hi Stampers!!

I have been very busy this past week organizing my craft area as well as taking my husband to several doctor’s appointments to try to determine the cause of his anemia.  At this point, it is leaning toward a rare blood cancer and we are praying that we have caught it in time for treatment to be successful.  We know that the Lord has a plan for us and we are trusting fully in Him  :-)

In order to relax a bit this evening, I decided to play around with some of my mixed media supplies and used Black, Orange and White for The Card Concept #20 Challenge (not sure of this card qualifies for any of the actual styles highlighted but the closest would be “Freestyle Collage”)  and the warm colors qualify for the MIX87 Signs of Fall Challenge as well as the SC88 October Inspiration Photo.

I hope you have a chance to check out all three galleries and Design Team samples- such inspiration from all !

It is a bit difficult to describe all of the steps taken to create this card but just have fun!  Here are the basic steps: 

Originally the main panel was a piece of Designer Series Paper (DSP) that was a bit busy for my taste so the entire piece of DSP was covered using a few layers of Gesso.  
.
Once the Gesso dried, apply Faber-Castell Gelatos™  blending with water and allowing to dry. 

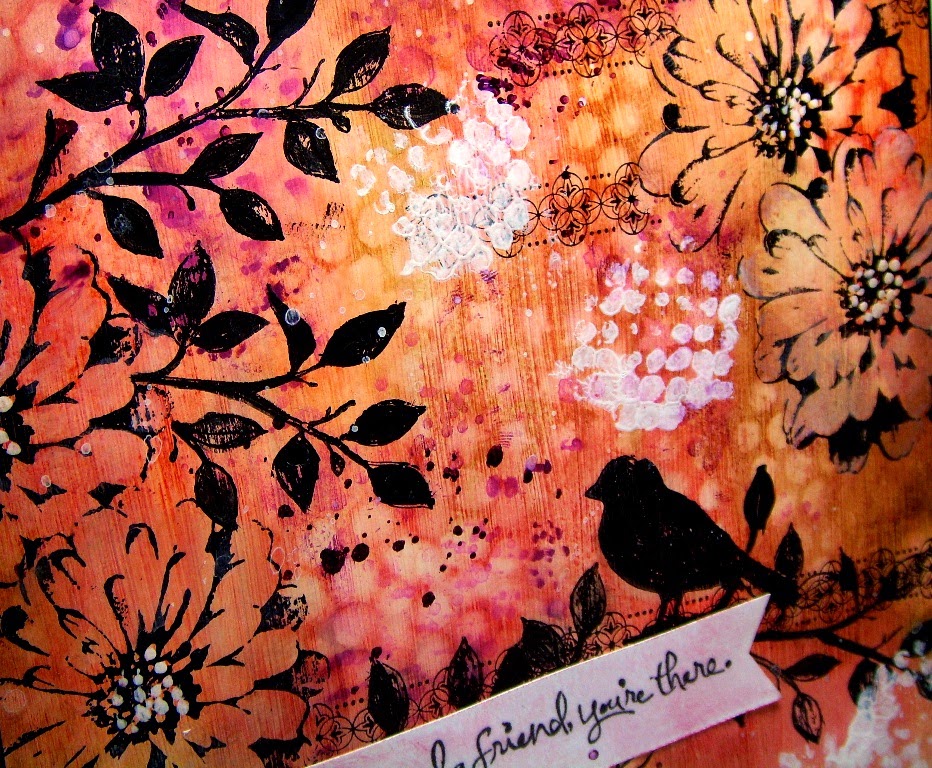
Stencil using Gesso along with baby wipes to remove some of the Gelatos™ and stamp the flowers from Choose Happiness using StazOn® Jet Black Ink (masking a few of the flowers as you stamp). 

Mask the flowers and stamp the leaf stems, border and bird image from Choose Happiness.  Darken the images using a Black Faber-Castell Pitt Pen. 

A close-up view of the stenciling, Gesso and pen details :-)
Add additional white highlights with the White Faber-Castell Pitt Pen to the center of the flowers and use Mod-Podge® to seal the flowers and add additional shine.

Stamp the sentiment onto Whisper White cardstock using StazOn® Jet Black Ink,  add Gelatos™  (blend with your finger) and adhere to the card front using Mod-Podge®.

Trim the panel and mount onto the 5 ½” square Basic Black card base to finish off the card.

Stamp Sets:  Choose Happiness

Ink: Staz-On® Jet Black, Faber-Castell Gelatos™, Faber-Castell Pitt Pen- Black and White

Paper: Basic Black, Designer Series Paper (to use as a base)

Accessories: Gesso, Mod-Podge®, Stencils, Baby Wipes

So what do you think?  Freestyle Collage or just a jumbled up "mess"- lol!!?


Thanks again for taking the time to visit- I hope you have a wonderful Sunday!

Sunday, September 28, 2014

Fall Leaves for Three Challenges :-)

Hi Stampers!!

Ok, it is official- I need an intervention!  I am totally addicted to the Alcohol Marker Marbling Technique and it is all Audrey’s and Splitcoaststampers fault- lol!!  :-)

This technique is so easy and the results are so unique- I had to use it one more time for the ColourQ CQC260 Challenge along with the PP215 Paper Players Sketch and since it incorporates different inks and elements, the MIX87 Signs of Fall Challenge.

I hope you have a chance to check out all three galleries and Design Team samples- such inspiration from all!

To create this card:

Using the medium marker from the Pumpkin Pie Stampin’ Blendabilities™ Collection, scribble some color onto the zip lock bag as noted in the tutorial , add additional color onto the bag using the dark marker from the Daffodil Delight and Night of Navy Stampin’ Bleandabilities™ and spritz with rubbing alcohol.   

Close-up of the leaf images 
Lay a piece of Glossy White cardstock over the ink and lift up, spritz the ink again with the rubbing alcohol, lay a second piece of Glossy White cardstock over the moistened ink and lift for your second print (I used the second print for this card and saved the first print for another day) :-)

Allow to the panel to dry and using StazOn® Jet Black Ink, stamp the various leaves from French Foliage onto the background panel.   Create masks for the leaves and stamp the script and postage mark images as well.   Add additional color with the Tangerine Tango Stampin’ Write marker and stamp the splatter image using Night of Navy Classic Ink.

Using the 1” Square Punch, punch out the entire panel.   Randomly position the punched squares and adhere to a piece of embossed Whisper White cardstock panel using Stampin’ Dimensionals®, trim and mount onto the Tangerine Tango cardstock panel.

Stamp the sentiment using StazOn® Jet Black Ink onto Crumb Cake cardstock, create the banner points using the Hexagon Punch and add to the card front with Stampin’ Dimensionals®. 

Adhere the retired Night of Navy button with Natural Linen Thread to the sentiment and mount the entire panel to the Whisper White card base to finish off the card.

Stamp Sets:  French Foliage, Absolutely Fabulous

Ink: Staz-On® Jet Black, Night of Navy Classic Ink, Stampin’ Blendabilities™- Daffodil Delight, Night of Navy and Pumpkin Pie Collections; Stampin’ Write Tangerine Tango Marker

Paper: Glossy White, Whisper White, Crumb Cake, Tangerine Tango

Accessories: Big Shot™, Woodgrain Textured Impressions™ Embossing Folder,  Hexagon and 1” Square Punch, Plastic Zip Bag, Natural Linen Thread, retired Night of Navy button


Thanks again for taking the time to visit- I hope you have a marvelous Monday!
Related Posts Plugin for WordPress, Blogger...