Saturday, March 20, 2021

Let's Do Coffee

Hi Friends!

Today I am sharing a card for the 2021 Spring/Summer Coffee Lover’s Blog Hop that was designed using the Coffee & Friends 6x6 Paper Pad by Echo Park along with stamps, dies, ribbon, etc. from Stamp Simply.


The spring colors in the  Coffee & Friends paper are so pretty with the cute coffee images!   I paired several different patterns from the paper pad with the coffee themed A Cup of Java stamp set and dies (along with a few other Stamp Simply supplies) and Tangerine seam binding- a perfect match for this paper!


 In addition to the Coffee Lover’s Blog Hop, I incorporated the Splitcoaststampers SC229 Sketch Challenge (from 2009- so thankful they never expire, lol!) into the design.  

I am also playing along with the Simon Says Wednesday “Use 2 or More Patterned Papers” Challenge and the Word Art Wednesday #483-#484 “Anything Goes” Challenge.

If you have not had a chance to stop by the Stamp Simply blog yet, or the other the challenge sites, I encourage you to take the time to do so- gorgeous inspiration from all!

To create this card:

Trim a piece of coral designer paper from the Coffee & Friends paper pad, mount onto a piece of white cardstock, trim again and adhere to a piece of black cardstock. 


Trim a piece of black plaid paper from the Coffee & Friends paper pad, mount onto a piece of black cardstock, trim close to the edge and adhere to the background panel.

On a piece of green cardstock, use a stencil brush with the Tim Holtz Lace Layering Stencil to apply green distress ink onto the cardstock. 

Ink the background stamp image from A Cup of Java with espresso ink and repeatedly stamp onto the stenciled cardstock.  Trim and mount onto black cardstock before adhering to the background panel.

De-static a piece of black cardstock with an embossing powder tool, stamp the “Let’s Do Coffee” sentiment from the Stick Family Sentiment Add-Ons stamp set with Versamark™ ink, apply white embossing powder and heat set with a heat tool. Die cut the sentiment with the Fishtail Sentiment Banners Dies (die-cutting two additional dies to mount behind the sentiment for added strength).
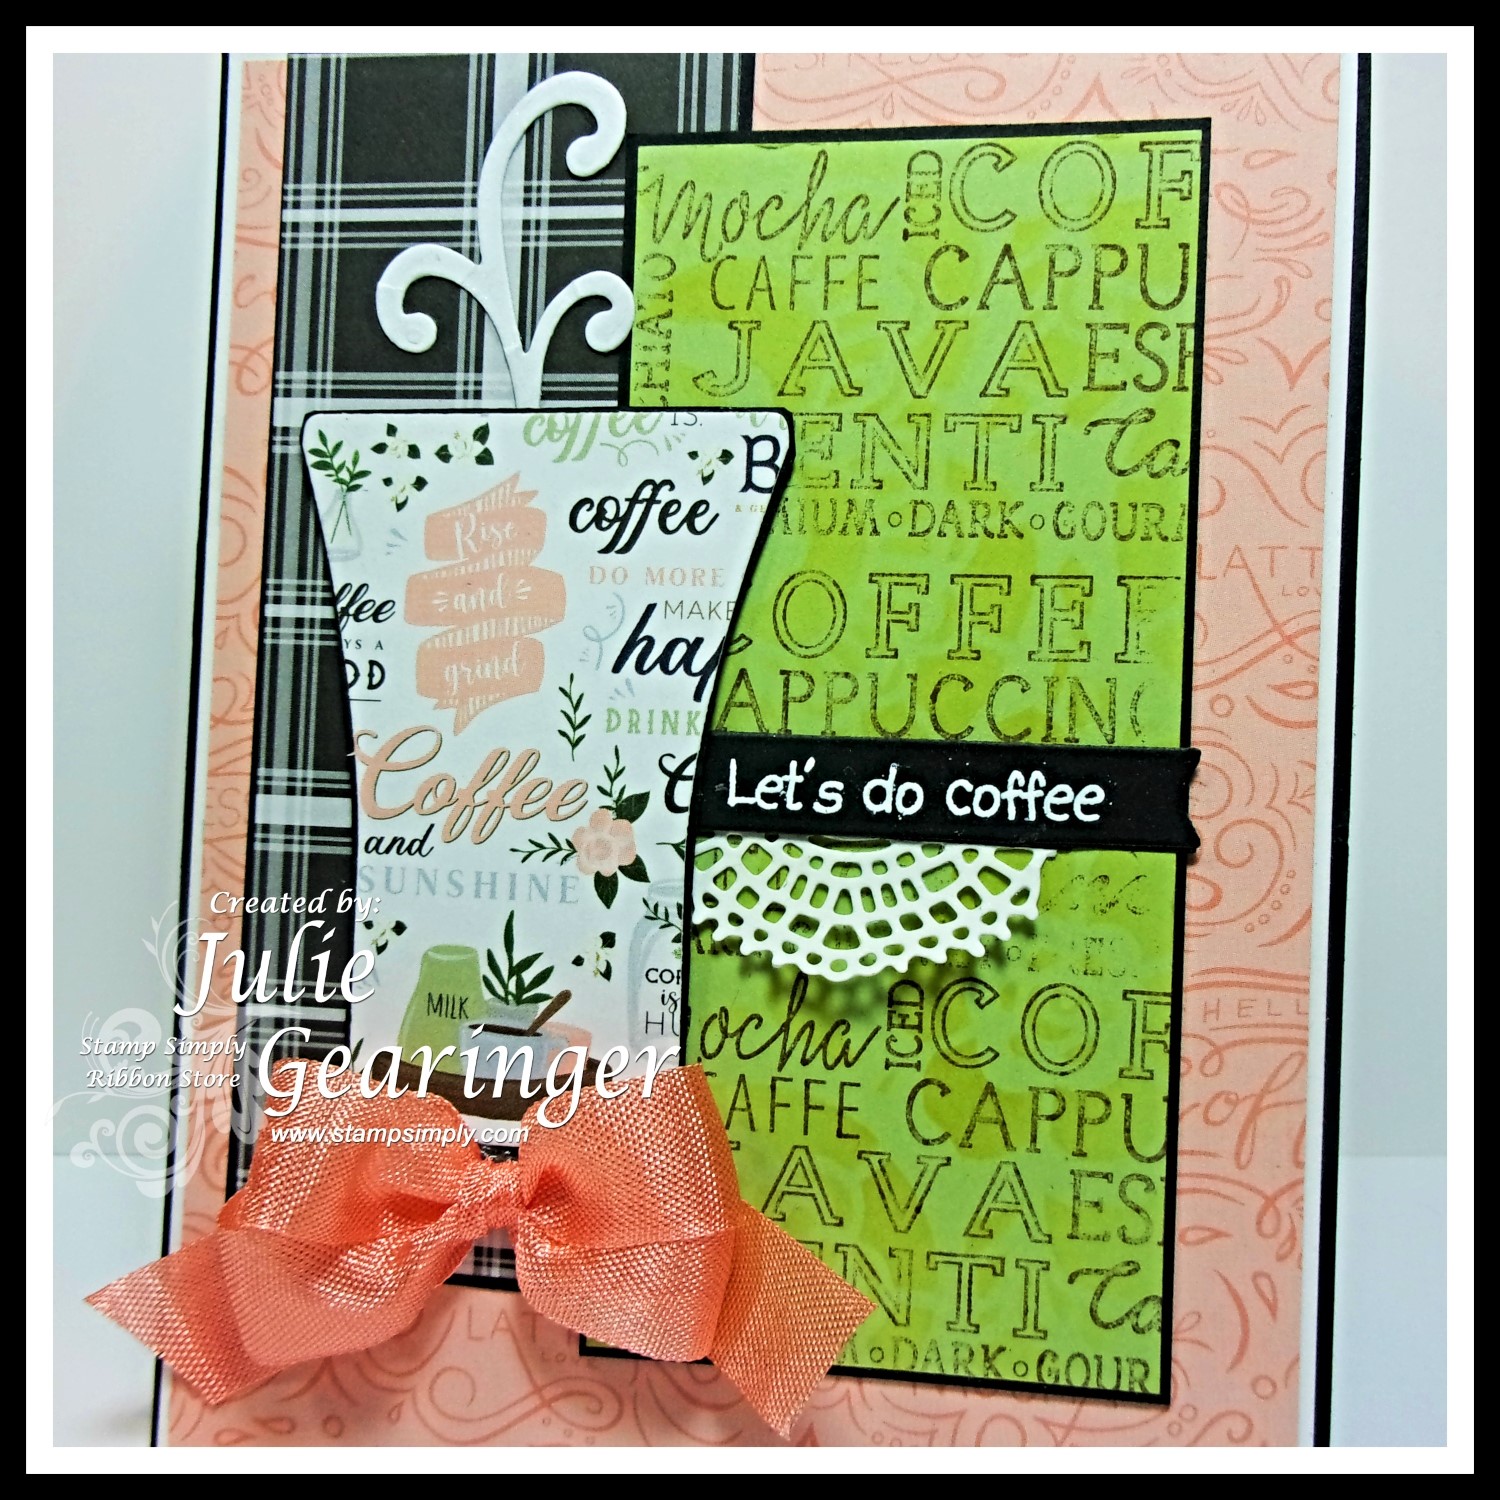

Die cut a piece of white cardstock with the Tim Holtz Crochet Die (I had this piece on my desk from a previous project), mount behind the sentiment and add to the background panel.

Mount the entire background panel onto a white card base.

Die cut the coffee cup using the A Cup of Java die set (I used the smaller coffee cup size) from the patterned paper from  Coffee & Friends paper.  Mount onto black cardstock and trim close to the edge.

Mount the coffee die cut to the card front using dimensional foam (or chipboard) and add the Tangerine seam binding bow to finish off the card.


Stamp Sets: 
A Cup of Java, Stick Family Sentiment Add-Ons (Stamp Simply)  

Ink/Mediums: Versamark™, Tim Holtz Ground Espresso and Mowed Lawn Distress Ink

Cardstock/Paper:  White, Black;  Coffee & Friends 6x6 Paper Pad by Echo Park

Accessories/Tools:  Gemini, Jr., Stamp Simply Dies- A Cup of Java, Fishtail Sentiment Banners;  Sizzix Thinlits Dies by Tim Holtz- Crochet, Tim Holtz Layering Stencil- LaceEmbossing Powder Tool, Stampendous Super Fine Embossing Powder- Detail White; , Heat Tool, Tangerine Seam Binding

Thanks again for taking the time to stop by- I hope you have a wonderful weekend, sweet friends!


Wednesday, March 17, 2021

TCC151 Do Not Be Anxious


Hi Friends!

Welcome to The Card Concept #151 {Butterfly Brilliance} Challenge!  

For those of you who are not familiar with our bi-weekly challenge, we offer an inspiration photo to inspire you to design your card (in your choice of card-making style and/or styles).  We ask that you include our inspiration photo in your blog post along with an explanation of what inspired you from our photo for your card. 

I love this beautiful butterfly and was inspired by the green background, the jewel tones of the butterfly to create a Mixed Media card!

In my continuing effort to use some of my older stamps, I paired a few retired Stampin’ Up! stamps with a verse from a current stamp set, Scripture Collection 4 (Divinity Designs, LLC).  I also used various mediums- watercolor crayons and powders, water-based markers, shimmer paint, washi tape, ModPodge®, white paint pen, Nuvo® jewel drops- the entire kitchen sink from my stash!  

Most of you know that I enjoy participating with online challenges and am also playing along with the Addicted to Stamps and More #401 Make Your Mark Challengethe WatercoolerWednesday WWC311 “Kath’s Challenge: All Things Feminine”  and the Retro Rubber #154 “Anything Goes” Challenge.  

One of the requirements from the Retro Rubber Challenge is to use stamps that are over one year old- the butterfly stamp is from 2011 and music background stamp is from 2000.  

If you have not had a chance to visit The Card Concept, or the other challenge sites yet, I encourage you to do so- wonderful inspiration from all! 

To create this card:

On a piece of white cardstock, scribble watercolor crayons over the background (I used Gable Green, Green Galore and Always Artichoke), spritz with water and spread with a water brush.  Dry with a heat tool.

Sprinkle a small amount of Leaf Green Brushos® over the background, spritz with water, tilt the paper to spread the water, blot off the excess and dry with a heat tool.

Ink the Music Score background stamp with Mowed Lawn Distress Ink and randomly press the background panel onto the background stamp.

De-static the upper right-hand area of the panel with an embossing powder tool, ink the verse sentiment from Scripture Collection 4 with Versafine™ Onyx Black ink, stamp onto the prepared panel, apply clear embossing powder and heat set with a heat tool.

Apply Frost White Shimmer Paint over the background with a water brush and stamp a few splatters with a small stamp from Timeless Textures with Mowed Lawn Distress Ink.

Distress the edges with a distressing tool, add the strips of washi tape and mount onto a piece of black cardstock.  Adhere the entire panel onto a white card base.

Ink the Wonderful Wings image using Versafine™ Onyx Black ink, stamp onto the prepared panel, apply clear embossing powder and heat set with a heat tool. 

Once the embossing has cooled, scribble the watercolor crayons onto a glass surface and use a water brush to watercolor the image.  Add additional coloring with water-based markers and once dry, fussy-cut the image.


Use a black Pitt-Penn™ marker to cover the cut edges and mount onto the card front.

Use a foam brush to apply Gloss ModPodge® to the butterfly wings and an extra fine white paint pen to add a few white splatter dots in the background.

Finish off the card with Nuvo™ Morning Dew Jewel Drops.

Stamp Sets:  Scripture Collection 4 (Divinity Designs LLC); retired Stampin’ Up! sets- Wonderful Wings, Musical Score Background, Timeless Textures

Ink/Mediums: Versafine™ Onyx Black Ink, Tim Holtz™ Mowed Lawn Distress Ink; retired Stampin’ Up! Watercolor Crayons- Green Galore, Gable Green, Always Artichoke, Pink Passion, Orchid Opulence, Tempting Turquoise; Stampin’ Write Markers- Gorgeous Grape, Rich Razzleberry, Tempting Turquoise; Pitt Penn™ Black Pen, Leaf Green Brushos®, Frost White Shimmer Paint, Nuvo™ Morning Dew Jewel Drops, Sharpie® Extra Fine White Paint Pen, Gloss ModPodge®

Paper/Cardstock: Whisper White, Basic Black

Tools/Accessories: Embossing Powder Tool, Clear Embossing Powder, Heat Tool, Graphic45 Washi Tape. Misc. Washi Tape, AquaPainter™, Distressing Tool

Thanks again for taking the time to visit!  We would love for you to create a card based on our inspiration photo and join us at The Card Concept! The challenge is open until March 29th  at noon EDT.

Saturday, March 13, 2021

Easter Trio of Tags

Hi Friends!

Today I am sharing a set of Easter tags designed with the Stamp Simply February Mini Release Stamp/Die Bundle sets, He Lives and Easter is for Jesus along with the Welcome Easter 6x6 Paper Pad and other supplies from Stamp Simply.


Generally, when I am creating cards, I will stamp additional images while I have the stamps/dies out and save for a future project.  As I was straightening up my desk area, I noticed several scraps of the Welcome Easter paper along with a few stamped images plus scraps of die cut lace, that I thought would be perfect for tags.


As many of you know, I enjoy playing along with online challenges and will be linking the daffodil tag to the Tic-Tac-Toe #104 Challenge (middle column down Die-Cut, Flower, Colouring) along with the Word Art Wednesday #481-#482 “Anything Goes” Challenge.

I will also be adding the bunny tag to the Animal Friends "March Bunnies” Challenge.

If you have not had time to check out the Stamp Simply blog or the above challenge sites yet, I hope you will do so- fabulous inspiration from all!

To create the trio of tags:

Die cut three tags from white cardstock using the second to the largest die in the Sizzix Framelits Dies- Tim Holtz Tag Collection.


De-static white cardstock for the stamped images using an embossing powder tool, stamp the rabbit and egg images from Easter is for Jesus stamp/die bundle along with the Daffodil image from He Lives using a pigment black ink onto the prepared cardstock, apply clear embossing powder and heat set with a heat tool.

Die-cut the eggs, rabbit and daffodils using the coordinating dies (I also die cut additional pieces from white cardstock to mount behind the colored images to give them additional strength).

De-static scraps of white cardstock and heat emboss the sentiments with clear embossing powder (as in the steps above), Die cut the sentiments with the Stamp Simply Fishtail Sentiments Banners dies and layer along with the scraps of Welcome Easter, Crochet Lace pieces and stamped images onto the tags.

Add a bit of tangerine seam binding to finish off the tags.

Stamp/Die Sets: He Lives, Easter is for Jesus (Stamp Simply)

Ink/Mediums: Versafine™ Onyx Black, Water-based Markers- Zig® Clean Color and Stampin’ Up!

Paper: White Cardstock, Welcome Easter 6x6 Paper Pad by Echo Park


Accessories/Tools: Gemini, Jr., Stamp Simply Dies- He Lives, Easter is for Jesus,
Fishtail Sentiment Banners, Sizzix Thinlit Dies by Tim Holtz- Crochet, Sizzix Framelits Dies- Tim Holtz Tag Collection, EK Success Powder Tool Applicator, Ranger Super Fine Embossing Powder- Clear , ½” Seam Binding- Tangerine


Thanks again for taking the time to visit- I hope all of you have a wonderful weekend!


Saturday, March 6, 2021

He Lives- Wishing You A Blessed Easter


Hi Friends!

Today I am sharing another quick Easter card designed with the Stamp Simply February Mini Release Stamp/Die Bundle set, He Lives along with other tools/supplies from Stamp Simply.

I enjoy playing along with online challenges and was inspired by the colors in The Spot #152 Inspiration Challenge .  I love this gorgeous inspiration photo with the oranges, greens and soft blues. 

I am also linking to one of my favorite challenges- the Word Art Wednesday #481/#482 “Anything Goes” Challenge.

If you have not had time to check out the Stamp Simply blog or the above challenge sites yet, I hope you will do so- fabulous inspiration from all!

To create this card:


De-static a piece of white cardstock with embossing powder toolstamp the daffodil image from the He Lives Bundle using a pigment black ink, apply clear embossing powder and heat set with a heat tool.

Once the embossing is cooled, use the coordinating dies from the He Lives Bundle to die cut the daffodil.  Watercolor the daffodil with water-based markers, and once dried, white accents with an extra fine white paint pen.

The background was created by smooshing distress oxide inks in the middle of an acetate envelope, spritzing a bit with water and pressing a piece of white cardstock into the ink.  Once you are satisfied with the color, dry with a heat tool.

De-static the lower right-hand corner and heat emboss the sentiment from the He Lives Bundle (using the same steps as above).


Add the die cut lace strip along with green seam binding (wrap the edges behind the panel) and adhere the panel onto a white card base.

Add the die cut daffodil image with dimensional foam (or chipboard) and finish off the card with a few rhinestones.


Stamp Sets: He Lives Bundle (Stamp Simply)

Ink/Mediums: Versafine™ Onyx Black, Tim Holtz® Distress Oxide- Tumbled Glass, Peacock Feathers; Zig® Real Color Markers- Yellow, Orange, Greens; Extra Fine White Paint Pen

Paper/Cardstock:  White Cardstock

Tools/Accessories:  Gemini, Jr., Stamp Simply Dies- He Lives Bundle, Sizzix Thinlit Dies by Tim Holtz- Crochet,  Embossing Powder Tool, Clear Embossing Powder, Heat Tool,  ½” Seam Binding- Dusty OliveRhinestones- Silver

Thanks again for taking the time to visit- I hope all of you have a wonderful weekend!

Thursday, March 4, 2021

TTTC103 Guest Designer- Rejoice in the Lord Always


Hi Friends!

Woohoo- I am so thrilled to be the Guest Designer for the Tic-Tac-Toe #103 Challenge!

One of the “perks” of winning their challenge is that you are eligible to be a Guest Designer in the future- what an honor!

If you are not familiar with the Tic-Tac-Toe Challenge , every Thursday, they provide a new challenge board with elements that you can choose either in a row (or rows) or diagonally when designing your card. 

For this card, I decided to pull out a few of my older stamps and paired them with retired designer paper, miscellaneous washi tape and a few other supplies.  I included the items from the left row down (Splatter, Flowers, Green) along with the top row across (Splatter, Washi, Heat Embossing) into the design.

I am also linking to the Splitcoaststampers SC324 Sketch Challenge (from 2012), the Simon Says Wednesday “Beautiful Blooms” Challenge and the Word Art Wednesday #481-#482 “Anything Goes” Challenge.

To create this card:

Emboss a piece of green designer paper with a brocade embossing folder, distress the raised portions of the embossing with a sanding block, trim to approx. 4” x 5 ¼” and distress the edges.  Mount onto a 4 ¼” x 5 ½” piece of black cardstock and adhere to a white card base.


De-static a piece of white cardstock with an embossing powder tool, ink the floral stamp from Pretty Peonies (SugarPea Designs) with Versafine™ Onyx Black ink, stamp onto the prepared panel, apply clear embossing powder and heat set with a heat tool.

Once the embossing has cooled, watercolor the image with water-based markers and a water brush. 

Watercolor the background and add splatter with Tumbled Glass Distress Ink.

Die cut the image with a stitched rectangle die, mount onto black cardstock and trim close to the edge.

Add the strips of washi tape to the upper corner and mount the image onto the card front with dimensional foam (or chipboard).

De-static a piece of vellum, stamp the sentiment with Versafine™ Onyx Black ink, stamp onto the prepared panel, apply clear embossing powder and heat set with a heat tool.

Once the embossing has cooled, trim close to the sentiment, tear the edge and mount onto the card front.


Add a strip of washi tape to the corner and finish off the card with Nuvo™ Morning Dew drops.

Stamp Sets: Pretty Peonies (SugarPea Designs), Scripture Medley (retired Verve Stamps), Timeless Textures (retired Stampin’ Up!)

Inks/Mediums: Versafine™ Onyx Black, retired Stampin’ Write Markers- Pink Pirouette, Primrose Petals, Rose Red, Lucky Limeade, Gumball Green; Tim Holtz™ Tumbled Glass Distress Ink, Nuvo™ Morning Dew Crystal Drops

Cardstock/Paper: Whisper White, Basic Black, Vellum; retired Garden Green Designer Series Paper (Stampin’ Up!)

Accessories/Tools: Gemini, Jr., Lacy Brocade Embossing Folder (retired Stampin’ Up!), MFT Stitched Rectangle STAX A2 Set 1, AquaPainter™, Embossing Powder Tool, Clear Embossing Powder, Heat Tool, Misc and G45 Washi Tape, Distressing Tool, Sanding Block

Thanks again for taking the time to visit- I hope you can join us at the Tic-Tac-Toe #103Challenge! 

Wednesday, March 3, 2021

TCC150 Be Strong and Courageous


Hi Friends!

Welcome to The Card Concept #150 {Luck of the Irish} Challenge!

What a beautiful floral arrangement! I was inspired by the greens, yellows, and whites along with the buckle on the planter to create a Clean and Graphic/Layered card!

The background was designed using new to me, Birch Designs Epiphany Layering Dies (a gift from a recent challenge prize, love it!) and paired the background with a heat embossed sentiment along with ribbon and a ribbon slide from my stash.

I will also be linking this card to Dies R Us #168 Anything Goes with Dies that DRU Sells” Challenge (they carry Birch Design Dies although they do not stock this set of layering dies) and the As You Like It “Fav Reason to Send a Card & Why” Challenge.

 My favorite reason to send cards is to encourage those who need prayer in our church family and I love to encourage others by using Scripture on the front of the card.


Again, if you have not had a chance to visit The Card Concept or the other challenge sites yet, I encourage you to do so- fabulous inspiration from all! 

Stamp Sets:  Scripture Collection 3 (Divinity Designs LLC)

Ink/Mediums: Versafine™ Onyx Black

Paper/Cardstock: Whisper White, Barely Banana, Luscious Lime, Handsome Hunter

Tools/Accessories: Gemini, Jr., Birch Press Designs- Epiphany Layering A, B, C;  Embossing Powder Tool, Clear Embossing Powder, Heat Tool, 5/8” Dark Green Grosgrain Ribbon, Pewter Ribbon Slide, Rhinestones

Thanks again for taking the time to stop by!  We would love for you to create a card based on our inspiration photo and join us at The Card Concept! The challenge is open until March 15th  at noon EST.

Related Posts Plugin for WordPress, Blogger...