Showing posts with label Fragrance (ODBD). Show all posts

Wednesday, February 20, 2019

TCC109 Let Us Love

Hi Friends!


Isn’t this inspiration photo bright and cheerful?  

I love the colors (especially the hot pink) and since I do not own any pineapple or tropical "cute-sy" type stamps, I decided to use the colors to create a "simple" Mixed Media card (the main panel is just one layer, so to me, that is simple) :-)  

Since this card is "simple", I will be linking to the As You See It #194 “Simple is As Simple Does”Challenge and am also participating with the Word Art Wednesday #374-#375 “Anything Goes” Challenge.

As I mentioned above, the main panel is just one layer and to me, that is simple,  A bit of heat embossing, watercoloring, masking and the card was done!  Without dimension is "simple" to me :-)

If you have not had a chance to visit us at The Card Concept or the other challenge sites yet, I hope you will find time to do so- fabulous inspiration from all!

To create this card:

1). De-static a piece of white cardstock with an embossing powder tool.   Using Versafine™ Onyx Black Ink, stamp the floral image from Wild Rose and the sentiment from God Verses 2, both from Divinity Designs formerly Our Daily Bread Designs)  onto the prepared panel, apply clear embossing powder and heat set with a heat tool.  Once the embossing has cooled, watercolor the flowers using water-based markers and watercolor pencils (see colors that I used below in the card recipe).


2). Create a mask for the flowers by stamping the image again onto a piece of sticky note paper (or scrap paper).  Fussy-cut the image from the sticky note paper and cover the stamped image on the panel.

3). Ink the retired Chalkboard Word Collage (Divinity Designs) background stamp with Tim Holtz® Tumbled Glass Distress Oxide ink and stamp over the entire panel.  Spritz lightly with water, tamp with a dry paper towel and gently wipe off any excess ink from the stamped images.  Heat set the background lightly with a heat tool.

4). Die cut the panel with a stitched rectangle die, mount onto a piece of black cardstock, trim the black cardstock and mount onto the white card base.

5).  Use a clear glitter pen to add shimmer to the flower petals to finish off the card.

Stamp Sets: Wild Rose, God Verses 2, retired Chalkboard Word Collage (Divinity Designs)

Ink/Mediums: Versafine™ Onyx Black, Zig® Clean Color Real Brush Markers- Lt. Pink, Pink, Yellow, Green; Stampin’ Write Markers- Crushed Curry, Daffodil Delight, Melon Mambo, retired Pink Passion, Wild Wasabi; Tim Holtz® Tumbled Glass Distress Oxide, Derwent® Watercolor Pencils- Burnt Cadium, Oriental Blue; Spectrum Noir™ Clear  Glitter Pen

Cardstock/Paper: Whisper White, Basic Black

Tools/Accessories:  Embossing Buddy®, Clear Embossing Powder, Heat Tool, MFT Stitched Rectangle A2 Set 2 Dies, AquaPainter

Thank you for taking the time to visit! I hope you will be inspired to create a card and join us at The Card Concept! The challenge is open until Monday, March 4th at noon (EST)- we would love to see your card in our gallery!

Tuesday, December 20, 2016

ODBDSLC281 Let's Be Sentimental Reminder


Hi Friends! 

Woohoo!  We know that the Christmas week is very busy but we wanted to remind you that it is not too late to join in with us at the Our Daily Bread Designs Shining the Light “ODBDSLC281” Let’s Be Sentimental” Challenge!  

Remember, you have until Friday, December 30, 2016 to join us for a chance to be spotlighted for the Shining the Light award or to win a $15 ODBD gift certificate (one random participant will be chosen).  To be spotlighted for the Shining the Light Award, you must use ODBD stamps (or stamps from our sister companies: North Coast Creations or Artistic Outpost). 

I paired the brand new ODBD Pennant Flag Verses (Clear Stamps) with the new coordinating ODBD Pennant Flags Dies and ODBD Double Stitched Pennant Flags Dies from the December 2016 ODBD Release with the previously released ODBD Fragrance stamp set and ODBD Pierced Rectangle Dies for this sympathy card.


If you have not visited the rest of my ODBD Design Team Sisters’ blogs and checked out their fabulous inspiration yet, I hope you will find time to do so:

Chris   ∙ Diana   ∙ Robin

To create this card:

1). Ink the ODBD Pennant Flag Verses (Clear Stamps) sentiment with archival black ink and stamp onto white cardstock.

 2). Die cut and emboss the sentiment with the ODBD Pennant Flag Dies and layer onto a piece of black cardstock that was die cut and embossed with the coordinating ODBD  Double Stitched Pennant Flag Dies.

3). Ink the floral image from the ODBD Fragrance stamp set with archival black ink and stamp onto a piece of white cardstock, also stamp another image onto a piece of scrap paper or sticky note paper, fussy-cutting this image to create a mask.

4). Mask the first stamped image on the white cardstock, re-ink the floral stamp with archival black ink and stamp onto the panel.

5). Heat set the flowers with a heat tool, use water-based markers to watercolor the image (also full strength markers for shadows), add white highlights with a extra fine white paint pen and use a clear glitter pen to add shimmer to the flower petals.

6). Die cut and emboss a piece of black cardstock with the ODBD Pierced Rectangles Dies, trim the floral panel and mount onto the die cut panel ( I apologize that it is a bit difficult to see the piercing in the photo but it is there and I love this die for framing your images).

7). Mount the entire floral panel onto the green card base and add the sentiment with dimensional foam to finish off the card.

I love the new ODBD Pennant Flag Verses (Clear Stamps) sentiments with the coordinating ODBD Pennant Flags Dies and ODBD Double Stitched Pennant Flags Dies – perfect for so many occasions. 

I am also linking this card to the Word Art Wednesday #260-#261 “Anything Goes” Challenge- I love their bi-weekly challenge that focuses on the Word of God and hope you will stop by their gallery to check out all of the gorgeous creations as well!

Thanks again for taking the time to stop by!  We would be thrilled to see your artwork in the Our Daily Bread Designs Shining the Light “ODBDSLC281” Let’s Be Sentimental” Challenge gallery!  Hugs and have a blessed Christmas week, my friends!

Wednesday, October 26, 2016

SC616 Fragrance of Christ 2 Cor 2:15


Hi Friends!


If you have not already visited the above challenge sites, I hope you will have a chance to do so- fabulous inspiration from my DT Sisters at the SCS Sketch Gallery as well as the other Splitcoaststampers’ galleries and the gorgeous Word Art Wednesday challenge site!

To create this card:

Ink the Our Daily Bread Designs (ODBD) Fragrance floral stamp with archival black ink and stamp two of the images onto a piece of white cardstock.

Color the floral image using sugarplum and razzleberry water based markers for the petals, slate for the center and wasabi for the leaves, softening the colors with a water brush.

Fussy cut the images, cutting one of the stamped images apart for the different elements in the sketch.

Apply a Clear Glitter Pen to add shimmer to the petals and an Extra Fine White Paint Pen to add highlights to the flower centers. 

Ink the sentiment from ODBD Fragrance using archival black ink, stamp onto a piece of slate cardstock, trim and mount onto the razzleberry card base.

Trim a piece of white cardstock to a point for the upper part of the sketch, mount onto razzleberry cardstock, mimicking the angles.

Adhere the angled element onto the card front and mount the floral images with dimensional foam.

Add rhinestones to the corners and near the sentiment to finish off the card.

I hope this card inspires you to create a project this week, and if so, come play along with us at Splitcoaststampers!

Thanks again for visiting- hugs and have a blessed week, my friends!

Wednesday, July 6, 2016

The Fragrance of Christ

Hi Friends!

I hope all of you are having a great week so far!  I just love the images in the July 2016 release from Our Daily BreadDesigns and decided to create a quick Clean and Simple (CAS) card using the new stamp set, A True Friend along with the previously released stamp sets, Fragrance and Chalkboard Fan Background.


If you have not had a chance to visit any of the above challenge sites yet, I highly encourage you to do so- wonderful inspiration from all!

To create this card:

Using Stāz-On® Jet Black Ink, stamp the iris image from the ODBD A True Friend  onto a piece of Whisper White cardstock and use an AquaPainter™ along with Stampin’ Write Markers (Daffodil Delight, Melon Mambo and Bermuda Bay) to watercolor the image (I alos used the Smoky Slate marker for a few shadows).

Fussy-cut the flower, apply Clear Wink of Stella® to the petals (I also applied Frost White Shimmer Paint) and use a bone folder to curl the petals.

Using the Big Shot™, die cut two pieces of Whisper White cardstock using the ODBD Leafy EdgedBorder Dies – one with just the curved smaller scallop border die and the other with the curved ornate border.

Ink the ODBD Chalkboard Fan Background stamp with Bermuda Bay Classic Ink, stamp onto a piece of Bermuda Bay cardstock, clean the stamp, re-ink with Daffodil Delight and use your fingers to sporadically ink the die cut piece of Whisper White cardstock.

Stamp the sentiment from the ODBD Fragrance stamp set with Bermuda Bay Classic Ink, layer the die cut pieces of Whisper White cardstock onto the Bermuda Bay card base and add the watercolored iris image with dimensional foam to finish off the card.


Ink/Mediums: Stāz-On® Jet Black, Bermuda Bay Classic Ink  (Stampin’ Up); Stampin’ Write Markers- Bermuda Bay, Daffodil Delight, Melon Mambo, Smoky Slate; Clear Wink of Stella®, Frost White Shimmer Paint

Cardstock/Paper: Whisper White, Bermuda Bay (Stampin’ Up!)

Tools/Accessories: Big Shot™, ODBD Leafy Edged Border Dies, AquaPainter™

Thanks again for taking the time to stop by- hugs and God Bless!


Monday, May 30, 2016

In His Word I Put My Trust


Hi Again Friends!

I wanted to create another fairly quick card using the Splitcoaststampers (SCS) TLC588 “Stencil Monoprint” Challenge (see details here and gallery here) along with the CAS379 “May Flowers” Challenge and the Just Us Girls #345 Photo Week Challenge.  

This was a fun technique and I will have to try this again with some of my other stencils:-)

If you have not had a chance to visit the above challenge galleries yet, I encourage you to do so- gorgeous cards and inspiration from all!!

To create this card:

Using the SCS Stencil Monoprints tutorial (see here), apply Ranger® Tim Holtz® Mustard Seed, Scattered Straw and Fossilized Amber Distress Inks directly to the back of the Texture Flourish stencil from Memory Box™.

Lay a piece of Whisper White cardstock over the stencil and use your hand or a clean towel to rub the ink from the stencil onto the paper (I found this to be easier than flipping the stencil over onto my paper).

Use a Heat Tool to dry the ink, de-static the area for the sentiment with an Embossing Buddy®, ink the verse from Our Daily Bread Designs (ODBD) Scripture Collection 9 and heat emboss with Gold Embossing Powder.

Trim the panel and mount onto a piece of Crushed Curry cardstock, trim and mount onto the Extra Thick Whisper White card base.

Ink the flowers from Fragrance (ODBD) using Stampin’ Archival™ Basic Black Ink, heat set with the Heat Tool and color with Stampin’ Write Markers- Pink Pirouette, Flirty Flamingo, Melon Mambo, Pear Pizzazz, Always Artichoke and Crushed Curry.

Carefully fussy-cut the images and mount onto the card front (I used dimensional foam for the lower two blossoms).

Add Clear Wink of Stella® to the blossoms and use the Faber-Castell® Pitt Pen Gold and White Markers to add highlights to the flower centers.

Add the Pearls to the opposite corners to finish off the card.

Stamp Sets: Fragrance, Scripture Collection 9 (Our Daily Bread Designs)

Ink: Versamark™, Stampin’ Archival™ Basic Black ; Stampin’ Write Markers- Pink Pirouette, Flirty Flamingo, Melon Mambo, Pear Pizzazz, Always Artichoke and Crushed Curry ; Ranger® Tim Holtz® Mustard Seed, Scattered Straw and Fossilized Amber Distress Inks; Faber-Castell® Pitt Pen Gold and White Markers; Clear Wink of Stella®

Paper: Extra Thick Whisper White, Whisper White, Crushed Curry

Accessories: Memory Box™ Texture Flourish Stencil, Embossing Buddy®, Stampin’ Emboss® Gold Embossing Powder, Heat Tool, Pearls


Thanks again for taking the time to visit- hugs to all of you!

Tuesday, May 17, 2016

Phil 4:8 "Think About Such Things" - A One Layer Floral Card

Hi Again Friends!


If you have not had a chance to visit the above challenge galleries yet, I encourage you to do so- fabulous cards and so much inspiration!!

Our Awana club year ends this week with our Award ceremony, so I created seven of this design (each a bit different) for each of my 5th and 6th grade girls.  

We have had a wonderful year together and several of the girls have been with me for two years...I will miss seeing each of them every week and look forward to serving in Awana again next year - it is always hard to see the girls "move up" but I know that each one of these young ladies will be living for the Lord and that in itself, makes it a bit easier:-)

The design of this card is fairly simple to create- stamp the sentiment from Scripture Collection 9 (ODBD) with Stāz-On® Jet Black Ink onto a folded piece of Extra Thick Whisper White cardstock, mask the sentiment with sticky note paper,  stamp the flowers from the Fragrance stamp set (ODBD) with Stāz-On® Jet Black Ink (creating a mask for the flowers and repeat stamping), color the flowers with a variety of Stampin’ Write Markers and use an AquaPainter™ to watercolor and soften the markers.

Add the splashes of ink with the Smakin’ Acetate technique, draw a few lines with a Pitt Pen “B” Black Marker and finish off with Clear Wink of Stella®. 

I have more details on each of the steps in a previous post of a similar card here.

Stamp Sets: Fragrance, Scripture Collection 9 (Our Daily Bread Designs)

Ink: Stāz-On® Jet Black, Rose Red, Wisteria Wonder; Stampin’ Write Markers- Always Artichoke, Pear Pizzazz, Pink Pirouette, Melon Mambo, Wisteria Wonder, Rich Razzleberry, Flirty Flamingo, Sweet Sugarplum, Blackberry Bliss, Hello Honey, Faber-Castell® B Black Pitt Pen Marker; Clear Wink of Stella®

Paper: Extra Thick Whisper White

Accessories: AquaPainter™, Paper for masking, Clear Envelope, Water Spritzer Bottle

Thanks again for stopping by!  I hope you have a great week and find time to be creative 

Sunday, May 15, 2016

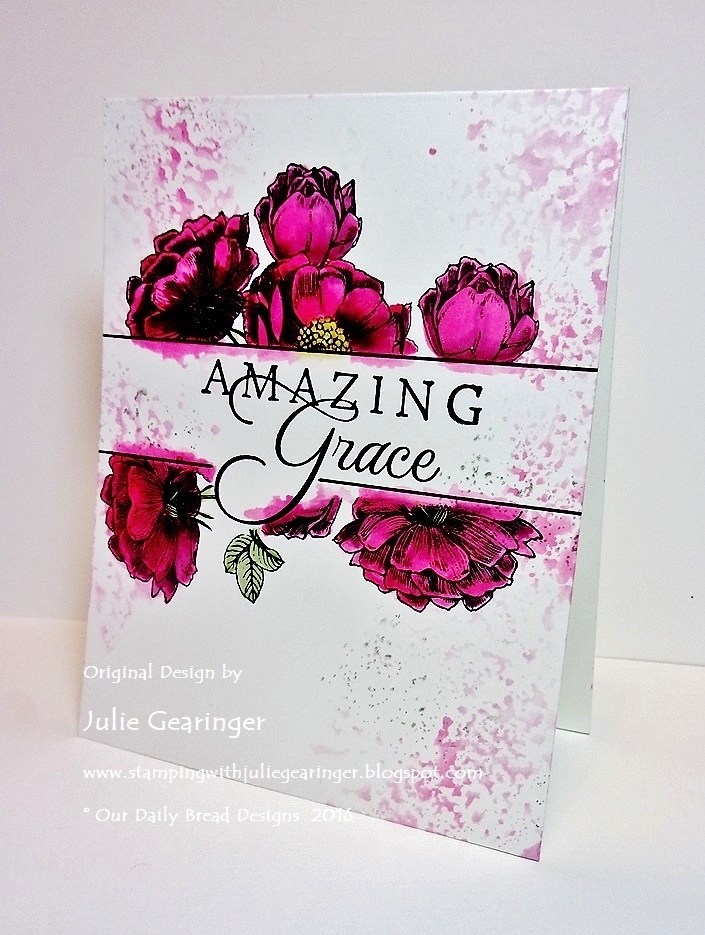
Amazing Grace- One Layer Card


Hi Again Stampers!!

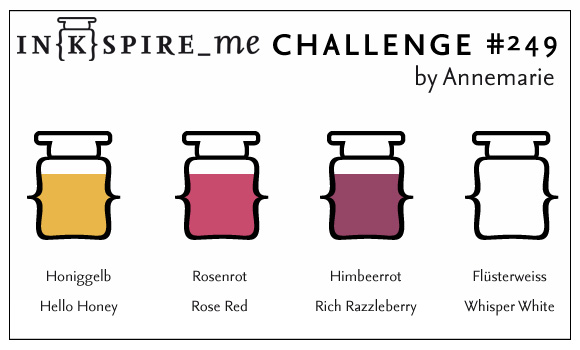
This Clean and Simple (CAS) One Layer card was created using the IN{K}SPIRE_me #249  Color Challenge along with the One Layer Simplicity OLS27 "Fruit Smoothie" Challenge and the CAS(E) This Sketch #172 Sketch Challenge.

Again, if you have not already done so, I hope you will find the time to visit the above challenge sites to check out their fabulous Design Team samples and challenge entries!

To create this card:

Fold a piece of 4 ¼” x 11” Extra Thick Whisper White cardstock in half for the card base.

Ink the sentiment from How Sweet the Sound (Our Daily Bread Designs) with Stāz-On® Jet Black Ink and stamp onto the card front.

Use sticky note paper to create a mask over the sentiment, ink the Fragrance floral image (ODBD) with Stāz-On® Jet Black Ink and stamp around the sentiment.

Use an AquaPainter™ with Rose Red Classic Ink to color the flowers and add additional shadows with the Rich Razzleberry Stampin’ Write Marker.

Use Stampin’ Write Markers- Hello Honey for the flower center and Pear Pizzazz for the leaves to finish coloring the flowers.

Add Rose Red and Rich Razzleberry ink to the center of a clear envelope (cut open like a book- this is a modified Smakin' Acetate technique :-)), spritz with water, “smoosh” the marker ink between the acetate of the envelope, lay portions of the card front onto the ink to add the splatter on the corners.

Add additional splatter with the Grunge Elements (Artistic Outpost) stamp and Stāz-On® Stone Gray Ink (stamping off before stamping onto the card front).

Card base was decorated only-
no additional layers :-)
Add the definition lines with a ruler and a Faber-Castell® Pitt Pen “B” Black Marker and apply Clear Wink of Stella® to the flowers to finish off the card.

Stamp Sets: How Sweet the Sound & Fragrance (Our Daily Bread Designs), Grunge Elements (Artistic Outpost)

Ink/Mediums: Stāz-On® Jet Black, Rose Red; Stampin’ Write Markers- Rose Red, Rich Razzleberry, Hello Honey, Pear Pizzazz; Clear Wink of Stella®, Faber-Castell® Pitt Pen Black Marker

Paper: Extra Thick Whisper White

Accessories: AquaPainter™, Ruler, Sticky Note Paper, Clear Envelope, Water Spritzer Bottle


Thanks again for taking the time to stop by- hugs and have a blessed week, my friends!  
Related Posts Plugin for WordPress, Blogger...