Saturday, August 3, 2013

Dare To Get Dirty- Card #3


Hi Stampers!

Here is the third card I created as a sample maker for the 2013 Dare To Get Dirty Challenge at  Splitcoaststampers (this one is for StamperTammy's challenge).

Again, if you are a Fan Club Member we would love to have you join in and participate- the deadline to upload your creations is August 5th and if you have not joined theFan Club, I would highly recommend it!

To create this card:

Using the Embossing Buddy®, de-static a piece of Basic Black cardstock and stamp the frame image using Versamark™ ink.  Apply Stampin’ Emboss® White Embossing Powder and heat with the Heat Tool.   

Create a mask from a sticky note to mask the frame and stamp the bird image with the same steps as above. 

On a separate piece of Basic Black cardstock, stamp the flowers, butterfly, sentiment and label tag, again, using the same steps above.

Carefully cut out the label tag, butterfly and flowers.  Punch the sentiment out using the XL Oval Punch and punch two other pieces from Whisper White to create the layer  behind the sentiment. 

Stamp the script stamp from Notable Notions over the background layer using White Craft ink and smudge a bit with your finger or a Sponge Dauber.

Using Metallic Pencils, color the embossed areas on the frame, bird, butterfly and flowers. 

Layer all of the stamped elements, adhere the entire panel to a Whisper White Layer and then again onto Basic Black cardstock.  Add the Gingham Ribbon bow along with the Pearls to finish off the card.

Stamp Sets: Papaya Collage, Love and Sympathy, Notable Notions, Flower Shop

Ink: Versamark™, White Craft Ink

Paper/Cardstock:  Whisper White, Basic Black

Accessories:  Embossing Buddy®, Stampin’ Write® White Embossing Powder, Heat Tool, XL Oval Punch, Metallic Pencils (retired), Gingham Ribbon (retired), Pearls


Thanks again for stopping by- have a wonderful evening!!

A Mountain Vista for My Wonderful Husband :-)

Hi Stampers! 

I had so much fun creating my sponged seashore yesterday that I decided to create another scene using the same technique and the colors from this week’s CQC200 ColourQ Challenge along with the theme for the JAI176 Just Add Blokes at Just Add Ink.

I hope you will have the time to stop by and visit each site- again, so much inspiration and it always amazes me how many different interpretations can be made with one color or one theme challenge.

I created this card for my loving husband- he works so hard at the same job he has had for over 40 years and has a difficult time taking any time off, but when he does, we love to visit Shenandoah National Park in Virginia and drive along Skyline Drive.  We try to escape there as often as we can, but for us it is an all day trip, so we can only visit every few months.  We have been fortunate enough to see at least one bear on each visit and recently, we saw five bears in one day (three were a Mother bear and her two cute cubs- we were very blessed!!).  We love the scenic overlooks and our favorite is Jewel Hollow…so this card may not seem masculine to you, but I created it for my loving husband and he will understand the meaning :-)  He is so special to me and I love our times on the mountain celebrating God’s creation!!

To create this card:

Use the 1 3/8” Circle Punch to punch out a circle from a sticky note or other piece of paper to use as a mask for the sun (also place a mask to create the mountain horizon lines – wavy and not perfectly straight). 
Using a Sponge Dauber, apply So Saffron Classic Ink in the circle to create the sun, remove the mask and cover the recently sponged sun with the circle to protect the yellow and sponge Marina Mist over the sky area (leaving some white for the clouds).
 Add a bit of Midnight Muse to the sky to darken a few of the clouds (this is a cloudy day and would not be pour preference on the mountain trip but makes for a better scene).
Remove the mountain layer, move down and re-position a bit and add Marina Mist to create the first horizon.  Soften the ink using the AquaPainter™ with water and continue to build the layers of mountains, adding Midnight Muse to darken as you get closer to the bottom of the card. 
For the closest set of mountains/valley, sponge Old Olive onto the card and add a bit of Midnight Muse to darken some of the peaks/valleys. 
Add the smaller trees using Midnight Muse ink on the Lovely As A Tree stamp and repeatedly re-ink and stamp for the desired effect.
Using the Heat Tool, dry the card thoroughly.  De-static with the Embossing Buddy®, ink up the large pine stamp using Versamark™ ink and stamp the tree on the left hand side.  Apply Navy Stampin’ Emboss® Embossing Powder (retired color) and heat with the Heat Tool, allow to cool and once cooled, repeat the above steps to add a few more trees.

Trim the panel to the desired size and stamp the script stamp from Notable Notions in the sky area.  If desired, add a bit of wispy clouds with the Chalk Marker (I did this since my blue clouds over the sun started to look a bit green- blue plus yellow equals green- duh!!) and mount onto a piece of Midnight Muse cardstock. 

Use the Big Shot™ with the Woodgrain Textured Impressions™ Embossing Folder to emboss a piece of So Saffron cardstock.  Add to a piece of Midnight Muse cardstock and adhere to the card base.

Stamp the sentiment using Midnight Muse Classic Ink onto Whisper White cardstock, trim and add the banner points with the 1” Square Punch.  Adhere to a scrap piece of Midnight Muse cardstock, trim to size and add the banner points. 

Add the sentiment banner to the card using Stampin’ Dimensionals® to finish off the card. 

Stamp Sets: Lovely As A Tree, Notable Notions, Blessings from Heaven, Papaya Collage (can barely see in the right hand lower corner)

Ink: So Saffron, Marina Mist, Midnight Muse, Old Olive

Paper/Cardstock:  Whisper White, Midnight Muse, So Saffron

Accessories: Big Shot™, Woodgrain Textured Impressions™ Embossing Folder , Sponge Daubers, Embossing Buddy™,  Heat Tool, Navy Stampin’ Emboss® Embossing Powder, AquaPainter™, 1” Square Punch (for banner points)


Thanks again for stopping!!  If you have a chance to stop by again later- I hope to post some of the other cards I created for the Dare To Get Dirty Challenge this evening and tomorrow- have a great weekend!!

Sunset by the Seashore- Thinking of You

Hi Stampers! 


I wanted to create a card using the bright summery colors from this week’s Pals Paper Arts PPA166 ColorChallenge and decided to use the Freshly Made Sketch FMS97 Sketch (flipped the sketch over :-)).  

 If you have not had a chance to do so, I would highly recommend checking out both sites- the Design Teams are fabulous and all of the other entries are wonderful as well!!
 
The colors reminded me of a beautiful sunset at the beach, so I decided to use a masking/watercolor technique to create this little scene...wish I could be there :-)

To create this card:
Use the 1 3/8” Circle Punch to punch out a circle from a sticky note or other piece of paper to use as a mask for the sun (also place a mask to create the waterline on the horizon). 

Using a Sponge Dauber, apply Daffodil Delight Classic Ink in the circle to create the sun, remove the mask and cover the recently sponged sun to sponge additional Daffodil Delight and Strawberry Slush over the sky area (keeping the horizontal mask in place at this time).

Remove the sun mask, sponge some of the Strawberry Slush over the sun to create the cloud effect and use another Sponge Dauber with Smoky Slate Classic Ink to create the clouds in the upper sky area and around the edges. 

Remove the horizontal mask, mask the area that you just sponged and create the water with Daffodil Delight, Strawberry Slush and Smoky Slate and near the shoreline, just the Daffodil Delight and Smoky Slate.  Add a bit of water using the AquaPainter™ and smooth out the ink on the water.

Once dry, re-mask the horizontal line and create the jagged masks for the distant shoreline- sponge Basic Gray for the darker shadow.   Stamp the script from Notable Notions using Smoky Slate over the sky area. 

Stamp the birds from the Wetlands set, fill in the birds and shoreline images using the Basic Gray Stampin’ Write Marker (if desired, add a few birds by hand near the sun).

Use the Color Spritzer Tool with the Basic Gray Stampin’ Write Marker to add a bit of interest to the sand area at the bottom (mask the water when doing this step).   Trim the panel and adhere to a piece of Basic Gray cardstock.

Stamp the Notable Notions script using Basic Gray over a piece of Strawberry Slush cardstock and adhere to a piece of Basic Gray cardstock.  Mount the focal image and add the sentiment banner layers along with the Antique Brad to finish off the card.

Stamp Sets: Wetlands, Notable Notions

Ink: Daffodil Delight, Strawberry Slush, Smoky Slate, Basic Gray, Stampin’ Write Marker- Basic Gray

Paper/Cardstock:  Whisper White, Basic Gray, Strawberry Slush, Eastern Elegance Designer Series Paper

Accessories: Sponge Daubers, Color Spritzer Tool, AquaPainter™, 1” Square Punch (for banner points), Antique Brad


Thanks again for visiting!! I really had a great time creating this scene :-)

 If you have the chance to stop by again, I will be posting more of the Dare To Get Dirty cards this weekend- have a great day!!

Thursday, August 1, 2013

Bonjour, My Friend- A Monochromatic Color Challenge

Hi Again Stampers! 

I decided to stay up again until the wee hours and create a card for the DD63 Dynamic Duos ColorChallenge (I know I should be sleeping but I seem to be more creative in very late at night :-)))…

If you have a chance, check out the Dynamic Duos site- so many cards created with just the two colors-it is amazing!!

To create this card:

Use the Big Shot™ and emboss a piece of Whisper White cardstock using the Pretty Print Textured Impressions™ Embossing Folder.  

Trim to size and adhere to a piece of Garden Green cardstock.

Stamp the outline solid leaves from Gently Falling onto sticky notes and carefully cut out.  Using Pear Pizzazz Classic Ink, stamp the solid leaves onto Whisper White, masking as you stamp. 

Ink the outline leaf images using Garden Green and stamp/mask over the images creating the border.  Carefully cut out the border and adhere to the embossed panel.  

Add the Pear Pizzazz brads in the upper right hand corner and adhere the entire panel onto a layer of Whisper White and Garden Green cardstock.

Stamp the sentiment onto Whisper White cardstock using Garden Green Classic Ink and cut out using the Big Shot™ with the Adorning Accents Edgelit™.  Emboss with the Adorning Accents Textured Impressions™ Embossing Folder, trim to size, add the Pear Pizzazz ½” Seam Binding Triple Ribbon Bow along with the Garden Green border strip at the bottom.

Mount the sentiment to the lower portion of the card front to finish off the card.

Stamp Sets: Gently Falling, My Friend (French- Chere Amie)

Ink: Garden Green, Pear Pizzazz

Paper/Cardstock:  Whisper White, Garden Green

Accessories: Big Shot™,  Pretty Print and Adorning Accents Textured Impressions™ Embossing Folders, Adorning Accents Edgelit™, ½” Pear Pizzazz Seam Binding Ribbon, Brads (retired)


Thanks again for visiting- I hope all of you have a wonderful Thursday!!

Wednesday, July 31, 2013

2013 Dare To Get Dirty- Card #2


Hi Stampers!

Here is the second card created for one of the Splitcoaststampers Dare To Get Dirty Challenge  :-)   Are you a Fan Club Member ofSplitcoaststampers yet?  If so, come join in on the fun and if not, it is not too late to join (did I mention in addition to the forum discussions and fun creating the cards,  that the Member Companies will have prizes??))  


To create this card:

Using the Embossing Buddy®, de-static a piece of Island Indigo cardstock and stamp the ornament image using Versamark™ ink.  Apply Stampin’ Emboss® Silver Embossing Powder and heat with the Heat Tool.   

Cut the ornament out using the Big Shot™ with the corresponding Holiday Ornaments Framelit™. 

Emboss a piece of Whisper White cardstock using the Big Shot™ with the Fancy Fan Textured Impressions™ Embossing Folder inserting only part of the paper into the embossing folder.  Stamp the sentiment along the bottom of the cardstock using Basic Gray Classic Ink.

Adhere the Winter Frost Designer Series Paper (DSP) to a piece of Island Indigo, add the embossed Whisper White cardstock.  Add a piece of Basic Gray Satin Ribon along with a piece of White Satin Ribbon to cover the seam.

Adhere the ornament using the Stampin’ Dimensionsals® and add the Silver Cord along with the Large Rhinestone.   Add the additional Rhinestones to finish off the card.


Stamp Sets: Ornament Keepsakes,  More Merry Messages  

Ink: Versamark™, Basic Gray

Paper/Cardstock:  Whisper White, Island Indigo, Winter Frost DSP

Accessories:  Big Shot™, Holiday Ornaments Framelits™, Fancy Fan Textured Impressions™ Embossing Folder, Embossing Buddy®, Stampin’ Write® Silver Embossing Powder, Heat Tool, Rhinestones, Silver Cord (retired), Satin Ribbon (from my stash)

Thanks again for visiting- I hope all of you have a wonderful Thursday!!

PP156 Heaven Knows You Are Special

Hi Stampers! 

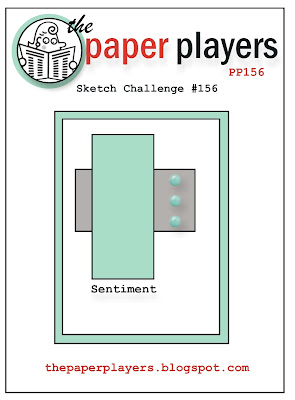
I wanted to create a card using The Paper Players PP156 Sketch and decided to incorporate a few images that I had already watercolored, fussy cut and had on hand. 

If you have a chance, check out the Design Team samples as well as the other entries- a great job by all!

To create this card:

Stamp the images from By The Tide using Early Espresso Classic Ink onto Whisper White cardstock and carefully watercolor using the AquaPainter™ with Crisp Cantaloupe Classic Ink from the ink pad.

Ink the label stamp from Everything Eleanor using Crisp Cantaloupe Classic Ink and stamp onto Whisper White.  Ink the script stamp from By The Tide using Early Espresso Classic Ink and repeatedly stamp over the label image.  Carefully cut this image out by hand and cut in half vertically.

Stamp the label from Notable Notions twice using Early Espresso Classic Ink onto Whisper White cardstock and carefully cut by hand.  Cut the bottom off one of the images and layer to create a longer tag.

Stamp the coral image using Early Espresso Classic Ink onto the elongated tag and watercolor Crisp Cantaloupe Classic Ink over the coral.  Use the Early Espresso Stampin’ Write marker to add a bit of distressing and the Satin Ribbon to cover up the seam in the tag.

Use the Big Shot™ to emboss a piece of Crumb Cake cardstock using the Woodgrain Textured Impressions™ Embossing Folder and layer onto the Early Espresso cardstock.

Add all of the elements per the sketch, embellish with Pearls to finish off the card.

Stamp Sets:  By The Tide, Everything Eleanor, Blessings from Heaven, Notable Notions  

Ink: Early Espresso, Crisp Cantaloupe

Paper: Whisper White, Crumb Cake, Early Espresso

Accessories:  Big Shot™, Woodgrain Textured Impressions™ Embossing Folder, Chalk Talk Framelits™, AquaPainter™, Color Spritzer Tool, Sponge Dauber, Pearls


Thanks again for stopping by- I hope all of you have a great Wednesday!!

Tuesday, July 30, 2013

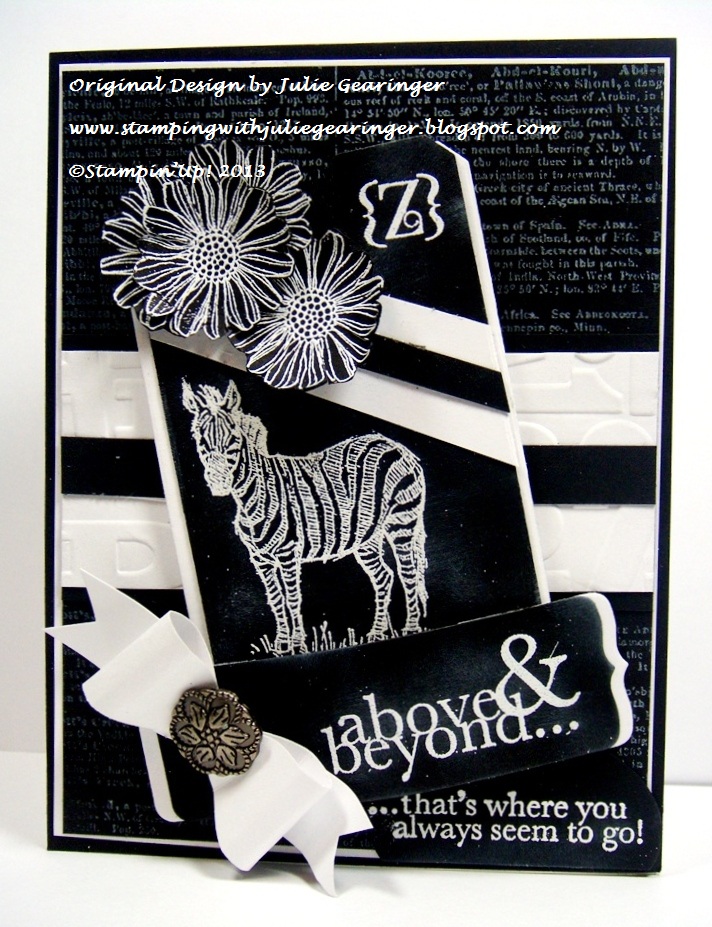
SUO76 Z is for Zebra, Zinnia- Thank you!

Hi Stampers! 

The Stampin’ Up! Only Challenges theme for the SUO76 Challengeis Back To School.  For some reason when I thought of this challenge, the first thing that came to my mind were the alphabet flash cards :-))  

I truly hope that you will have a chance to stop by to visit SUO-Only Challenges to check out all of the other Design Team creations and play along with us :-))

To create this card:

Ink the new background stamp, Dictionary, with Whisper White Craft Ink and stamp onto a piece of Basic Black cardstock.

Use the Big Shot™ with the Alphabet Press Textured Impressions™ Embossing Folder to emboss a piece of Whisper White cardstock.  Trim for the horizontal panel and adhere to Basic Black cardstock.  Add the Basic Black cardstock strip to the center of the panel and adhere to the Dictionary background panel.

Use the Big Shot™ with the Chalk Talk Framelits™ to cut the large tag and narrow tag from Basic Black cardstock.  De-static using the Embossing Buddy® and stamp the sentiment on the long narrow tag along with the zebra and “Z” image on the larger tag with Versamark™ ink.  Apply Stampin’ Emboss® White Embossing Powder and heat with the Heat Tool.  Once cooled, apply a bit of Whisper White Craft Ink with a Sponge Dauber to finish off the chalkboard effect.

If desired, add the Whisper White and Basic Black cardstock strip along with the top edge of the tag (FYI- I added this to hide my original handwritten “Z” that I decided did not look right- so now you know another secret about me:-))).
 
De-static another piece of Basic Black cardstock using the Embossing Buddy® and stamp the zinnia flower along with the sentiment for the lower portion of the card with Versamark™ ink.  Apply Stampin’ Emboss® White Embossing Powder and heat with the Heat Tool.  Once cooled, again apply a bit of Whisper White Craft Ink with a Sponge Dauber to finish off the chalkboard effect. 

Adhere the large Chalk Talk tag and the narrow sentiment tag to a Whisper White layer and mount to the card using Stampin’ Dimensionals®.   “Fussy-cut” the three zinnias and adhere to the top of the tag.   Punch out the lower sentiment using the XL Oval Punch and then cut the oval to square with the bottom of the card.

Create the paper bow using two large oval punches from Whisper White (rolled in half and adhered with a Mini Glue Dot), add a small strip of Whisper White cardstock on the bottom, adhere the two folded ovals and the two strips for tails.  Add the Antique Brad to the center and adhere to the card.

Stamp Sets:  Zoo Review, Best of Flowers, One in A Million, Dictionary, Occasions Alphabet

Ink: Versamark™

Paper/Cardstock: Whisper White, Basic Black

Accessories:  Big Shot™, Alphabet Press Textured Impression ™ Embossing Folders, Chalk Talk Framelits™, Embossing Buddy®, Heat Tool, Stampin’ Emboss® White Embossing Powder, XL and Large Oval Punch, 1” Square Punch, Antique Brad

Thanks again for stopping by- I know this card may not be what you would traditionally think of with a “Back to School” challenge but that is what I love about challenges- so many interpretations!! 


Again, I hope you can come join us for our Backto School Challenge at SUO Challenges!! Have a great Tuesday!!!

Harvest of Thanks- A GateFold for the Pals Paper Arts!


Hi Again Stampers! 
 
I wanted to create one more card this evening and even though I am too late for the deadline, I just loved the Pals Paper Arts PPA165 Sketch  and decided to create a GateFold card :-)    I hope that you will find the time to visit their site- they now have two different Design Teams and they rotate each week for a new challenge, so again, tons of inspiration!!

This sketch seemed perfect for a Gate Fold card- so to create this card:

GateFold- Open 
Ink up the large label stamp from Harvest of Thanks using Stampin’ Write markers in Chocolate Chip, Crushed Curry, Tangerine Tango and Wild Wasabi and stamp onto Whisper White cardstock.  

Use the Distressing Tool to distress the edges and a Sponge Dauber with Crumb Cake to antique the paper. 

Use the Big Shot™ with the Apothecary Accents Framelits™ to cut out the image and also cut a piece from Chocolate Chip.   Cut the Chocolate Chip layer in half horizontally to layer behind the focal image.

Use the Big Shot™ with the Circle Framelits™ to cut a circle from the Sweater Weather Designer Series Paper and also a circle the same size using Chocolate Chip cardstock.  Cut the Chocolate Chip circle in half and layer behind the DSP circle and adhere the focal image label.

Use the Simpy Score™ Tool to create the GateFold from Whisper White cardstock and layer Chocolate Chip cardstock on the two gate folds in the front  (on second thought, I should have created the card base using Chocolate Chip cardstock- hindsight is 20/20 :-)))… Adhere a piece of embossed Sweater Weather DSP on both sides (Soft Sky Polka Dot pieces using the Square Lattice Textured Impressions™ Embossing Folder) .

Card in Closed Position 
Use the Dotted Scallop Ribbon Border Punch to punch out a piece from Chocolate Chip cardstock and attach to the bottom of a piece of Crushed Curry DSP (again from Sweater Weather), distress with the Distressing Tool and add to the right hand panel per the sketch.

Add the Chocolate Chip DSP panel in the center of the card as well as a piece along the lower right hand panel (distress as well) along with the Antique Brad and Gratitude sentiment (stamped in Chocolate Chip onto Whisper White and cut with the Big Shot™ and  the Bitty Banners Framelits™ to finish off the card.

Stamp Sets: Harvest of Thanks

Ink: Chocolate Chip, Stampin’ Write Markers- Chocolate Chip, Crushed Curry, Tangerine Tango, Wild Wasabi

Paper/Cardstock:  Whisper White, Chocolate Chip, Sweater Weather DSP

Accessories: Big Shot™, Apothecary Accents Framelits™, Circle Framelits™, Bitty Banner Framelits™, Dotted Scallop Ribbon Border Punch, Distressing Tool, Sponge Dauber, Antique Brad


Thanks again for visiting and I hope you have a terrific Tuesday!!
Related Posts Plugin for WordPress, Blogger...